Page 217 of 273

Do not use cleaners, conditioners and protectants con-
taining silicon or bleach as these may cause gloss level
increases and/or discoloration.
You should not increase the gloss level, especially on top
of the instrument panel top surface. Higher gloss levels
will increase the reflectivity in the windshield that could
decrease visibility under bright light driving conditions.
WARNING!
Do not use volatile solvents for cleaning purposes.
Many are potentially flammable, and if used in
closed areas they may cause respiratory harm.
Leather Seat Care and Cleaning
CAUTION!
Never use polishes, oils, cleaning fluids, solvents,
detergents, or ammonia based cleaners to clean the
leather. The leather has already been pretreated. The
application of any leather conditioner may damage
the factory applied top coat.
Leather is best preserved by regular cleaning with a
damp soft cloth. Small particles of dirt can act as an
abrasive and damage the leather surface and should be
removed immediately with a damp cloth. Stubborn soils
can be removed easily with a soft cloth and Mopar Total
Clean. Care should be taken to avoid soaking the leather
with any liquid.
Cleaning Headlights
Your vehicle has plastic headlights that are lighter and
less susceptible to stone breakage than glass headlights.
MAINTAINING YOUR VEHICLE 217
7
Page 218 of 273

Plastic is not as scratch resistant as glass and therefore
different lens cleaning procedures must be followed.
To minimize the possibility of scratching the lenses and
reducing light output, avoid wiping with a dry cloth. To
remove road dirt, wash with a mild soap solution fol-
lowed by rinsing.
Do not use abrasive cleaning components, solvents, steel
wool or other aggressive material to clean the lenses.
Glass Surfaces
All glass surfaces should be cleaned on a regular basis
with any commercial household-type glass cleaner.
Never use an abrasive type cleaner. Use caution when
cleaning inside rear windows equipped with electric
defrosters. Do not use scrapers or other sharp instru-
ments which may scratch the elements.
Instrument Panel Cover
The instrument panel cover has a low glare surface which
minimizes reflections in the windshield. Do not use
protectants or other products which may cause undesir-
able reflections. Use soap and warm water to restore the
low glare surface.
Cleaning Plastic Instrument Cluster Lenses
The lenses in front of the instruments in this vehicle are
molded in clear plastic. When cleaning the lenses, care
must be taken to avoid scratching the plastic.
²Clean with a wet soft rag. A mild soap solution may be
used, but do not use high alcohol content or abrasive
cleaners. If soap is used, wipe clean with a clean damp
rag.
²Dry with a soft tissue.
Seat Belt Maintenance
Do not bleach, dye or clean the belts with chemical
solvents or abrasive cleaners. This will weaken the fabric.
Sun damage will also weaken the fabric.
If the belts need cleaning, use a mild soap solution or
lukewarm water. Do not remove the belts from the
vehicle to wash them.
Replace the belts if they appear frayed or worn or if the
buckles do not work properly.
218 MAINTAINING YOUR VEHICLE
Page 219 of 273
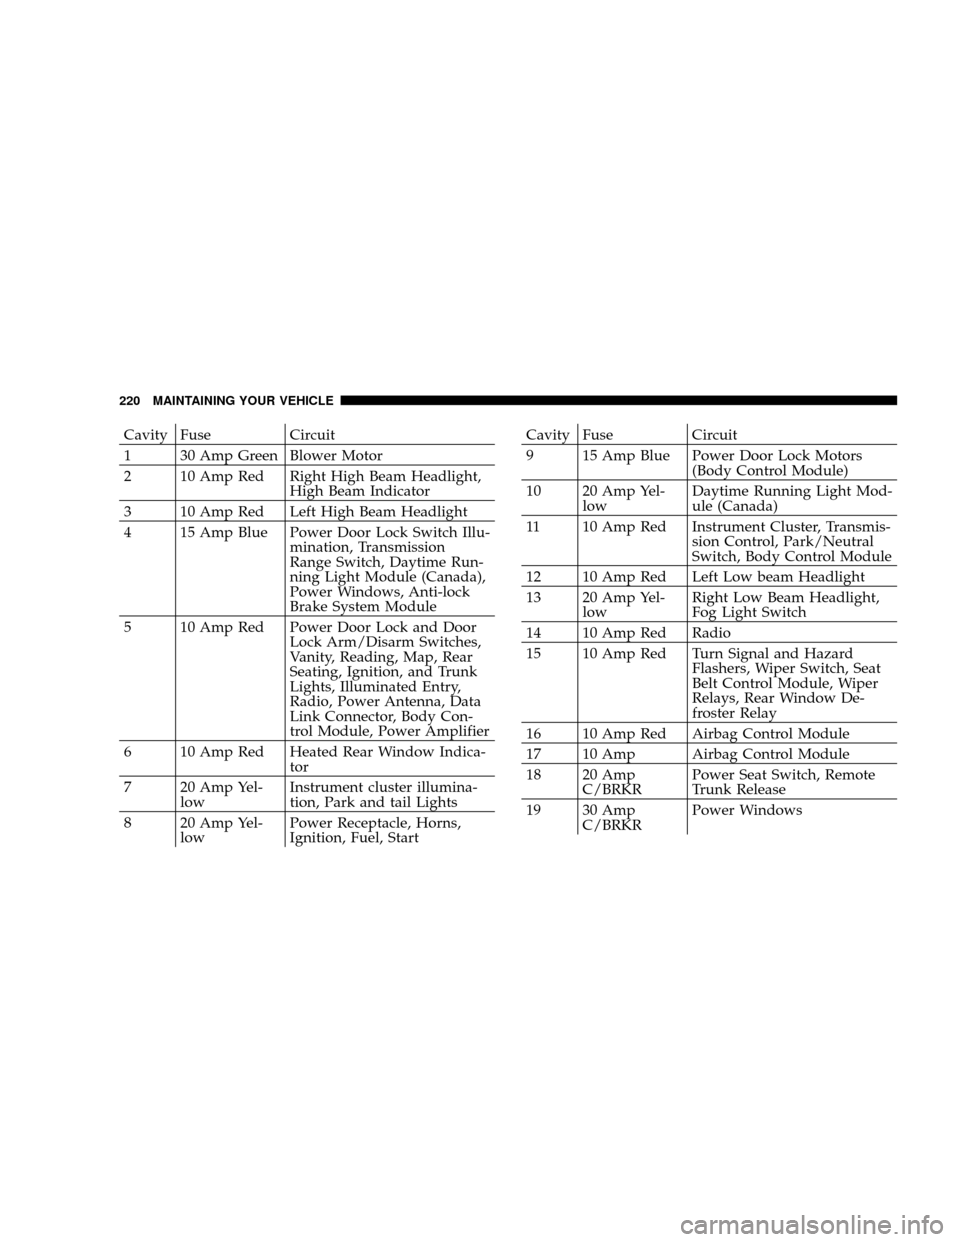
FUSES
Underhood Fuses (Power Distribution Center)A Power Distribution Center is located in the engine
compartment; near the air cleaner. This information applies
to vehicles built without the fuse and relay numbering
embossed on the Power Distribution Center Top Cover.
Interior Fuses
The fuse access panel is behind the end cover at the left
side of the instrument panel. To remove the panel, pull it
out, as shown.
The identity of each fuse is indicated on the backside of
the cover.
MAINTAINING YOUR VEHICLE 219
7
Page 220 of 273

Cavity Fuse Circuit
1 30 Amp Green Blower Motor
2 10 Amp Red Right High Beam Headlight,
High Beam Indicator
3 10 Amp Red Left High Beam Headlight
4 15 Amp Blue Power Door Lock Switch Illu-
mination, Transmission
Range Switch, Daytime Run-
ning Light Module (Canada),
Power Windows, Anti-lock
Brake System Module
5 10 Amp Red Power Door Lock and Door
Lock Arm/Disarm Switches,
Vanity, Reading, Map, Rear
Seating, Ignition, and Trunk
Lights, Illuminated Entry,
Radio, Power Antenna, Data
Link Connector, Body Con-
trol Module, Power Amplifier
6 10 Amp Red Heated Rear Window Indica-
tor
7 20 Amp Yel-
lowInstrument cluster illumina-
tion, Park and tail Lights
8 20 Amp Yel-
lowPower Receptacle, Horns,
Ignition, Fuel, StartCavity Fuse Circuit
9 15 Amp Blue Power Door Lock Motors
(Body Control Module)
10 20 Amp Yel-
lowDaytime Running Light Mod-
ule (Canada)
11 10 Amp Red Instrument Cluster, Transmis-
sion Control, Park/Neutral
Switch, Body Control Module
12 10 Amp Red Left Low beam Headlight
13 20 Amp Yel-
lowRight Low Beam Headlight,
Fog Light Switch
14 10 Amp Red Radio
15 10 Amp Red Turn Signal and Hazard
Flashers, Wiper Switch, Seat
Belt Control Module, Wiper
Relays, Rear Window De-
froster Relay
16 10 Amp Red Airbag Control Module
17 10 Amp Airbag Control Module
18 20 Amp
C/BRKRPower Seat Switch, Remote
Trunk Release
19 30 Amp
C/BRKRPower Windows
220 MAINTAINING YOUR VEHICLE
Page 221 of 273

CAUTION!
When replacing a blown fuse, it is important to use
only a fuse having the correct amperage rating. The
use of a fuse with a rating other than indicated may
result in a dangerous electrical system overload. If a
properly rated fuse continues to blow, it shows a
problem in the circuit that must be corrected.
REPLACEMENT LIGHT BULBS
LIGHT BULBS Ð Interior Bulb Number
ABS Lamp........................... PC161
Instrument Cluster..................... PC194
Fog Light Indicator..................... PC161
Dome Light............................ 578
Front Reading/Map Lights.................. 906
Trunk Light............................ 562
Cup Holder Light......................... 37
Climate Control Light...................... 37
Traction Control Light...................PC161LIGHT BULBS Ð Exterior Bulb Number
Headlight.............................9007
Park/Turn Signal (Front).................3157A
Fog Light.............................880L
Tail/Stop/Turn Signal....................3157
Back Up Light........................... 921
Center Stop Light........................ 921
License Light...........................2825
MAINTAINING YOUR VEHICLE 221
7
Page 222 of 273
BULB REPLACEMENT
Headlight Bulb Replacement
1. Open the hood and remove the two headlight mount-
ing screws.2. Remove the push-in fasteners by prying under the
head of the fasteners with a flat bladed tool.
222 MAINTAINING YOUR VEHICLE
Page 223 of 273
3. Gently pry the headlight assembly away from the
fender as shown in the picture. This will free the ball stud
from its retainer in the fender. Pull the headlight assem-
bly away from the vehicle.
4. Turn the retaining ring counterclockwise and remove
the bulb and socket assembly.5. Pull the bulb out of the socket and replace the bulb.
CAUTION!
Do not touch the new bulb with your fingers. Oil
contamination will severely shorten bulb life.
6. If the bulb comes in contact with any oily surface,
clean the bulb with rubbing alcohol.
MAINTAINING YOUR VEHICLE 223
7
Page 224 of 273
7. Reinsert the bulb and socket assembly and turn the
retaining ring clockwise to secure the bulb.
8. Reinstall the headlight assembly.
Park, Turn Signal, Sidemarker Bulb Replacement
1. Open the hood and remove the two headlight assem-
bly mounting screws. Pull the headlight assembly away
from the vehicle.2. Turn the bulb socket counterclockwise and remove the
bulb and socket assembly.
3. Pull the bulb out of the socket, replace the bulb, and
reinstall the bulb and socket to the headlight assembly.
Reinstall the headlight assembly.
224 MAINTAINING YOUR VEHICLE