2004 DODGE RAM 2500 DIESEL flat tire
[x] Cancel search: flat tirePage 300 of 426

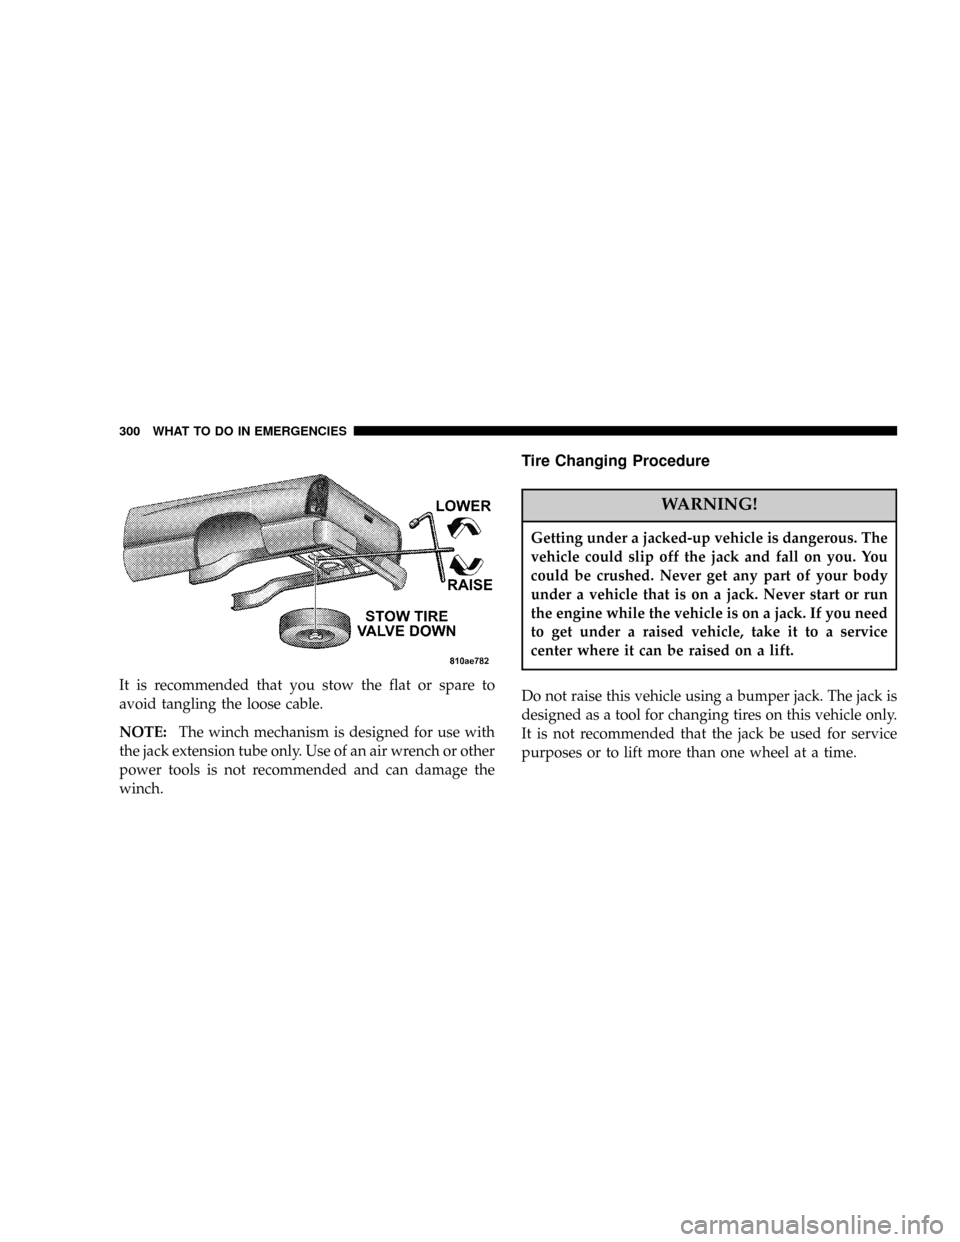
It is recommended that you stow the flat or spare to
avoid tangling the loose cable.
NOTE:The winch mechanism is designed for use with
the jack extension tube only. Use of an air wrench or other
power tools is not recommended and can damage the
winch.
Tire Changing Procedure
WARNING!
Getting under a jacked-up vehicle is dangerous. The
vehicle could slip off the jack and fall on you. You
could be crushed. Never get any part of your body
under a vehicle that is on a jack. Never start or run
the engine while the vehicle is on a jack. If you need
to get under a raised vehicle, take it to a service
center where it can be raised on a lift.
Do not raise this vehicle using a bumper jack. The jack is
designed as a tool for changing tires on this vehicle only.
It is not recommended that the jack be used for service
purposes or to lift more than one wheel at a time.
300 WHAT TO DO IN EMERGENCIES
Page 305 of 426

WARNING!
Raising the vehicle higher than necessary can make
the vehicle unstable and cause an accident. It could
slip off the jack and hurt someone near it. Raise the
vehicle only enough to remove the tire.
5. Remove the wheel nuts and pull the wheel off. Install
the spare wheel and wheel nuts with the cone shaped end
of the nuts toward the wheel on 2500/3500 single rear
wheel (SRW) models. On 3500 dual rear wheel models
(DRW) the lug nuts are a two piece assembly with a flat
face. Lightly tighten the nuts. To avoid risk of forcing the
vehicle off the jack, do not fully tighten the nuts until the
vehicle has been lowered.
6. Using the wheel wrench, finish tightening the nuts
using a crisscross pattern. Correct nut tightness is 135 ft.
lbs. (183 N´m) torque for 2500/3500 single rear wheel(SRW) models and 145 ft. lbs. (197 N´m) for 3500 dual rear
wheel models. If in doubt about the correct tightness,
have them checked with a torque wrench by your dealer
or at a service station.
WARNING!
A loose tire or jack thrown forward in a collision or
hard stop could injure someone in the vehicle.
Always stow the jack parts and the extra tire and
wheel in the places provided.
7. Install wheel center cap and remove wheel blocks. Do
not install chrome or aluminum wheel center caps on the
spare wheel. This may result in cap damage.
8. Lower the jack to its fully closed position. If the jack
will not lower by turning the dial (thumb wheel) by
WHAT TO DO IN EMERGENCIES 305
6
Page 306 of 426

hand, it may be necessary to use the jack drive tube in
order to lower the jack. Stow the replaced tire, jack, and
tools as previously described.
9. Adjust the tire pressure when possible.
NOTE:Do not oil wheel studs. For chrome wheels, do
not substitute with chrome plated wheel nuts.
Hub Caps
The hub caps must be removed before raising the vehicle
off the ground.
For 2500/3500 single rear wheel (SRW) models, use the
blade on the end of the lug wrench to pry the cap off.
On 3500 models with dual rear wheels (DRW), you must
first remove the hub caps. The jack handle driver has a
hook at one end that will fit in the pry off notch of the
rear hub caps. Position the hook and pull out on the
ratchet firmly. The cap should pop off. The wheel skins
can now be removed. For the front hub cap on 3500models use the blade on the end of the lug wrench to pry
the caps off. The wheel skin can now be removed.
You must use the flat end of the lug wrench to pry off the
wheel skins. Insert the flat tip completely and using a
back and forth motion, loosen the wheel skin. Repeat this
procedure around the tire until the skin pops off.
Replace the wheel skins first using a rubber mallet. When
replacing the hub caps, tilt the cap retainer over the
lugnut bolt circle and strike the high side down with a
rubber mallet. Be sure that the hub caps and wheel skins
are firmly seated around the wheel.
8-Stud Ð Dual Rear Wheels
Dual wheels are flat mounted, center piloted. The lug
nuts are a two piece assembly. When the tires are being
rotated or replaced, clean these lug nuts and add 2 drops
of oil at the interface between the hex and the washer.
306 WHAT TO DO IN EMERGENCIES
Page 309 of 426

wheel. The nuts should then be tightened to recom-
mended torque. Tighten the nuts to final torque in
increments. Progress around the bolt circle, tightening
the nut opposite to the nut just previously tightened until
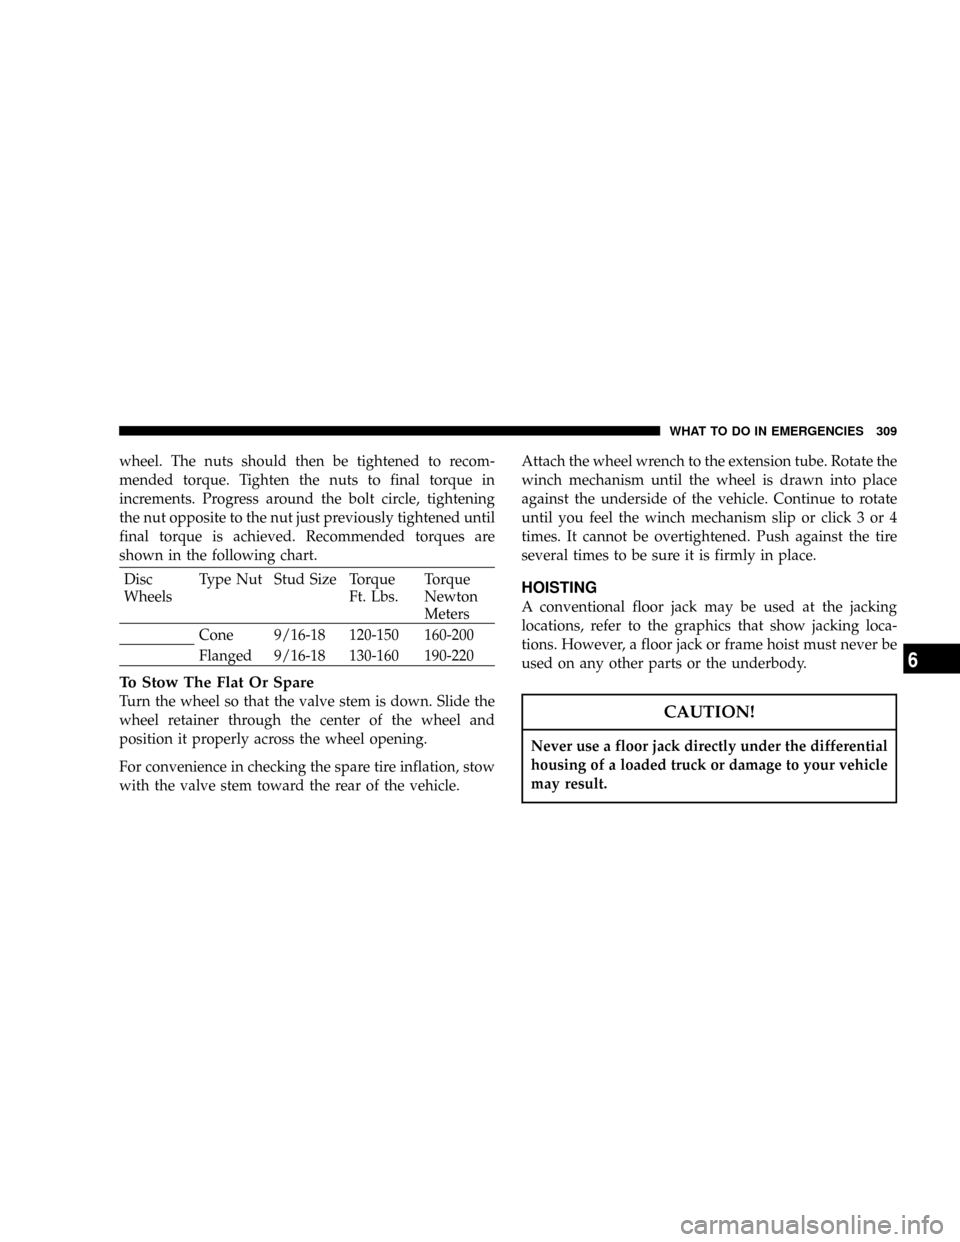
final torque is achieved. Recommended torques are
shown in the following chart.
Disc
WheelsType Nut Stud Size Torque
Ft. Lbs.Torque
Newton
Meters
Cone 9/16-18 120-150 160-200
Flanged 9/16-18 130-160 190-220
To Stow The Flat Or Spare
Turn the wheel so that the valve stem is down. Slide the
wheel retainer through the center of the wheel and
position it properly across the wheel opening.
For convenience in checking the spare tire inflation, stow
with the valve stem toward the rear of the vehicle.Attach the wheel wrench to the extension tube. Rotate the
winch mechanism until the wheel is drawn into place
against the underside of the vehicle. Continue to rotate
until you feel the winch mechanism slip or click 3 or 4
times. It cannot be overtightened. Push against the tire
several times to be sure it is firmly in place.
HOISTING
A conventional floor jack may be used at the jacking
locations, refer to the graphics that show jacking loca-
tions. However, a floor jack or frame hoist must never be
used on any other parts or the underbody.
CAUTION!
Never use a floor jack directly under the differential
housing of a loaded truck or damage to your vehicle
may result.
WHAT TO DO IN EMERGENCIES 309
6
Page 416 of 426

Exterior Lighting........................ 101
Fan .................................. 347
Filters
Engine Oil.....................325,328,380
Flashers
Turn Signal.......................... 103
Flat Tire Stowage.....................299,309
Fluid, Brake........................... 381
Fluid Capacities......................... 379
Fluid Level Checks
Brake............................... 348
Manual Transmission................... 352
Power Steering........................ 339
Transfer Case......................... 352
Fog Lights..........................102,378
Fold Flat Load Floor..................... 130
Four Wheel Drive....................... 226
Four-Way Hazard Flasher.................. 296Freeing A Stuck Vehicle................... 313
Front Axle..........................340,351
Fuel..............................264,297
Diesel.........................264,297,380
Gauge.............................. 149
Requirements......................... 264
Specifications......................... 267
Tank Capacity........................ 379
Fuses................................ 366
Garage Door Opener..................... 120
Gauges............................... 150
Coolant Temperature.................... 146
Fuel................................ 149
Oil Pressure.......................... 145
Speedometer......................... 145
Tachometer.......................... 144
Voltmeter............................ 144
Gear Ranges........................... 218
416 INDEX
Page 417 of 426

Glass Cleaning.......................... 365
GVWR............................... 269
Hands-Free Phone........................ 79
Hazard Warning Flasher................... 296
Head Restraints.......................... 93
Headlights..........................101,367
High Beam........................... 104
High Beam/Low Beam Select Switch........ 104
Lights On Reminder.................... 102
Passing............................. 104
Switch.............................. 101
Heated Mirrors....................78,191,195
Heated Seats............................ 96
Heater............................... 187
High Beam/Low Beam Select Switch.......... 104
Hitches
Trailer Towing........................ 275
Hoisting.............................. 309Homelink Transmitter.................... 120
Hood Release........................... 97
Hoses.............................348,350
Hub Caps............................. 306
Hydraulic Clutch Fluid.................... 351
Ignition.............................14,204
Key ............................... 11,14
Lock................................ 14
Infant Restraint........................55,56
Inflation Pressure Tires.................... 259
Inside Rearview Mirror.................... 75
Instrument Cluster....................142,143
Instrument Panel and Controls.............. 141
Instrument Panel Lens Cleaning............. 365
Interior Appearance Care.................. 364
Intermittent Wipers...................... 105
Introduction............................. 4
INDEX 417
10
Page 424 of 426

Tire Markings.......................... 243
Tire Safety Information.................... 243
Tires ...............................70,251
Air Pressure.......................... 251
Alignment........................... 258
Chains.............................. 259
Changing............................ 299
Compact Spare........................ 255
Dual............................263,306
General Information.................... 251
High Speed.......................... 254
Inflation Pressures..................... 252
Jacking............................. 300
Load Capacity.....................247,248
Radial.............................. 255
Replacement......................... 257
Rotation............................. 261
Safety...........................243,251
Sizes............................... 244Snow Tires........................... 261
Spare Tire........................... 299
Spinning............................ 256
Tread Wear Indicators................... 257
Wheel Mounting....................... 300
Wheel Nut Torque..................... 305
Tongue Weight/Trailer Weight.............. 278
Torque Converter Clutch.................. 222
Tow Hooks, Emergency................... 314
Towing
Disabled Vehicle....................... 315
Guide.............................. 279
Recreational.......................... 286
Trailering............................ 274
Weight.............................. 279
Traction.............................. 293
Traction Control......................... 352
Trailer Towing.......................... 272
Hitches............................. 275
424 INDEX