Page 196 of 300

tongue that typically provides adjustable friction associ-
ated with the telescoping motion to dampen any un-
wanted trailer swaying motions while traveling.
CAUTION!
²During the first 500 miles (805 km) your new
vehicle is driven, do not tow a trailer. Doing so
may damage your vehicle.
²When first towing a trailer, limit your speed to 50
mph (80 km/h) during the first 500 miles (805 km)
of towing.
Consider the following items when computing the
weight on the rear axle:
²the tongue weight of the trailer
²the weight of any other type of cargo or equipment put
in or on your vehicle
NOTE:Remember that everything put into or on the
trailer adds to the load on your vehicle. Also, additional
factory-installed options, or dealer-installed options,
must be considered as part of the total load on your
vehicle. Refer to the Certification label located at the
driver's door for the Gross Vehicle Weight Rating.
Perform maintenance services as prescribed in the Main-
tenance Schedules section. When your vehicle is used for
trailer towing, never exceed the gross axle weight rating
(GAWR) and GVWR.
WARNING!
Improper towing can lead to an injury accident.
Follow these guidelines to make your trailer towing
as safe as possible:
²Be sure the trailer is loaded heavier in front, with 60%
to 65% of the weight located ahead of the trailer's
axles(s) sufficiently to place result in tongue weights of
between 10% and 15% of the GTW loaded trailer
weight on the tow hitch of your vehicle. (For a95th
196 STARTING AND OPERATING
Page 208 of 300

HAZARD WARNING FLASHER
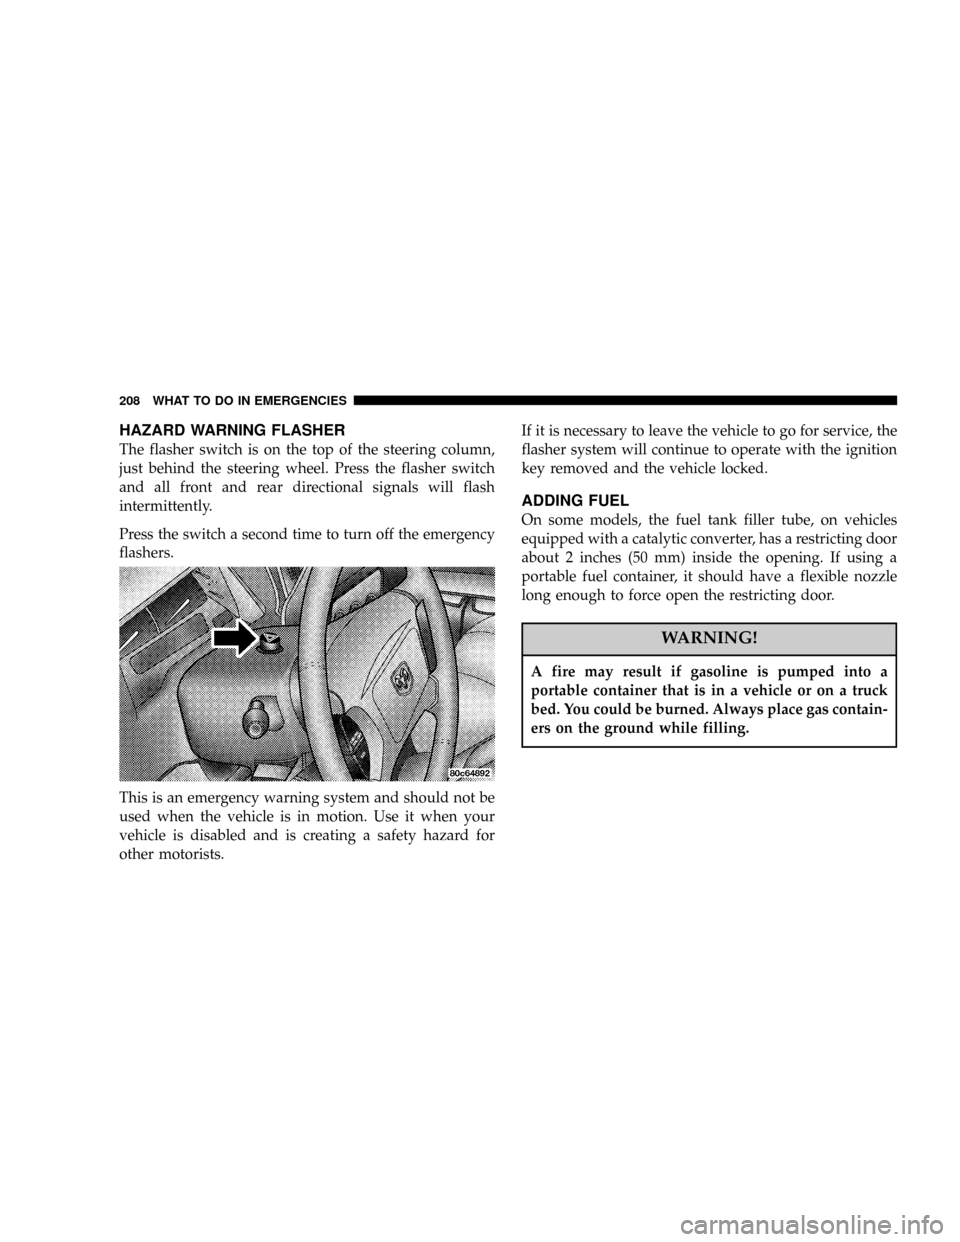
The flasher switch is on the top of the steering column,
just behind the steering wheel. Press the flasher switch
and all front and rear directional signals will flash
intermittently.
Press the switch a second time to turn off the emergency
flashers.
This is an emergency warning system and should not be
used when the vehicle is in motion. Use it when your
vehicle is disabled and is creating a safety hazard for
other motorists.If it is necessary to leave the vehicle to go for service, the
flasher system will continue to operate with the ignition
key removed and the vehicle locked.
ADDING FUEL
On some models, the fuel tank filler tube, on vehicles
equipped with a catalytic converter, has a restricting door
about 2 inches (50 mm) inside the opening. If using a
portable fuel container, it should have a flexible nozzle
long enough to force open the restricting door.
WARNING!
A fire may result if gasoline is pumped into a
portable container that is in a vehicle or on a truck
bed. You could be burned. Always place gas contain-
ers on the ground while filling.
208 WHAT TO DO IN EMERGENCIES
Page 209 of 300

WARNING!
Remove the gas cap slowly to prevent fuel spray
from the filler neck which may cause injury.
The volatility of present gasolines may cause a build
up of pressure in the fuel tank that may increase
while you drive. This pressure can result in a spray
of gasoline and/or vapors when you remove the cap
from a hot vehicle. Removing the cap slowly allows
the pressure to vent and prevents fuel spray.
Never allow any lit smoking materials near the
vehicles while removing the cap or filling the tank.
Never add fuel to the vehicle when the engine is
running.
CHANGING A FLAT TIRE
Jack Location
The jack, jack drive tube, 2 tube extensions, and wheel
wrench are located behind the seat on the passenger's
side of the vehicle.
WARNING!
The jack is designed as a tool for changing tires only.
The jack should not be used to lift the vehicle for
service purposes, unless suitable supports are placed
under the vehicle as a safety measure. The vehicle
should be jacked on a firm level surface only. Avoid
ice or slippery areas.
²In the Regular Cab the jack and tools are stowed under
a formation in the carpet behind the passenger seat.
²In the Quad Cab the jack and tools are stowed under
the rear seat. Lift the passenger side rear seat cushion
to gain access to this area.
WHAT TO DO IN EMERGENCIES 209
6
Page 211 of 300

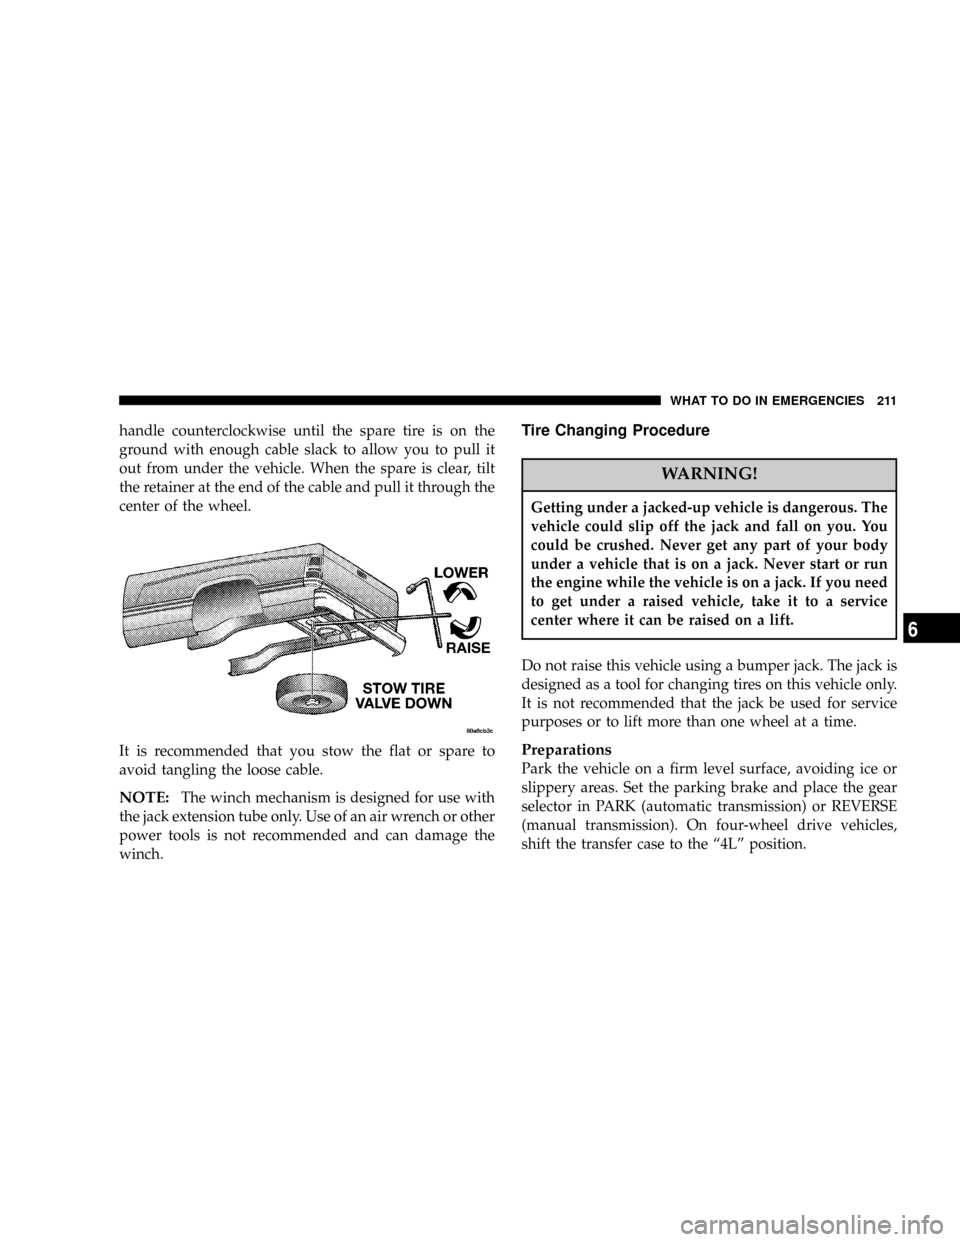
handle counterclockwise until the spare tire is on the
ground with enough cable slack to allow you to pull it
out from under the vehicle. When the spare is clear, tilt
the retainer at the end of the cable and pull it through the
center of the wheel.
It is recommended that you stow the flat or spare to
avoid tangling the loose cable.
NOTE:The winch mechanism is designed for use with
the jack extension tube only. Use of an air wrench or other
power tools is not recommended and can damage the
winch.
Tire Changing Procedure
WARNING!
Getting under a jacked-up vehicle is dangerous. The
vehicle could slip off the jack and fall on you. You
could be crushed. Never get any part of your body
under a vehicle that is on a jack. Never start or run
the engine while the vehicle is on a jack. If you need
to get under a raised vehicle, take it to a service
center where it can be raised on a lift.
Do not raise this vehicle using a bumper jack. The jack is
designed as a tool for changing tires on this vehicle only.
It is not recommended that the jack be used for service
purposes or to lift more than one wheel at a time.
Preparations
Park the vehicle on a firm level surface, avoiding ice or
slippery areas. Set the parking brake and place the gear
selector in PARK (automatic transmission) or REVERSE
(manual transmission). On four-wheel drive vehicles,
shift the transfer case to the ª4Lº position.
WHAT TO DO IN EMERGENCIES 211
6
Page 213 of 300

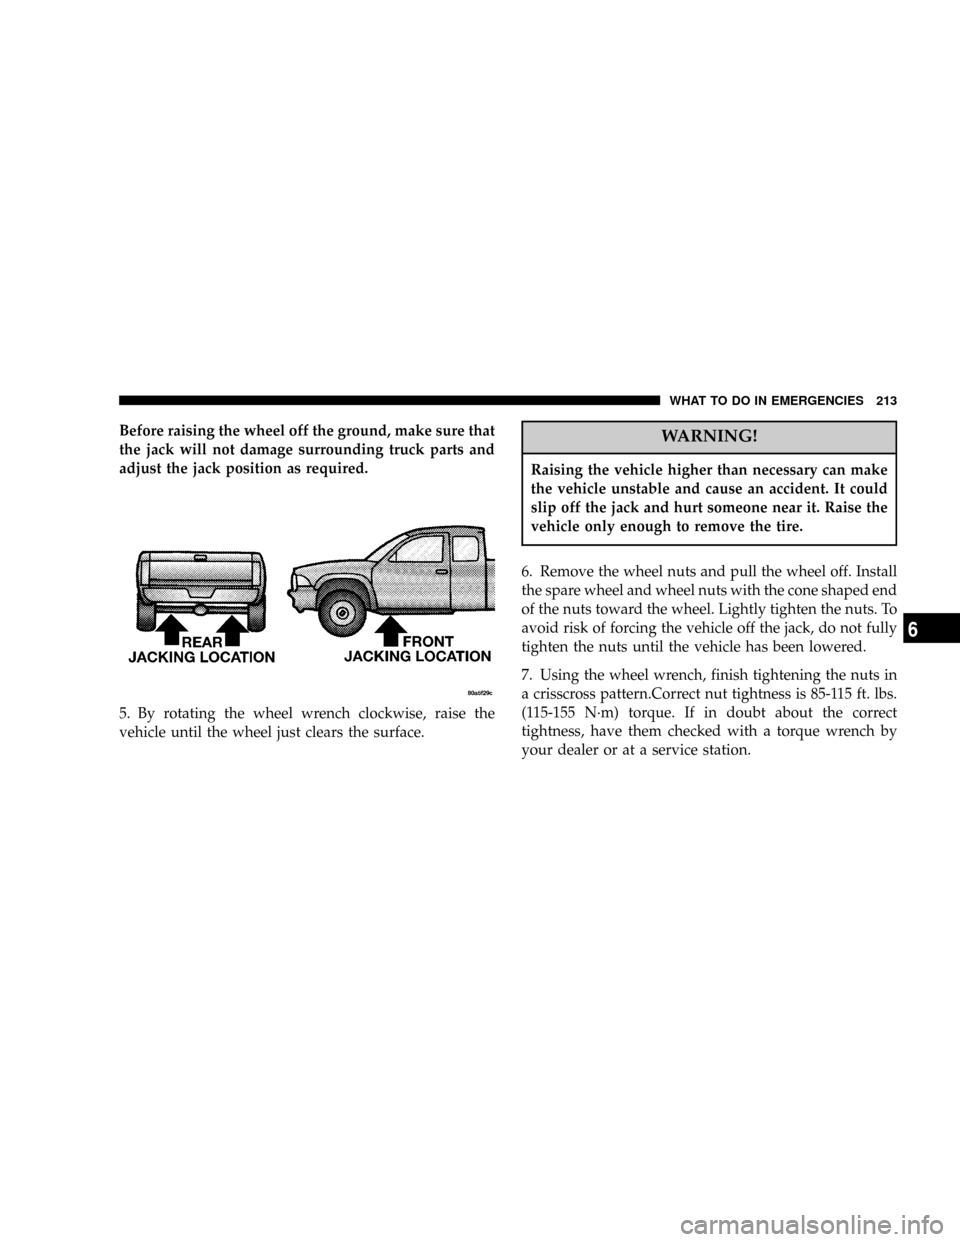
Before raising the wheel off the ground, make sure that
the jack will not damage surrounding truck parts and
adjust the jack position as required.
5. By rotating the wheel wrench clockwise, raise the
vehicle until the wheel just clears the surface.WARNING!
Raising the vehicle higher than necessary can make
the vehicle unstable and cause an accident. It could
slip off the jack and hurt someone near it. Raise the
vehicle only enough to remove the tire.
6. Remove the wheel nuts and pull the wheel off. Install
the spare wheel and wheel nuts with the cone shaped end
of the nuts toward the wheel. Lightly tighten the nuts. To
avoid risk of forcing the vehicle off the jack, do not fully
tighten the nuts until the vehicle has been lowered.
7. Using the wheel wrench, finish tightening the nuts in
a crisscross pattern.Correct nut tightness is 85-115 ft. lbs.
(115-155 N´m) torque. If in doubt about the correct
tightness, have them checked with a torque wrench by
your dealer or at a service station.
WHAT TO DO IN EMERGENCIES 213
6
Page 219 of 300

MAINTAINING YOUR VEHICLE
CONTENTS
mEngine Compartment 3.7L V6.............221
mEngine Compartment 4.7L V-8............222
mOnboard Diagnostic System Ð OBD II......223
mEmissions Inspection And Maintenance
Programs
............................224
mReplacement Parts.....................225
mDealer Service........................225
mMaintenance Procedures.................226
NEngine Oil..........................226
NEngine Oil Filter......................229
NDrive Belts Ð Check Condition And Tension . . 230
NSpark Plugs.........................230NIgnition Cables.......................230
NEngine Air Cleaner Filter................230
NEngine Fuel Filter.....................231
NCatalytic Converter....................231
NMaintenance-Free Battery................232
NAir Conditioner Maintenance.............233
NPower Steering Ð Fluid Check............234
NFront Suspension Ball Joints..............235
NSteering Linkage......................235
NDrive Shaft Constant Velocity
Joints Ð 4X4 Models...................235
NBody Lubrication.....................235
7
Page 223 of 300

ONBOARD DIAGNOSTIC SYSTEM Ð OBD II
Your vehicle is equipped with a sophisticated onboard
diagnostic system called OBD II. This system monitors
the performance of the emissions, engine, and automatic
transmission control systems. When these systems are
operating properly, your vehicle will provide excellent
performance and fuel economy, as well as engine emis-
sions well within current government regulations.
If any of these systems require service, the OBD II system
will turn on the ªMalfunction Indicator Light.º It will
also store diagnostic codes and other information to
assist your service technician in making repairs. Al-
though your vehicle will usually be drivable and not
need towing, see your dealer for service as soon as
possible.CAUTION!
²Prolonged driving with the ªMalfunction Indica-
tor Lightº on could cause further damage to the
emission control system. It could also affect fuel
economy and driveability. The vehicle must be
serviced before any emissions tests can be per-
formed.
²If the ªMalfunction Indicator Lightº is flashing
while the engine is running, severe catalytic con-
verter damage and power loss will soon occur.
Immediate service is required.
MAINTAINING YOUR VEHICLE 223
7
Page 224 of 300

EMISSIONS INSPECTION AND MAINTENANCE
PROGRAMS
In some localities, it may be a legal requirement to pass
an inspection of your vehicle's emissions control system.
Failure to pass could prevent vehicle registration.
For states which have an I/M (Inspection and
Maintenance) requirement, this check verifies the
following: the MIL (Malfunction Indicator Lamp)
is functioning and is not on when the engine is running,
and that the OBD (On Board Diagnostic) system is ready
for testing.
Normally, the OBD system will be ready. The OBD
system maynotbe ready if your vehicle was recently
serviced, if you recently had a dead battery, or a battery
replacement. If the OBD system should be determined
not ready for the I/M test, your vehicle may fail the test.
Your vehicle has a simple ignition key actuated test
which you can use prior to going to the test station. To
check if your vehicle's OBD system is ready, you must do
the following:
1. Insert your ignition key into the ignition switch.2. Turn the ignition to the ON position, but do not crank
or start the engine.
3. If you crank or start the engine, you will have to start
this test over.
4. As soon as you turn your key to the ON position, you
will see your MIL symbol come on as part of a normal
bulb check.
5. Approximately 15 seconds later, one of two things will
happen:
a. The MIL light will blink for approximately 5
seconds and then remain on until the first engine
crank or the key is turned off. This means that your
vehicle's OBD system isnot readyand you should
notproceed to the I/M station.
b. The MIL light will remain fully illuminated until
the first engine crank or the key is turned off. This
means that your vehicle's OBD system isreadyand
you can proceed to the I/M station.
If your OBD system isnot ready,you should see your
dealer or repair facility. If your vehicle was recently
224 MAINTAINING YOUR VEHICLE