2004 DODGE DAKOTA battery
[x] Cancel search: batteryPage 230 of 300

quality filters should be used to assure most efficient
service. Mopar Engine Oil Filters are a high quality oil
filter and are recommended.
Drive Belts Ð Check Condition and Tension
At the mileage indicated in the maintenance schedule, all
belts should be checked for condition and proper tension.
Improper belt tension can cause belt slippage and failure.
Belts should be inspected for evidence of cuts, cracks, or
glazing, and replaced if there is indication of damage
which could result in belt failure. If adjustment is re-
quired, see your authorized dealer for service. Low
generator belt tension can cause battery failure. A special
tool is required to properly measure tension and to
restore belt tension to factory specifications.
Also check belt routing to make sure there is no interfer-
ence between the belts and other engine components.
Spark Plugs
Spark plugs must fire properly to assure proper engine
performance and emission control. The plugs installed in
your vehicle should operate satisfactorily in normal
service for the mileage indicated in the MaintenanceChart. New plugs should be installed at this mileage. The
entire set should be replaced if there is any malfunction
due to a faulty spark plug. Check the Vehicle Emissions
Control Information label for the proper type of spark
plug for your vehicle.
CAUTION!
When replacing plugs, do not overtighten. You could
damage them and cause them to leak.
Ignition Cables
Replace the ignition cables at the mileage interval shown
in the maintenance charts.
Engine Air Cleaner Filter
Under normal driving conditions, replace the air filter at
the intervals shown on Schedule ªAº. If, however, you
drive the vehicle frequently under dusty or severe con-
ditions, the filter element should be inspected periodi-
cally and replaced if necessary at the intervals shown on
Schedule ªBº.
230 MAINTAINING YOUR VEHICLE
Page 232 of 300

WARNING!
A hot exhaust system can start a fire if you park over
materials that can burn. Such materials might be
grass or leaves coming into contact with your ex-
haust system. Do not park or operate your vehicle in
areas where your exhaust system can contact any-
thing that can burn.
In unusual situations involving grossly malfunctioning
engine operation, a scorching odor may indicate severe
and abnormal catalyst overheating. If this occurs, the
vehicle should be stopped, the engine shut off and the
vehicle allowed to cool. Thereafter, service, including a
tune-up to manufacturer's specifications, should be ob-
tained immediately.To minimize the possibility of catalyst damage:
²Do not shut off the engine or interrupt the ignition
when the transmission is in gear and the vehicle is in
motion.
²Do not try to start engine by pushing or towing the
vehicle.
²Do not idle the engine with any spark plug wires
disconnected or removed, such as when diagnostic
testing, or for prolonged periods during very rough
idling or malfunctioning operating conditions.
Maintenance-Free Battery
All Dodge trucks are equipped with maintenance-free
batteries. You will never have to add water, nor is
periodic maintenance required.
232 MAINTAINING YOUR VEHICLE
Page 233 of 300

WARNING!
Battery posts, terminals, and related accessories con-
tain lead and lead compounds. Always wash hands
after handling the battery.
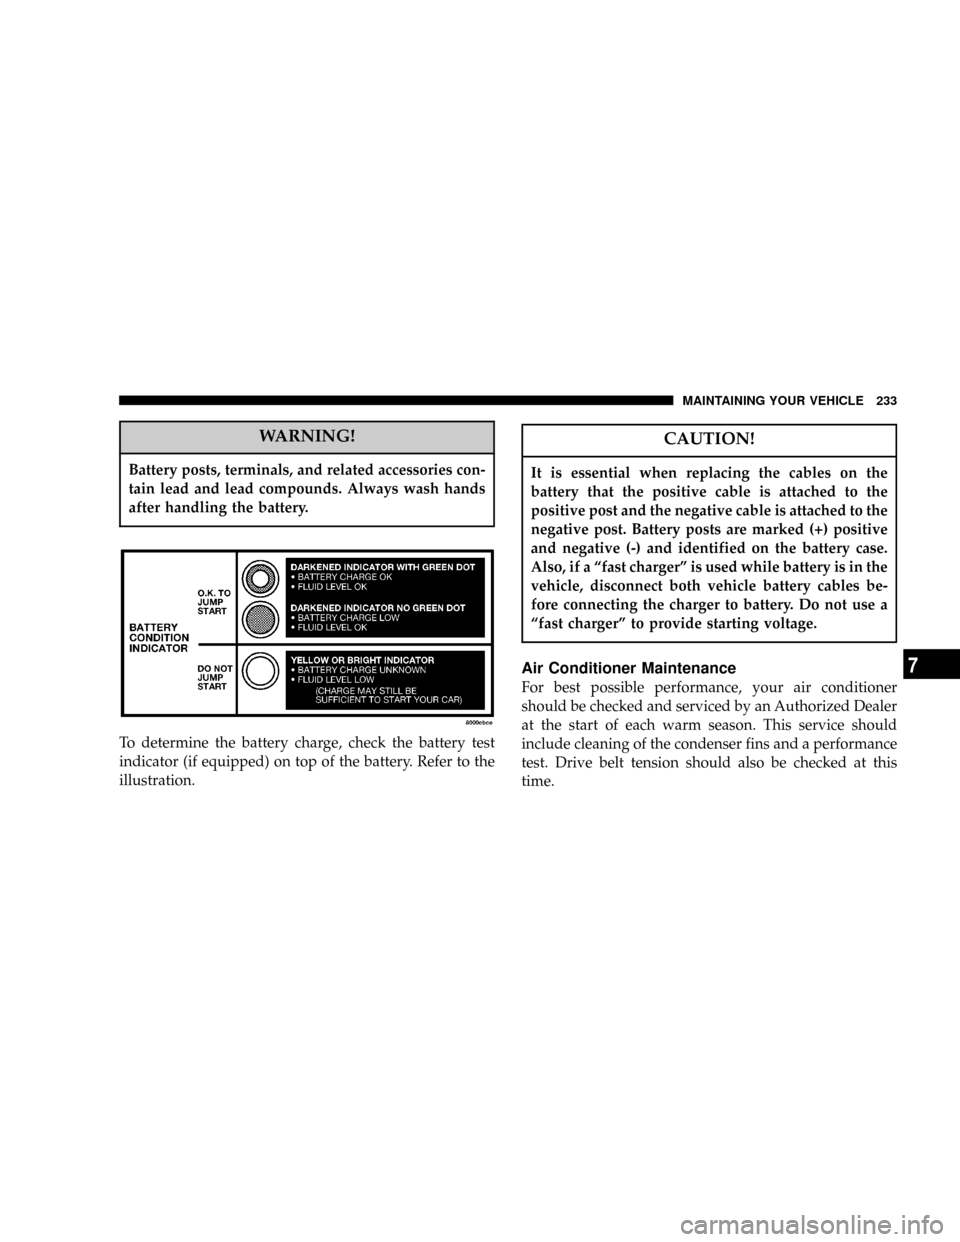
To determine the battery charge, check the battery test
indicator (if equipped) on top of the battery. Refer to the
illustration.
CAUTION!
It is essential when replacing the cables on the
battery that the positive cable is attached to the
positive post and the negative cable is attached to the
negative post. Battery posts are marked (+) positive
and negative (-) and identified on the battery case.
Also, if a ªfast chargerº is used while battery is in the
vehicle, disconnect both vehicle battery cables be-
fore connecting the charger to battery. Do not use a
ªfast chargerº to provide starting voltage.
Air Conditioner Maintenance
For best possible performance, your air conditioner
should be checked and serviced by an Authorized Dealer
at the start of each warm season. This service should
include cleaning of the condenser fins and a performance
test. Drive belt tension should also be checked at this
time.
MAINTAINING YOUR VEHICLE 233
7
Page 252 of 300

defrosters or windshields equipped with a windshield
wiper de-icer. Do not use scrapers or other sharp instru-
ments which may scratch the elements.
When cleaning the rear view mirror, spray cleaner on the
towel or rag that you are using. Do not spray cleaner
directly on the mirror.
Cleaning Plastic Instrument Cluster Lenses
The lenses in front of the instruments in this vehicle are
molded in clear plastic. When cleaning the lenses, care
must be taken to avoid scratching the plastic.
1. Clean with a wet soft rag. A mild soap solution may be
used, but do not use high alcohol content or abrasive
cleaners. If soap is used, wipe clean with a clean damp
rag.
2. Dry with a soft tissue.
Seat Belt Maintenance
Do not bleach, dye or clean the belts with chemical
solvents or abrasive cleaners. This will weaken the fabric.
Sun damage will also weaken the fabric.If the belts need cleaning, use a mild soap solution or
lukewarm water. Do not remove the belts from the car to
wash them.
Replace the belts if they appear frayed or worn or if the
buckles do not work properly.
POWER DISTRIBUTION CENTER
Your vehicle is equipped with an electrical Power Distri-
bution Center located in the engine compartment near
the battery.
252 MAINTAINING YOUR VEHICLE
Page 254 of 300

NOTE:If you are leaving your vehicle dormant for
longer than 21 days, you may want to take steps to
protect your battery. You may do this by disconnecting
the battery or by disconnecting the ignition-off draw
(I.O.D.) fuse in cavity #12. The I.O.D. cavity includes a
snap-in retainer that allows the fuse to be disconnected,
without removing it from the fuse block. Pressing the
I.O.D. fuse back into the cavity reconnects it.
VEHICLE STORAGE
If you are storing your vehicle for more than 21 days, we
recommend that you take the following steps to mini-
mize the drain on your vehicle's battery:
²Disconnect the Ignition-Off Draw fuse (I.O.D.) fuse
located in cavity #12 of the fuse block. The I.O.D.
cavity includes a snap-in retainer that allows the fuse
to be disconnected, without removing it from the fuse
block.
²The transfer case should be placed in the 4HI mode
and kept in this position to minimize the battery drain.
²As an alternative to the above steps you may discon-
nect the negative cable from the battery.
REPLACEMENT LIGHT BULBS
LIGHT BULBS Ð Inside Bulb No.
A/C Control............................. 74
Ash Tray.............................. 161
Brake System Warning Indicator.............. 194
Dome Light............................ 579
EGR Reminder.......................... 194
Glove Box.............................. 194
Heater Control.......................... 158
High Beam Indicator...................... 194
Instrument Cluster........................ 194
Low Fuel Indicator....................... 194
Low Washer Fluid Indicator................. 194
Oil Indicator............................ 194
Overhead Console........................ 578
Seat Belt Indicator........................ 194
Switched Dome.......................... 578
Temperature Indicator..................... 194
Turn Signals............................ 194
Underhood Light......................... 561
4x4 Shift Indicator........................ 161
254 MAINTAINING YOUR VEHICLE
Page 264 of 300

CAUTION!
Failure to perform the required maintenance items
may result in damage to the vehicle.
At Each Stop for Fuel
²
Check the engine oil level about 5 minutes after a fully
warmed engine is shut off. Checking the oil level while
the vehicle is on level ground will improve the accu-
racy of the oil level reading. Add oil only when the
level is at or below the ADD or MIN mark.
²Check the windshield washer solvent and add if
required.
Once a Month
²
Check tire pressure and look for unusual wear or
damage.
²Inspect the battery and clean and tighten the terminals
as required.
²Check the fluid levels of coolant reservoir, brake
master cylinder, and transmission and add as needed.
²Check all lights and all other electrical items for correct
operation.
At Each Oil Change
²
Change the engine oil filter.
²Inspect the exhaust system.
²Inspect the brake hoses.
²Inspect the CV joints (if equipped) and front suspen-
sion components.
²Check the automatic transmission fluid level (if
equipped).
²Check the manual transmission fluid level (if
equipped).
²Check the coolant level, hoses, and clamps.
Tire Rotation
²
Rotate the tires every 6,000 miles (10 000 km).
264 MAINTENANCE SCHEDULES
8
M
A
I
N
T
E
N
A
N
C
E
S
C
H
E
D
U
L
E
S
Page 288 of 300

Adding Engine Coolant (Antifreeze)......... 239
Adding Fuel........................186,208
Air Conditioner Maintenance.............. 233
Air Conditioning....................... 134
Air Conditioning, Operating Tips........135,137
Air Conditioning Refrigerant.............. 234
Air Conditioning System................. 134
Air Pressure, Tires...................176,182
Airbag...........................31,34,102
Airbag Light........................... 38
Airbag On/Off Switch.................... 34
Alarm.............................21,102
Alarm, Panic........................... 19
Alignment and Balance.................. 181
Alterations/Modifications, Vehicle............ 5
Antifreeze (Engine Coolant)............238,258
Anti-Lock Brake System...............164,165
Anti-Lock Warning Light................. 102
Anti-Theft System....................21,102
Appearance Care....................... 249
Automatic Dimming Mirror................ 59
Automatic Transmission............144,146,245
Adding Fluid........................ 246Fluid and Filter Changes................ 247
Fluid Level Check..................... 245
Fluid Type.......................247,260
Gear Ranges......................... 147
Overdrive........................... 148
Shifting............................ 146
Special Additives..................... 247
Torque Converter..................... 149
Axle Fluid............................ 260
Axle Lubrication....................... 248
Backfire, Engine........................ 190
Ball Joints............................ 235
Battery............................... 232
Charging........................... 215
Emergency Starting.................... 215
Gas Caution......................... 215
Keyless Transmitter Replacement.......... 21
Saving Feature........................ 68
Belts, Drive........................... 230
Belts, Seat............................. 25
Body Mechanism Lubrication.............. 235
B-Pillar Location....................... 172
288 INDEX
Page 295 of 300

Power Door.......................... 14
Lower Anchors and Tether for CHildren
(LATCH)............................ 42
Lubricating Oil........................ 248
Lubrication, Body....................... 235
Lug Nuts............................. 213
Lumbar Support........................ 63
Maintenance.......................... 226
Maintenance Free Battery................. 232
Maintenance Procedures.................. 226
Maintenance Schedule................... 263
Schedule9A9......................... 274
Schedule9B9......................... 265
Malfunction Indicator Light............103,224
Manual, Service........................ 284
Manual Transmission..............144,150,245
Fluid Level Check..................... 245
Lubricant Selection.................245,260
Shift Speeds......................... 151
Mirrors............................... 58
Automatic Dimming.................... 59
Electric Powered....................... 60Outside............................. 59
Rearview............................ 58
Modifications/Alterations, Vehicle............ 5
Mopar Parts........................225,284
Multi-Function Control Lever............... 70
New Vehicle Break-In Period............... 52
Occupant Restraints...................... 24
Odometer............................ 103
Trip ............................... 103
Oil, Engine.........................226,259
Capacity............................ 258
Change Interval...................... 227
Dipstick............................ 226
Disposal............................ 229
Filter...........................229,259
Filter Disposal....................... 229
Identification Logo.................... 228
Materials Added to.................... 229
Pressure Gauge....................... 100
Recommendation..................228,258
Synthetic........................... 229
INDEX 295
10