2004 DAEWOO NUBIRA Engine Electrical
[x] Cancel search: Engine ElectricalPage 1845 of 2643

FIVE–SPEED MANUAL TRANSAXLE 5B – 21
DAEWOO V–121 BL4
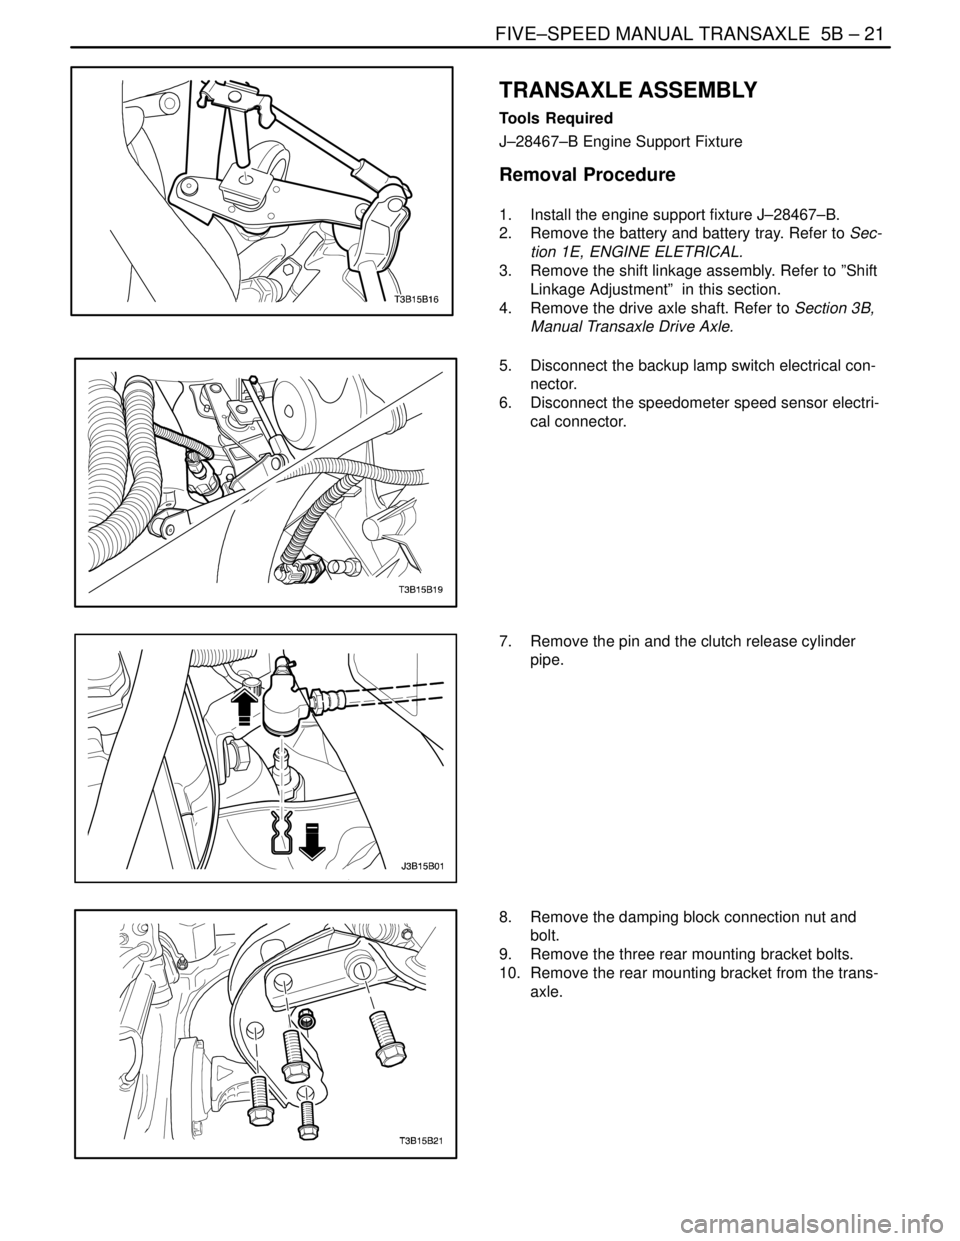
TRANSAXLE ASSEMBLY
Tools Required
J–28467–B Engine Support Fixture
Removal Procedure
1. Install the engine support fixture J–28467–B.
2. Remove the battery and battery tray. Refer to Sec-
tion 1E, ENGINE ELETRICAL.
3. Remove the shift linkage assembly. Refer to ”Shift
Linkage Adjustment” in this section.
4. Remove the drive axle shaft. Refer to Section 3B,
Manual Transaxle Drive Axle.
5. Disconnect the backup lamp switch electrical con-
nector.
6. Disconnect the speedometer speed sensor electri-
cal connector.
7. Remove the pin and the clutch release cylinder
pipe.
8. Remove the damping block connection nut and
bolt.
9. Remove the three rear mounting bracket bolts.
10. Remove the rear mounting bracket from the trans-
axle.
Page 1849 of 2643

FIVE–SPEED MANUAL TRANSAXLE 5B – 25
DAEWOO V–121 BL4
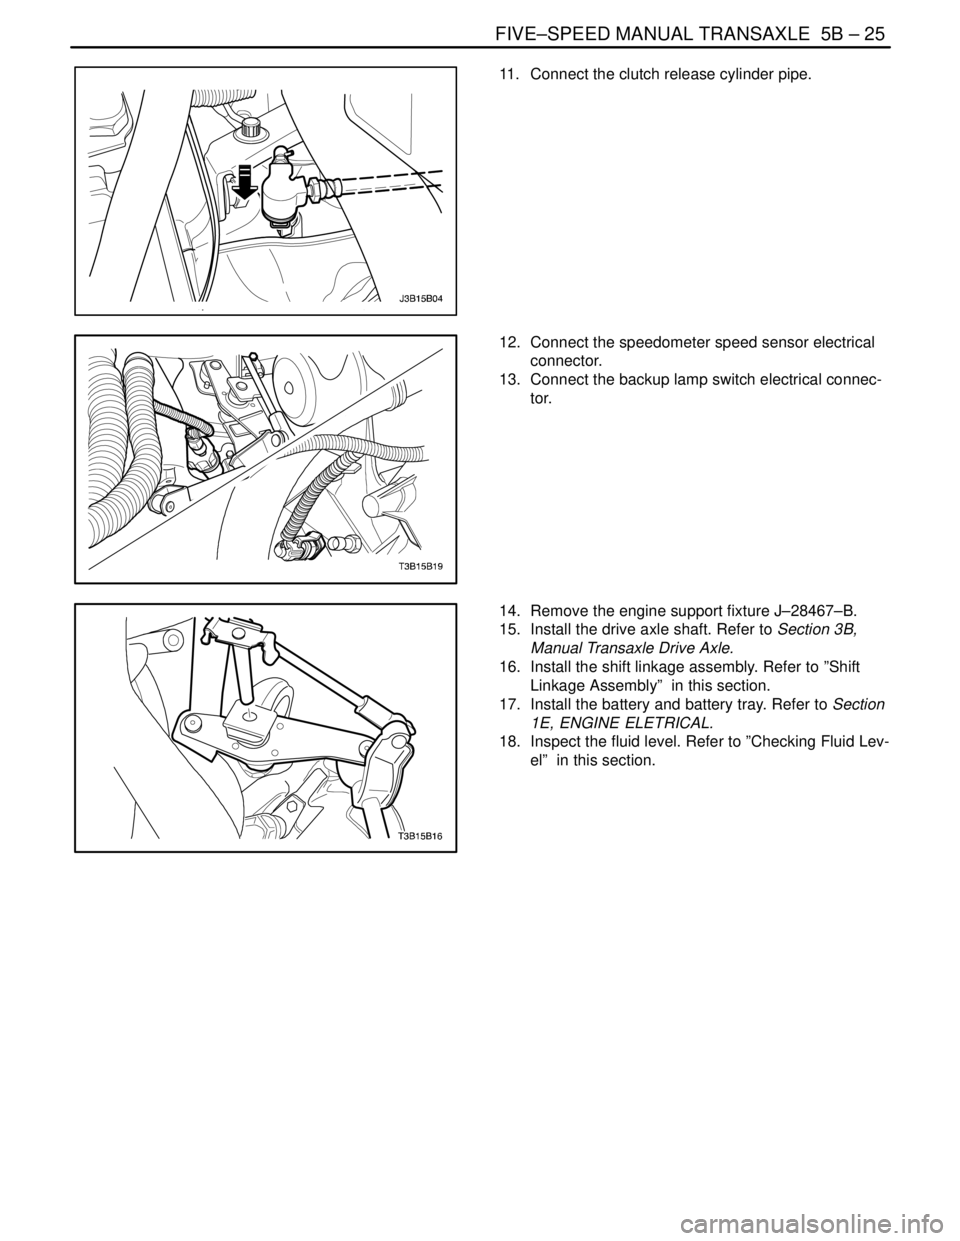
11. Connect the clutch release cylinder pipe.
12. Connect the speedometer speed sensor electrical
connector.
13. Connect the backup lamp switch electrical connec-
tor.
14. Remove the engine support fixture J–28467–B.
15. Install the drive axle shaft. Refer to Section 3B,
Manual Transaxle Drive Axle.
16. Install the shift linkage assembly. Refer to ”Shift
Linkage Assembly” in this section.
17. Install the battery and battery tray. Refer to Section
1E, ENGINE ELETRICAL.
18. Inspect the fluid level. Refer to ”Checking Fluid Lev-
el” in this section.
Page 1924 of 2643

POWER STEERING GEAR 6C – 7
DAEWOO V–121 BL4
SPEED SENSITIVE POWER STEERING SYSTEM
OPERATING WITH FULL ASSIST AT ALL TIMES
StepActionValue(s)YesNo
1Perform an initial inspection of the power steering
system.
Is the system operational?–Go to Step 2Go to
Section 6A,
Power Steering
System
2Check the speedometer.
Is the speedometer inoperative?–Go to
Section5,
TransaxleGo to Step 3
3Check the diagnostic trouble codes at the engine
control module (ECM).
Is the ECM code 24 set?–Go to
Section1F,
Engine
ControlsGo to Step 4
41. Turn the ignition ON.
2. Disconnect the electronic variable orifice (EVO)
solenoid actuator electrical connector at the
power steering pump.
3. Probe terminal 1 of the EVO actuator connec-
tor with a voltmeter.
Does the voltmeter display the specified value?–Go to Step 6Go to Step 5
5Repair the open or short in the circuit between termi-
nal 1 of the EVO solenoid actuator electrical connec-
tor and terminal 2 on the speed sensitive power
steering (SSPS) control module connector.
Is the repair complete?–System OK–
61. Remove the EVO solenoid actuator from the
power steering pump.
2. Turn the actuator upside down to position the
pintle.
3. Stimulate the actuator by connecting it to the
battery.
Does the actuator click?–Go to Step 8Go to Step 7
7Replace the EVO solenoid actuator.
Is the repair complete?–System OK–
81. Turn the ignition OFF.
2. Remove the SSPS control module from the
control module bracket.
3. Disconnect the SSPS control module connec-
tor.
4. Connect a test light from terminal 8 on the
SSPS control module connector to the ground.
5. Turn the ignition ON.
Is the test light on?–Go to Step 14Go to Step 9
9Check the ignition fuse.
Is the ignition fuse open?–Go to Step 10Go to Step 11
10Replace the ignition fuse.
Is the repair complete?–System OK–
11Check for an open or short in the circuit between ter-
minal 8 of the control module connector and the I/P
fuse block.
Is the connection faulty?–Go to Step 12Go to Step 13
Page 1980 of 2643

7A – 6IHEATING AND VENTILATION SYSTEM
DAEWOO V–121 BL4
DIAGNOSIS
HEATER SYSTEM
INSUFFICIENT HEATING OR DEFROSTING
CAUTION : The cooling system is pressurized when hot. Injury can result from removing the surge tank cap be-
fore the engine is sufficiently cool.
Step
ActionValue(s)YesNo
1Verify the customer’s complaint.
Are the customer’s concerns verified?–Go to Step 2System OK
2Check the coolant level.
Is the coolant level correct?–Go to Step 4Go to Step 3
3Add coolant as needed.
Is the repair complete?–System OKGo to Step 4
4Check the timing belt for tension or damage.
Are the drive belts OK?–Go to Step 6Go to Step 5
5Correct any problem with the timing belt.
Is the repair complete?–System OKGo to Step 6
6Check the coolant hoses for leaks or kinks.
Are the coolant hoses OK?–Go to Step 8Go to Step 7
7Repair any problem with the coolant hoses.
Is the repair complete?–System OKGo to Step 8
8Check the surge tank cap. Refer to Section 2D, En-
gine Cooling.
Is the surge tank cap OK?–Go to Step 10Go to Step 9
9Repair or replace the surge tank cap as needed.
Is the repair complete?–System OKGo to Step 10
101. Turn the A/C switch OFF on vehicles equipped
with air conditioning (A/C).
2. Set the blower motor switch on maximum
speed.
3. Set the heater control to full hot.
4. Turn the ignition ON.
5. Check for airflow from the vent outlet.
Is there heavy airflow from the heater outlet?–Go to Step 11Go to Step 26
11Check for a change in the airflow at various blower
speeds.
Does the blower speed increase as the switch is
turned from 1 to 4.–Go to Step 12Go to ”Blower
Electrical
(Manual and
Non–A/C)”
121. Turn the A/C switch OFF.
2. Set the temperature lever to full hot.
3. Set the blower motor switch on maximum
speed.
4. With the engine sufficiently cool, remove the
surge tank cap.
5. Start the vehicle and idle the engine.
6. Watch for the flow of the coolant.
Is the coolant flow visible?–Go to Step 14Go to Step 13
Page 1982 of 2643

7A – 8IHEATING AND VENTILATION SYSTEM
DAEWOO V–121 BL4
StepNo Yes Value(s) Action
20Replace the thermostat. Refer to Section 2D, En-
gine Cooling.
Is the repair complete?–System OK–
21Reinstall the thermostat.
Is the repair complete?–System OK–
22Inspect the heater hoses for proper installation.
Are the heater hoses reversed?–Go to Step 23Go to Step 24
23Reinstall the heater hoses properly.
Is the repair complete?–System OK–
241. Back flush the heater core.
2. Drain the cooling system.
3. Replace the coolant.
4. Warm the engine to an average operating tem-
perature.
5. Feel the heater inlet hose and the heater outlet
hose.
Is the heater inlet hose hot and the heater outlet
hose warm?–System OKGo to Step 25
25Replace the heater core.
Is the repair complete?–System OK–
26Recheck the system using the ”Control Settings/
Correct Results” tests. Refer to ”Improper Air Deliv-
ery or No Mode Shift” in this section.
Is the repair complete?–System OKGo to Step 27
27Check for airflow from the defroster or the vent out-
lets.
Is there high airflow from the defroster or vent out-
lets?–Go to Step 28Go to Step 29
281. Check the heater door at the floor and the vent
door to get the proper airflow and to verify
proper operation.
2. Repair as required.
Is the repair complete?–System OK–
29Switch the mode knob to defrost.
Is the defroster airflow OK?–Go to Step 30Go to Step 31
301. Remove the heater outlet and check for ob-
structions.
2. Remove any obstructions in the heater outlet.
Is the repair complete?–System OK–
31Check for airflow change at various blower speeds.
Does the blower speed increase as the control is
turned from 1 to 4?–Go to Step 32Go to ”Blower
Electrical
(Manual and
Non–A/C)”
32Check for obstructions in the system at the blower
inlet and at the air filter, if the vehicle is equipped with
one.
Are there any obstructions?–Go to Step 33Go to Step 34
33Remove the obstructions in the system at the blower
inlet or replace a clogged filter.
Is the repair complete?–System OK–
Page 1983 of 2643

HEATING AND VENTILATION SYSTEM 7A – 9
DAEWOO V–121 BL4
StepNo Yes Value(s) Action
341. Set the blower on maximum speed.
2. Rotate the temperature control from full hot to
full cold.
3. Listen for an airflow change.
Does the airflow change?–Go to Step 35Go to Step 36
351. Check the following aspects of the temperature
door:
S Travel.
S Cables.
S Linkage.
S Control.
2. Verify the accuracy of the temperature control
at full hot.
Is the repair complete?–Go to Step 1–
361. Check the system for any obstruction between
the blower and the system outlets.
2. Remove any obstruction.
Is the repair complete?–Go to Step 1–
BLOWER ELECTRICAL
StepActionValue(s)YesNo
1Verify the customer’s complaint.
Are the customer’s concerns verified?–Go to Step 2System OK
2Turn the blower ON.
Does the blower run at any speed?–Go to Step 14Go to Step 3
31. Disconnect the power connector from the blow-
er motor under the dashboard on the passen-
ger side of the vehicle.
2. Turn the ignition ON.
3. Turn the blower ON.
4. Test for voltage on the connector. The terminal
connected to the violet wire is positive and the
terminal connected to the black wire is nega-
tive.
Is this voltage present?11–14vGo to Step 4Go to Step 5
4Replace the blower motor.
Is the repair complete?–System OK–
5Check fuse F7 in the I/P fuse block in the engine fuse
block.
Is the fuse blown?–Go to Step 6Go to Step 7
61. Turn the ignition ON.
2. Use a short detector to locate a possible short
in the following locations:
S Fuse panel–to–blower speed switch.
S Blower speed switch–to–heater resistor
block.
S Heater resistor block–to–blower motor.
S Blower speed switch–to–blower HI relay.
3. Repair any short.
4. Replace any blown fuse.
Is the repair complete?–System OK–
Page 1986 of 2643

7A – 12IHEATING AND VENTILATION SYSTEM
DAEWOO V–121 BL4
StepActionValue(s)YesNo
1Verify the customer’s complaint.
Are the customer’s concerns verified?Go to Step 2System OK
2S Examine the affected door in the unit for proper
attachment to the vacuum actuator.
S Check the actuator connection to the door.
S Check that the vacuum hose is properly con-
nected.
Is everything connected properly?–Go to Step 4Go to Step 3
3Repair as necessary.
Is the repair complete?–System OK–
41. Disconnect the actuator at the door.
2. Check the range of the door travel and the ef-
fort required to move it.
Does the door move freely through its entire range
of travel so that it can close at both ends of the
range?–Go to Step 5Go to Step 3
5Check the travel of the actuator by turning the con-
trol knob with the engine running.
Is the actuator travel OK?–Go to Step 6Go to Step 7
61. Reinstall the actuator.
2. Recheck the system using the ”Control Set-
tings/Correct Results” tests in this procedure.
Does the system perform properly?–System OKGo to Step 9
71. Check the vacuum hose at the control.
2. Check for a broken control.
Is there a problem with the vacuum hose or the con-
trol?–Go to Step 8Go to Step 9
8Repair the vacuum hose or the control as necessary.
Is the repair complete?–System OKGo to Step 9
9Recheck the system using the ”Control Settings/
Correct Results” tests in this procedure.
Is the repair complete?–System OKGo to Step 10
10Check for airflow from the defroster or the vent out-
lets.
Is there high airflow from the defroster or the vent
outlets?–Go to Step 11Go to Step 12
11Adjust the heater door at the floor and the vent door
to get the proper airflow.
Is the repair complete?–System OK–
12Switch the mode knob to defrost.
Is the defroster airflow OK?–Go to Step 13Go to Step 14
131. Remove the heater outlet.
2. Check the heater outlet for obstructions.
3. Remove any obstructions in the heater outlet.
Is the repair complete?–System OK–
14Check the blower speeds for change in the airflow.
Does the blower speed increase as the control is
turned from 1 to 4?–Go to Step 15Go to ”Blower
Electrical
(Manual and
Non–A/C)”
Page 1997 of 2643

HEATING AND VENTILATION SYSTEM 7A – 23
DAEWOO V–121 BL4
Tighten
Tighten the heater/air distributor case assembly
screws to 4 NSm (35 lb–in).
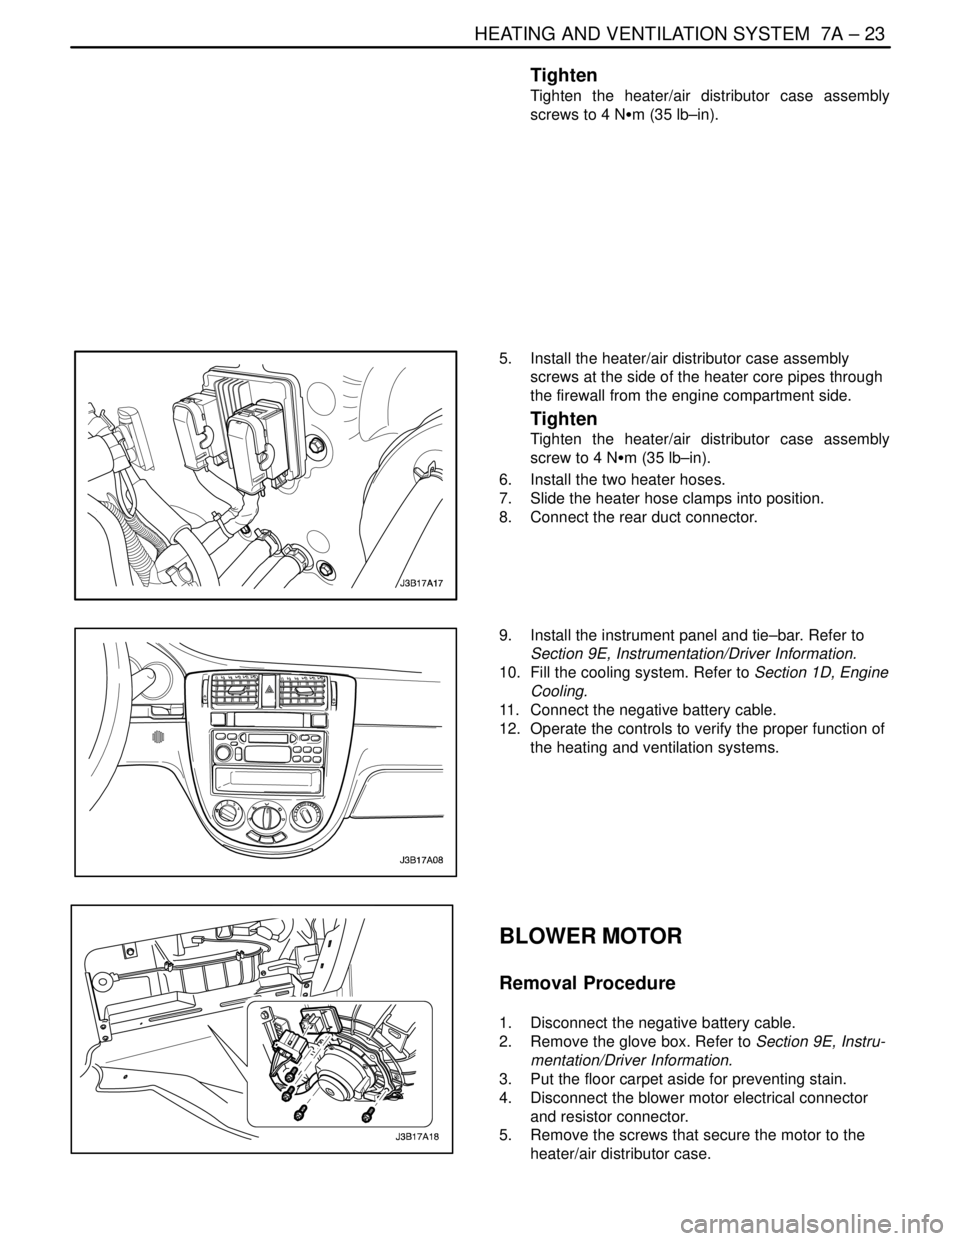
5. Install the heater/air distributor case assembly
screws at the side of the heater core pipes through
the firewall from the engine compartment side.
Tighten
Tighten the heater/air distributor case assembly
screw to 4 NSm (35 lb–in).
6. Install the two heater hoses.
7. Slide the heater hose clamps into position.
8. Connect the rear duct connector.
9. Install the instrument panel and tie–bar. Refer to
Section 9E, Instrumentation/Driver Information.
10. Fill the cooling system. Refer to Section 1D, Engine
Cooling.
11. Connect the negative battery cable.
12. Operate the controls to verify the proper function of
the heating and ventilation systems.
BLOWER MOTOR
Removal Procedure
1. Disconnect the negative battery cable.
2. Remove the glove box. Refer to Section 9E, Instru-
mentation/Driver Information.
3. Put the floor carpet aside for preventing stain.
4. Disconnect the blower motor electrical connector
and resistor connector.
5. Remove the screws that secure the motor to the
heater/air distributor case.