2004 DAEWOO LACETTI battery location
[x] Cancel search: battery locationPage 1994 of 2643

7A – 20IHEATING AND VENTILATION SYSTEM
DAEWOO V–121 BL4
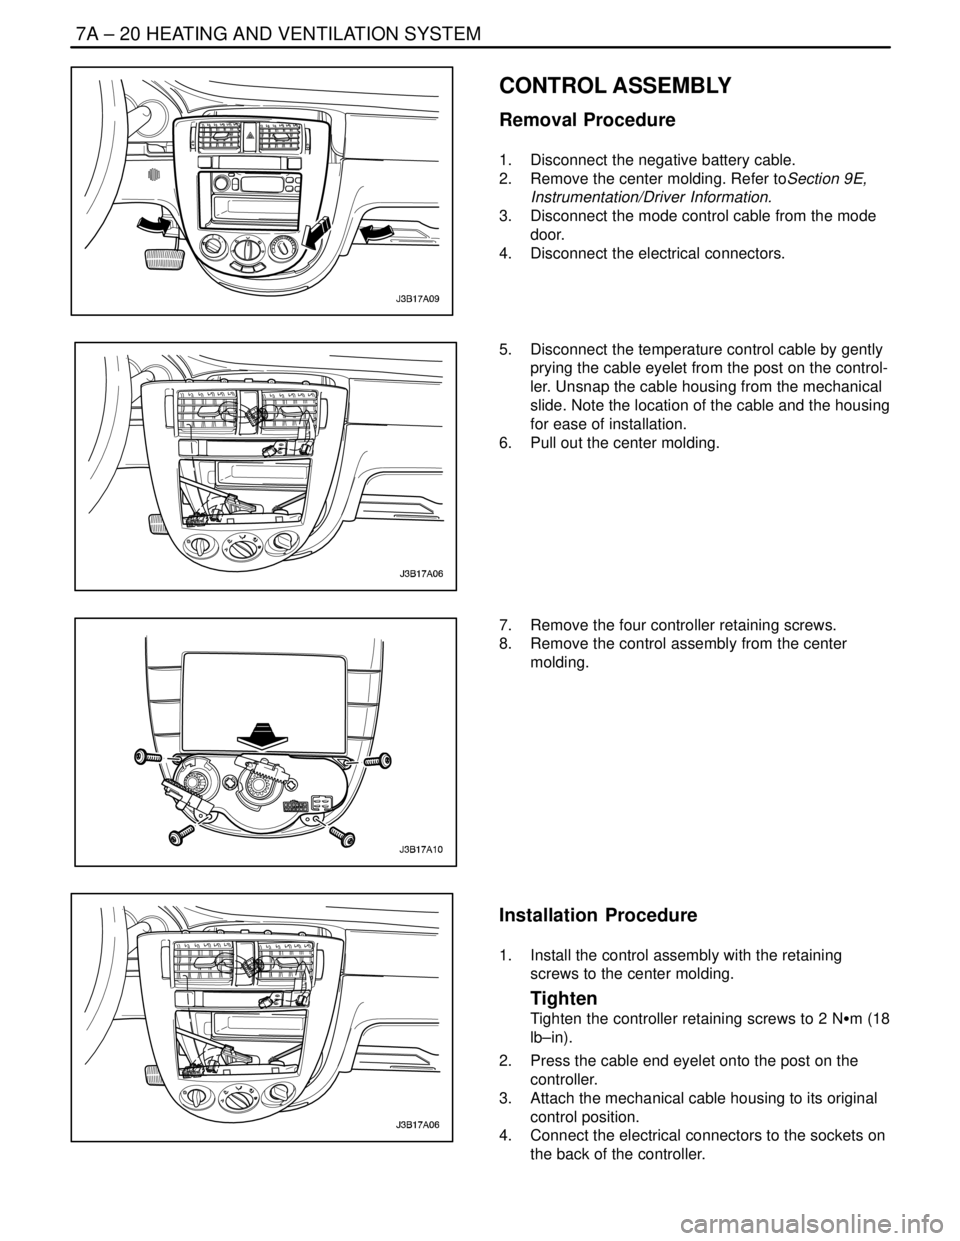
CONTROL ASSEMBLY
Removal Procedure
1. Disconnect the negative battery cable.
2. Remove the center molding. Refer toSection 9E,
Instrumentation/Driver Information.
3. Disconnect the mode control cable from the mode
door.
4. Disconnect the electrical connectors.
5. Disconnect the temperature control cable by gently
prying the cable eyelet from the post on the control-
ler. Unsnap the cable housing from the mechanical
slide. Note the location of the cable and the housing
for ease of installation.
6. Pull out the center molding.
7. Remove the four controller retaining screws.
8. Remove the control assembly from the center
molding.
Installation Procedure
1. Install the control assembly with the retaining
screws to the center molding.
Tighten
Tighten the controller retaining screws to 2 NSm (18
lb–in).
2. Press the cable end eyelet onto the post on the
controller.
3. Attach the mechanical cable housing to its original
control position.
4. Connect the electrical connectors to the sockets on
the back of the controller.
Page 2013 of 2643

MANUAL CONTROL HEATING, VENTILATION AND AIR CONDITIONING SYSTEM 7B – 11
DAEWOO V–121 BL4
LEAK TESTING REFRIGERANT
SYSTEM
Test for leaks whenever you suspect a refrigerant leak in
the system. You should also test for leaks whenever you
perform a service operation which results in disturbing the
lines or the connections. Leaks are commonly found at the
refrigerant fittings or at the connections. Leaks are com-
monly caused by the following problems:
S Improper torque.
S Damaged O–ring seals.
S Dirt or lint on the O–ring seals.
Liquid Leak Detectors
Use a liquid leak detector solution on locations such as fit-
tings. Apply the solution to the area in question with the
swab that is supplied with the solution. Look for bubbles
to appear. This will indicate the existence and the location
of any leak.
For areas where this is not practical, such as sections of
the evaporator and the condenser, an electronic leak de-
tector is more useful.
Electronic Leak Detectors
Follow the manufacturer’s instructions for calibration, op-
eration, and maintenance of an electronic leak detector.
Battery condition is especially important to the accuracy
of a portable model. Set the detector to R–134a before be-
ginning the test.
Notice : Electronic leak detectors are sensitive to wind-
shield washing solutions, solvents and cleaners, and cer-
tain vehicle adhesives. Surfaces must be clean to prevent
false readings. Make sure that all surfaces are dry to pre-
vent damage to the detector.
General Testing Instructions
1. Follow the entire path of the refrigerant system.
2. Completely circle each joint at 25 to 50 mm (1 to 2
inches) per second.
3. Hold the probe tip within 6 mm (1/4 inch) of the sur-
face.4. Do not block the air intake.
5. The audible tone changes from 1 to 2 clicks per
second into a solid alarm if there is a leak. Adjust
the balance control to maintain 1 to 2 clicks per
second.
6. Test all of the following areas, even after one leak
has been confirmed:
S Evaporator inlet and outlet.
S Receiver–drier inlet and outlet.
S Condenser inlet and outlet.
S Brazed and welded areas.
S Damaged areas.
S Hose couplings.
S Compressor rear head.
S All fittings and joints.
Testing Service Ports/Access Valves
The sealing caps provide protection for the service ports.
Make sure that these caps are not missing or loose. Al-
ways use the correct cap for each port.
Testing the Evaporator Core
Leaks in the evaporator core are difficult to find. Test the
evaporator core using the following procedure:
1. Run the blower fan at the maximum speed setting
for at least 15 minutes.
2. Turn the blower OFF.
3. Wait for 10 minutes.
4. Remove the blower motor resistor. Refer to Section
7A, Heating and Ventilation System.
5. Insert the leak detector probe as close as possible
to the evaporator core. The detector will indicate a
leak with a solid alarm.
6. Use a flashlight to search for refrigerant oil on the
core surface.
Testing the Compressor Shaft Seal
1. Blow shop air behind and in front of the compressor
clutch/pulley for at least 15 seconds.
2. Wait 1 to 2 minutes.
3. Probe the area in front of the pulley. If the detector
emits a solid alarm, there is a leak.
Page 2026 of 2643

7B – 24IMANUAL CONTROL HEATING, VENTILATION AND AIR CONDITIONING SYSTEM
DAEWOO V–121 BL4
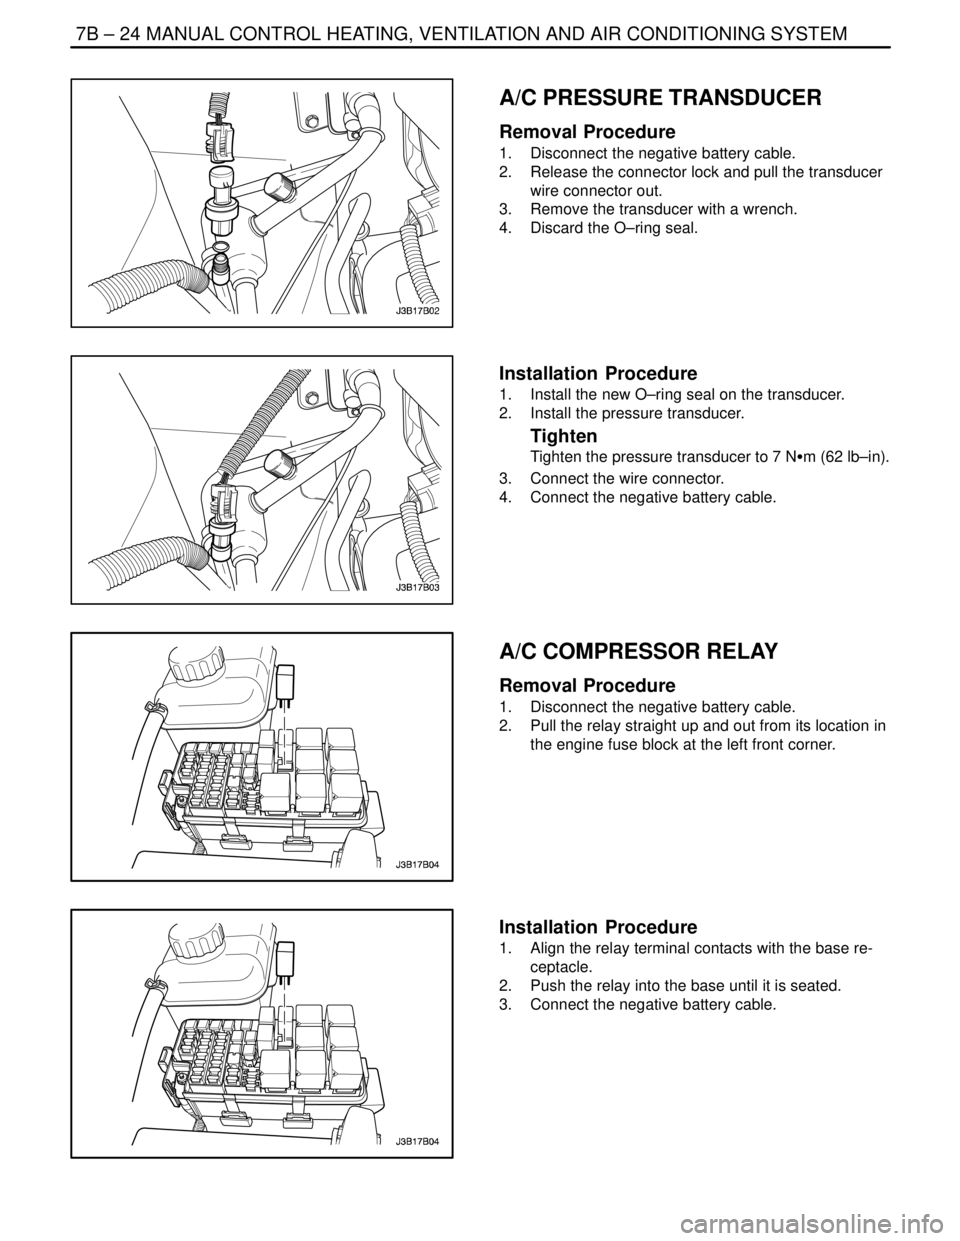
A/C PRESSURE TRANSDUCER
Removal Procedure
1. Disconnect the negative battery cable.
2. Release the connector lock and pull the transducer
wire connector out.
3. Remove the transducer with a wrench.
4. Discard the O–ring seal.
Installation Procedure
1. Install the new O–ring seal on the transducer.
2. Install the pressure transducer.
Tighten
Tighten the pressure transducer to 7 NSm (62 lb–in).
3. Connect the wire connector.
4. Connect the negative battery cable.
A/C COMPRESSOR RELAY
Removal Procedure
1. Disconnect the negative battery cable.
2. Pull the relay straight up and out from its location in
the engine fuse block at the left front corner.
Installation Procedure
1. Align the relay terminal contacts with the base re-
ceptacle.
2. Push the relay into the base until it is seated.
3. Connect the negative battery cable.
Page 2044 of 2643

7B – 42IMANUAL CONTROL HEATING, VENTILATION AND AIR CONDITIONING SYSTEM
DAEWOO V–121 BL4
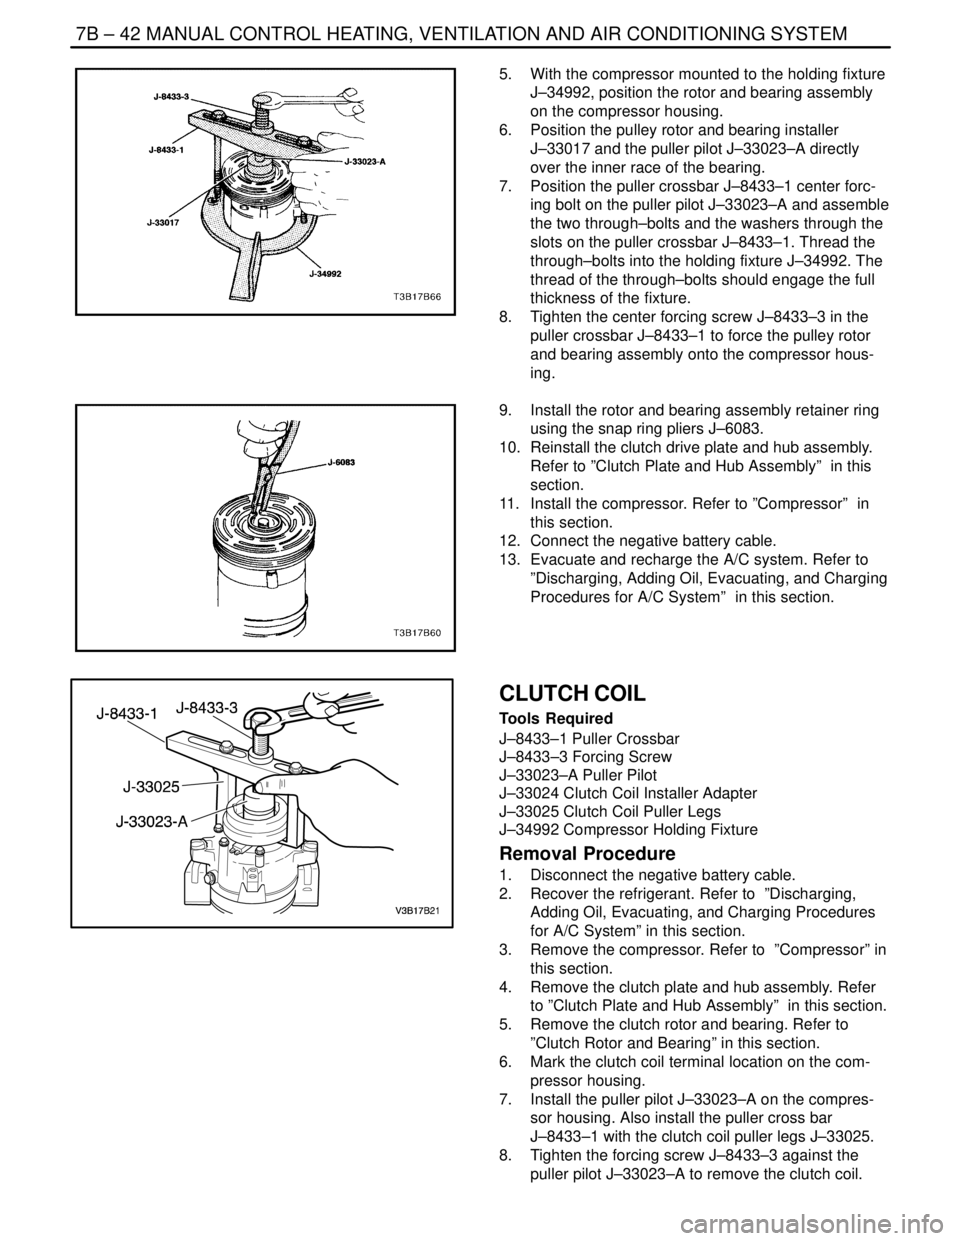
5. With the compressor mounted to the holding fixture
J–34992, position the rotor and bearing assembly
on the compressor housing.
6. Position the pulley rotor and bearing installer
J–33017 and the puller pilot J–33023–A directly
over the inner race of the bearing.
7. Position the puller crossbar J–8433–1 center forc-
ing bolt on the puller pilot J–33023–A and assemble
the two through–bolts and the washers through the
slots on the puller crossbar J–8433–1. Thread the
through–bolts into the holding fixture J–34992. The
thread of the through–bolts should engage the full
thickness of the fixture.
8. Tighten the center forcing screw J–8433–3 in the
puller crossbar J–8433–1 to force the pulley rotor
and bearing assembly onto the compressor hous-
ing.
9. Install the rotor and bearing assembly retainer ring
using the snap ring pliers J–6083.
10. Reinstall the clutch drive plate and hub assembly.
Refer to ”Clutch Plate and Hub Assembly” in this
section.
11. Install the compressor. Refer to ”Compressor” in
this section.
12. Connect the negative battery cable.
13. Evacuate and recharge the A/C system. Refer to
”Discharging, Adding Oil, Evacuating, and Charging
Procedures for A/C System” in this section.
CLUTCH COIL
Tools Required
J–8433–1 Puller Crossbar
J–8433–3 Forcing Screw
J–33023–A Puller Pilot
J–33024 Clutch Coil Installer Adapter
J–33025 Clutch Coil Puller Legs
J–34992 Compressor Holding Fixture
Removal Procedure
1. Disconnect the negative battery cable.
2. Recover the refrigerant. Refer to ”Discharging,
Adding Oil, Evacuating, and Charging Procedures
for A/C System” in this section.
3. Remove the compressor. Refer to ”Compressor” in
this section.
4. Remove the clutch plate and hub assembly. Refer
to ”Clutch Plate and Hub Assembly” in this section.
5. Remove the clutch rotor and bearing. Refer to
”Clutch Rotor and Bearing” in this section.
6. Mark the clutch coil terminal location on the com-
pressor housing.
7. Install the puller pilot J–33023–A on the compres-
sor housing. Also install the puller cross bar
J–8433–1 with the clutch coil puller legs J–33025.
8. Tighten the forcing screw J–8433–3 against the
puller pilot J–33023–A to remove the clutch coil.
Page 2489 of 2643

9T1 – 8IREMOTE KEYLESS ENTRY AND ANTI–THEFT SYSTEM
DAEWOO V–121 BL4
GENERAL DESCRIPTION
AND SYSTEM OPERATION
REMOTE KEYLESS ENTRY AND
ANTI–THEFT SYSTEM
The remote keyless entry and anti–theft system can per-
form the following functions:
S Remotely lock and unlock the vehicle doors by
means of a hand–held, high–frequency transmitter.
S Sense intrusion into the vehicle.
S Activate a warning in the event of an intrusion.
S Help the driver find the vehicle in a parking area.
S Automatically re–lock the doors if the door or the
trunk is not opened within 30 seconds after the ve-
hicle has been unlocked by the remote keyless
entry.
S Communicate serial data to a scan tool to help
diagnose system faults.
The remote keyless entry and anti–theft system consists
of the following components:
S Keyless entry and anti–theft control module/receiv-
er.
S Security indicator.
S Trunk open switch (NOTCHBACK).
S Trunk tamper switch (NOTCHBACK).
S Front door tamper switches.
S Door contact switches.
S Central door lock relay.
S Turn signal bulbs.
S Siren.
S Hood open switch.
REMOTE LOCKING AND UNLOCKING
The hand–held transmitter locks and unlocks the vehicle
doors by sending radio waves to the control module/re-
ceiver in the vehicle. The effective range of the transmitter
varies between 5 and 10 meters, (approximately 16 to 32
feet), depending on whether or not objects, such as other
vehicles are blocking the path of the radio waves.
The transmitter has a LOCK button and an UNLOCK but-
ton which only function when the ignition is OFF. Pressing
the UNLOCK button has the following effects:
S The doors are unlocked.
S The turn signal bulbs flash twice.
S The control module is disarmed.
Pressing the LOCK button has the following effects:
S The doors are locked.
S The turn signal bulbs flash once.
S The control module is armed.
The transmitter has a replaceable battery. The battery is
designed to last at least two years before replacement is
necessary.
SECURITY INDICATOR
There is a security indicator on the instrument panel. After
the LOCK button of the transmitter is pressed, the module
is placed in the armed mode, and the security indicator
flashes. The security indicator turns ON for 0.1 second
and OFF for 0.7 second. It then flashes at that frequency
until the control module/receiver is disarmed.
INTRUSION SENSING
The anti–theft function is armed if the transmitter sends
the LOCK message to the control module/receiver when
the ignition is OFF. When the hood, door, or trunk is
opened, the hood open, door contact, or trunk open switch
sends a ”ground” signal to the control module/receiver.
Unless the control module/receiver is disarmed, the siren
will be activated when the ”ground” signal is received from
the trunk open, hood open, or door contact switches.
The following actions disarm the anti–theft system:
S An UNLOCK message is received from the trans-
mitter.
S Key operation is detected by the tamper switches.
(The tamper switches are operated by the lock cyl-
inders in the front doors and trunk.)
The alarm will also be activated if the control module/re-
ceiver detects voltage from the ignition before either of the
following conditions occur:
S An UNLOCK message is received from the trans-
mitter.
S Key operation is indicated by the tamper switches.
SIREN (GENERAL ONLY)
The remote keyless entry system is armed when the
LOCK message is received from the transmitter when the
ignition is OFF. When the system is armed, it will activate
the siren and flash the turn signals for 28 seconds if any
of the following conditions occur:
S Close all the windows.
S Turn the ignition key to LOCK and remove the key.
S Have all passengers get out of the vehicle.
S Close all doors, the hood and the turnk lid.
S The control module/receiver detects ignition voltage
while the system is armed.
The siren will not operate if any of the following conditions
occur after the system has been armed:
S The door is opened with the key.
S The trunk is opened with the key.
S The UNLOCK or LOCK button on the remote trans-
mitter is pressed within 2 seconds after the siren is
activated.
VEHICLE LOCATOR
The remote keyless entry system assists the driver in lo-
cating the vehicle. When the vehicle is unlocked with the
remote control, the turn signals flash twice to indicate the
location of the vehicle. The duration of the flashes and the