2004 DAEWOO LACETTI oil level
[x] Cancel search: oil levelPage 1405 of 2643

5A1 – 56IZF 4 HP 16 AUTOMATIC TRANSAXLE
DAEWOO V–121 BL4
SYMPTOM DIAGNOSIS
Oil Leakage
Notice :
– Careful localization of leakage points may make it
possible to prevent incorrect or cost–intensive re-
pairs.
Test Steps :– Thoroughly clean the transaxle, engine, and sur-
rounding area(using a steam jet, for example).
– To locate leakage, use a suitable identifying spray
or similar product.
– Depending on the amount of leakage, take the
car for a short or a longer test drive – It may prove
sufficient to place the car on a hoist and run the
engine at idle speed to trace the leak.
– If possible, determine exactly which type of oil is
escaping.
Symptom
Possible CauseAction
Transaxle Oil Leak-
ageOil Pump(Torque Converter Sealing)S Visually check torque converter sealing.
S Replace the converter sealing as described in
the transaxle repair on the vehicle service.
Crankshaft Sealing RingS Check whether engine oil or TFT is leaking out.
S If leak is engine oil, replace the sealing ring as
described in the engine repair instruction.
Torque ConverterS Visual check.
S Fit an exchange converter as described in the
repair instruction.
Oil Content Too HighS Check oil level(TFT and axle oil) as described
in this chapter.
S Correct oil level, and recheck after a test drive.
Notice : Comply with the measuring procedure (fill-
ing procedure) in the repair instruction. Check the oil
level at the overflow plug adjust to proper level if nec-
essary.
O–ring at Bolt Head Damaged or Miss-
ingS Check O–ring.
S Replace O–ring as described in the repair in-
struction.
Shaft SealS Visually check the shaft seal.
S Replace the sealing ring as described in the
repair instruction.
Hose Clamp LooseS Check to ensure that the hose clamp fits tightly.
S If necessary, retighten clamp.
Oil Pan Gasket Not Installed ProperlyS Check to see if the gasket was positioned
properly.
S Install gasket properly as described in the re-
pair instruction.
Oil Pan Gasket DamagedS Check the gasket visually.
S Replace gasket as described in the repair in-
struction.
Bolt at Bracket LooseCheck the Tightening Torque
Retighten bolt
Sealing Ring at Oil DipstickS Check O–ring.
S If necessary, replace O–ring.
Sealing Ring Near End–Cover Connec-
tion DefectiveS Check sealing rings.
S Put in new sealing ring Check O–ring as de-
scribed in the repair instruction.
Page 1406 of 2643

ZF 4 HP 16 AUTOMATIC TRANSAXLE 5A1 – 57
DAEWOO V–121 BL4
Symptom ActionPossible Cause
Sealing Ring Selector ShaftS Check sealing ring.
S Replace sealing ring as described in the repair
instruction.
O–ring at Socket OutletS Check O–ring.
S Replace O–ring as described in the repair in-
struction.
O–ring and Speed Sensor ConnectionS Check O–ring.
S Replace O–ring as described in the repair in-
struction.
Oil Leak Incorrectly IdentifiedS No oil leak is possible at this point.
Speed Sensor Itself Is LeakingS Check speed sensor.
S Replace speed sensor as described in the re-
pair instruction.
Hair Line Crack at the Piping in the Con-
nection Area, Sealing Ring Fit in Trans-
axle HousingS Pressurize the line with compressed air and
check it.
S Replace lines as described in the repair in-
struction.
O–ring Defective, IncorrectCheck O–ring.
Replace O–rings as described in the repair instruc-
tion.
Plug LooseCheck the Tightening Torque for the screw plug.
Tighten to torque specified in the repair instruction.
Noise
SymptomPossible CauseAction
NoiseTFT Level Too LowS When the TFT level is too low, the gear wheels
from the transaxle oil pump might generate
noise.
S Check the TFT level as described in the repair
instruction and fill to the proper level.
Monolith in Catalytic Converter Has
BrokenS Check according to the exhaust gas diagnostic
procedure or by shaking the catalytic converter
casing.
S Replace catalytic converter if necessary.
Noise from Auxiliaries (e.g. exhaust
system, alternator, drive shafts.)S Check these components; if necessary, elimi-
nate the faults as described in the repair in-
struction
Noise from Tires or Wheel BearingsS Eliminate fault if necessary
Noise from Planetary GearsS Whistling noise on traction and overrun(in first
gear only)caused by high rotating speeds(func-
tionally unavoidable)
Cumulative Tooth Backlash in the Com-
plete Drive LineS Production status. Customer must be con-
vinced.
Jerky Noise of the Parking Lock (e.g.
when the car is standing on a gradient)S Load–reversal reaction
S Apply the handbrake before selection the park-
ing Lock (position P)
Page 1407 of 2643

5A1 – 58IZF 4 HP 16 AUTOMATIC TRANSAXLE
DAEWOO V–121 BL4
Symptom ActionPossible Cause
NoiseThe Engine’s Torsional Vibrations are
Being Transmitted to the Drive ShaftsS At low speeds in fourth gear, vibration can
arise (driving at too low an engine speed)
S Noise is functionally unavoidable; due to toler-
ances. Convince the customer.
NoiseTorque Reaction Strut LooseS Check mounting and repair if necessary.
Shift quality
Notice :
– The assessment of shaft quality is, to a large ex-
tent, an individual, subjective matter. Take careful
note of how the customer describes the complaint
and of the manner in which he or she handles the
vehicle and the controls.
– A sudden deterioration of shift quality may also
be caused by the transaxle selecting an emergency
or substitute program
Test Steps :– Carry out the general checks described in the
automatic transaxle diagnostic information.
– Perform a test drive to answer the following ques-
tions.
In which driving situations does the shift quality
complaint arise?
To which shifts does the complaint apply?
Is the complaint reproducible within a short period,
or has it only occurred sporadically or on a single
occasion?
– Check the oil level and oil quality
– Interrogate the fault memory and read out mea-
surement block data.
Symptom
Possible CauseAction
Shift QualityRapid Pressure Build–up in the ClutchS Operating error (position selected several times
in quick succession).
Jerk When Parking Lock Is ReleasedS Refer to ”Noise” in this section.
Incorrect Electronic Transaxle Control
moduleS Check the data status for transaxle control
module ; refer to ”TCM” in this section.
Emergency/Substitute Program Has
Been ActivatedS For checking and remedial action, refer to
”Emergency/Substitute program” in this sec-
tion.
Accelerator Pedal in Indefinite Position
Between Full Throttle and Kick DownS Persuade customer to choose clearly between
kick down and full throttle
S Check setting according go engine repair in-
struction ; adjust if necessary.
Control Overlap Between to Clutches
During ShiftS Production status
S Convince the customer
Temperature Sensor
(Not Fault Memory)S Check function according to ”Emergency/Sub-
stitute program” in this section.
Kick Down Setting IncorrectS Check
A) Floor mat is obstructing accelerator pedal
B) The kick down setting as described in the
Engine Section.
Malfunction
Notice :
The faults dealt with here concern transaxle functions
such as ”traction” (forwards and reverse) and all type of
shifts. Entries will not always be made in the fault memory.Test Steps :
Perform the general checks according to the automatic
transaxle diagnostic procedure.
– Test drive
– Check oil level and quality
– Interrogate fault memory
Page 1540 of 2643

ZF 4 HP 16 AUTOMATIC TRANSAXLE 5A1 – 191
DAEWOO V–121 BL4
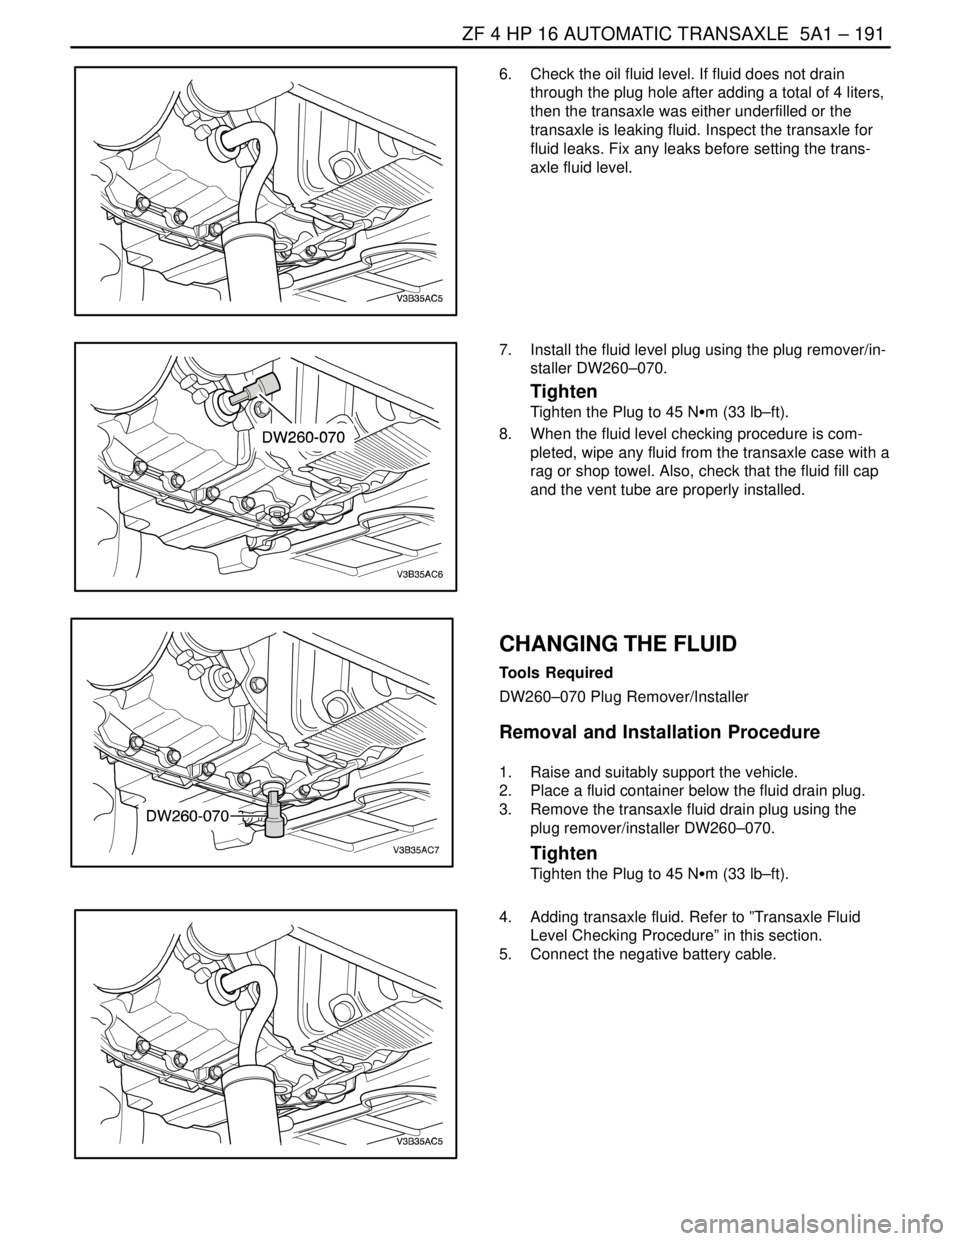
6. Check the oil fluid level. If fluid does not drain
through the plug hole after adding a total of 4 liters,
then the transaxle was either underfilled or the
transaxle is leaking fluid. Inspect the transaxle for
fluid leaks. Fix any leaks before setting the trans-
axle fluid level.
7. Install the fluid level plug using the plug remover/in-
staller DW260–070.
Tighten
Tighten the Plug to 45 NSm (33 lb–ft).
8. When the fluid level checking procedure is com-
pleted, wipe any fluid from the transaxle case with a
rag or shop towel. Also, check that the fluid fill cap
and the vent tube are properly installed.
CHANGING THE FLUID
Tools Required
DW260–070 Plug Remover/Installer
Removal and Installation Procedure
1. Raise and suitably support the vehicle.
2. Place a fluid container below the fluid drain plug.
3. Remove the transaxle fluid drain plug using the
plug remover/installer DW260–070.
Tighten
Tighten the Plug to 45 NSm (33 lb–ft).
4. Adding transaxle fluid. Refer to ”Transaxle Fluid
Level Checking Procedure” in this section.
5. Connect the negative battery cable.
Page 1541 of 2643

5A1 – 192IZF 4 HP 16 AUTOMATIC TRANSAXLE
DAEWOO V–121 BL4
FLUID LEVEL SET AFTER SERVICE
1. Add transaxle fluid through the fill cap hole prior to
adjusting the fluid level. The amount of fluid to add
should be based on the type of service done.
Adjustment Notice
S Use ESSO LT 71141 transaxle fluid only.
S Oil pan removed : 4L (4.2 qt)
S Torque converter removed : 2L (2.1 qt)
S Complete overhaul : 6.7L (7.1qt)
S Drain plug removed : 4L (4.2 qt)
2. Check the transaxle fluid level. Refer to ”Transaxle
Fluid Level Checking Procedure” in this section.
3. Add additional fluid through the fill cap hole in 0.5
liter (0.5 quart) increments until the fluid comes out
through the plug hole.
4. Allow the fluid to finish draining out through the plug
hole, then install the fluid level plug.
5. When the fluid level setting procedure is completed,
wipe any fluid from the transaxle case with a rag or
shop towel. Also, check that the fluid fill cap and the
vent tube are properly installed.
REPAIRING FLUID LEAKS
Locating Leaks
General Method
1. Verify that the leak is transaxle fluid.
2. Thoroughly clean the suspected leak area.
3. Operate the vehicle for about 25 kilometers (15
miles) or until the transaxle reaches normal operat-
ing temperature, 88°C (190°F).
4. Park the vehicle over clean paper or cardboard.
5. Turn the engine off and look for fluid spots on the
paper.
6. Make the necessary repairs to correct the leak.
Powder Method
1. Thoroughly clean the suspected leak area.
2. Apply an aerosol–type powder (foot powder) to the
suspected leak area.
3. Operate the vehicle for about 25 kilometers (15
miles) or until the transaxle reaches normal operat-
ing temperature, 88°C (190°F).
4. Turn the engine off.
5. Inspect the suspected leak area and trace the leak
path through the powder to find the source of the
leak.
6. Make the necessary repairs.
Page 1551 of 2643

5A1 – 202IZF 4 HP 16 AUTOMATIC TRANSAXLE
DAEWOO V–121 BL4
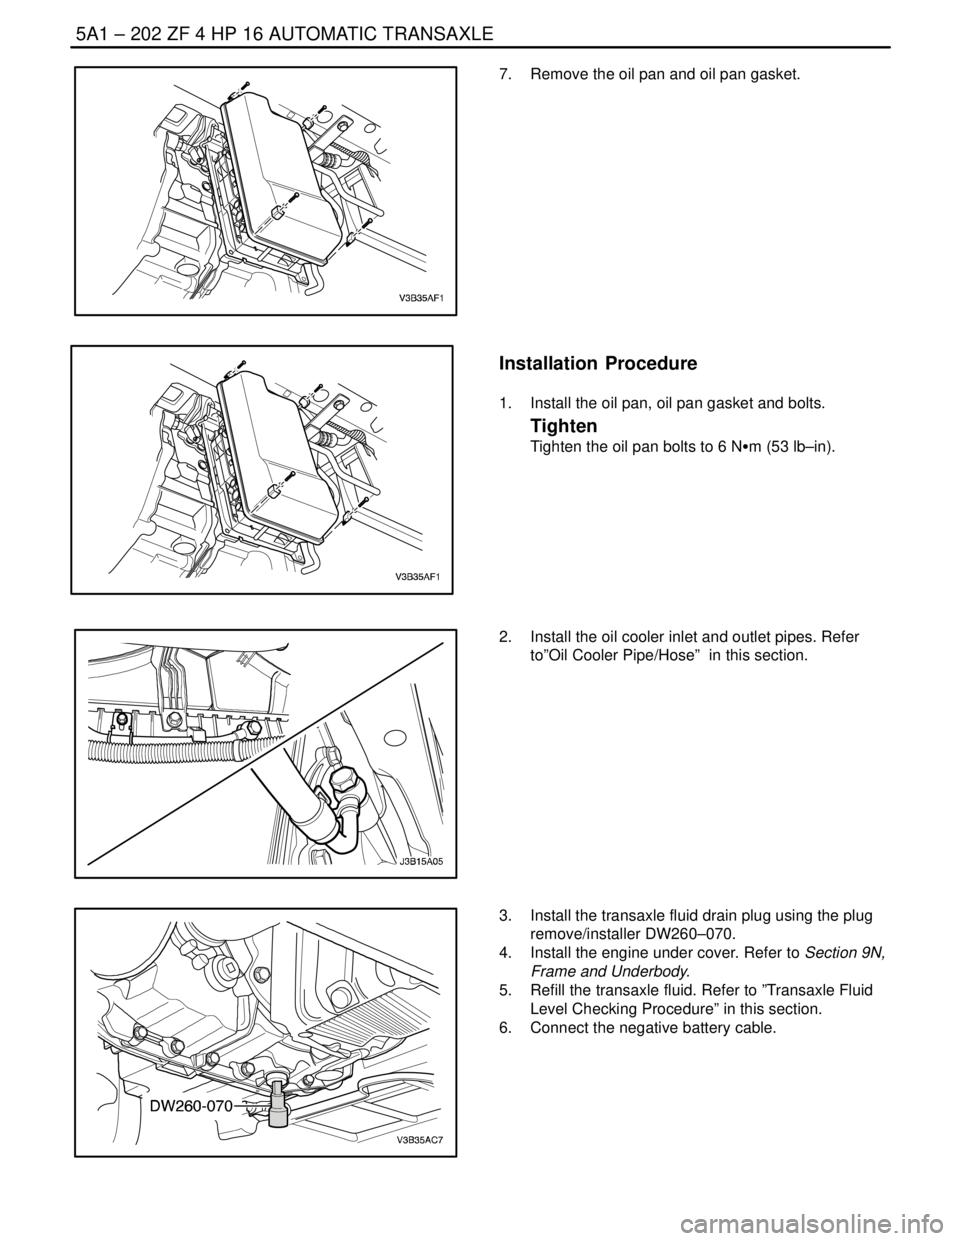
7. Remove the oil pan and oil pan gasket.
Installation Procedure
1. Install the oil pan, oil pan gasket and bolts.
Tighten
Tighten the oil pan bolts to 6 NSm (53 lb–in).
2. Install the oil cooler inlet and outlet pipes. Refer
to”Oil Cooler Pipe/Hose” in this section.
3. Install the transaxle fluid drain plug using the plug
remove/installer DW260–070.
4. Install the engine under cover. Refer to Section 9N,
Frame and Underbody.
5. Refill the transaxle fluid. Refer to ”Transaxle Fluid
Level Checking Procedure” in this section.
6. Connect the negative battery cable.
Page 1829 of 2643

FIVE–SPEED MANUAL TRANSAXLE 5B – 5
DAEWOO V–121 BL4
DIAGNOSIS
ISOLATE NOISE
Identify the cause of any noise before attempting to repair
the clutch, the transaxle, or their related link–ages.
Symptoms of trouble with the clutch or the manual trans-
axle include:
S A great effort required to shift gears.
S The sound of gears clashing and grinding.
S Gear blockout.
Any of these conditions requires a careful analysis. Make
the following checks before disassembling the clutch or
the transaxle for repairs.
Road Travel Noise
Many noises that appear to come from the transaxle may
actually originate with other sources such as the:
S Tires.
S Road surfaces.
S Wheel bearings.
S Engine.
S Exhaust system.
These noises may vary according to the:
S Size of the vehicle.
S Type of the vehicle.
S Amount of insulation used in the body of the ve-
hicle.
Transaxle Noise
Transaxle gears, like any mechanical device, are not ab-
solutely quiet and will make some noise during normal op-
eration.
To verify suspected transaxle noises:
1. Select a smooth, level asphalt road to reduce tire
and resonant body noise.
2. Drive the vehicle far enough to warm up all the lu-
bricants thoroughly.
3. Record the speed and the gear range of the trans-
axle when the noise occurs.
4. Check for noises with the vehicle stopped, but with
the engine running.
5. Determine if the noise occurs while the vehicle op-
erates in:
S Drive – under a light acceleration or a heavy
pull.
S Float – maintaining a constant speed with a light
throttle on a level road.
S Coast – with the transaxle in gear and the
throttle partly or fully closed.
S All of the above.
Bearing Noise
Differential Side Bearing Noise
Differential side bearing noise and wheel bearing noise
can be confused easily. Since side bearings are pre–
loaded, a differential side bearing noise should not dimin-
ish much when the differential/transaxle is run with the
wheels off the ground.
Wheel Bearing Noise
Wheel bearings produce a rough growl or grating sound
that will continue when the vehicle is coasting and the
transaxle is in NEUTRAL. Since wheel bearings are not
pre–loaded, a wheel bearing noise should diminish con-
siderably when the wheels are off the ground.
Other Noise
Brinelling
A brinelled bearing causes a ”knock” or ”click” approxi-
mately every second revolution of the wheel because the
bearing rollers do not travel at the same speed as the
wheel. In operation, the effect is characterized by a low–
pitched noise.
A brinelled bearing is caused by excessive thrust which
pushes the balls up on the pathway and creates a triangu-
lar–shaped spot in the bearing race. A brinelled bearing
can also be caused from pressing one race into position
by applying pressure on the other race.
A false indication of a brinelled bearing occurs as a result
of vibration near the area where the bearing is mounted.
Brinelling is identified by slight indentations, resulting in a
washboard effect in the bearing race.
Lapping
Lapped bearing noise occurs when fine particles of abra-
sive materials such as scale, sand, or emery circulate
through the oil in the vehicle, causing the surfaces of the
roller and the race to wear away. Bearings that wear loose
but remain smooth, without spalling or pitting, are the re-
sult of dirty oil.
Locking
Large particles of foreign material wedged between the
roller and the race usually causes one of the races to turn,
creating noise from a locked bearing. Pre–loading regular
taper roller bearings to a value higher than that specified
also can result in locked bearings
Pitting
Pitting on the rolling surface comes from normal wear and
the introduction of foreign materials.
Spalling
Spalled bearings have flaked or pitted rollers or races
caused by an overload or an incorrect assembly that re-
sults in a misalignment, a cocking of bearings, or adjust-
ments that are too tight.
After completing these checks, refer to the ”Diagnosis
Chart” in this section.
Page 1839 of 2643

FIVE–SPEED MANUAL TRANSAXLE 5B – 15
DAEWOO V–121 BL4
MAINTENANCE AND REPAIR
ON–VEHICLE SERVICE
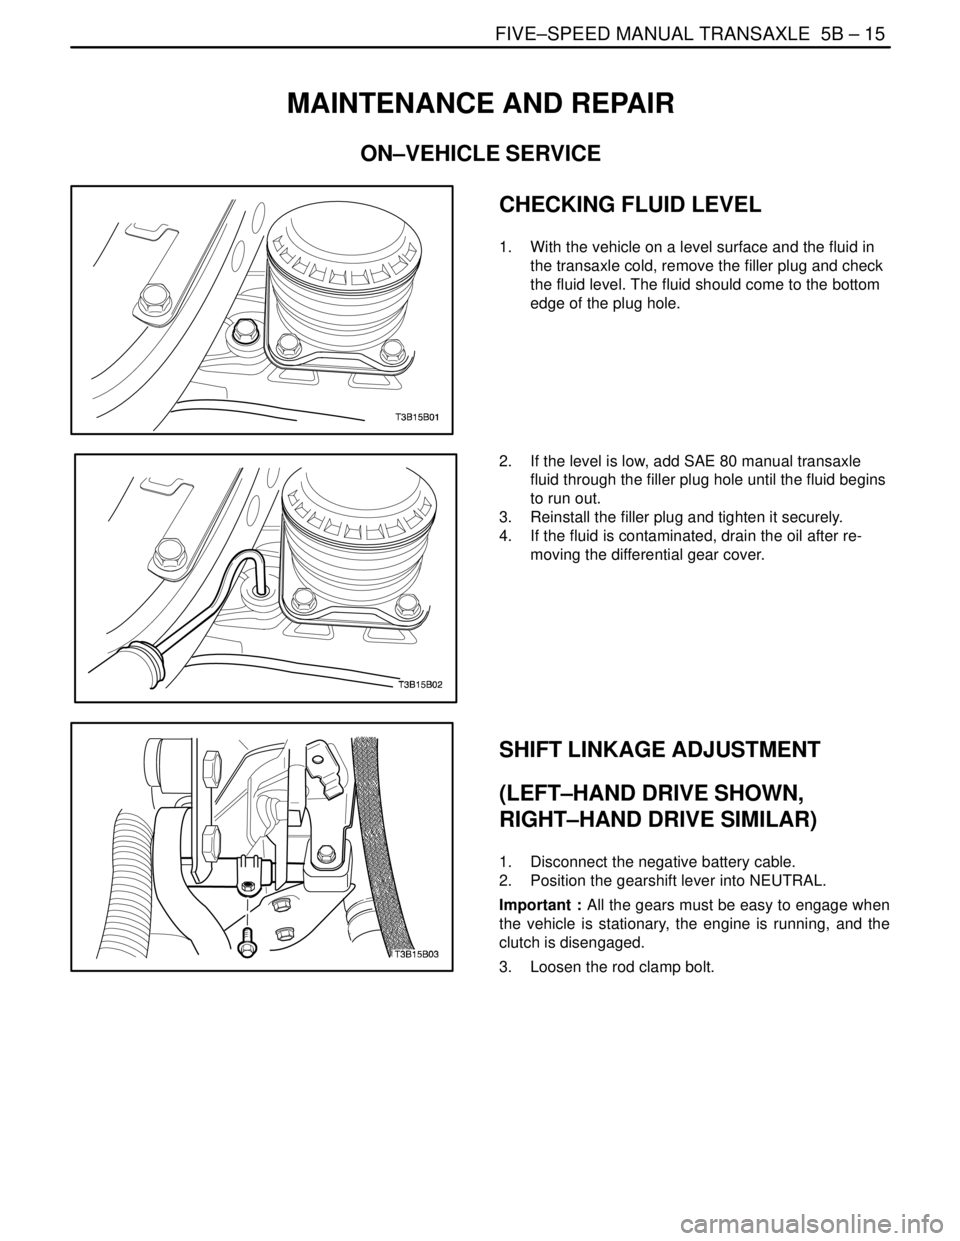
CHECKING FLUID LEVEL
1. With the vehicle on a level surface and the fluid in
the transaxle cold, remove the filler plug and check
the fluid level. The fluid should come to the bottom
edge of the plug hole.
2. If the level is low, add SAE 80 manual transaxle
fluid through the filler plug hole until the fluid begins
to run out.
3. Reinstall the filler plug and tighten it securely.
4. If the fluid is contaminated, drain the oil after re-
moving the differential gear cover.
SHIFT LINKAGE ADJUSTMENT
(LEFT–HAND DRIVE SHOWN,
RIGHT–HAND DRIVE SIMILAR)
1. Disconnect the negative battery cable.
2. Position the gearshift lever into NEUTRAL.
Important : All the gears must be easy to engage when
the vehicle is stationary, the engine is running, and the
clutch is disengaged.
3. Loosen the rod clamp bolt.