2004 CHRYSLER TOWN AND COUNTRY air filter
[x] Cancel search: air filterPage 214 of 401

Defrost modes are selected. This is done to assist in
drying the air and it will help in keeping the windows
from fogging.
Manual Air Conditioning Operation
To turn on the air conditioning, set the front
blower control to any position except O (OFF) and
press the A/C button which is located next to the
recirculation button. An indicator light on the A/C
button shows that the air conditioning is on.
Cool dehumidified air comes through the outlets selected
by the Mode Control. To turn off the air conditioning,
press the A/C button a second time. The indicator light
will turn off.
NOTE:
²The compressor will not engage until the engine has
been running for a few seconds.
²If your air conditioning performance seems lower than
expected, check the A/C air filter and the front of the
A/C condenser for an accumulation of dirt or insects.
The A/C condenser is located in front of the radiator.
The A/C air filter is located under the instrument
panel on the passenger side.
²Fabric type fascia protectors tend to block the amount
of air to the condenser and may reduce air condition-
ing performance.
Economy Mode
If economy mode is desired, press the A/C button to turn
off the indicator light, and the A/C compressor. Move the
temperature control lever to the desired temperature.
Recirculation Control
Press the recirculation button to recirculate the
air inside the vehicle. This is located next to the
A/C button. An indicator light on the button
shows that air is being recirculated. Use the
214 UNDERSTANDING YOUR INSTRUMENT PANEL
Page 230 of 401

A/C Air Filter Ð If Equipped
The climate control system filters out dust, pollen and
some odors from the air. Strong odors can not be totally
filtered out. Refer to section 7 ªAir Conditioningº for
filter replacement instructions.
REAR WINDOW FEATURES
Intermittent Rear Wiper Operation Ð Manual
Temperature Control Only
The controls are located on the Manual Tempera-
ture Control head above the front blower control.
When the button is pressed and released and the
Ignition Switch in ON, the rear wiper will operate at a
fixed interval of about 8 seconds. As vehicle speed
increases, the time delay will shorten. The LED indicator
will light when the wiper is ON. Pressing and releasing
the button again with turn the wiper off.
Rear Washer Operation Ð Manual Temperature
Control Only
The controls are located on the Manual Tempera-
ture Control head above the front blower control.
Press and hold the button for as long as spray is
desired. If the button is depressed and held while the
Intermittent wiper is on, the wiper will operated for a few
seconds after the button is released, then resume inter-
mittent operation. If the button was pressed and held
when the intermittent wiper is off, the wiper will operate
for two cycles, then turn off. The LED will not illuminate
when Washer is selected and Intermittent is OFF.
NOTE:The washer will stop spraying if the switch is
pressed longer than 10 seconds.
Vehicles equipped with Automatic Temperature Control,
the controls for these features are located in the middle of
the instrument panel above the radio.
230 UNDERSTANDING YOUR INSTRUMENT PANEL
Page 305 of 401
MAINTAINING YOUR VEHICLE
CONTENTS
m3.3L/3.8L Engines......................308
mOnboard Diagnostic System Ð OBD II........309
mEmissions Inspection And Maintenance
Programs............................310
mReplacement Parts......................311
mDealer Service.........................311
mMaintenance Procedures..................312
NEngine Oil..........................313
NEngine Oil Filter......................316NDrive Belts Ð Check Condition And Tension . . 316
NSpark Plugs.........................317
NEngine Air Cleaner Filter................317
NEngine Fuel Filter.....................318
NCatalytic Converter....................318
NMaintenance-Free Battery................319
NAir Conditioner......................321
NPower Steering Ð Fluid Check............322
NFront Suspension Ball Joints..............323
7
Page 316 of 401

Synthetic Engine Oils
There are a number of engine oils being promoted as
either synthetic or semi-synthetic. If you chose to use
such a product, useonlythose oils that meet the Ameri-
can Petroleum Institute (API) and SAE viscosity stan-
dard. Follow the service schedule that describes your
driving type.
Materials Added to Engine Oil
The manufacture strongly recommends against the addi-
tion of any additives (other than leak detection dyes) to
the engine oil. Engine oil is an engineered product and
it's performance may be impaired by supplemental ad-
ditives.
Disposing of Used Engine Oil And Oil Filters
Care should be taken in disposing of used engine oil and
oil filters from your vehicle. Used oil and oil filters,
indiscriminately discarded, can present a problem to the
environment. Contact your dealer, service station, orgovernmental agency for advice on how and where used
oil and oil filters can be safely discarded in your area.
Engine Oil Filter
The engine oil filter should be replaced at every engine
oil change.
Engine Oil Filter Selection
The manufacturer's engines have a full-flow type oil
filter. Use a filter of this type for replacement. The quality
of replacement filters varies considerably. Only high
quality filters should be used to assure most efficient
service. Mopar Engine Oil Filters are a high quality oil
filter and are recommended.
Drive Belts Ð Check Condition and Tension
At the mileage indicated in the maintenance schedule, all
belts should be checked for condition and proper tension.
Improper belt tension can cause belt slippage and failure.
316 MAINTAINING YOUR VEHICLE
Page 317 of 401
Belts should be inspected for evidence of cuts, cracks, or
glazing, and replaced if there is indication of damage
which could result in belt failure. If adjustment is re-
quired, see your authorized dealer for service. Low
generator belt tension can cause battery failure. A special
tool is required to properly measure tension and to
restore belt tension to factory specifications.
Also check belt routing to make sure there is no interfer-
ence between the belts and other engine components.
Spark Plugs
Spark plugs must fire properly to assure engine perfor-
mance and emission control. New plugs should be in-
stalled at the specified mileage. The entire set should be
replaced if there is any malfunction due to a faulty spark
plug, malfunctioning spark plugs can damage the cata-
lytic converter. For proper type of replacement spark
plugs, refer to the ªVehicle Emission Control Informa-
tionº label in the engine compartment.
Engine Air Cleaner Filter
Under normal driving conditions, replace the air filter at
the intervals shown on Schedule ªAº. If, however, you
drive the vehicle frequently under dusty or severe con-
ditions, the filter element should be inspected periodi-
cally and replaced if necessary at the intervals shown on
Schedule ªBº.
WARNING!
The air cleaner can provide a measure of protection
in the case of engine backfire. Do not remove the air
cleaner unless such removal is necessary for repair or
maintenance. Make sure that no one is near the
engine compartment before starting the vehicle with
the air cleaner removed. Failure to do so can result in
serious personal injury.
MAINTAINING YOUR VEHICLE 317
7
Page 322 of 401
Refrigerant Recovery And Recycling
The air conditioning system of your vehicle contains
R-134a, a refrigerant that does not deplete the ozone layer
in the upper atmosphere. The manufacturer recommends
that air conditioning service be done by facilities using
refrigerant recycling and recovery equipment that meets
SAE standard J1991.
A/C Air Filter
The filter access door is located under the instrument
panel on the passenger side. To replace the filter slide the
lock toward the rear of the vehicle (unlock position).
Remove the access door and pull the filter downward.
When installing a new filter, ensure its proper orienta-
tion. Align the black arrow on the bottom of the filter
frame with the direction of airflow (away from the
blower motor and towards the center of the car).
Recommended Filter Replacement Interval ± 12,000
Miles (19 000 km)
Power Steering Ð Fluid Check
Checking the power steering fluid level at a defined
service interval is not required. The fluid should only be
checked if a leak is suspected, abnormal noises are
apparent, and/or the system is not functioning as antici-
pated. Coordinate inspection efforts through a certified
DaimlerChrysler Dealership.9
WARNING!
Fluid level should be checked on a level surface and
with the engine off to prevent injury from moving
parts and to insure accurate fluid level reading. Do
not overfill. Use only manufacturers recommended
power steering fluid.
322 MAINTAINING YOUR VEHICLE
Page 337 of 401
CAUTION!
Do not overfill. Dirt and water in the transmission
can cause serious damage. To prevent dirt and water
from entering the transmission after checking or
replenishing fluid, make certain that the dipstick cap
is reseated properly.
Fluid and Filter Changes
Automatic transmission fluid should be changed on all
transmissions as follows:
Normal Usage Ð No change necessary
Severe Usage (fluid and filter) Ð 60,000 miles (96 000 km)
Severe Usage is defined as:
²Police, taxi, limousine, commercial type operation, or
trailer towing where the vehicle is driven regularly for
more than 45 minutes of continuous operation.NOTE:Refer to Section 8 of this manual for Mainte-
nance Schedules.
If the transmission is disassembled for any reason, the
fluid and filter should be changed.
Special Additives
Do not add any fluid additives to the transmission. The
only exception to this policy is the use of special dyes to
aid in detecting fluid leaks. The use of transmission
sealers should be avoided as they may adversely affect
seals.
All Wheel Drive (AWD)
Under normal operating conditions, periodic fluid level
checks and lubricant changes for the Power Transfer
Unit, Overrunning Clutch and Rear Carrier, are not
required. However when the vehicle is serviced for other
reasons, the exterior surface of these components should
be inspected for evidence of fluid leaks. Confirmed leaks
should be repaired as soon as possible.
MAINTAINING YOUR VEHICLE 337
7
Page 360 of 401
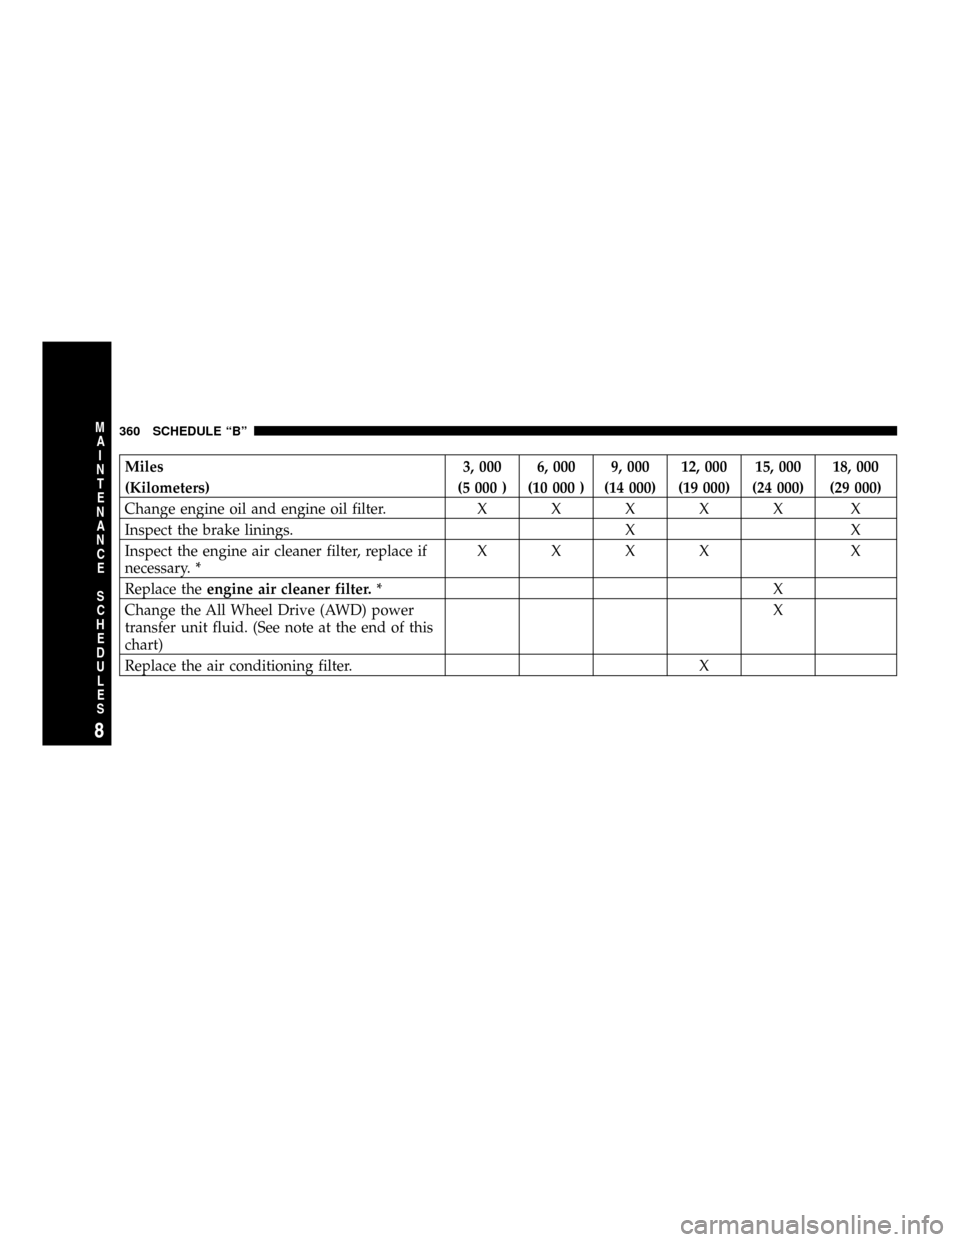
Miles 3, 000 6, 000 9, 000 12, 000 15, 000 18, 000
(Kilometers) (5 000 ) (10 000 ) (14 000) (19 000) (24 000) (29 000)
Change engine oil and engine oil filter.XXXXX X
Inspect the brake linings. X X
Inspect the engine air cleaner filter, replace if
necessary. *XXXX X
Replace theengine air cleaner filter.*X
Change the All Wheel Drive (AWD) power
transfer unit fluid. (See note at the end of this
chart)X
Replace the air conditioning filter. X
360 SCHEDULE ªBº
8
M
A
I
N
T
E
N
A
N
C
E
S
C
H
E
D
U
L
E
S