Page 263 of 382

Jack
To remove
Turn the shaft end so that the jack contracts and detach it
from the storage bracket.
To store
Turn the shaft end by hand to expand the jack until it is
secured firmly in position.
COMPACT SPARE TIRE
The compact spare tire is designed to save space in the
trunk and its lighter weight makes it easier to use if a flat
tire occurs.
CAUTION!
²The tire pressure should be periodically checked
and maintained at the specified pressure while
the tire is stowed.
²Driving with an insufficient tire pressure can lead
to an accident. If you have no choice but to drive
with an insufficient tire pressure, keep your speed
down and adjust to the specified pressure [60 psi
(420 kPa)] as soon as possible.
²The compact spare should only be used temporarily
and should be returned to the trunk and the
original
tire repaired or replaced as soon as possible. If your
vehicle is equipped with aluminum type wheels, the
wheel nuts for aluminum type wheels can be used
temporarily on the compact spare tire wheel.
²Do not exceed 50 mph (80 km/h) while the com-
pact spare tire is installed on the vehicle.
N21C0010To removeTo storeStorage
bracket
EMERGENCIES 263
8
Page 265 of 382
NOTE: The wheel cover is made of plastic; use caution
when prying it off.
NOTE: Some styles of wheels will have bolt-on type
wheel covers. To remove this style, remove the bolts that
hold the cover to the wheel.
CAUTION!
Trying to simply remove the wheel cover with your
bare hands may severely injure your fingers.
To install
Align the air valve with the valve opening provided on
the wheel cover.
Then pound around the outer edge of the wheel cover
with your hand to secure it in place.
NOTE: The full wheel cover has its reverse side pro-
vided with a symbol mark to show the air valve location.
N23B0910
EMERGENCIES 265
8
Page 281 of 382

CAUTION!
²Towing should only be done by a professional
tow service particularly if it will involve towing
on winding roads, hills or heavy traffic. If you
have any doubts, use a professional tow service.
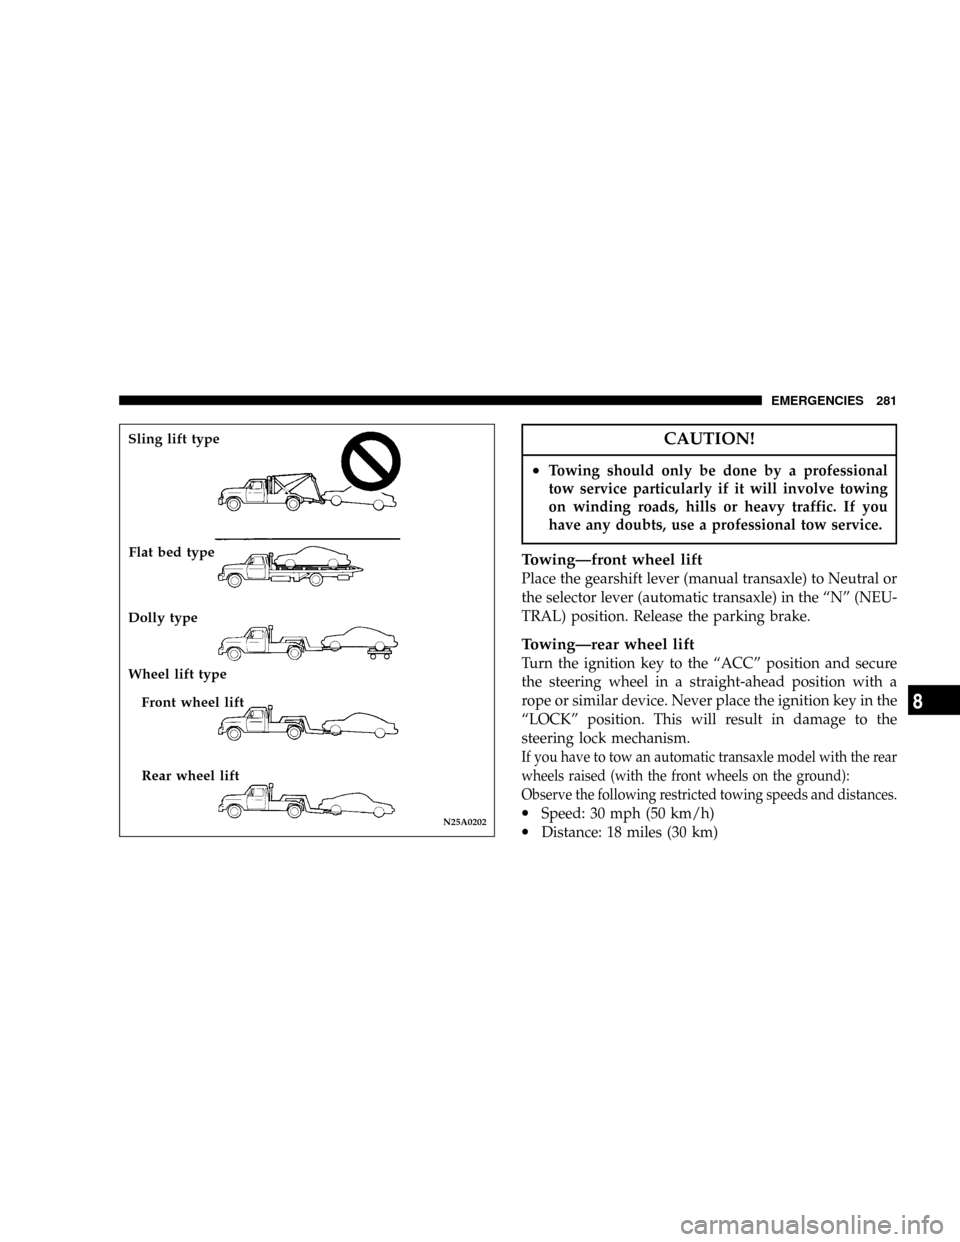
TowingÐfront wheel lift
Place the gearshift lever (manual transaxle) to Neutral or
the selector lever (automatic transaxle) in the ªNº (NEU-
TRAL) position. Release the parking brake.
TowingÐrear wheel lift
Turn the ignition key to the ªACCº position and secure
the steering wheel in a straight-ahead position with a
rope or similar device. Never place the ignition key in the
ªLOCKº position. This will result in damage to the
steering lock mechanism.
If you have to tow an automatic transaxle model with the rear
wheels raised (with the front wheels on the ground):
Observe the following restricted towing speeds and distances.
·Speed: 30 mph (50 km/h)
·Distance: 18 miles (30 km)N25A0202
Sling lift type
Flat bed type
Dolly type
Wheel lift type
Front wheel lift
Rear wheel lift
EMERGENCIES 281
8
Page 288 of 382
5. Insert a new fuse of the same capacity securely into the
fuse block location.
CAUTION!
²Never use a fuse with a capacity larger than that
specified or any substitute, such as wire, foil, etc.
Doing so will cause the circuit wiring to heat up
and could cause a fire.
²If the newly inserted fuse blows again after a
short time, have the electrical system checked by
an authorized dealer to find and correct the cause.
REPLACEMENT OF LIGHT BULBS
Before replacing a bulb, be sure the light is off. Do not
touch the glass part of the new bulb with your bare
fingers; the skin oil left on the glass will evaporate when
the bulb gets hot and the vapor will condense on the
reflector and dim the surface.
Bulb capacity
A bulb should only be replaced with a new bulb of the
same rating and type. The designation can be found on
the base of the bulb.
N29C0010
288 EMERGENCIES
Page 309 of 382

If the light is flashing, severe catalytic converter damage
and power loss will soon occur. Immediate service is
required.
If the gas cap is not tightened properly, the light may
come on. Be sure the gas cap is tightened every time you
add fuel. Tighten the cap until you hear it ªclick.º
REPLACEMENT PARTS
Use of genuine Mopar parts for normal/scheduled main-
tenance and repairs is highly recommended to insure the
designed performance. Damage or failures caused by the
use of non-Mopar parts for maintenance and repairs will
not be covered by the DaimlerChrysler Motors Corpora-
tion warranty.
Fuel system (tank, filler tube, connections, and
fuel tank filler cap)
Check periodically for damage or leakage in the fuel lines
and connections, and check for damage and looseness of
the fuel tank filler tube cap. Particular attention should be
paid to examining those fuel lines nearest to high heat
sources such as the exhaust manifold.
WARNING!
If you see a fuel leak or if you smell fuel, do not
operate the vehicle. Any spark (including from the
ignition ), flame or smoking material could cause an
explosion or fire. Call an authorized dealer for
assistance.
Fuel hoses
Inspect the surfaces of hoses for evidence of heat and
mechanical damage, hard and brittle rubber, cracking,
tears, cuts and abrasions. Particular attention should be
paid to examining those hose surfaces nearest to high
heat sources such as the exhaust manifold. Inspect all
hose connections, such as clamps and couplings, to make
sure they are secure and that no leaks exist. If there is any
evidence of deterioration or damage, hoses should be
replaced immediately.
MAINTENANCE 309
9
Page 321 of 382
NOTE
1. Check each battery terminal for corrosion. If necessary,
neutralize corrosion by washing with a solution of bak-
ing soda and water. Apply grease to posts and clamps
after cleaning or tightening.
2. Before cleaning the battery, tighten all filler port caps
to prevent foreign matter from entering the battery.
3. Check to see if the battery is securely installed and
cannot be moved. Also check each terminal for tightness.
4. When the vehicle is to be left unused for a long period
of time, remove the battery and store it in a place where
the battery fluid will not freeze. The battery should be
stored only in a fully charged condition.
AUTOMATIC TRANSAXLE
The automatic transaxle should be maintained and ser-
viced by an authorized dealer to obtain the best perfor-
mance and maximize life. It is important that the trans-
axle fluid be maintained at the level prescribed.
M05A0530
Good
MAINTENANCE 321
9
Page 381 of 382

Seatback.............................. 58
Seats
Front seats........................... 55
Rear seats............................ 64
SECURITY indicator................48,105,110
Service Assistance...................... 366
Service Manuals........................ 371
Setting the clock........................ 214
Severe maintenance schedule.............. 343
Snow tires............................ 333
Spare tire.......................262,263,361
Spark plugs........................ 311,363
Speedometer.......................104,106
Starting
At extremely cold ambient temperature..... 151
Flooded engine....................... 151
Normal conditions.................... 150
Steering system
Steering lock......................... 149
Tilt lock lever........................ 173
Sun visors............................ 207
Sunroof............................... 45Supplemental Restraint System - Airbag
Maintenance......................... 323
Warning light.....................105,114
Supplemental Restraint System (SRS) - Air bag . . 87
Supplemental Restraint System warning light . . 114
Tachometer........................104,106
Tape Player........................... 217
Temperature Gage, Engine Coolant.......... 275
Theft protection........................ 149
Theft-alarm
SECURITY indicator..............48,105,110
System.............................. 48
Timing belt........................... 328
Tips for driving in various conditions........ 199
Tire chains............................ 333
Ti re s
Compact spare tire.................... 263
Inflation pressure...............328,360,361
Maintenance......................328,331
Quality Grading...................... 373
Rotation............................ 332
Size (tire and wheels).................. 361
INDEX 381