Page 225 of 277

•It is important that the drain holes in the lower edges
of the doors, rocker panels and rear deck lid be kept
clear and open.
•If you detect any stone chips or scratches in the paint,
touch them up immediately. The cost of such repairs is
considered the responsibility of the owner.
•Use Mopar touch up paint on scratches or chips as
soon as possible. Your dealer has touch up paint to
match the color of your vehicle.
•If your vehicle is damaged due to an accident or
similar cause which destroys the paint and protective
coating have your vehicle repaired as soon as possible.
The cost of such repairs is considered the responsibil-
ity of the owner.
•Aluminum and chrome wheels should be cleaned
regularly with mild soap and water to prevent corro-
sion. To remove heavy soil, select a non abrasive,
non-acidic cleaner. Do not use scouring pads or metal
polishes. Avoid automatic car washes that use acidic
solutions or harsh brushes that may damage the
wheels’ protective finish.
•If you carry special cargo such as chemicals, fertilizers,
deicer salt, etc., be sure that such materials are well
packaged and sealed.
•If a lot of driving is done on gravel roads, consider
mud or stone shields behind each wheel.
Interior Care
Use Mopar Fabric Cleaner to clean fabric upholstery and
carpeting.
Use a mild soap and warm water solution to clean vinyl
or leather upholstery. For stubborn stains, use Mopar
Vinyl Cleaner.
Mopar Vinyl Cleaner is specifically recommended for
vinyl trim.
WARNING!
Do not use volatile solvents for cleaning purposes.
Many are potentially flammable, and if used in
closed areas they may cause respiratory harm.
MAINTAINING YOUR VEHICLE 225
7
Page 226 of 277

CAUTION!
The use of vinyl, leather or plastic protectants may
cause excessive gloss and/or discoloration of interior
trim parts.
Leather Seat Care and Cleaning
Leather is best preserved by regular cleaning with a
damp soft cloth. Small particles of dirt can act as an
abrasive and damage the leather surface and should be
removed immediately with a damp cloth. Stubborn soils
can be removed easily with a soft cloth and Mopar Total
Clean. Care should be taken to avoid soaking the leather
with any liquid. Please do not use polishes, oils, cleaning
fluids, solvents, detergents, or ammonia based cleaners
to clean the leather. Application of a leather conditioner is
not required to maintain the original condition.
Wooden Steering Wheel Care — If Equipped
If your vehicle is equipped with a wood steering wheel,
it is finished with a clear topcoat. Please take care to
avoid scratching the surface with sharp or abrasive
materials.
Cleaning Headlights
Your vehicle has plastic headlights that are lighter and
less susceptible to stone breakage than glass headlights.
Plastic is not as scratch resistant as glass and therefore
different lens cleaning procedures must be followed.
To minimize the possibility of scratching the lenses and
reducing light output, avoid wiping with a dry cloth. To
remove road dirt, wash with a mild soap solution fol-
lowed by rinsing.
Do not use abrasive cleaning components, solvents, steel
wool or other aggressive material to clean the lenses.
Glass Surfaces
All glass surfaces should be cleaned on a regular basis
with any commercial household-type glass cleaner.
Never use an abrasive type cleaner. Use caution when
cleaning inside rear windows equipped with electric
defrosters. Do not use scrapers or other sharp instru-
ments which may scratch the elements.
Instrument Panel Cover
The instrument panel cover has a low glare surface which
minimizes reflections in the windshield. Do not use
226 MAINTAINING YOUR VEHICLE
Page 233 of 277

6. Lift and prop the crossmember above the headlamp on
the side being serviced, and remove the electrical con-
nectors from the headlamp.
7. Pull headlamp up and under crossmember to remove
it from the vehicle.
8. Remove the bulb retaining ring by turning it counter-
clockwise. Pull the bulb and socket assembly from the
housing and pull the bulb from the socket.
9. Install a new headlight bulb in the socket, reinstall the
bulb and socket assembly and tighten the retaining ring.
CAUTION!
Do not touch the new bulb with your fingers. Oil
contamination will severely shorten bulb life.
If the bulb comes into contact with any oily surface,
clean the bulbs with rubbing alcohol.
10. Reinstall the headlight assembly, replace the electri-
cal connectors from the headlamp and lower the cross-
member back on the headlamp.11. Reinstall the upper crossmember attachments, head-
lamp jackscrews, windshield filler neck screw and speed
control servo screw.
Front Park, Turn Signal and Front Sidemarker
Light
1. Reach up under the front fascia and turn the bulb and
socket assembly counterclockwise to remove it from the
light housing.
2. Pull the bulb from the socket, install the new bulb, and
reinstall the bulb and socket assembly.
Fog Light
1.Remove the screw securing the fog light to the fascia
and pull the light away from the vehicle to expose the bulb.
2. Remove the bulb by turning counter-clockwise. Pull
the bulb out of the light housing.
3. Remove the wiring connector from the bulb.
4. Insert the new bulb and turn clockwise.
5. Connect the wiring connector to the new bulb and
reinstall the assembly.
MAINTAINING YOUR VEHICLE 233
7
Page 235 of 277
License Plate Light
1. Remove the screws securing the light to the rear fascia.
2. Remove the bulb and socket assembly and pull the
bulb from the socket.3. Replace the bulb and reinstall the bulb and socket
assembly.
4. Reattach the light to the rear fascia.
SPECIFICATIONS
ENGINE 3.5L
Oil Filter Mopar 5281090 or equivalent
Thermostat 180°F (82°C)
Spark Plug See Underhood Label
Spark Plug Gap See Underhood Label
Firing Order 1-2-3-4-5-6
MAINTAINING YOUR VEHICLE 235
7
Page 236 of 277
FLUID CAPACITIES
U.S. Metric
Fuel (Approximate)17 Gallons 64 Liters
Engine Oil with Filter
3.5 Liter Engine 5 Qts 4.7 Liters
Cooling System *
3.5 Liter Engine 11 Qts 10.5 Liters
* Includes heater and coolant recovery bottle filled to MAX level.
236 MAINTAINING YOUR VEHICLE
Page 237 of 277
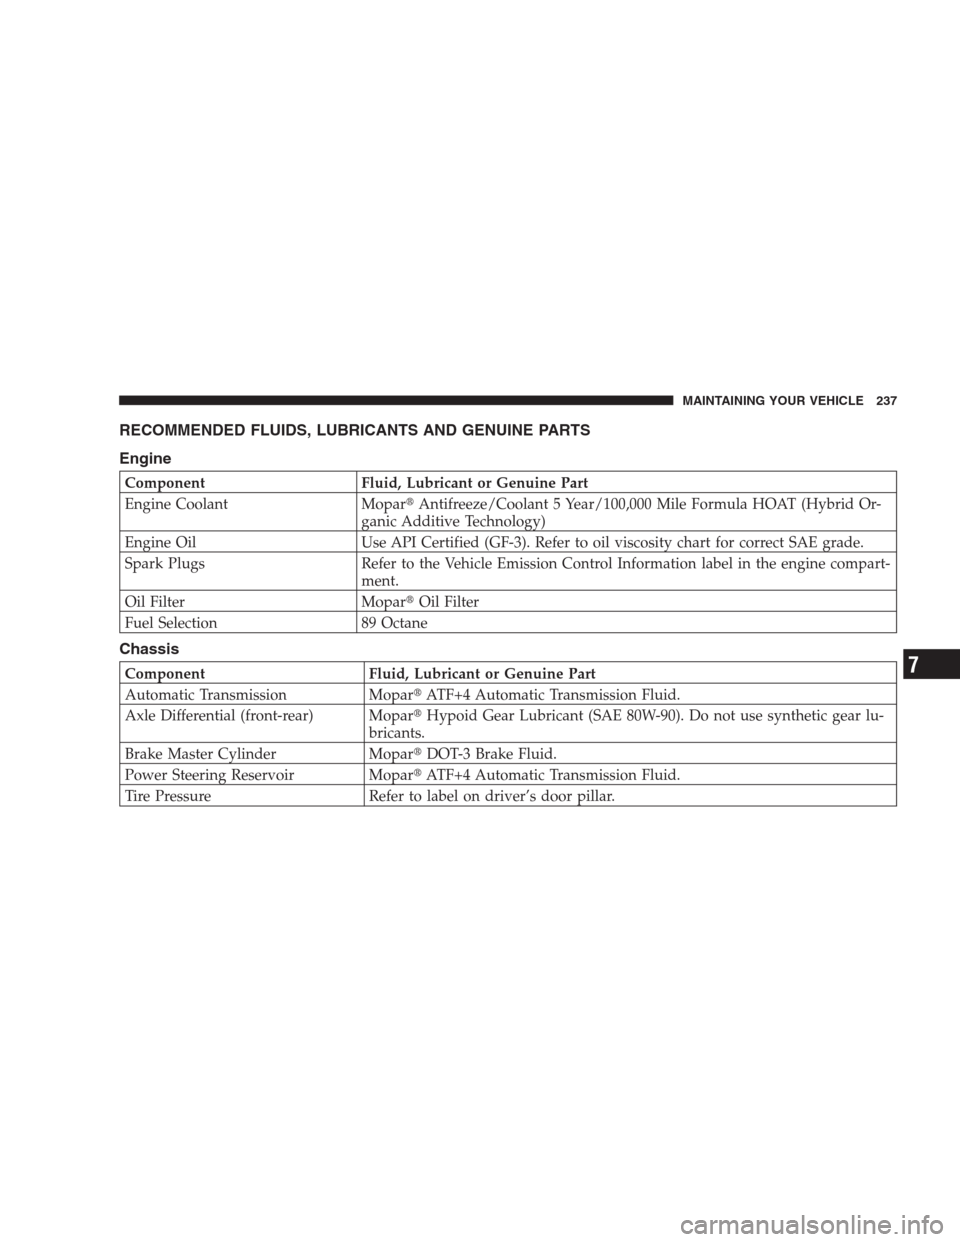
RECOMMENDED FLUIDS, LUBRICANTS AND GENUINE PARTS
Engine
Component Fluid, Lubricant or Genuine Part
Engine Coolant Mopar�Antifreeze/Coolant 5 Year/100,000 Mile Formula HOAT (Hybrid Or-
ganic Additive Technology)
Engine Oil Use API Certified (GF-3). Refer to oil viscosity chart for correct SAE grade.
Spark Plugs Refer to the Vehicle Emission Control Information label in the engine compart-
ment.
Oil Filter Mopar�Oil Filter
Fuel Selection 89 Octane
Chassis
Component Fluid, Lubricant or Genuine Part
Automatic Transmission Mopar�ATF+4 Automatic Transmission Fluid.
Axle Differential (front-rear) Mopar�Hypoid Gear Lubricant (SAE 80W-90). Do not use synthetic gear lu-
bricants.
Brake Master Cylinder Mopar�DOT-3 Brake Fluid.
Power Steering Reservoir Mopar�ATF+4 Automatic Transmission Fluid.
Tire Pressure Refer to label on driver’s door pillar.
MAINTAINING YOUR VEHICLE 237
7
Page 238 of 277
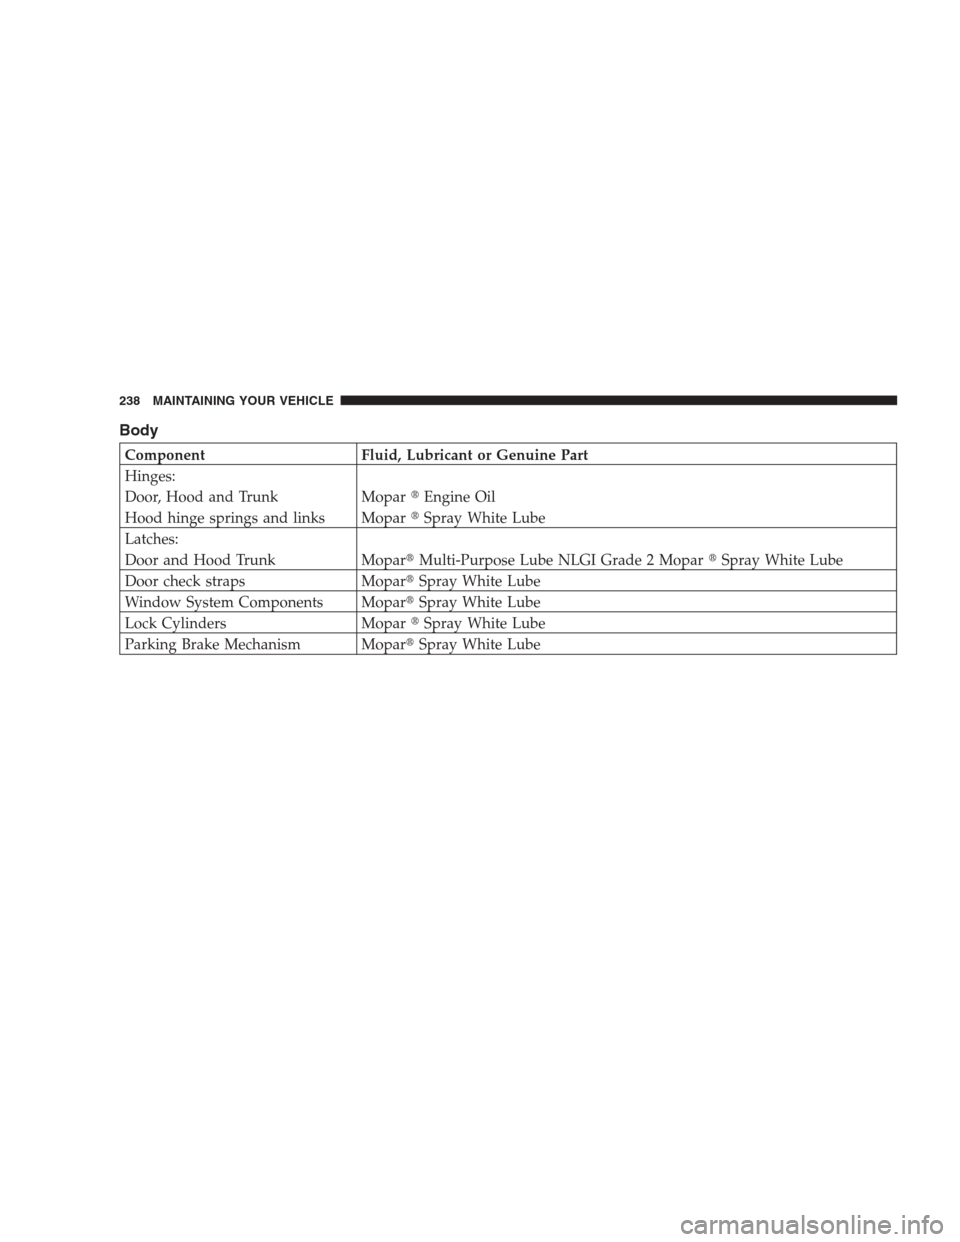
Body
Component Fluid, Lubricant or Genuine Part
Hinges:
Door, Hood and Trunk Mopar�Engine Oil
Hood hinge springs and links Mopar�Spray White Lube
Latches:
Door and Hood Trunk Mopar�Multi-Purpose Lube NLGI Grade 2 Mopar�Spray White Lube
Door check straps Mopar�Spray White Lube
Window System Components Mopar�Spray White Lube
Lock Cylinders Mopar�Spray White Lube
Parking Brake Mechanism Mopar�Spray White Lube
238 MAINTAINING YOUR VEHICLE
Page 241 of 277
 or 3 months,
whichever comes first and follow schedule “B” of the
�Maintenance Schedules�section of this ma")
NOTE:IfANYof these apply to you then change your
engine oil every 3,000 miles (5 000 km) or 3 months,
whichever comes first and follow schedule “B” of the
�Maintenance Schedules�section of this manual.
NOTE:Most vehicles are operated under the conditions
listed for Schedule�B�.
Second is Schedule“A”. It is for vehicles that are not
operated under any of the conditions listed under Sched-
ule�B�.
Use the schedule that best describes your driving condi-
tions. Where time and mileage are listed, follow the
interval that occurs first.
NOTE:Under no circumstances should oil change
intervals exceed 6000 miles (10 000 km) or 6 months
whichever comes first.
CAUTION!
Failure to perform the required maintenance items
may result in damage to the vehicle.
At Each Stop for Fuel
•
Check the engine oil level about 5 minutes after a fully
warmed engine is shut off. Checking the oil level while
the vehicle is on level ground will improve the accu-
racy of the oil level reading. Add oil only when the
level is at or below the ADD or MIN mark.
•Check the windshield washer solvent and add if
required.
MAINTENANCE SCHEDULES 241
8
M
A
I
N
T
E
N
A
N
C
E
S
C
H
E
D
U
L
E
S

17 Gallons 64 Liters
Engine Oil with Filter
3.5 Liter Engine 5 Qts 4.7 Liters
Cooling System *
3.5 Liter Engine 11 Qts 10.5 Liters
* Includes heater and")