2004 CHEVROLET TAHOE load capacity
[x] Cancel search: load capacityPage 160 of 556
Don’t exceed the maximum vehicle capacity when
loading your vehicle. For more information on vehicle
capacity and loading, see″Loading Your Vehicle″.
To prevent damage or loss of cargo as you’re leaving,
check now and then to make sure the luggage and
cargo are still securely fastened.
Be sure the cargo is properly loaded.
If small heavy objects are placed on the roof, place
the load in the area over the rear wheels (behind
the rear side door on extended models). If you need
to, cut a piece of 3/8 inch plywood to �t inside the
crossrails and siderails to spread the load. If
plywood is used, tie it to the siderail supports.
Tie the load to the crossrails or the siderail supports.
Use the crossrails only to keep the load from sliding.
To move the crossrails, pull out on the latch release
handle at each end. Slide the crossrail to the desired
position balancing the force side to side. Push the
release handle back into the latched position and
slide the crossrail back and forth slightly to be sure
the latch snaps securely into place.
If you need to carry long items, move the crossrails
as far apart as they will go. Tie the load to the
crossrails and the siderails or siderail supports. Also
tie the load to the bumpers. Do not tie the load so
tightly that the crossrails or siderails are damaged.
After moving a crossrail, be sure it is securely locked
into the siderail.
Your vehicle has a Center High-Mounted Stoplamp
(CHMSL) located above the glass or above the rear
load doors.
If items are loaded on the roof of the vehicle, care
should be taken not to block or damage the CHMSL unit.
If your vehicle has the Z71 option your vehicle’s
luggage carrier has a roller crossrail at the rear of the
vehicle.
To load cargo, place cargo on the roller and roll the
cargo forward onto the two front crossrails.
To move the crossrails do the following:
1. Loosen the thumbscrew at each end.
2. Move crossrail to desired position.
3. Tighten the thumbscrews.
Make sure the crossrail is secured.
2-64
Page 211 of 556

If you move the shift lever to FIRST (1), the light
will come on and stay on to indicate that the
traction system is off. This is normal operation. To
turn the system back on, move the shift lever
back to a position other than FIRST (1); the light
should go off. SeeTraction Assist System (TAS) on
page 4-9.
The light will come on and stay on if the TAS
automatic engagement feature has been turned off.
To turn the system on, press the TAS off/on
button; the light should go off. To turn the automatic
engagement feature back on, seeTraction Assist
System (TAS) on page 4-9.
If the Traction Assist System is affected by an
anti-lock brake system, TAS or engine-related
problem, the system will turn off and the light will
come on. Have your vehicle serviced.
If the vehicle is driven over an extremely rough
road, the system will turn off and the light will come
on. The light will go off a few seconds after the
rough road conditions go away or when the vehicle
comes to a complete stop. This is normal
operation.
Engine Coolant Temperature Gage
This gage shows the engine coolant temperature.
It also provides an indicator of how hard your vehicle is
working. During a majority of the operation, the gage
will read 210°F (100°C) or less. If you are pulling a load
or going up hills, it is normal for the temperature to
�uctuate and approach the 250°F (122°C) mark. If the
gage reaches the 260°F (125°C) mark, it indicates
that the cooling system is working beyond its capacity.
SeeEngine Overheating on page 5-29. United States
Canada
3-47
Page 362 of 556
{CAUTION:
Shifting a four-wheel-drive vehicle’s transfer
case into NEUTRAL can cause your vehicle to
roll even if the transmission is in Park (P). You
or others could be injured. Make sure the
parking brake is �rmly set before you shift the
transfer case to NEUTRAL.
6. Shift the transfer case to NEUTRAL. See
Four-Wheel Drive on page 2-30for the proper
procedure to select the NEUTRAL position for your
vehicle.
7. Release the parking brake only after the vehicle
being towed is �rmly attached to the towing
vehicle.
8. Turn the ignition off and lock the steering column.
Loading Your Vehicle
It is very important to know how much weight your
vehicle can carry. This weight is called the vehicle
capacity weight and includes the weight of all occupants,
cargo and all nonfactory-installed options. Two labels
on your vehicle show how much weight it may properly
carry, the Tire and Loading Information label and the
Certi�cation/Tire label.
{CAUTION:
Do not load your vehicle any heavier than the
GVWR, or either the maximum front or rear
GAWR. If you do, parts on your vehicle can
break, and it can change the way your vehicle
handles. These could cause you to lose
control and crash. Also, overloading can
shorten the life of your vehicle.
4-58
Page 363 of 556
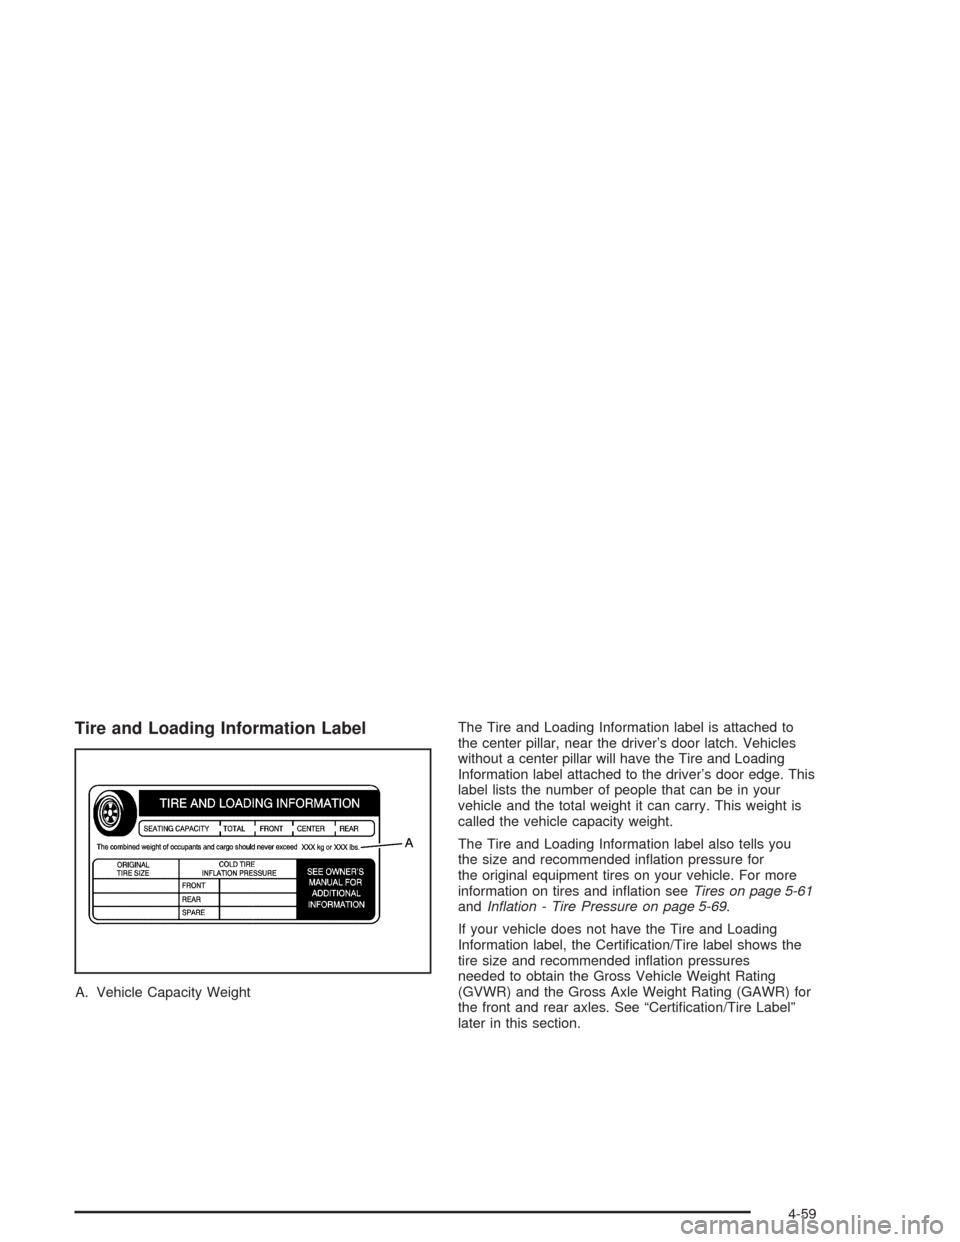
Tire and Loading Information Label
A. Vehicle Capacity WeightThe Tire and Loading Information label is attached to
the center pillar, near the driver’s door latch. Vehicles
without a center pillar will have the Tire and Loading
Information label attached to the driver’s door edge. This
label lists the number of people that can be in your
vehicle and the total weight it can carry. This weight is
called the vehicle capacity weight.
The Tire and Loading Information label also tells you
the size and recommended in�ation pressure for
the original equipment tires on your vehicle. For more
information on tires and in�ation seeTires on page 5-61
andIn�ation - Tire Pressure on page 5-69.
If your vehicle does not have the Tire and Loading
Information label, the Certi�cation/Tire label shows the
tire size and recommended in�ation pressures
needed to obtain the Gross Vehicle Weight Rating
(GVWR) and the Gross Axle Weight Rating (GAWR) for
the front and rear axles. See “Certi�cation/Tire Label”
later in this section.
4-59
Page 364 of 556
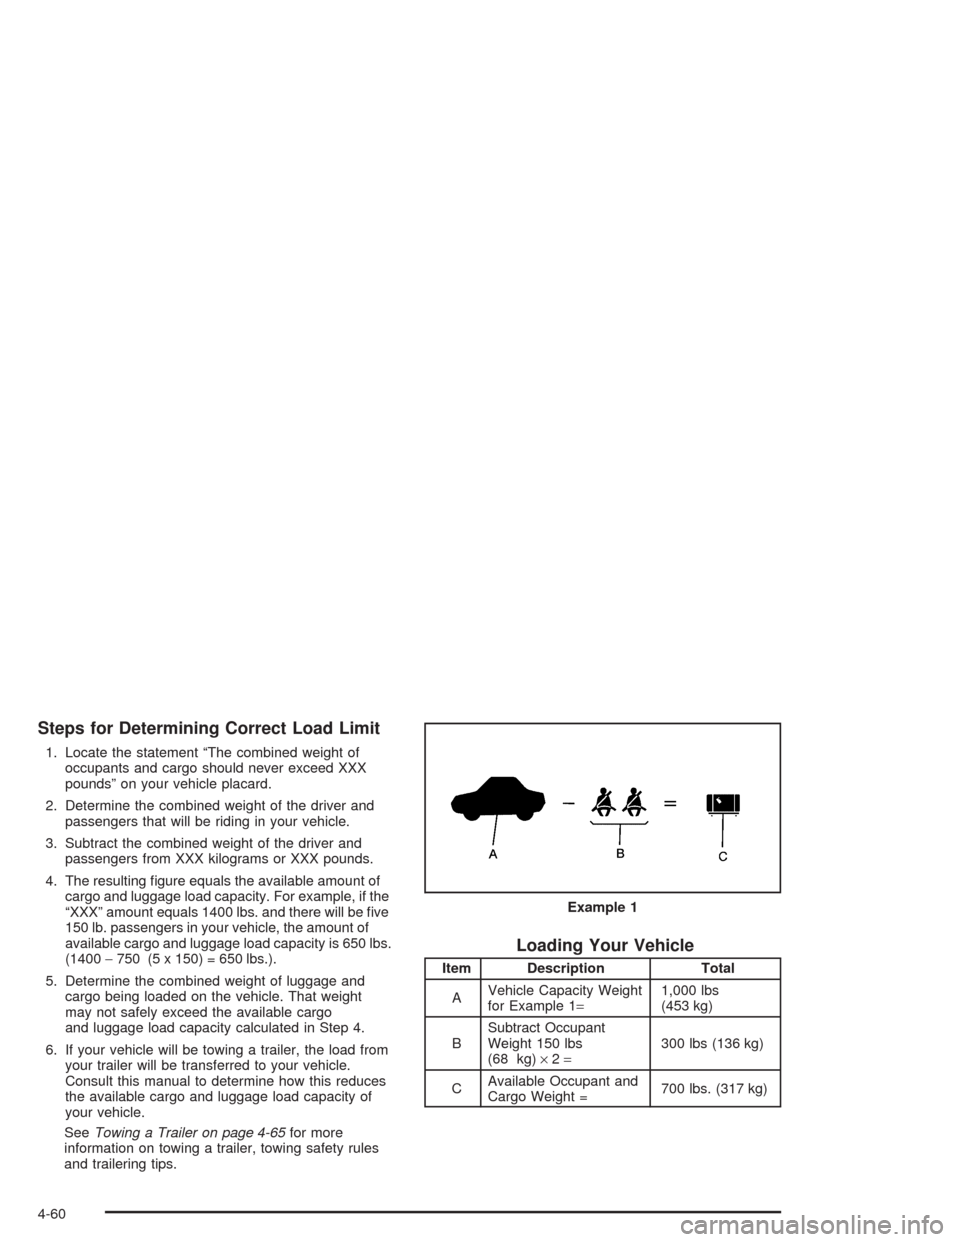
Steps for Determining Correct Load Limit
1. Locate the statement “The combined weight of
occupants and cargo should never exceed XXX
pounds” on your vehicle placard.
2. Determine the combined weight of the driver and
passengers that will be riding in your vehicle.
3. Subtract the combined weight of the driver and
passengers from XXX kilograms or XXX pounds.
4. The resulting �gure equals the available amount of
cargo and luggage load capacity. For example, if the
“XXX” amount equals 1400 lbs. and there will be �ve
150 lb. passengers in your vehicle, the amount of
available cargo and luggage load capacity is 650 lbs.
(1400−750 (5 x 150) = 650 lbs.).
5. Determine the combined weight of luggage and
cargo being loaded on the vehicle. That weight
may not safely exceed the available cargo
and luggage load capacity calculated in Step 4.
6. If your vehicle will be towing a trailer, the load from
your trailer will be transferred to your vehicle.
Consult this manual to determine how this reduces
the available cargo and luggage load capacity of
your vehicle.
SeeTowing a Trailer on page 4-65for more
information on towing a trailer, towing safety rules
and trailering tips.
Loading Your Vehicle
Item Description Total
AVehicle Capacity Weight
for Example 1=1,000 lbs
(453 kg)
BSubtract Occupant
Weight 150 lbs
(68 kg)×2=300 lbs (136 kg)
CAvailable Occupant and
Cargo Weight =700 lbs. (317 kg) Example 1
4-60
Page 365 of 556
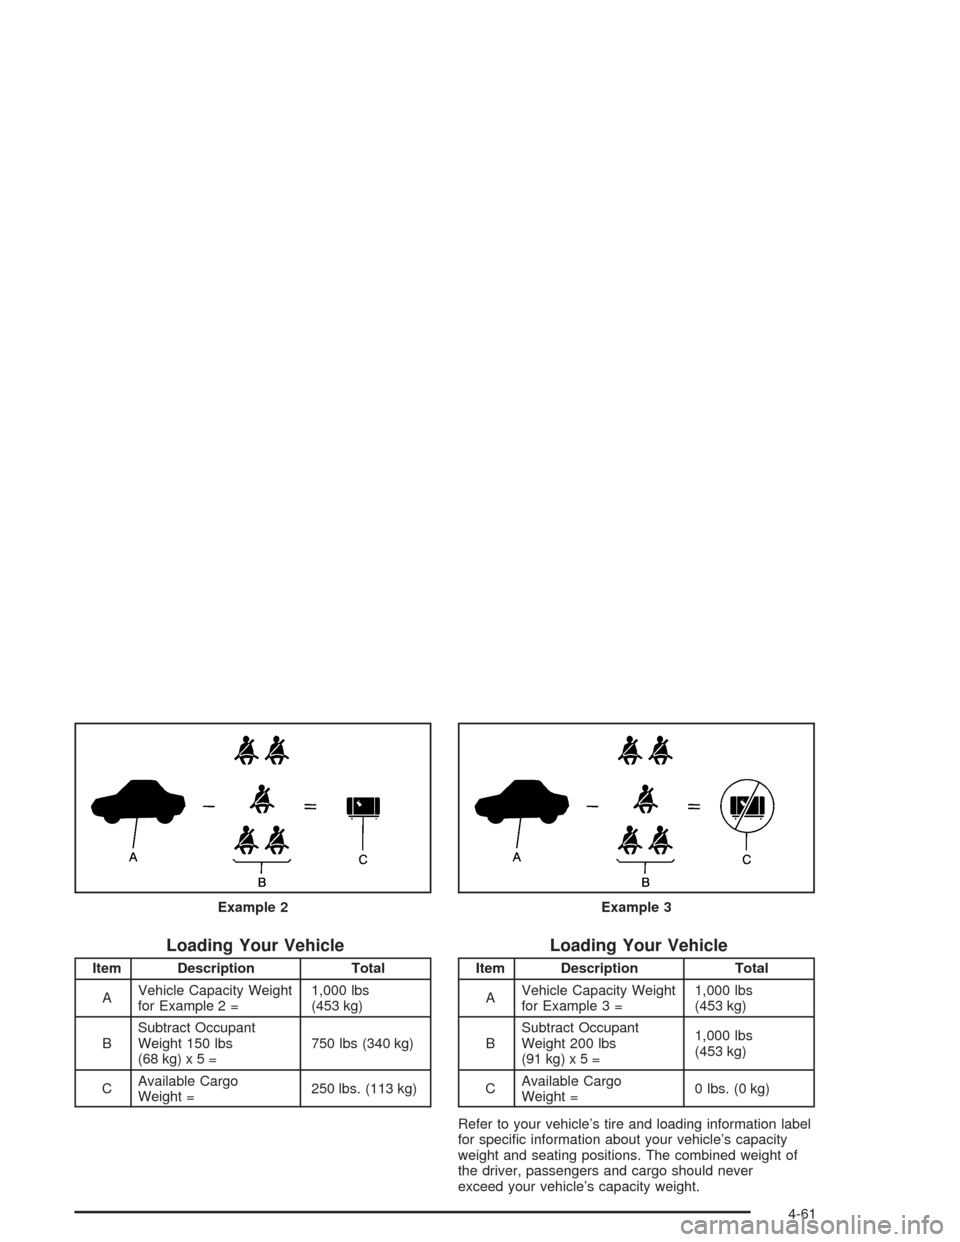
Loading Your Vehicle
Item Description Total
AVehicle Capacity Weight
for Example 2 =1,000 lbs
(453 kg)
BSubtract Occupant
Weight 150 lbs
(68kg)x5=750 lbs (340 kg)
CAvailable Cargo
Weight =250 lbs. (113 kg)
Loading Your Vehicle
Item Description Total
AVehicle Capacity Weight
for Example 3 =1,000 lbs
(453 kg)
BSubtract Occupant
Weight 200 lbs
(91kg)x5=1,000 lbs
(453 kg)
CAvailable Cargo
Weight =0 lbs. (0 kg)
Refer to your vehicle’s tire and loading information label
for speci�c information about your vehicle’s capacity
weight and seating positions. The combined weight of
the driver, passengers and cargo should never
exceed your vehicle’s capacity weight. Example 2
Example 3
4-61
Page 366 of 556

Certi�cation/Tire Label
The Certi�cation/Tire label is found on the rear edge of
the driver’s door or in the Incomplete Vehicle
Document in the cab.The label shows the size of your original tires and the
in�ation pressures needed to obtain the gross weight
capacity of your vehicle. This is called the GVWR (Gross
Vehicle Weight Rating). The GVWR includes the
weight of the vehicle, all occupants, fuel and cargo.
The Certi�cation/Tire label also tells you the maximum
weights for the front and rear axles, called Gross
Axle Weight Rating (GAWR). To �nd out the actual loads
on your front and rear axles, you need to go to a
weigh station and weigh your vehicle. Your dealer can
help you with this. Be sure to spread out your load
equally on both sides of the centerline.
Never exceed the GVWR for your vehicle, or the GAWR
for either the front or rear axle.
The Certi�cation/Tire label also contains information
about your Front Axle Reserve Capacity. See “Front
Axle Reserve Capacity” later in this section.
And, if you do have a heavy load, you should spread
it out.
4-62
Page 369 of 556
Trailer Recommendations
You must subtract your hitch loads from the Cargo
Weight Rating (CWR) for your vehicle. CWR is
the maximum weight of the load your vehicle can carry.
It doesn’t include the weight of the people inside. But
you can �gure about 150 lbs. (68 kg) for each seat.
The total cargo load must not be more than your
vehicle’s CWR.
Weigh your vehicle with the trailer attached, so that you
won’t go over the GVWR or GAWR. If you are using
a weight-distributing hitch, weigh the vehicle without the
spring bars in place.
You’ll get the best performance if you spread out the
weight of your load the right way, and if you choose the
correct hitch and trailer brakes.
For more information, seeTowing a Trailer on page 4-65
Towing a Trailer.
Towing a Trailer
{CAUTION:
If you do not use the correct equipment and
drive properly, you can lose control when you
pull a trailer. For example, if the trailer is too
heavy, the brakes may not work well — or even
at all. You and your passengers could be
seriously injured. Pull a trailer only if you have
followed all the steps in this section. Ask your
dealer for advice and information about towing
a trailer with your vehicle.
Notice:Pulling a trailer improperly can damage
your vehicle and result in costly repairs not covered
by your warranty. To pull a trailer correctly, follow
the advice in this part, and see your dealer for
important information about towing a trailer with
your vehicle.
To identify the vehicle trailering capacity of your vehicle,
you should read the information in “Weight of the
Trailer” that appears later in this section.
4-65