2004 CHEVROLET SILVERADO buttons
[x] Cancel search: buttonsPage 11 of 584
Power Lumbar
Your vehicle’s seats may be equipped with
power lumbar.
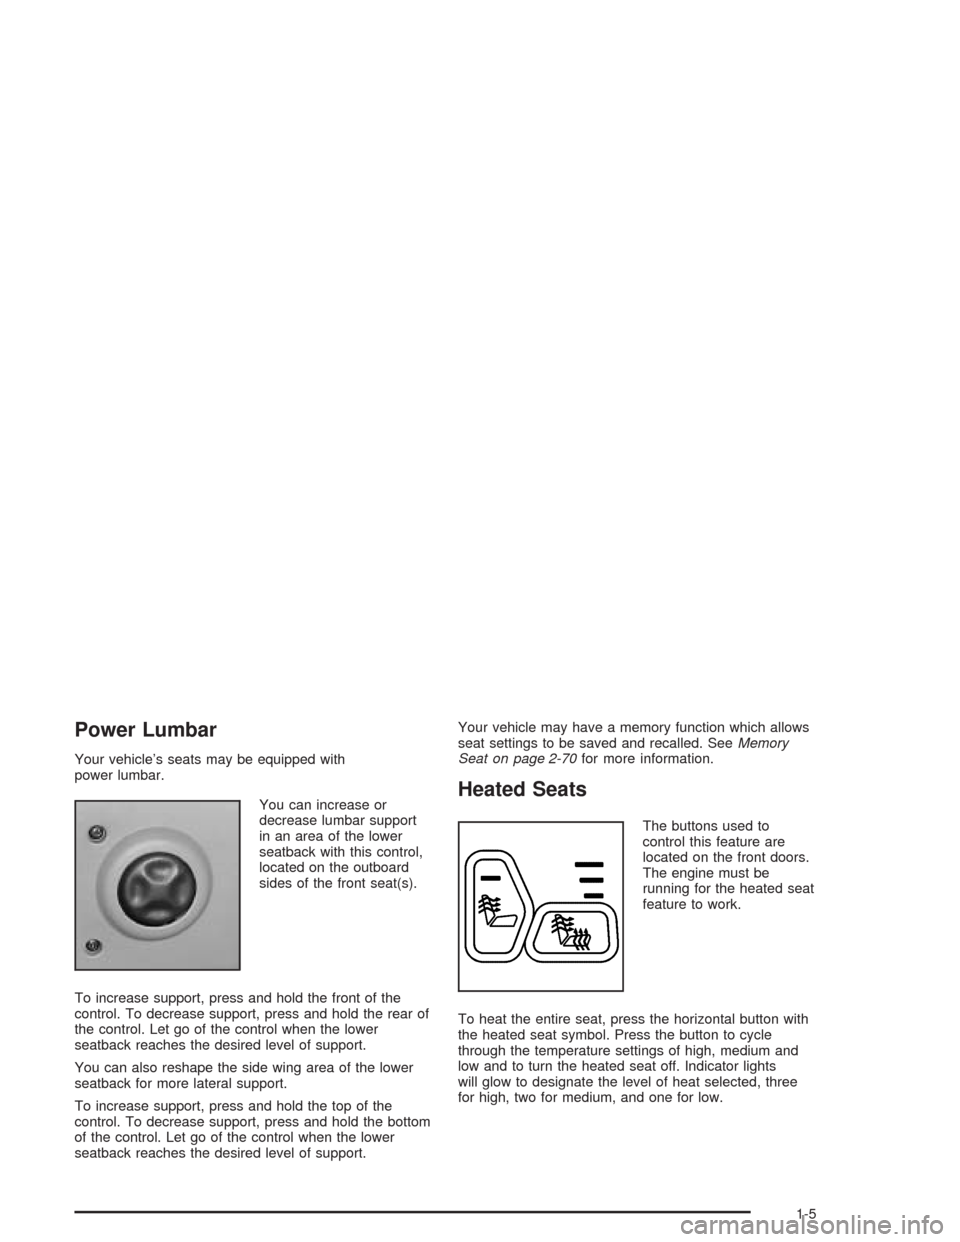
You can increase or
decrease lumbar support
in an area of the lower
seatback with this control,
located on the outboard
sides of the front seat(s).
To increase support, press and hold the front of the
control. To decrease support, press and hold the rear of
the control. Let go of the control when the lower
seatback reaches the desired level of support.
You can also reshape the side wing area of the lower
seatback for more lateral support.
To increase support, press and hold the top of the
control. To decrease support, press and hold the bottom
of the control. Let go of the control when the lower
seatback reaches the desired level of support.Your vehicle may have a memory function which allows
seat settings to be saved and recalled. SeeMemory
Seat on page 2-70for more information.
Heated Seats
The buttons used to
control this feature are
located on the front doors.
The engine must be
running for the heated seat
feature to work.
To heat the entire seat, press the horizontal button with
the heated seat symbol. Press the button to cycle
through the temperature settings of high, medium and
low and to turn the heated seat off. Indicator lights
will glow to designate the level of heat selected, three
for high, two for medium, and one for low.
1-5
Page 99 of 584

To replace the battery in the keyless entry transmitter,
do the following:
1. Insert a thin object, such as a coin, in the slot
between the covers of the transmitter housing
near the key ring hole. Remove the bottom
by twisting the coin.
2. Remove and replace the battery with a
three-volt CR2032 or equivalent battery,
positive (+) side up.
3. Align the covers and snap them together.
4. Resynchronize the transmitter. See
“Resynchronization” next.
5. Check the operation of the transmitter.Resynchronization
Resynchronization may be necessary due to the
security method used by this system. The transmitter
does not send the same signal twice to the receiver. The
receiver will not respond to a signal that has been
sent previously. This prevents anyone from recording
and playing back the signal from the transmitter.
To resynchronize your transmitter, stand close to your
vehicle and press and hold the lock and unlock
buttons on the transmitter at the same time for
15 seconds. The door locks should cycle to con�rm
synchronization. If the locks do not cycle, see your
dealer for service.
2-7
Page 132 of 584
Shifting In or Out of 4LO
Notice:Shifting the transfer case into 4LO while
moving at speeds faster than 3 mph (5 km/h)
may cause premature wear to the transfer case, and
may cause the gears to grind. To avoid causing
premature wear, and grinding the gears, do not shift
the transfer case into 4LO while the vehicle is
moving faster than 3 mph (5 km/h).
Shifts into 4LO can be made with the vehicle at a stop,
or while slowly rolling about 1 to 3 mph (2 to 5 km/h).
Shift the automatic transmission into
NEUTRAL (N), or with a manual transmission,
press the clutch pedal, or shift into NEUTRAL.
Shift the transfer case shift lever in one continuous
motion into the 4LO position.
When in 4LO do not drive faster than 45 mph.
This will reduce wear and extend the life of
your transfer case.
Shifting In or Out of NEUTRAL
1. With the vehicle running and the engine at an idle
set the parking brake.
2. Place the transmission into NEUTRAL (N).
Shift the transfer case in one continuous motion into or
out of the NEUTRAL (N) position.
Automatic Transfer Case
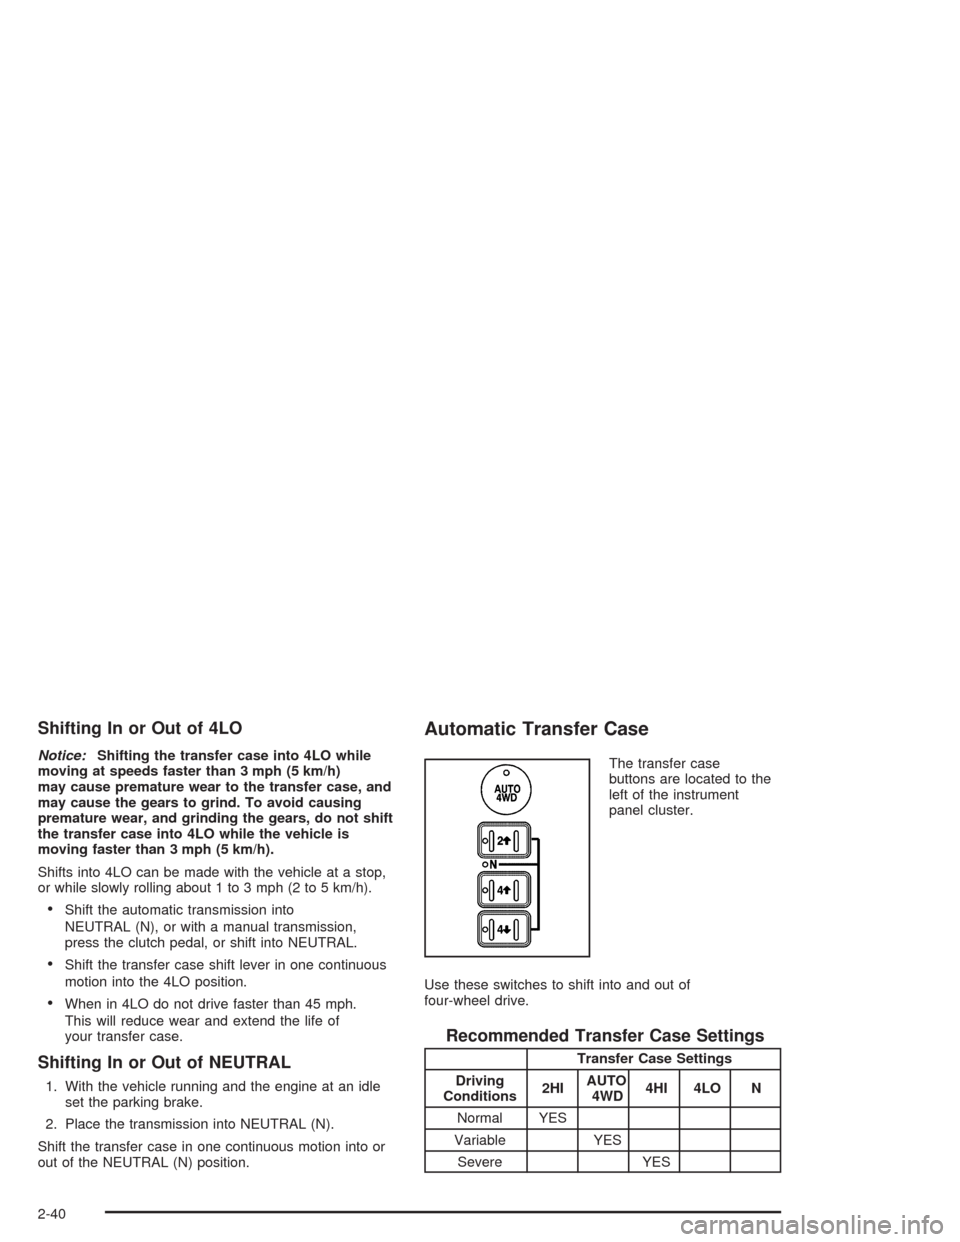
The transfer case
buttons are located to the
left of the instrument
panel cluster.
Use these switches to shift into and out of
four-wheel drive.
Recommended Transfer Case Settings
Transfer Case Settings
Driving
Conditions2HIAUTO
4WD4HI 4LO N
Normal YES
Variable YES
Severe YES
2-40
Page 135 of 584

Shifting Out of 4LO
To shift from 4LO to 4HI, AUTO 4WD or 2HI your vehicle
must be stopped or moving less than 3 mph (4.8 km/h)
with the transmission in NEUTRAL (N) and the ignition in
RUN. The preferred method for shifting out of 4LO is to
have your vehicle moving 1 to 2 mph (1.6 to 3.2 km/h).
Press and release the 4HI, AUTO 4WD or 2HI switch.
You must wait for the 4HI, AUTO 4WD or 2HI indicator
light to stop �ashing and remain illuminated before
shifting your transmission into gear.
Notice:Shifting the transmission into gear before
the 4LO indicator light has stopped �ashing
could damage the transfer case. To help avoid
damaging your vehicle, always wait for the 4LO
indicator light to stop �ashing before shifting
the transmission into gear.
It is typical for your vehicle to exhibit signi�cant
engagement noise and bump when shifting between
4LO and 4HI ranges or from NEUTRAL with the
engine running.
If the 4HI, AUTO 4WD or 2HI switch is pressed when
your vehicle is in gear and/or moving, the 4HI,
AUTO 4WD or 2HI indicator light will �ash for
30 seconds but will not complete the shift unless your
vehicle is moving less than 3 mph (4.8 km/h) and
the transmission is in NEUTRAL (N).
Shifting into NEUTRAL
To shift the transfer case to NEUTRAL do the following:
1. Make sure the vehicle is parked so that it
will not roll.
2. Set the parking brake.
3. Start the vehicle or turn the ignition to RUN.
4. Connect the vehicle to the towing vehicle.
5. Put the transmission in NEUTRAL (N).
6. Shift the transfer case to 2HI.
7. Simultaneously press and hold the 2HI and 4LO
buttons for 10 seconds. The red NEUTRAL light
will come on when the transfer case shift to
NEUTRAL is complete.
8. Shift the transmission to REVERSE (R) for one
second, then shift the transmission to DRIVE (D)
for one second, or FIRST (1) for vehicles equipped
with a manual transmission.
9. Turn the ignition to LOCK.
10. Place the transmission shift lever in PARK (P), or
FIRST (1) for vehicles with a manual transmission.
11. Release the parking brake prior to towing.
2-43
Page 139 of 584
Shifting into NEUTRAL
To shift the transfer case to NEUTRAL, �rst make sure
the vehicle is parked so that it will not roll:
1. Set the parking brake.
2. Start the vehicle or turn the ignition to RUN.
3. Connect the vehicle to the towing vehicle.
4. Put the transmission in NEUTRAL (N).
5. Shift the transfer case to 2HI.
6. Simultaneously press and hold the 2HI and 4LO
buttons for 10 seconds. The red NEUTRAL light
will come on when the transfer case shift to
NEUTRAL is complete.
7. Shift the transmission to REVERSE (R) for one
second, then shift the transmission to DRIVE (D)
for one second, for FIRST (1) for vehicles equipped
with a manual transmission.
8. Turn the ignition to LOCK.
9. Place the transmission shift lever in PARK (P), or
FIRST (1) for vehicles equipped with a
manual transmission.
10. Release the parking brake prior to towing.
Shifting Out of NEUTRAL
To shift out of NEUTRAL:
1. Set the parking brake and apply the regular
brake pedal.
2. Shift the transmission to NEUTRAL (N) and turn the
ignition to RUN with the engine off.
3. Press the button for the desired transfer case shift
position (2HI, 4HI, or 4LO).
4. After the transfer case has shifted out of NEUTRAL
the red light will go out.
5. Release the parking brake.
6. You may start the engine and shift the transmission
to the desired position.
Excessively shifting the transfer case into or out of the
different modes may cause the transfer case to enter the
shift protection mode. This will protect the transfer case
from possible damage and will only allow the transfer
case to respond to one shift per 10 seconds. The transfer
case may stay in this mode for up to three minutes.
2-47
Page 150 of 584

Passenger Air Bag Indicator
Your vehicle may be equipped with a passenger air bag
indicator, on the mirror glass, just above the buttons.
For more information, seePassenger Sensing System
on page 1-78.
Cleaning the Mirror
When cleaning the mirror, use a paper towel or similar
material dampened with glass cleaner. Do not spray
glass cleaner directly on the mirror as that may cause
the liquid cleaner to enter the mirror housing.
Automatic Dimming Rearview
Mirror with Compass and
Temperature Display
If your vehicle is equipped with an automatic mirror, it
will automatically dim to the proper level to minimize
glare from lights behind you after dark.
The mirror also includes a display in the upper right
corner of the mirror face. The compass reading and the
outside temperature will both appear in the display at the
same time. The dual display can be turned on or off by
brie�y pressing either the TEMP or the COMP button.
Temperature Display
The temperature can be displayed by pressing the
TEMP button. Pressing the TEMP button once brie�y,
will toggle the temperature reading on and off. To
alternate the temperature reading between Fahrenheit
and Celsius, press and hold the TEMP button for
approximately four seconds until the display blinks °F
and °C. Press and release the TEMP button to
toggle between the Fahrenheit and Celsius readings.
After approximately four seconds of inactivity, the display
will stop blinking and display the last selection made.
If an abnormal reading is displayed, for an extended
period of time, please see your dealer. Under certain
circumstances, a delay in updating the temperature
is normal.
Automatic Dimming Mirror Operation
The time period you need to press and hold the TEMP
button to turn the automatic dimming feature on or off is
approximately eight seconds. The indicator light to the left
of the TEMP button will still turn on or off to show you
when the automatic dimming feature is activated. Once
the mirror is turned off, it will remain off until it is turned
back on, or until the vehicle is restarted.
2-58
Page 152 of 584
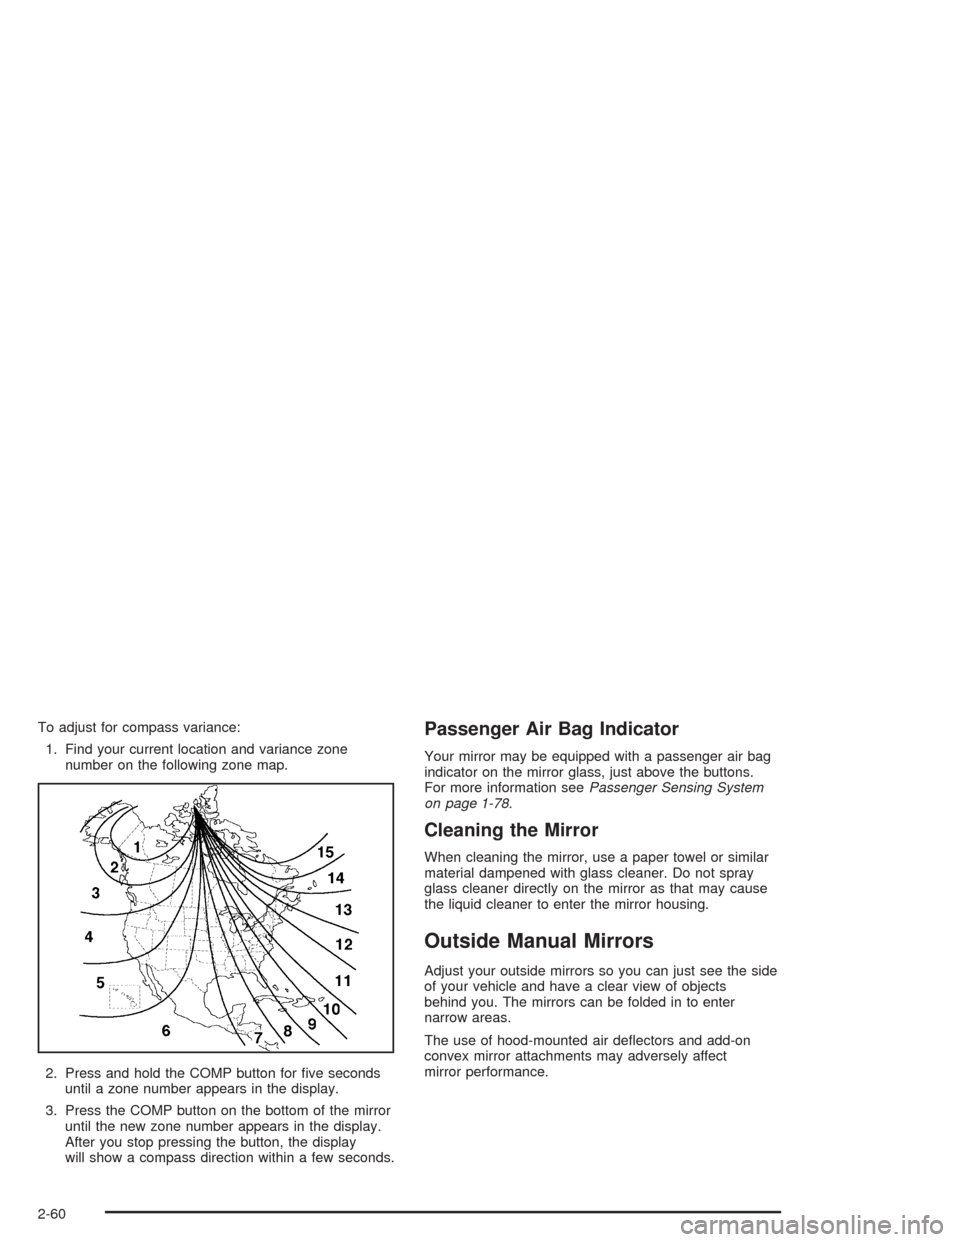
To adjust for compass variance:
1. Find your current location and variance zone
number on the following zone map.
2. Press and hold the COMP button for �ve seconds
until a zone number appears in the display.
3. Press the COMP button on the bottom of the mirror
until the new zone number appears in the display.
After you stop pressing the button, the display
will show a compass direction within a few seconds.Passenger Air Bag Indicator
Your mirror may be equipped with a passenger air bag
indicator on the mirror glass, just above the buttons.
For more information seePassenger Sensing System
on page 1-78.
Cleaning the Mirror
When cleaning the mirror, use a paper towel or similar
material dampened with glass cleaner. Do not spray
glass cleaner directly on the mirror as that may cause
the liquid cleaner to enter the mirror housing.
Outside Manual Mirrors
Adjust your outside mirrors so you can just see the side
of your vehicle and have a clear view of objects
behind you. The mirrors can be folded in to enter
narrow areas.
The use of hood-mounted air de�ectors and add-on
convex mirror attachments may adversely affect
mirror performance.
2-60
Page 159 of 584
OnStar®Virtual Advisor
With OnStar®Virtual Advisor you can listen to your
favorite news, entertainment and information topics,
such as traffic and weather reports, stock quotes
and sports scores. You listen to your e-mail through
your vehicle’s speakers, and reply with your hands on
the wheel and your eyes on the road.
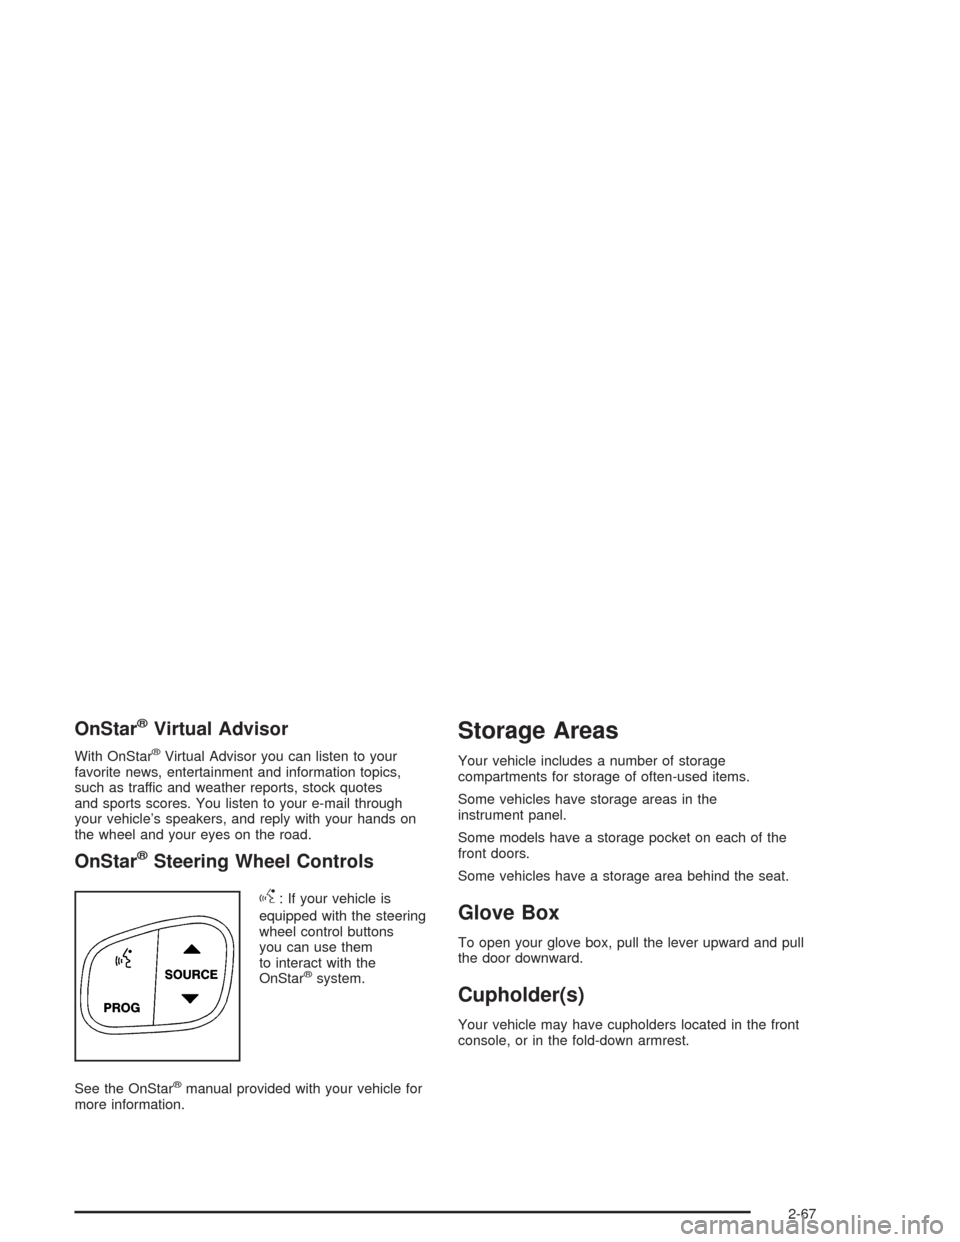
OnStar®Steering Wheel Controls
g
: If your vehicle is
equipped with the steering
wheel control buttons
you can use them
to interact with the
OnStar
®system.
See the OnStar
®manual provided with your vehicle for
more information.
Storage Areas
Your vehicle includes a number of storage
compartments for storage of often-used items.
Some vehicles have storage areas in the
instrument panel.
Some models have a storage pocket on each of the
front doors.
Some vehicles have a storage area behind the seat.
Glove Box
To open your glove box, pull the lever upward and pull
the door downward.
Cupholder(s)
Your vehicle may have cupholders located in the front
console, or in the fold-down armrest.
2-67