Page 178 of 426
AUTO TONE/AUTO EQ (Automatic Equalization):
Press this button to select customized equalization
settings designed for country, jazz, talk, pop, rock,
and classical.
The equalization setting last chosen will appear on the
display when you �rst press this button. Each time
you press this button, another equalization setting will
appear on the display and automatic tone or automatic
equalization will switch to that preset equalization
settings.
To return to the manual mode, press the AUTO TONE
or AUTO EQ button until CUSTOM appears on the
display. You can also manually adjust the bass,
midrange, and treble using the tone button.Adjusting the Speakers (Balance/Fade)
BAL/FADE /S(Balance/Fade):To adjust
the balance between the right and the left speakers,
push and release the balance and fade button until
BAL appears on the display. Turn the ADJ knob to
move the sound toward the right or the left speakers.
To adjust the fade, push and release the balance
and fade button until FADE appears on the display.
Turn the ADJ knob to move the sound toward the front
or the rear speakers.
To adjust balance or fade to the middle position, select
BAL or FADE. Then press and hold the balance and
fade button for more than two seconds. You will
hear one beep and the speaker control will be adjusted
to the middle position.
To adjust both speaker controls to the middle position,
push and hold the tone button when no speaker
control is displayed. ALL CENTERED will appear on the
display and you will hear one beep. The balance and
fade will be adjusted to the middle position.
3-62
Page 189 of 426
AUTO TONE/AUTO EQ (Automatic Equalization):
Press this button to select customized equalization
settings designed for country, jazz, talk, pop, rock,
and classical.
The equalization setting last chosen will appear on the
display when you �rst press this button. Each time
you press this button, another equalization setting will
appear on the display and automatic tone or automatic
equalization will switch to that preset equalization
settings.
To return to the manual mode, press the AUTO TONE
or AUTO EQ button until CUSTOM appears on the
display. You can also manually adjust the bass,
midrange, and treble using the tone button.Adjusting the Speakers (Balance/Fade)
BAL/FADE /S(Balance/Fade):To adjust
the balance between the right and the left speakers,
push and release the balance and fade button until
BAL appears on the display. Turn the ADJ knob to
move the sound toward the right or the left speakers.
To adjust the fade, push and release the balance
and fade button until FADE appears on the display.
Turn the ADJ knob to move the sound toward the
front or the rear speakers.
To adjust balance or fade to the middle position,
select BAL or FADE. Then press and hold the balance
and fade button for more than two seconds. You will
hear one beep and the speaker control will be adjusted
to the middle position.
To adjust both speaker controls to the middle position,
push and hold the tone button when no speaker
control is displayed. ALL CENTERED will appear on
the display and you will hear one beep. The balance
and fade will be adjusted to the middle position.
3-73
Page 202 of 426
AUTO TONE/AUTO EQ (Automatic Equalization):
Press this button to select customized equalization
settings designed for country, jazz, talk, pop, rock,
and classical.
The equalization setting last chosen will appear on the
display when you �rst press this button. Each time
you press this button, another equalization setting will
appear on the display and automatic tone or automatic
equalization will switch to that preset equalization
settings.
To return to the manual mode, press the AUTO TONE
or AUTO EQ button until CUSTOM appears on the
display. You can also manually adjust the bass,
midrange, and treble using the tone button.Adjusting the Speakers (Balance/Fade)
BAL/FADE /S(Balance/Fade):To adjust
the balance between the right and the left speakers,
push and release the balance and fade button until
BAL appears on the display. Turn the ADJ knob to move
the sound toward the right or the left speakers.
To adjust the fade, push and release the balance and
fade button until FADE appears on the display. Turn the
ADJ knob to move the sound toward the front or the
rear speakers.
To adjust balance or fade to the middle position, select
BAL or FADE. Then press and hold the balance and
fade button for more than two seconds. You will
hear one beep and the speaker control will be adjusted
to the middle position.
To adjust both speaker controls to the middle position,
push and hold the tone button when no speaker
control is displayed. ALL CENTERED will appear on the
display and you will hear one beep. The balance and
fade will be adjusted to the middle position.
3-86
Page 237 of 426
Your Driving, the Road, and Your Vehicle..........4-2
Defensive Driving...........................................4-2
Drunken Driving.............................................4-2
Control of a Vehicle........................................4-5
Braking.........................................................4-6
Enhanced Traction System (ETS).....................4-9
Steering......................................................4-11
Off-Road Recovery.......................................4-13
Passing.......................................................4-13
Loss of Control.............................................4-15
Driving at Night............................................4-16
Driving in Rain and on Wet Roads..................4-18City Driving..................................................4-21
Freeway Driving...........................................4-22
Before Leaving on a Long Trip.......................4-23
Highway Hypnosis........................................4-24
Hill and Mountain Roads................................4-24
Winter Driving..............................................4-26
If You Are Stuck: In Sand, Mud, Ice or Snow........4-30
Towing..........................................................4-31
Towing Your Vehicle.....................................4-31
Recreational Vehicle Towing...........................4-31
Loading Your Vehicle....................................4-34
Towing a Trailer...........................................4-40
Section 4 Driving Your Vehicle
4-1
Page 267 of 426
Rocking Your Vehicle To Get It Out
First, turn your steering wheel left and right. That will clear
the area around your front wheels. Then shift back and
forth between REVERSE (R) and a forward gear,
spinning the wheels as little as possible. Release the
accelerator pedal while you shift, and press lightly on the
accelerator pedal when the transaxle is in gear. By slowly
spinning your wheels in the forward and reverse
directions, you will cause a rocking motion that may free
your vehicle. If that does not get you out after a few tries,
you may need to be towed out. If you do need to be
towed out, seeTowing Your Vehicle on page 4-31.
Towing
Towing Your Vehicle
Consult your dealer or a professional towing service if
you need to have your disabled vehicle towed. See
Roadside Assistance Program on page 7-6.
If you want to tow your vehicle behind another vehicle
for recreational purposes (such as behind a motorhome),
see “Recreational Vehicle Towing” following.
Recreational Vehicle Towing
Recreational vehicle towing means towing your vehicle
behind another vehicle — such as behind a motorhome.
The two most common types of recreational vehicle
towing are known as “dinghy towing” (towing your vehicle
with all four wheels on the ground) and “dolly towing”
(towing your vehicle with two wheels on the ground and
two wheels up on a device known as a “dolly”).
4-31
Page 268 of 426
With the proper preparation and equipment, many
vehicle can be towed in these ways. See “Dinghy
Towing” and “Dolly Towing”, following.
Here are some important things to consider before you
do recreational vehicle towing:
What’s the towing capacity of the towing vehicle?
Be sure you read the tow vehicle manufacturer’s
recommendations.
How far will you tow? Some vehicles have
restrictions on how far and how long they can tow.
Do you have the proper towing equipment?
See your dealer or trailering professional for
additional advice and equipment recommendations.
Is your vehicle ready to be towed? Just as you
would prepare your vehicle for a long trip, you’ll
want to make sure your vehicle is prepared to be
towed. SeeBefore Leaving on a Long Trip on
page 4-23.
Dinghy Towing
To tow your vehicle with all four wheels on the ground,
follow these steps:
1. Position the vehicle to tow and then secure it.
2. Turn the ignition switch to OFF.
3. Set the parking brake.
4-32
Page 269 of 426
4. To prevent your battery from draining while the
vehicle is being towed, remove the following
fuse from the engine compartment fuse block: 20)
IBCM 1. See “Engine Compartment Fuse Block”
underFuses on page 5-88
5. Turn the ignition switch to ACCESSORY.
6. Shift your transaxle to NEUTRAL (N).
7. Release the parking brake.
Remember to install the fuses once you reach your
destination. To reinstall a fuse do the following:
1. Set the parking brake.
2. Remove the key from the ignition switch.
3. Reinstall the fuse.
Notice:If you exceed 65 mph (110 km/h) while
towing your vehicle, it could be damaged. Never
exceed 65 mph (110 km/h) while towing your vehicle.Notice:Towing your vehicle from the rear could
damage it. Also, repairs would not be covered by
the warranty. Never have your vehicle towed
from the rear.
4-33
Page 270 of 426
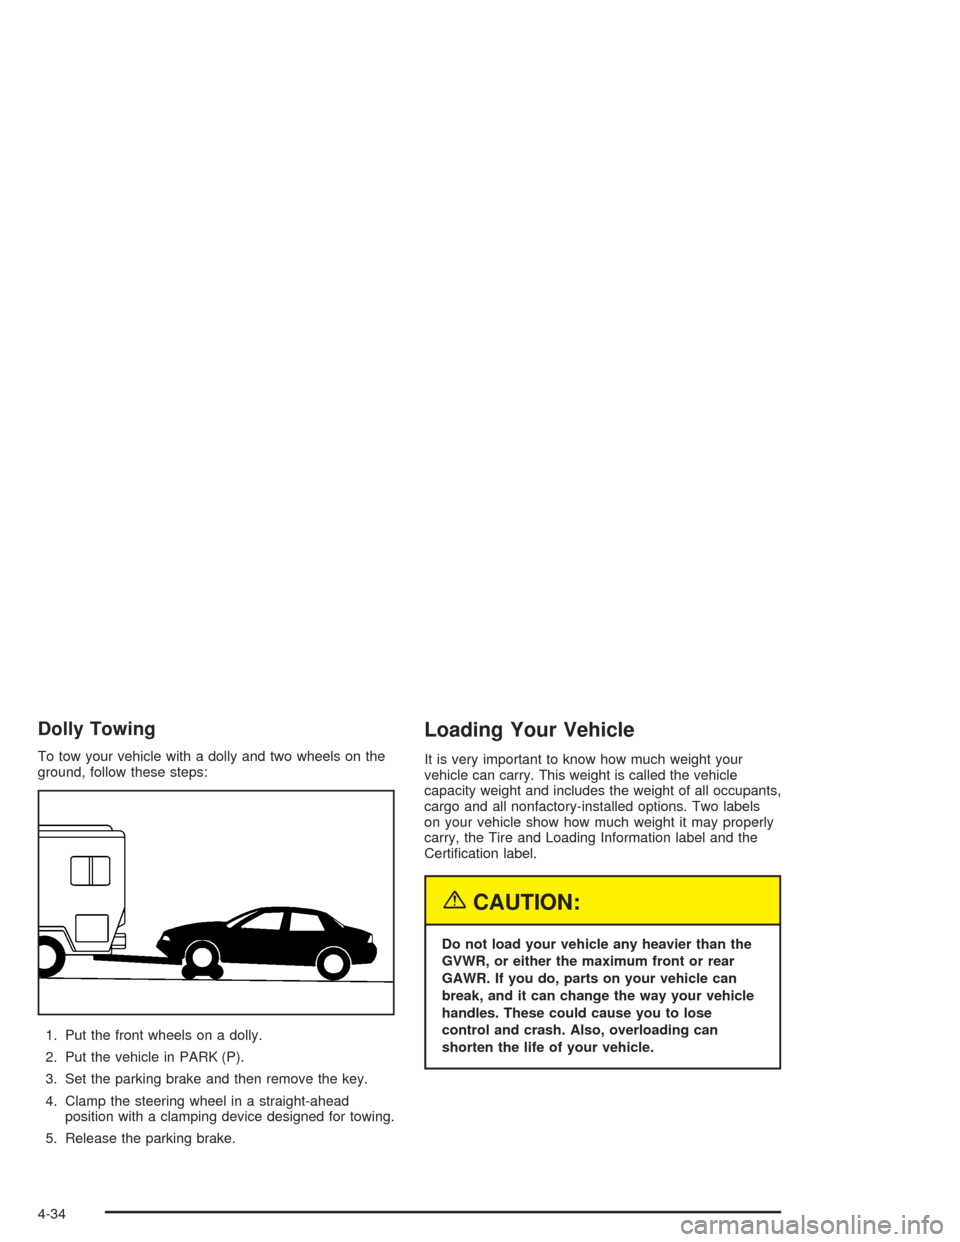
Dolly Towing
To tow your vehicle with a dolly and two wheels on the
ground, follow these steps:
1. Put the front wheels on a dolly.
2. Put the vehicle in PARK (P).
3. Set the parking brake and then remove the key.
4. Clamp the steering wheel in a straight-ahead
position with a clamping device designed for towing.
5. Release the parking brake.
Loading Your Vehicle
It is very important to know how much weight your
vehicle can carry. This weight is called the vehicle
capacity weight and includes the weight of all occupants,
cargo and all nonfactory-installed options. Two labels
on your vehicle show how much weight it may properly
carry, the Tire and Loading Information label and the
Certi�cation label.
{CAUTION:
Do not load your vehicle any heavier than the
GVWR, or either the maximum front or rear
GAWR. If you do, parts on your vehicle can
break, and it can change the way your vehicle
handles. These could cause you to lose
control and crash. Also, overloading can
shorten the life of your vehicle.
4-34