2004 CHEVROLET KODIAK air condition
[x] Cancel search: air conditionPage 131 of 366

Turn the mode knob on the right of the climate control
panel to select the defog or defrost mode.
-(Defog):With this setting, the outside air comes out
of both the floor and defroster outlets. Adjust the
temperature knob for warmer or cooler air. The air
conditioning compressor may operate in this setting to
dehumidify the air.
0(Defrost):This setting operates the defroster. Most
of the air comes out near the windshield, with some
going to the floor outlets and front side windows. The air
conditioning compressor may operate in this setting to
dehumidify the air.
The defog setting is useful for cold weather with a large
number of passengers or very humid conditions to
help keep the windshield clear. Use defrost to remove
fog or ice from the windshield quickly in extremely
cold conditions. The temperature knob should be in the
red area and the fan control toward high. Do not
drive the vehicle until all the windows are clear.
Rear Window Defogger
The rear window defogger uses a warming grid to
remove fog or frost from the rear window.Be sure to clear as much snow from the rear window as
possible.
Press this button which is
located near the fan
control to turn the rear
window defogger on or off.
An indicator light in the
button will come on when
the rear window defogger
is working.
The rear window defogger will only work when the
ignition is RUN.
The rear window defogger will turn off several minutes
after the button is pressed. The defogger can also
be turned off by pressing the button again or by turning
off the engine.
Notice:Don’t use anything sharp on the inside of
the rear window. If you do, you could cut or damage
the warming grid, and the repairs wouldn’t be
covered by your warranty. Do not attach a temporary
vehicle license, tape, a decal or anything similar
to the defogger grid.
3-21
Page 132 of 366

Outlet Adjustment
Your vehicle has air outlets
on the instrument panel
that allow you to adjust the
direction and amount of
airflow inside the vehicle.
Move the lever on the outlet up or down to direct the
airflow. Increase or reduce the amount of airflow
by opening and closing the louvers. The outlets can be
moved side-to-side to direct the airflow.
Operation Tips
•
Keep the hood and front air inlets free of ice, snow,
or any other obstruction (such as leaves). The
heater and defroster will work far better, reducing
the chance of fogging the inside of your windows.
•Keep the air path under the front seats clear
of objects. This helps air to circulate throughout
your vehicle.
•Adding outside equipment to the front of your
vehicle, such as hood-air deflectors, etc., may affect
the performance of the heating and air conditioning
system. Check with your dealer before adding
equipment to the outside of your vehicle.
3-22
Page 178 of 366

The anti-lock system can change the brake pressure
faster than any driver could. The computer is
programmed to make the most of available tire and road
conditions. This can help you steer around the obstacle
while braking hard.
As you brake, your computer keeps receiving updates
on wheel speed and controls braking pressure
accordingly.Remember: Anti-lock does not change the time you
need to get your foot up to the brake pedal or always
decrease stopping distance. If you get too close to
the vehicle in front of you, you will not have time to apply
your brakes if that vehicle suddenly slows or stops.
Always leave enough room up ahead to stop, even
though you have anti-lock brakes.
Using Anti-Lock
Do not pump the brakes. Just hold the brake pedal
down firmly and let anti-lock work for you. You may feel
the brakes pulsate, or you may hear air exhausting,
but this is normal.
Braking in Emergencies
With anti-lock, you can steer and brake at the same
time. In many emergencies, steering can help you more
than even the very best braking.
4-8
Page 208 of 366

Automatic Ether Injection System....................5-66
Front Wheel Bearings with Oil-Filled Hubs........5-67
Air Conditioning System.................................5-67
Tires..............................................................5-68
Inflation - Tire Pressure.................................5-68
Rims and Wheels.........................................5-69
Dual Tire Operation.......................................5-69
When It Is Time for New Tires.......................5-70
Wheel Alignment and Tire Balance..................5-70
Tightening the Wheel Nuts.............................5-71
Wheel Replacement......................................5-74
If a Tire Goes Flat........................................5-75
Changing a Flat Tire.....................................5-76
Appearance Care............................................5-76
Cleaning the Inside of Your Vehicle.................5-77
Care of Safety Belts......................................5-79
Weatherstrips...............................................5-79
Cleaning the Outside of Your Vehicle..............5-80
Sheet Metal Damage.....................................5-82Finish Damage.............................................5-83
Underbody Maintenance................................5-83
Chemical Paint Spotting.................................5-83
Vehicle Care/Appearance Materials..................5-84
Vehicle Identi�cation......................................5-85
Vehicle Identification Number (VIN).................5-85
Service Statement.........................................5-85
Service Parts Identification Label.....................5-86
Electrical System............................................5-86
Add-On Electrical Equipment..........................5-86
Headlamp Wiring..........................................5-86
Windshield Wiper Fuses................................5-87
Fusible Links................................................5-87
Power Windows and Other Power Options.......5-87
Fuses and Circuit Breakers............................5-87
Capacities and Speci�cations..........................5-93
Normal Maintenance Replacement Parts.........5-100
Engine Drive Belt Routing............................5-103
Section 5 Service and Appearance Care
5-2
Page 249 of 366

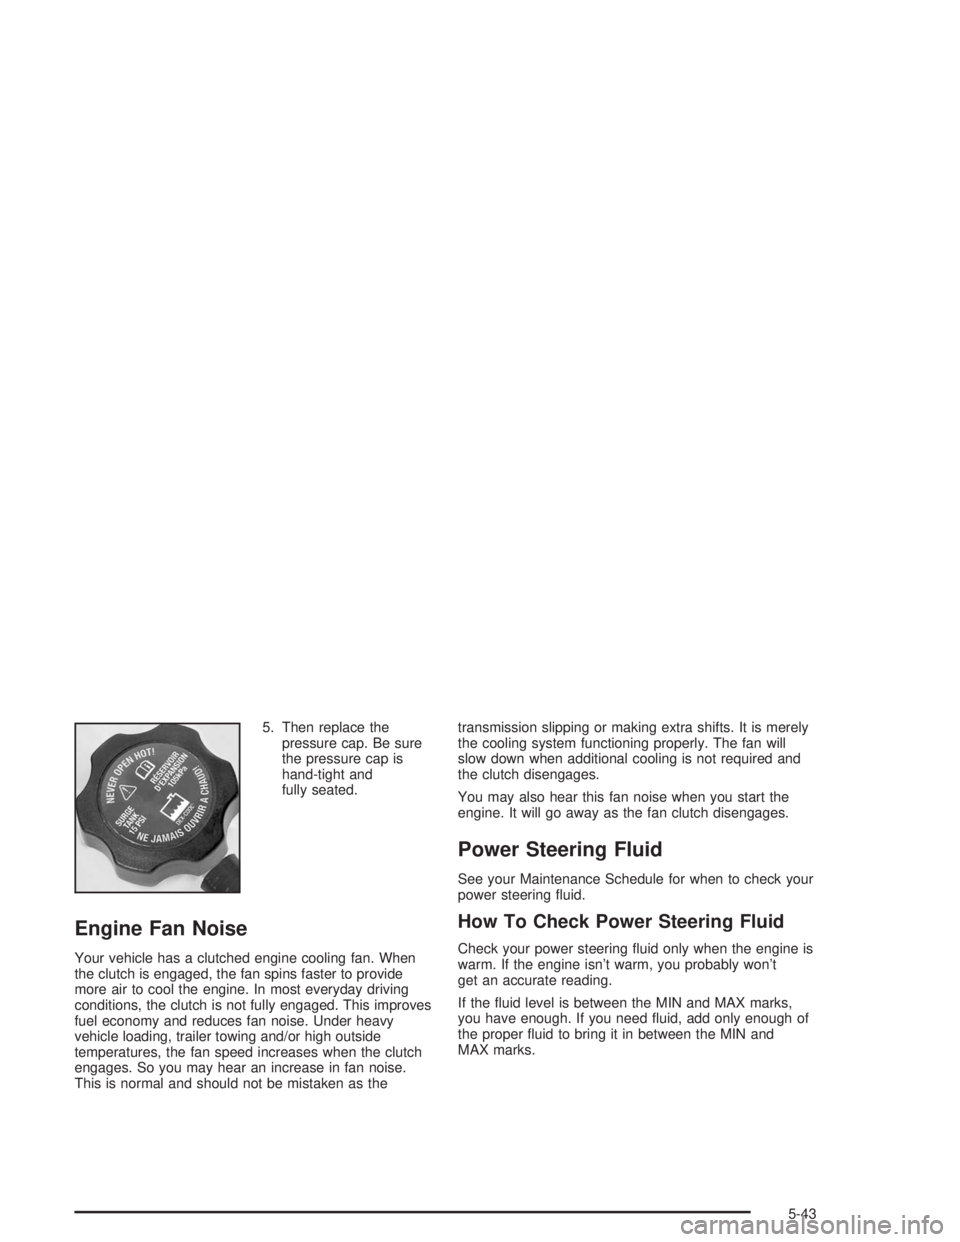
5. Then replace the
pressure cap. Be sure
the pressure cap is
hand-tight and
fully seated.
Engine Fan Noise
Your vehicle has a clutched engine cooling fan. When
the clutch is engaged, the fan spins faster to provide
more air to cool the engine. In most everyday driving
conditions, the clutch is not fully engaged. This improves
fuel economy and reduces fan noise. Under heavy
vehicle loading, trailer towing and/or high outside
temperatures, the fan speed increases when the clutch
engages. So you may hear an increase in fan noise.
This is normal and should not be mistaken as thetransmission slipping or making extra shifts. It is merely
the cooling system functioning properly. The fan will
slow down when additional cooling is not required and
the clutch disengages.
You may also hear this fan noise when you start the
engine. It will go away as the fan clutch disengages.
Power Steering Fluid
See your Maintenance Schedule for when to check your
power steering fluid.
How To Check Power Steering Fluid
Check your power steering fluid only when the engine is
warm. If the engine isn’t warm, you probably won’t
get an accurate reading.
If the fluid level is between the MIN and MAX marks,
you have enough. If you need fluid, add only enough of
the proper fluid to bring it in between the MIN and
MAX marks.
5-43
Page 255 of 366

Four-Wheel Disc Brakes
(Hydraulic Only)
Your vehicle has four-wheel disc brakes.
Some driving conditions or climates may cause a brake
squeal when the brakes are first applied or lightly
applied. This does not mean something is wrong with
your brakes.
Brake linings should always be replaced as complete
axle sets.
Four-Wheel and Six-Wheel Drum
Brakes (Air Only)
The brake drums should be removed and inspected
each time the tires are removed for rotation or changing.
When you have the front brakes replaced, have the
rear brakes inspected, too.
Brake linings should always be replaced as complete
axle sets.
Brake Pedal Travel
See your dealer if the brake pedal does not return to
normal height, or if there is a rapid increase in
pedal travel. This could be a sign of brake trouble.
Brake Adjustment
Every time you make a brake stop, your brakes adjust
for wear.
Replacing Brake System Parts
The braking system on a vehicle is complex. Its many
parts have to be of top quality and work well together if
the vehicle is to have really good braking. Your
vehicle was designed and tested with top-quality GM
brake parts. When you replace parts of your braking
system — for example, when your brake linings
wear down and you need new ones put in — be sure
you get new approved GM replacement parts. If you do
not, your brakes may no longer work properly. For
example, if someone puts in brake linings that are wrong
for your vehicle, the balance between your front and
rear brakes can change — for the worse. The braking
performance you have come to expect can change
in many other ways if someone puts in the wrong
replacement brake parts.
5-49
Page 273 of 366

6. Install a new gasket whenever you take out the
cylinder. Use only one gasket and spread a light
film of clean oil on it before installation.
7. Put in the new cylinder. Turn it clockwise until it just
starts to contact the gasket.
8. Tighten the cylinder another half turn (180 degrees).
Don’t over-tighten.
9. Retighten the cylinder clamp.
Front Wheel Bearings with
Oil-Filled Hubs
If your vehicle has oil-filled
hubs, occasionally check
to see if they have enough
oil. You can tell if there
is oil there by using
the circular gage on the
sight glass.If there isn’t, clean the rubber fill plug in the center of
the glass, and then remove it. Be careful not to
allow any dirt or water to get into the oil. Add enough of
the recommended oil to bring it up to the level mark
that you’ll see on the glass.
Refer to your Maintenance Schedule for the proper oil
to use.
When you fill the hub, check the glass again after
driving a short distance. It takes a while for the oil to
flow through the system, and you may find that you have
to add a little more to fill it to the proper level. Be sure
not to overfill the hub.Air Conditioning System
Every now and then, have your dealership check your
air conditioning system to be sure it has not lost
any cooling ability. If you think the system is not working
properly, have your GM dealer check it out as soon
as possible.
5-67
Page 289 of 366

Finish Damage
Any stone chips, fractures or deep scratches in the
finish should be repaired right away. Bare metal
will corrode quickly and may develop into major repair
expense.
Minor chips and scratches can be repaired with touch-up
materials avaliable from your dealer. Larger areas of
finish damage can be corrected in your dealer’s
body and paint shop.
Underbody Maintenance
Chemicals used for ice and snow removal and dust
control can collect on the underbody. If these are not
removed, corrosion and rust can develop on the
underbody parts such as fuel lines, frame, floor pan and
exhaust system even though they have corrosion
protection.
At least every spring, flush these materials from the
underbody with plain water. Clean any areas where mud
and debris can collect. Dirt packed in close areas of
the frame should be loosened before being flushed.
Your dealer or an underbody car washing system can
do this for you.
Chemical Paint Spotting
Some weather and atmospheric conditions can create a
chemical fallout. Airborne pollutants can fall upon and
attack painted surfaces on your vehicle. This damage
can take two forms: blotchy, ring-shaped discolorations,
and small, irregular dark spots etched into the paint
surface.
Although no defect in the paint job causes this, GM will
repair, at no charge to the owner, the surfaces of
new vehicles damaged by this fallout condition within
12 months or 12,000 miles (20 000 km) of purchase,
whichever occurs first.
5-83