2004 CHEVROLET EXPRESS CARGO VAN radio
[x] Cancel search: radioPage 196 of 406
CD Messages
CHECK CD:If this message appears on the display, it
could be for one of the following reasons:
It is very hot. When the temperature returns to
normal, the CD should play.
You are driving on a very rough road. When the
road becomes smooth, the CD should play.
The CD is dirty, scratched, wet, or upside down.
The air is very humid. If so, wait about an hour and
try again.
There may have been a problem while burning
the CD.
The label may be caught in the CD player.
If the CD is not playing correctly, for any other reason,
try a known good CD.
If any error occurs repeatedly or if an error cannot be
corrected, contact your dealer. If your radio displays an
error message, write it down and provide it to your
dealer when reporting the problem.
Theft-Deterrent Feature
(Non-RDS Radios)
THEFTLOCK®is designed to discourage theft of your
vehicle’s radio. The feature works automatically by
learning a portion of the Vehicle Identi�cation Number
(VIN). If the radio is moved to a different vehicle, it
will not operate and LOC will appear on the display.
With THEFTLOCK
®activated, the radio will not operate
if stolen.
Theft-Deterrent Feature
(RDS Radios)
THEFTLOCK®is designed to discourage theft of your
vehicle’s radio. The feature works automatically by
learning a portion of the Vehicle Identi�cation Number
(VIN). If the radio is moved to a different vehicle, it
will not operate and LOCKED will appear on the display.
When the radio and vehicle are turned off, the blinking
red light indicates that THEFTLOCK
®is armed.
With THEFTLOCK
®activated, the radio will not operate
if stolen.
3-72
Page 197 of 406
Radio Reception
AM
The range for most AM stations is greater than for FM,
especially at night. The longer range, however, can
cause stations to interfere with each other. AM can pick
up noise from things like storms and power lines. Try
reducing the treble to reduce this noise.
FM
FM stereo will give you the best sound, but FM signals
will reach only about 10 to 40 miles (16 to 65 km).
Tall buildings or hills can interfere with FM signals,
causing the sound to come and go.
Care of Your Cassette Tape Player
A tape player that is not cleaned regularly can cause
reduced sound quality, ruined cassettes, or a damaged
mechanism. Cassette tapes should be stored in their
cases away from contaminants, direct sunlight, and
extreme heat. If they are not, they may not operate
properly or may cause failure of the tape player.The tape player should be cleaned regularly after every
50 hours of use. The radio may display CLEAN to
indicate that the tape player has been used for 50 hours
without resetting the tape clean timer. If this message
appears on the display, the cassette tape player
needs to be cleaned. It will still play tapes, but it should
be cleaned as soon as possible to prevent damage
to the tapes and player. If there is a reduction in sound
quality, try a known good cassette to see if the tape
or the tape player is at fault. If this other cassette has no
improvement in sound quality, clean the tape player.
For best results, use a scrubbing action, non-abrasive
cleaning cassette with pads which scrub the tape
head as the hubs of the cleaner cassette turn. The
recommended cleaning cassette is available through
your dealer.
When cleaning the cassette tape player with the
recommended non-abrasive cleaning cassette, it is
possible that the cassette may eject, because the cut
tape detection feature on the radio may recognize it as a
broken tape, in error. To prevent the cleaning cassette
from being ejected, use the following steps:
1. Turn the ignition on.
2. Turn the radio off.
3. Press and hold the TAPE DISC button for �ve
seconds. READY will appear on the display and
the cassette symbol will �ash for �ve seconds.
3-73
Page 198 of 406
4. Insert the scrubbing action cleaning cassette.
5. Eject the cleaning cassette after the manufacturer’s
recommended cleaning time.
When the cleaning cassette has been ejected, the
cut tape detection feature will be active again.
A non-scrubbing action, wet-type cleaner which uses a
cassette with a fabric belt to clean the tape head
can be used. This type of cleaning cassette will not
eject on its own. A non-scrubbing action cleaner may not
clean as thoroughly as the scrubbing type cleaner.
The use of a non-scrubbing action, dry-type cleaning
cassette is not recommended.
After the player is cleaned, press and hold the eject
button for �ve seconds to reset the CLEAN indicator.
The radio will display --- or CLEANED to show the
indicator was reset.Cassettes are subject to wear and the sound quality
may degrade over time. Always make sure the cassette
tape is in good condition before the tape player is
serviced.
Care of Your CDs
Handle CDs carefully. Store them in their original cases
or other protective cases and away from direct
sunlight and dust. If the surface of a CD is soiled,
dampen a clean, soft cloth in a mild, neutral detergent
solution and clean it, wiping from the center to the edge.
Be sure never to touch the side without writing when
handling CDs. Pick up CDs by grasping the outer edges
or the edge of the hole and the outer edge.
3-74
Page 199 of 406
Care of Your CD Player
The use of CD lens cleaners for CD players is not
advised, due to the risk of contaminating the lens of the
CD optics with lubricants internal to the CD mechanism.
Fixed Mast Antenna
The �xed mast antenna can withstand most car washes
without being damaged. If the mast should ever
become slightly bent, straighten it out by hand. If the
mast is badly bent, replace it.
Check occasionally to make sure the mast is still
tightened to the fender. If tightening is required, tighten
by hand, then with a wrench one quarter turn.
Chime Level Adjustment
The radio is the vehicle chime producer. The chime is
produced from the driver’s side front door speakers.
To change the volume level, press and hold
pushbutton 6 with the ignition on and the radio power
off. The chime volume level will change from the normal
level to loud, and LOUD will appear on the radio
display. To change back to the default or normal setting,
press and hold pushbutton 6 again. The chime level
will change from the loud level to normal, and NORMAL
will appear on the radio display. Each time the chime
volume is changed, three chimes will sound to indicate
the change. Removing the radio and not replacing it
with a factory radio or chime module will disable vehicle
chimes.
3-75
Page 294 of 406
Battery
Your new vehicle comes with a maintenance free
ACDelco®battery. When it is time for a new battery, get
one that has the replacement number shown on the
original battery’s label. We recommend an ACDelco
®
battery. SeeEngine Compartment Overview on
page 5-12for battery location.
Warning:Battery posts, terminals and related
accessories contain lead and lead compounds,
chemicals known to the State of California to cause
cancer and reproductive harm. Wash hands after
handling.
Vehicle Storage
If you are not going to drive your vehicle for 25 days or
more, remove the black, negative (−) cable from
the battery. This will help keep your battery from
running down.
{CAUTION:
Batteries have acid that can burn you and gas
that can explode. You can be badly hurt if you
are not careful. SeeJump Starting on
page 5-43for tips on working around a battery
without getting hurt.
Contact your dealer to learn how to prepare your
vehicle for longer storage periods.
Also, for your audio system, seeTheft-Deterrent
Feature (Non-RDS Radios) on page 3-72or
Theft-Deterrent Feature (RDS Radios) on page 3-72.
5-42
Page 295 of 406
Jump Starting
If your battery has run down, you may want to use
another vehicle and some jumper cables to start your
vehicle. Be sure to follow the steps below to do it safely.
{CAUTION:
Batteries can hurt you. They can be dangerous
because:
They contain acid that can burn you.
They contain gas that can explode
or ignite.
They contain enough electricity to
burn you.
If you do not follow these steps exactly, some
or all of these things can hurt you.
Notice:Ignoring these steps could result in costly
damage to your vehicle that would not be covered
by your warranty.
Trying to start your vehicle by pushing or pulling it
will not work, and it could damage your vehicle.1. Check the other vehicle. It must have a 12-volt
battery with a negative ground system.
Notice:If the other vehicle’s system is not a 12-volt
system with a negative ground, both vehicles can
be damaged. Only use vehicles with 12-volt systems
with negative grounds to jump start your vehicle.
2. Get the vehicles close enough so the jumper cables
can reach, but be sure the vehicles aren’t touching
each other. If they are, it could cause a ground
connection you don’t want. You wouldn’t be able to
start your vehicle, and the bad grounding could
damage the electrical systems.
To avoid the possibility of the vehicles rolling, set
the parking brake �rmly on both vehicles involved in
the jump start procedure. Put an automatic
transmission in PARK (P) or a manual transmission
in NEUTRAL before setting the parking brake.
Notice:If you leave your radio or other accessories
on during the jump starting procedure, they could
be damaged. The repairs would not be covered
by your warranty. Always turn off your radio and
other accessories when jump starting your vehicle.
3. Turn off the ignition on both vehicles. Unplug
unnecessary accessories plugged into the cigarette
lighter or in the accessory power outlet. Turn off
the radio and all lamps that aren’t needed. This will
avoid sparks and help save both batteries. And it
could save your radio!
5-43
Page 346 of 406
Cleaning Vinyl
Use warm water and a clean cloth.
Rub with a clean, damp cloth to remove dirt. You
may have to do this more than once.
Things like tar, asphalt and shoe polish will stain if
you do not get them off quickly. Use a clean cloth
and vinyl cleaner. See your dealer for this product.
Cleaning Leather
Use a soft cloth with lukewarm water and a mild soap or
saddle soap and wipe dry with a soft cloth. Then, let
the leather dry naturally. Do not use heat to dry.
For stubborn stains, use a leather cleaner.
Neveruse oils, varnishes, solvent-based or abrasive
cleaners, furniture polish or shoe polish on leather.
Soiled or stained leather should be cleaned
immediately. If dirt is allowed to work into the �nish,
it can harm the leather.
Cleaning the Top of the Instrument
Panel
Use only mild soap and water to clean the top surfaces
of the instrument panel. Sprays containing silicones
or waxes may cause annoying re�ections in the
windshield and even make it difficult to see through the
windshield under certain conditions.
Cleaning Interior Plastic Components
Use only a mild soap and water solution on a soft cloth
or sponge. Commercial cleaners may affect the
surface �nish.
Cleaning Glass Surfaces
Glass should be cleaned often. GM Glass Cleaner or a
liquid household glass cleaner will remove normal
tobacco smoke and dust �lms on interior glass. See
Vehicle Care/Appearance Materials on page 5-99.
Notice:If you use abrasive cleaners when cleaning
glass surfaces on your vehicle, you could scratch
the glass and/or cause damage to the rear window
defogger and the integrated radio antenna. When
cleaning the glass on your vehicle, use only a soft
cloth and glass cleaner.
5-94
Page 355 of 406
Fuse Usage
22 Front Park Lamp
32 Auxiliary1
33 Auxiliary2
Relays Usage
23 Window Residual Accessory Power
24 Auxiliary
25 Right Rear Defogger
26 Courtesy Lamp
27 Cargo Unlock
28 Driver Unlock
29 Park Lamp
30 Door Locks
31 Pass Unlock
Circuit Breaker Usage
34 Power WindowEngine Compartment Fuse Block
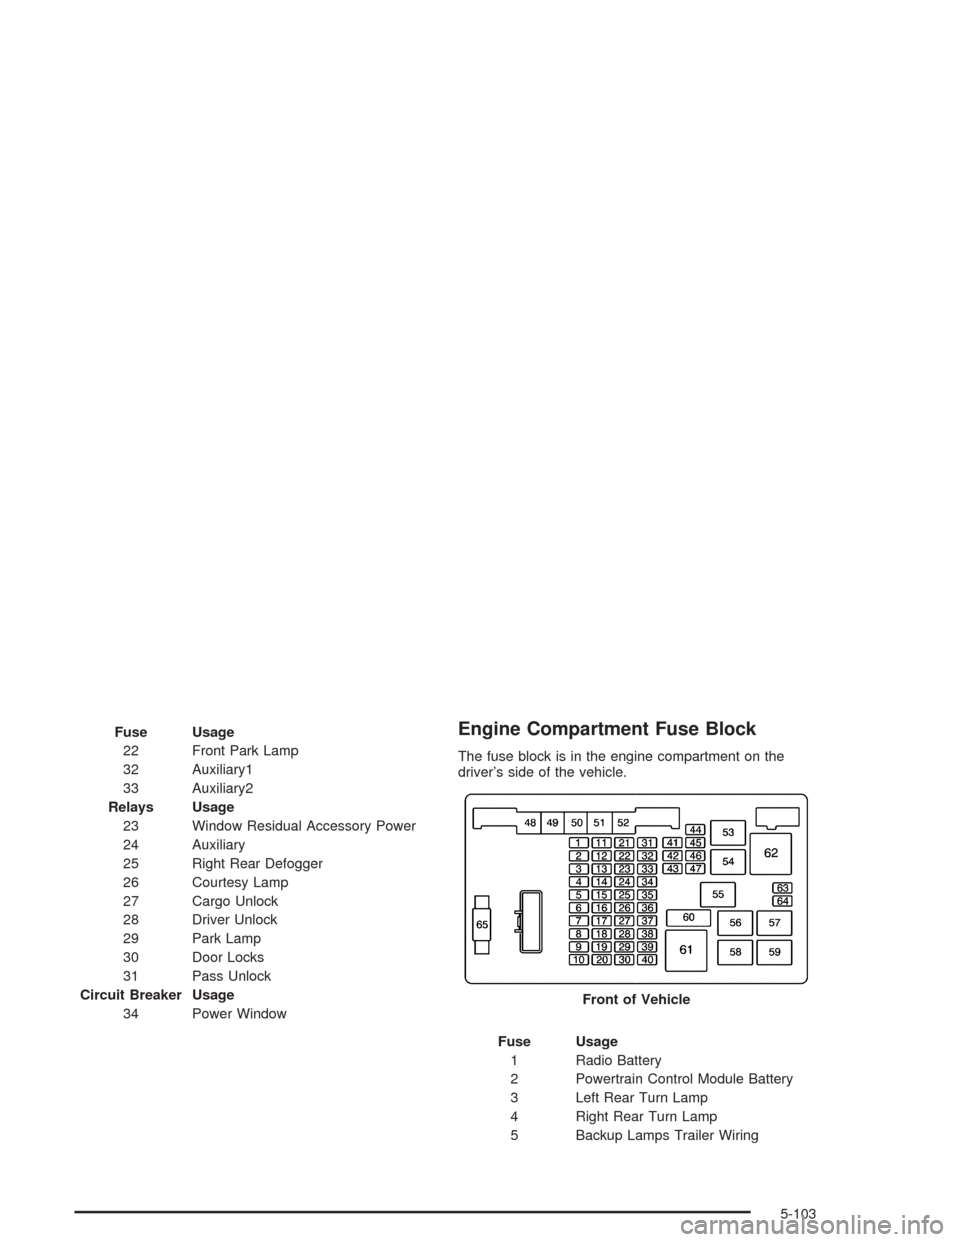
The fuse block is in the engine compartment on the
driver’s side of the vehicle.
Fuse Usage
1 Radio Battery
2 Powertrain Control Module Battery
3 Left Rear Turn Lamp
4 Right Rear Turn Lamp
5 Backup Lamps Trailer WiringFront of Vehicle
5-103