2004 CHEVROLET EPICA flat tire
[x] Cancel search: flat tirePage 195 of 338
Service............................................................5-3
Doing Your Own Service Work.........................5-4
Adding Equipment to the Outside of
Your Vehicle..............................................5-5
Fuel................................................................5-5
Gasoline Octane............................................5-5
Gasoline Specifications....................................5-5
California Fuel...............................................5-6
Additives.......................................................5-6
Fuels in Foreign Countries...............................5-7
Filling Your Tank............................................5-7
Filling a Portable Fuel Container.....................5-10
Checking Things Under the Hood....................5-10
Hood Release..............................................5-11
Engine Compartment Overview.......................5-12
Engine Oil...................................................5-13
Engine Air Cleaner/Filter................................5-17
Automatic Transaxle Fluid..............................5-19
Engine Coolant.............................................5-19
Coolant Surge Tank Pressure Cap..................5-21
Engine Overheating.......................................5-22
Cooling System............................................5-24
Power Steering Fluid.....................................5-30
Windshield Washer Fluid................................5-31
Brakes........................................................5-32Battery........................................................5-35
Jump Starting...............................................5-36
Headlamp Aiming...........................................5-40
Bulb Replacement..........................................5-41
Halogen Bulbs..............................................5-41
Headlamps..................................................5-41
Front Turn Signal Lamps...............................5-43
Center High-Mounted Stoplamp (CHMSL).........5-44
Parking Lamps.............................................5-45
Taillamps, Turn Signal, Stoplamps and
Back-up Lamps.........................................5-46
Windshield Wiper Blade Replacement..............5-47
Tires..............................................................5-48
Inflation - Tire Pressure.................................5-53
Tire Inspection and Rotation...........................5-54
When It Is Time for New Tires.......................5-55
Buying New Tires.........................................5-56
Uniform Tire Quality Grading..........................5-57
Wheel Alignment and Tire Balance..................5-58
Wheel Replacement......................................5-59
Tire Chains..................................................5-60
If a Tire Goes Flat........................................5-61
Changing a Flat Tire.....................................5-62
Spare Tire...................................................5-68
Section 5 Service and Appearance Care
5-1
Page 249 of 338
After the tires have been rotated, adjust the front and
rear inflation pressures as shown on the tire and loading
information label. Make certain that all wheel nuts are
properly tightened. See “Wheel Nut Torque” under
Capacities and Specifications on page 5-85.
{CAUTION:
Rust or dirt on a wheel, or on the parts to
which it is fastened, can make wheel nuts
become loose after a time. The wheel could
come off and cause an accident. When you
change a wheel, remove any rust or dirt from
places where the wheel attaches to the vehicle.
In an emergency, you can use a cloth or a
paper towel to do this; but be sure to use a
scraper or wire brush later, if you need to,
to get all the rust or dirt off. See “Changing
a Flat Tire” in the Index.
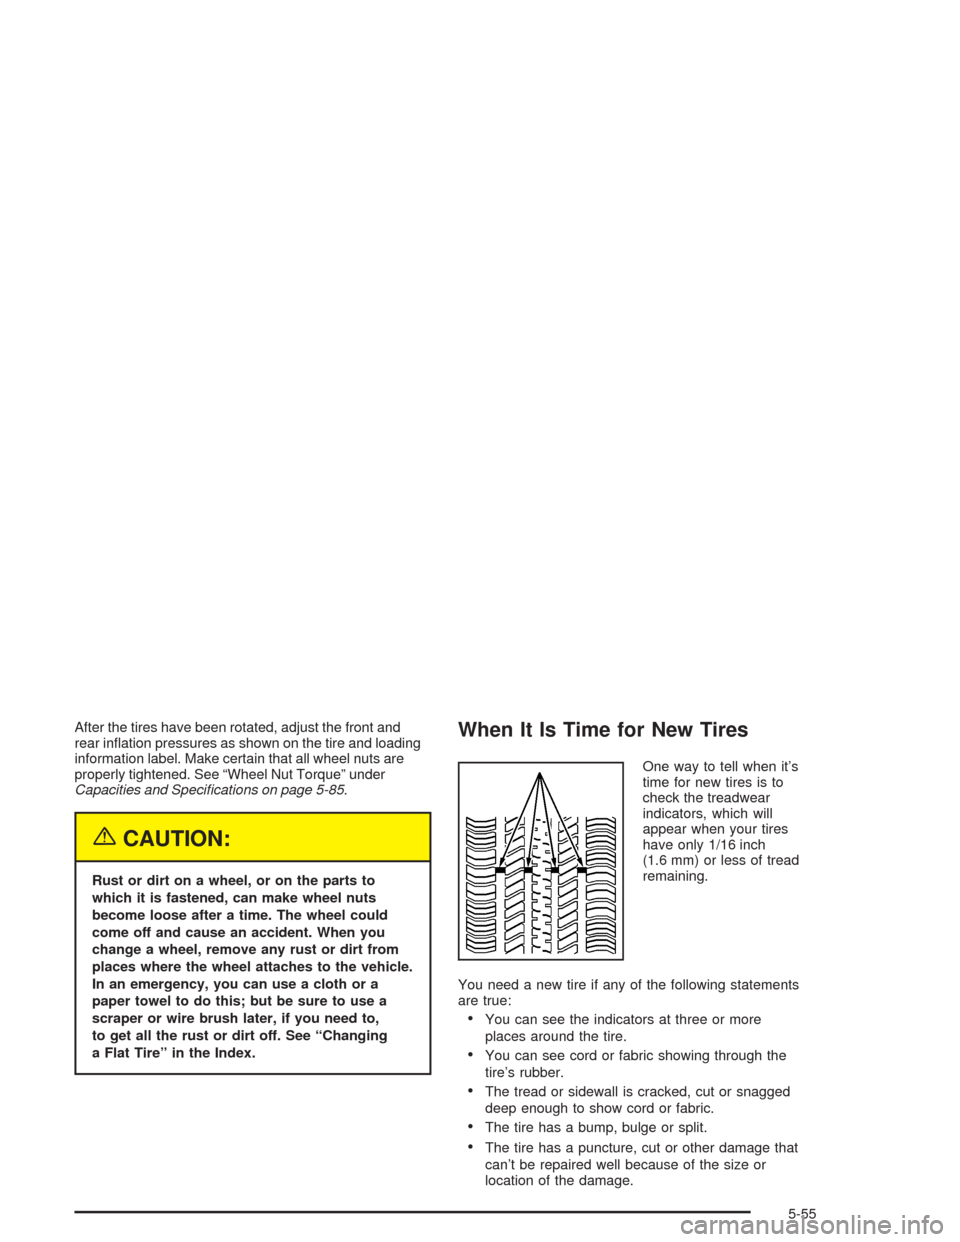
When It Is Time for New Tires
One way to tell when it’s
time for new tires is to
check the treadwear
indicators, which will
appear when your tires
have only 1/16 inch
(1.6 mm) or less of tread
remaining.
You need a new tire if any of the following statements
are true:
•You can see the indicators at three or more
places around the tire.
•You can see cord or fabric showing through the
tire’s rubber.
•The tread or sidewall is cracked, cut or snagged
deep enough to show cord or fabric.
•The tire has a bump, bulge or split.
•The tire has a puncture, cut or other damage that
can’t be repaired well because of the size or
location of the damage.
5-55
Page 253 of 338
Wheel Replacement
Replace any wheel that is bent, cracked or badly
rusted or corroded. If wheel nuts keep coming loose,
the wheel, wheel bolts and wheel nuts should be
replaced. If the wheel leaks air, replace it (except some
aluminum wheels, which can sometimes be repaired).
See your dealer if any of these conditions exist.
Your dealer will know the kind of wheel you need.
Each new wheel should have the same load-carrying
capacity, diameter, width, offset and be mounted
the same way as the one it replaces.
If you need to replace any of your wheels, wheel
bolts or wheel nuts, replace them only with new GM
original equipment parts. This way, you will be sure to
have the right wheel, wheel bolts and wheel nuts
for your vehicle.{CAUTION:
Using the wrong replacement wheels, wheel
bolts or wheel nuts on your vehicle can be
dangerous. It could affect the braking and
handling of your vehicle, make your tires lose
air and make you lose control. You could have
a collision in which you or others could be
injured. Always use the correct wheel, wheel
bolts and wheel nuts for replacement.
Notice:The wrong wheel can also cause problems
with bearing life, brake cooling, speedometer or
odometer calibration, headlamp aim, bumper height,
vehicle ground clearance and tire or tire chain
clearance to the body and chassis.
SeeChanging a Flat Tire on page 5-62for more
information.
5-59
Page 255 of 338
If a Tire Goes Flat
It’s unusual for a tire to “blowout” while you’re driving,
especially if you maintain your tires properly. If air goes
out of a tire, it’s much more likely to leak out slowly.
But if you should ever have a “blowout,” here are a few
tips about what to expect and what to do:
If a front tire fails, the flat tire will create a drag that
pulls the vehicle toward that side. Take your foot off the
accelerator pedal and grip the steering wheel firmly.
Steer to maintain lane position, and then gently brake
to a stop well out of the traffic lane.
A rear blowout, particularly on a curve, acts much like
a skid and may require the same correction you’d use in
a skid. In any rear blowout, remove your foot from the
accelerator pedal. Get the vehicle under control by
steering the way you want the vehicle to go. It may be
very bumpy and noisy, but you can still steer. Gently
brake to a stop, well off the road if possible.{CAUTION:
Lifting a vehicle and getting under it to do
maintenance or repairs is dangerous without
the appropriate safety equipment and training.
The jack provided with your vehicle is designed
only for changing a �at tire. If it is used for
anything else, you or others could be badly
injured or killed if the vehicle slips off the jack.
Use the jack provided with your vehicle only for
changing a �at tire.
If a tire goes flat, the next part shows how to use your
jacking equipment to change a flat tire safely.
5-61
Page 256 of 338
Changing a Flat Tire
If a tire goes flat, avoid further tire and wheel damage
by driving slowly to a level place. Turn on your
hazard warning flashers.
{CAUTION:
Changing a tire can be dangerous. The vehicle
can slip off the jack and roll over or fall on you
or other people. You and they could be badly
injured or even killed. Find a level place to
change your tire. To help prevent the vehicle
from moving:
1. Set the parking brake �rmly.
2. Put the shift lever in PARK (P).
CAUTION: (Continued)
CAUTION: (Continued)
3. Turn off the engine and do not restart
while the vehicle is raised.
4. Do not allow passengers to remain in
the vehicle.
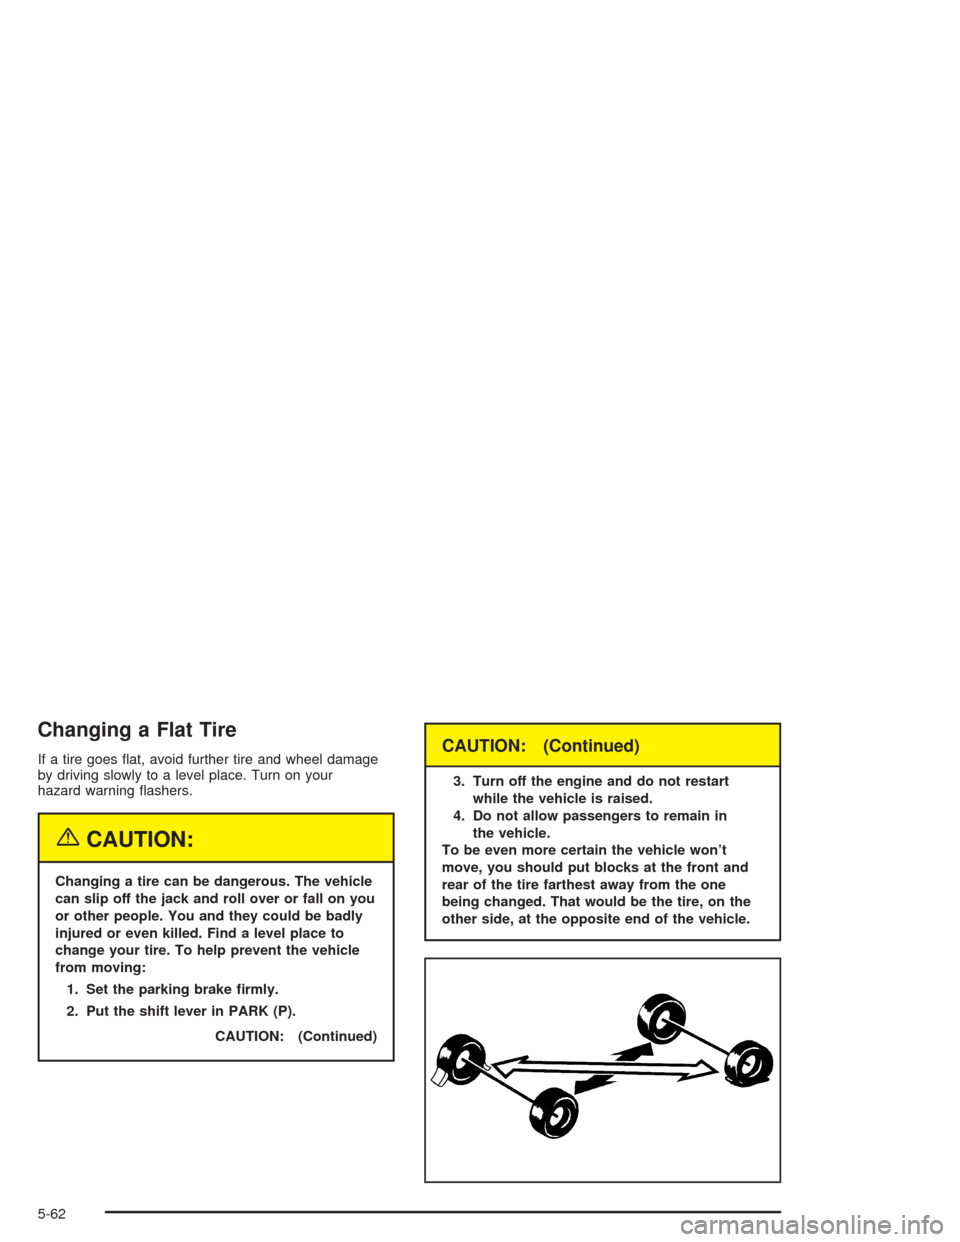
To be even more certain the vehicle won’t
move, you should put blocks at the front and
rear of the tire farthest away from the one
being changed. That would be the tire, on the
other side, at the opposite end of the vehicle.
5-62
Page 258 of 338
Removing the Flat Tire and Installing
the Spare Tire
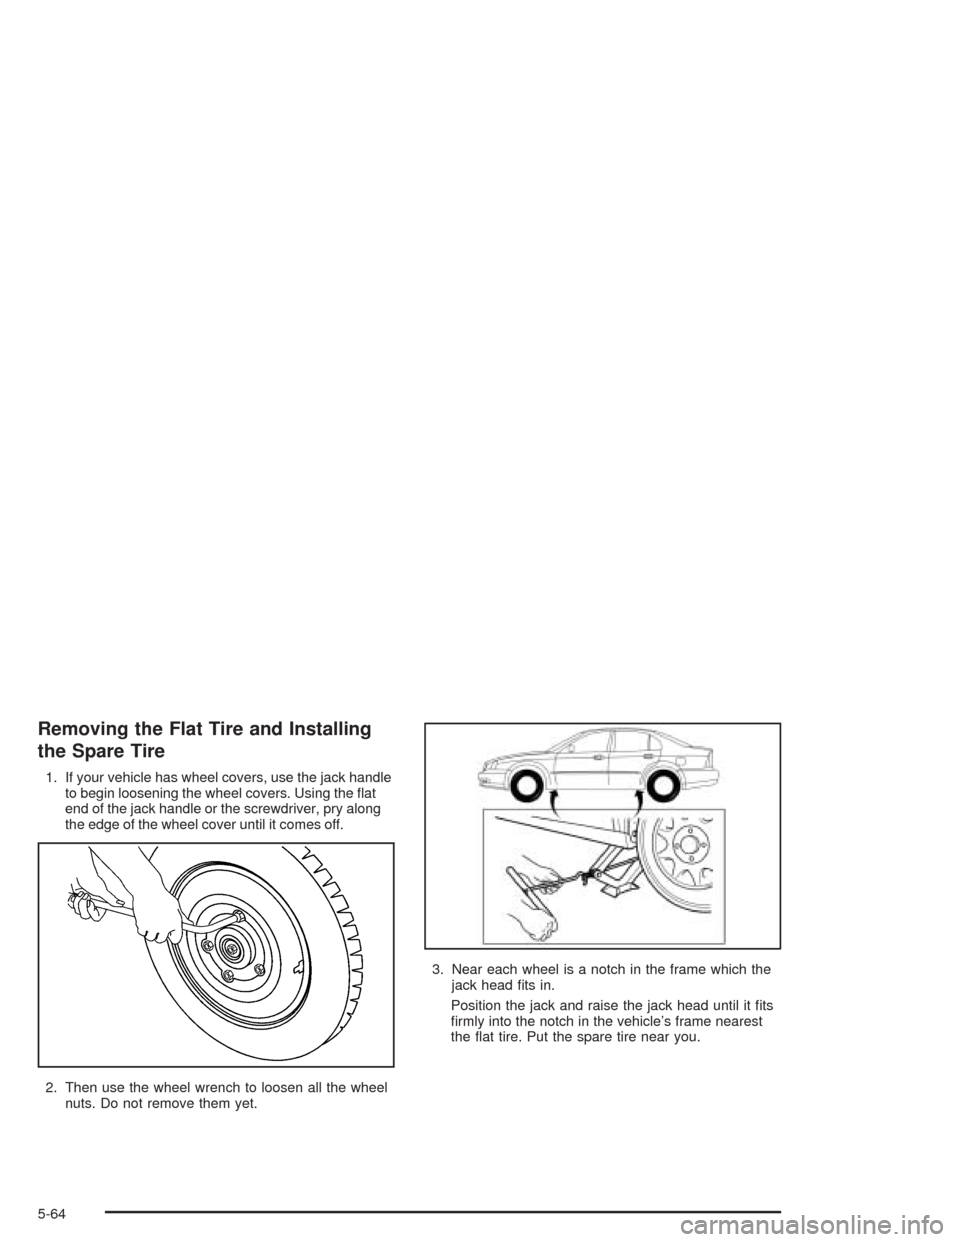
1. If your vehicle has wheel covers, use the jack handle
to begin loosening the wheel covers. Using the flat
end of the jack handle or the screwdriver, pry along
the edge of the wheel cover until it comes off.
2. Then use the wheel wrench to loosen all the wheel
nuts. Do not remove them yet.3. Near each wheel is a notch in the frame which the
jack head fits in.
Position the jack and raise the jack head until it fits
firmly into the notch in the vehicle’s frame nearest
the flat tire. Put the spare tire near you.
5-64
Page 261 of 338
{CAUTION:
Incorrect wheel nuts or improperly tightened
wheel nuts can cause the wheel to come loose
and even come off. This could lead to an
accident. Be sure to use the correct wheel
nuts. If you have to replace them, be sure to
get new GM original equipment wheel nuts.
Stop somewhere as soon as you can and have
the nuts tightened with a torque wrench to the
proper torque speci�cation. See “Capacities
and Speci�cations” in the Index for wheel nut
torque speci�cation.
Notice:Improperly tightened wheel nuts can lead
to brake pulsation and rotor damage. To avoid
expensive brake repairs, evenly tighten the wheel
nuts in the proper sequence and to the proper torque
speci�cation. See “Capacities and Speci�cations”
in the index for the wheel nut torque speci�cation.
Storing the Flat Tire and Tools
{CAUTION:
Storing a jack, a tire, or other equipment in the
passenger compartment of the vehicle could
cause injury. In a sudden stop or collision,
loose equipment could strike someone. Store
all these in the proper place.
Store the flat tire in the spare tire compartment. Place
the tire in the compartment, then secure the retainer.
Store the jack in its foam tray in the trunk. Store
the tools securely in the trunk. Replace the trim cover.
5-67
Page 262 of 338
Storing the Spare Tire and Tools
{CAUTION:
Storing a jack, a tire, or other equipment in the
passenger compartment of the vehicle could
cause injury. In a sudden stop or collision,
loose equipment could strike someone. Store
all these in the proper place.
Store the spare tire in the spare tire compartment. Place
the tire in the compartment, then secure the retainer.
Store the jack in its foam tray in the trunk. Store the tools
securely in the trunk. Replace the trim cover.
Spare Tire
Your vehicle, when new, had a fully inflated spare tire.
A spare tire may lose air over time, so check its
inflation pressure regularly. SeeInflation - Tire Pressure
on page 5-53and “Loading Your Vehicle” for information
regarding proper tire inflation and loading your vehicle.
For instruction on how to remove, install or store a spare
tire, seeChanging a Flat Tire on page 5-62.After installing the spare tire on your vehicle, you should
stop as soon as possible and make sure the spare is
correctly inflated. Have the damaged or flat road
tire repaired or replaced as soon as you can and
installed back onto your vehicle. This way, a spare tire
will be available in case you need it again.
Your vehicle may have a different size spare tire than
the road tires that were originally installed on your
vehicle. This spare tire was developed for use on your
vehicle, so you can drive on it.
If your vehicle has a spare tire that does not match your
vehicle’s original road tires and wheels in size and
type, do not include the spare tire in the tire rotation.
SeeTire Inspection and Rotation on page 5-54.
Appearance Care
Remember, cleaning products can be hazardous. Some
are toxic. Others can burst into flames if you strike a
match or get them on a hot part of the vehicle. Some are
dangerous if you breathe their fumes in a closed space.
When you use anything from a container to clean your
vehicle, be sure to follow the manufacturer’s warnings
and instructions. And always open your doors or windows
when you are cleaning the inside.
5-68