2004 CHEVROLET CORVETTE height
[x] Cancel search: heightPage 29 of 384
CAUTION: (Continued)
For example, in a crash at only 25 mph
(40 km/h), a 12-lb. (5.5 kg) baby will suddenly
become a 240-lb. (110 kg) force on a person’s
arms. A baby should be secured in an
appropriate restraint.
{CAUTION:
Children who are up against, or very close to,
any air bag when it in�ates can be seriously
injured or killed. Air bags plus lap-shoulder
belts offer outstanding protection for adults
and older children, but not for young children
and infants. Neither the vehicle’s safety belt
system nor its air bag system is designed for
them. Young children and infants need the
protection that a child restraint system can
provide.
Q:What are the different types of add-on child
restraints?
A:Add-on child restraints, which are purchased by the
vehicle’s owner, are available in four basic types.
Selection of a particular restraint should take
into consideration not only the child’s weight, height
and age but also whether or not the restraint will
be compatible with the motor vehicle in which it will
be used.
For most basic types of child restraints, there are
many different models available. When purchasing a
child restraint, be sure it is designed to be used
in a motor vehicle. If it is, the restraint will have a
label saying that it meets federal motor vehicle
safety standards.
The restraint manufacturer’s instructions that come
with the restraint state the weight and height
limitations for a particular child restraint. In addition,
there are many kinds of restraints available for
children with special needs.
1-23
Page 135 of 384
It is possible for sunlight to enter the HUD causing
all of the graphics to light up. The display will
return to normal when the sunlight is no longer
entering the HUD.
2. Adjust the seat to a comfortable driving position. If
you change your seat position later, you may have
to re-adjust your HUD.
3. Press the top or bottom of the DISPLAY switch to
center the HUD image in your view.
The HUD image can only be adjusted up and down,
not side-to-side.
4. Slide the dimmer control downward until the HUD
image is no brighter than necessary.
To turn HUD off, slide the switch to OFF.
If the sun comes out or it becomes cloudy, you may
need to adjust the HUD brightness again using
the dimmer control. Polarized sunglasses could make
the HUD image harder to see.
To change from English to metric units, press the
E/M button located to the right of the steering wheel.Clean the inside of the windshield as needed to remove
any dirt or film that reduces the sharpness or clarity
of the HUD image.
To clean the HUD, spray household glass cleaner on a
soft, clean cloth. Wipe the HUD lens gently, then dry
it. Do not spray cleaner directly on the lens because the
cleaner could leak into the unit.
If the ignition is on and you can’t see the HUD image,
check to see if:
•Something is covering the HUD unit.
•The HUD dimmer control is adjusted properly.
•The HUD image is adjusted to the proper height.
•Ambient light, in the direction your vehicle is facing,
is low.
•A fuse is blown. SeeFuses and Circuit Breakers on
page 5-93.
Keep in mind that your windshield is part of the HUD
system. If you ever have to have your windshield
replaced, be sure to get one that is designed for HUD
or your HUD image may look blurred and out of focus.
3-21
Page 281 of 384
Brake Wear
Your vehicle has four-wheel disc brakes.
Disc brake pads have built-in wear indicators that make
a high-pitched warning sound when the brake pads
are worn and new pads are needed. The sound
may come and go or be heard all the time your vehicle
is moving (except when you are pushing on the
brake pedal firmly).
{CAUTION:
The brake wear warning sound means that
soon your brakes will not work well. That
could lead to an accident. When you hear the
brake wear warning sound, have your vehicle
serviced.
Z06 models are equipped with high performance front
brake linings designed for improved brake performance
under severe use. They will normally exhibit some
low speed noise and you may notice an increase in the
amount of brake dust.Notice:Continuing to drive with worn-out brake
pads could result in costly brake repair.
Some driving conditions or climates may cause a brake
squeal when the brakes are first applied or lightly
applied. This does not mean something is wrong with
your brakes.
Brake linings should always be replaced as complete
axle sets.
Brake Pedal Travel
See your dealer if the brake pedal does not return to
normal height, or if there is a rapid increase in
pedal travel. This could be a sign of brake trouble.
Brake Adjustment
As you make brake stops, your disc brakes
automatically adjust for wear.
5-39
Page 298 of 384
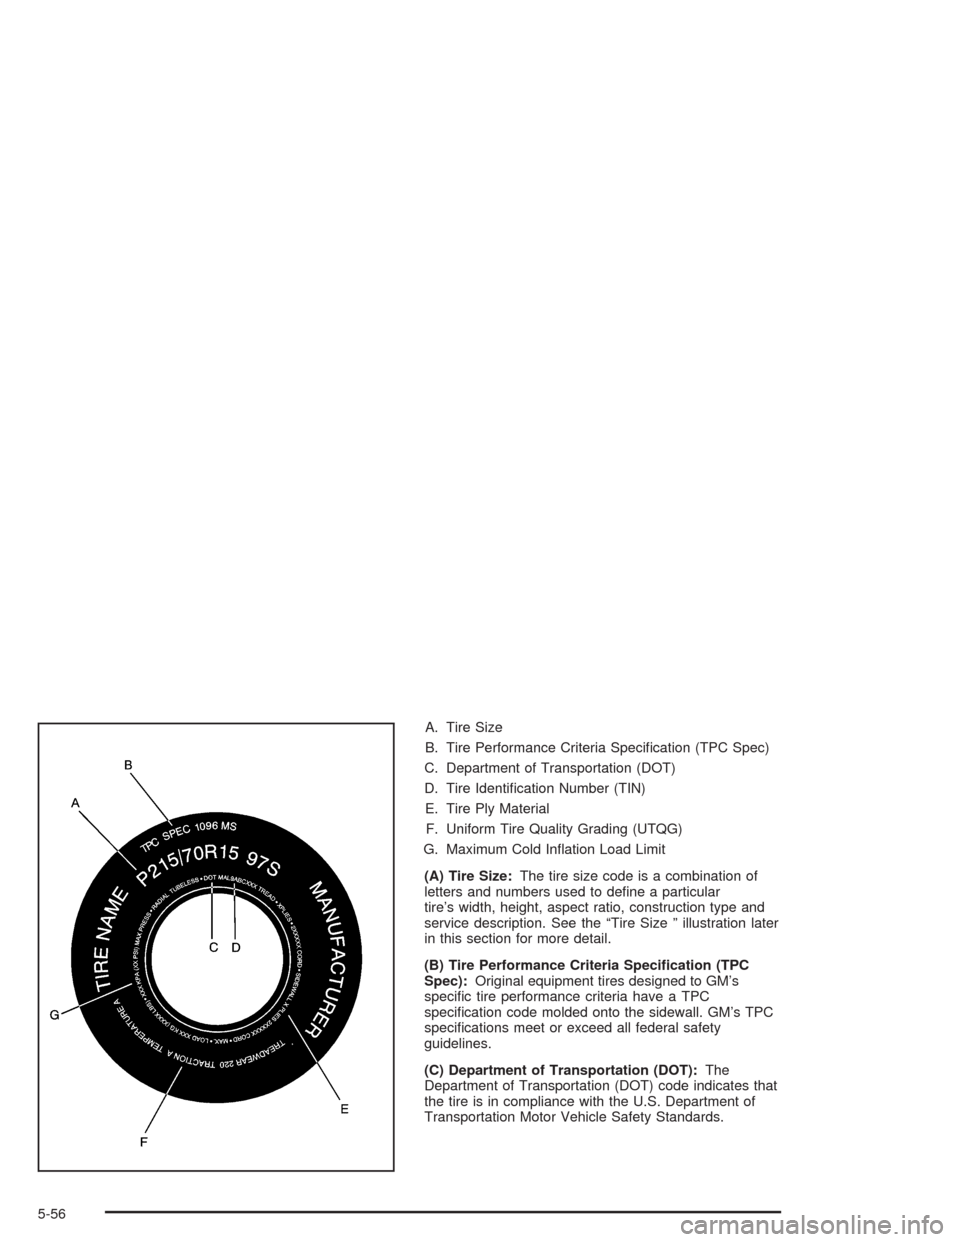
A. Tire Size
B. Tire Performance Criteria Specification (TPC Spec)
C. Department of Transportation (DOT)
D. Tire Identification Number (TIN)
E. Tire Ply Material
F. Uniform Tire Quality Grading (UTQG)
G. Maximum Cold Inflation Load Limit
(A) Tire Size:The tire size code is a combination of
letters and numbers used to define a particular
tire’s width, height, aspect ratio, construction type and
service description. See the “Tire Size ” illustration later
in this section for more detail.
(B) Tire Performance Criteria Speci�cation (TPC
Spec):Original equipment tires designed to GM’s
specific tire performance criteria have a TPC
specification code molded onto the sidewall. GM’s TPC
specifications meet or exceed all federal safety
guidelines.
(C) Department of Transportation (DOT):The
Department of Transportation (DOT) code indicates that
the tire is in compliance with the U.S. Department of
Transportation Motor Vehicle Safety Standards.
5-56
Page 300 of 384
(C) Aspect Ratio:A two-digit number that indicates the
tire height-to-width measurements. For example, if
the tire size aspect ratio is “70,” as shown in item “C” of
the illustration, it would mean that the tire’s sidewall
is 70% as high as it is wide.
(D) Construction Code:A letter code is used to
indicate the type of ply construction in the tire. The letter
“R” means radial ply construction; the letter “D” means
diagonal or bias ply construction; and the letter “B”
means belted-bias ply construction.
(E) Rim Diameter:Diameter of the wheel in inches.
(F) Service Description:These characters represent
the load range and the speed rating of a tire. The
load range represents the load carrying capacity a tire is
certified to carry. The load index can range from 1 to
279. The speed rating is the maximum speed a tire
is certified to carry a load. Speed ratings range
from “A” to “Z”.Tire Terminology and De�nitions
Air Pressure:The amount of air inside the tire pressing
outward on each square inch of the tire. Air pressure
is expressed in pounds per square inch (psi) or
kilopascal (kPa).
Accessory Weight:This means the combined weight
of optional accessories. Some examples of optional
accessories are, automatic transmission, power steering,
power brakes, power windows, power seats, and air
conditioning.
Aspect Ratio:The relationship of a tire’s height to its
width.
Belt:A rubber coated layer of cords that is located
between the plies and the tread. Cords may be made
from steel or other reinforcing materials.
Bead:The tire bead contains steel wires wrapped by
steel cords that hold the tire onto the rim.
Bias Ply Tire:A pneumatic tire in which the plies are
laid at alternate angles less than 90 degrees to the
centerline of the tread.
Cold In�ation Pressure:The amount of air pressure
in a tire, measured in pounds per square inch (psi)
before a tire has built up heat from driving.
SeeIn�ation - Tire Pressure on page 5-62.
5-58
Page 311 of 384
If you need to replace any of your wheels, wheel bolts
or wheel nuts, replace them only with new GM
original equipment parts. This way, you will be sure to
have the right wheel, wheel bolts and wheel nuts
for your vehicle.
{CAUTION:
Using the wrong replacement wheels, wheel
bolts or wheel nuts on your vehicle can be
dangerous. It could affect the braking and
handling of your vehicle, make your tires lose
air and make you lose control. You could have
a collision in which you or others could be
injured. Always use the correct wheel, wheel
bolts and wheel nuts for replacement.
Notice:The wrong wheel can also cause problems
with bearing life, brake cooling, speedometer or
odometer calibration, headlamp aim, bumper height,
vehicle ground clearance and tire clearance to the
body and chassis.
{CAUTION:
Rust or dirt on a wheel, or on the parts to
which it is fastened, can make wheel nuts
become loose after a time. The wheel could
come off and cause a crash. When you change
a wheel, remove any rust or dirt from places
where the wheel attaches to the vehicle. In an
emergency, you can use a cloth or a paper
towel to do this; but be sure to use a scraper
or wire brush later, if you need to, to get all the
rust or dirt off.
{CAUTION:
Never use oil or grease on studs or the
threads of the wheel nuts. If you do, the wheel
nuts might come loose and the wheel could
fall off, causing a crash.
5-69