2004 CHEVROLET CORVETTE battery location
[x] Cancel search: battery locationPage 61 of 384
Remote Keyless Entry System
Your vehicle has a Remote Keyless Entry (RKE) system
that operates on a radio frequency subject to Federal
Communications Commission (FCC) Rules and
with Industry Canada.
This device complies with Part 15 of the FCC Rules.
Operation is subject to the following two conditions:
(1) this device may not cause harmful interference, and
(2) this device must accept any interference received,
including interference that may cause undesired
operation.
This device complies with RSS-210 of Industry Canada.
Operation is subject to the following two conditions:
(1) this device may not cause interference, and
(2) this device must accept any interference received,
including interference that may cause undesired
operation of the device.
Changes or modifications to this system by other than
an authorized service facility could void authorization to
use this equipment.If you ever notice a decrease in the remote keyless
entry transmitter range, try doing one of the following:•Check the distance. You may be too far from
your vehicle. You may need to stand closer during
rainy or snowy weather.
•Check the location. Other vehicles or objects may
be blocking the signal. Take a few steps to the
left or right, hold the transmitter higher, and
try again.
•Check to determine if battery replacement is
necessary. See “Battery Replacement” under
Remote Keyless Entry System Operation on
page 2-6.
•Check to make sure that an electronic device such
as a cellular phone or lap top computer is not
causing interference.
•If you’re still having trouble, see your dealer or a
qualified technician for service.
2-5
Page 64 of 384
5. Press and hold the lock and unlock buttons on the
first transmitter simultaneously for five seconds.
6. When a transmitter is learned (matched), the DIC
will display FOB LEARNED and then prompt you to
learn the second transmitter.
7. Repeat Steps 5 and 6 for the third transmitter.
8. Remove the key from the ignition.
The programming mode will shut off if any of following
has occurred:
•You do not program any transmitters for
two minutes.
•You take the key out of the ignition.
•You have programmed three transmitters.
Battery Replacement
Under normal use, the battery in your remote keyless
entry transmitter should last about three years.
You can tell the battery is weak if the transmitter will not
work at the normal range in any location. If you have
to get close to your vehicle before the transmitter works,
it is probably time to change the battery.
Notice:When replacing the battery, use care not to
touch any of the circuitry. Static from your body
transferred to these surfaces may damage the
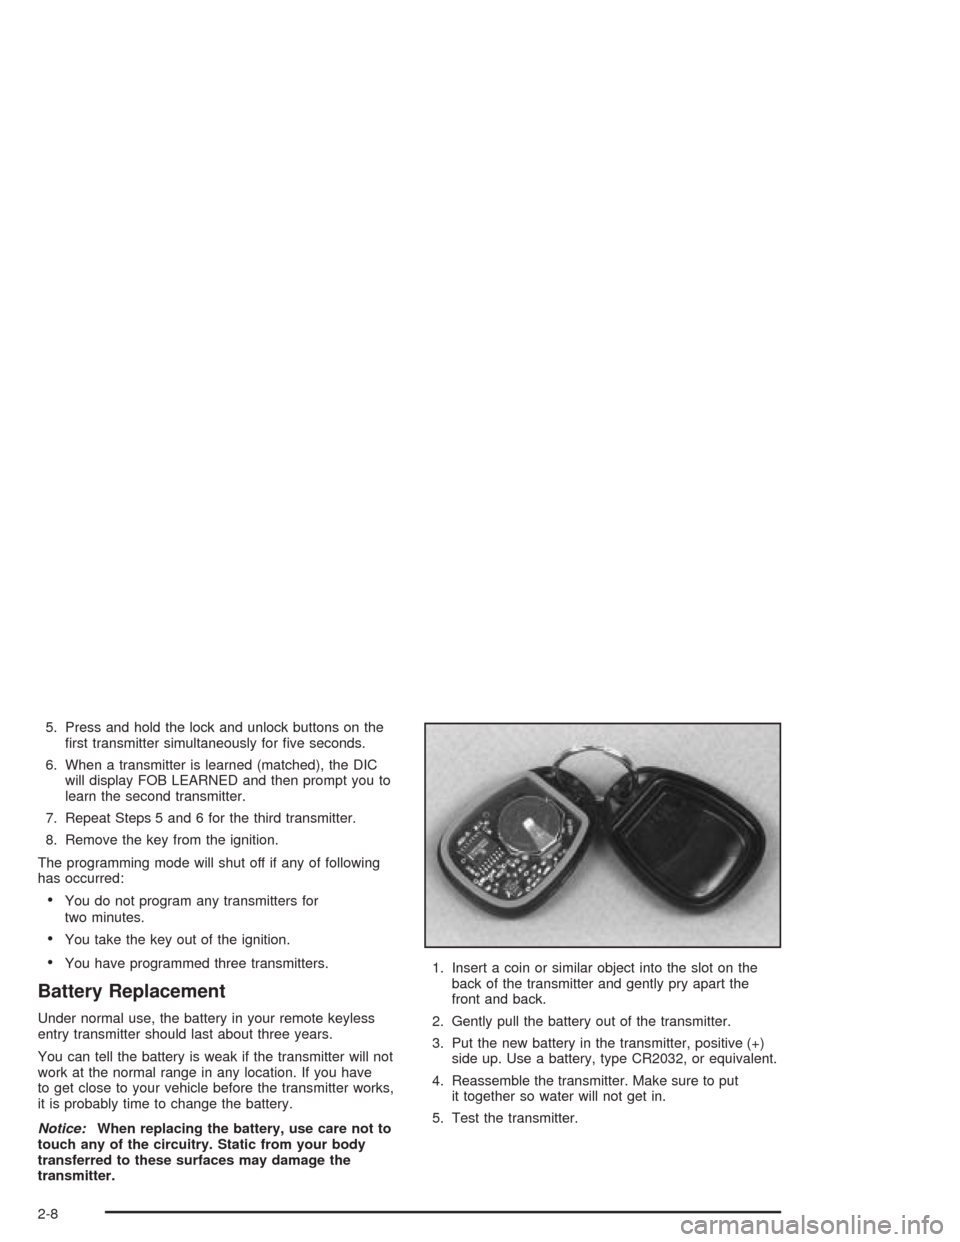
transmitter.1. Insert a coin or similar object into the slot on the
back of the transmitter and gently pry apart the
front and back.
2. Gently pull the battery out of the transmitter.
3. Put the new battery in the transmitter, positive (+)
side up. Use a battery, type CR2032, or equivalent.
4. Reassemble the transmitter. Make sure to put
it together so water will not get in.
5. Test the transmitter.
2-8
Page 171 of 384
Languages
You can select which language the DIC will display its
messages. Press the OPTIONS button until the
word LANGUAGES appears on the display, then use
the RESET button to page through the following choices:
•LANGUAGE ENGLISH
•LANGUAGE FRENCH
•LANGUAGE GERMAN
•LANGUAGE SPANISH
Blank Page
There is a blank page at the end of the OPTIONS
menu. When the blank page is displayed, you
can access the following items:
FOB TRAINING:This option allows you to match the
RKE transmitter(s) to your vehicle. You can access this
option by pressing and holding RESET for three
seconds while you are on the blank page at the end of
the OPTIONS menu. The message FOB TRAINING
will be displayed. See “Matching Transmitter(s) To Your
Vehicle” underRemote Keyless Entry System
Operation on page 2-6
.TIRE TRAINING (Except Z06):The Tire Pressure
Monitor (TPM) operates with battery-powered sensors
that are located inside the valve stems on each tire.
Each sensor has a unique ID code so the vehicle knows
the tire location of the sensor. When the vehicle
reaches a speed of greater than 15 mph (24 km/h), the
sensors begin to send the tire pressure readings to
a receiver inside the vehicle. These readings are
displayed when using the GAGES button on the DIC. If
you are unable to display your tire pressures while
the vehicle speed is greater than 15 mph (24 km/h), you
may need to have your sensor ID codes learned by
the vehicle. See your dealer.
3-57
Page 255 of 384
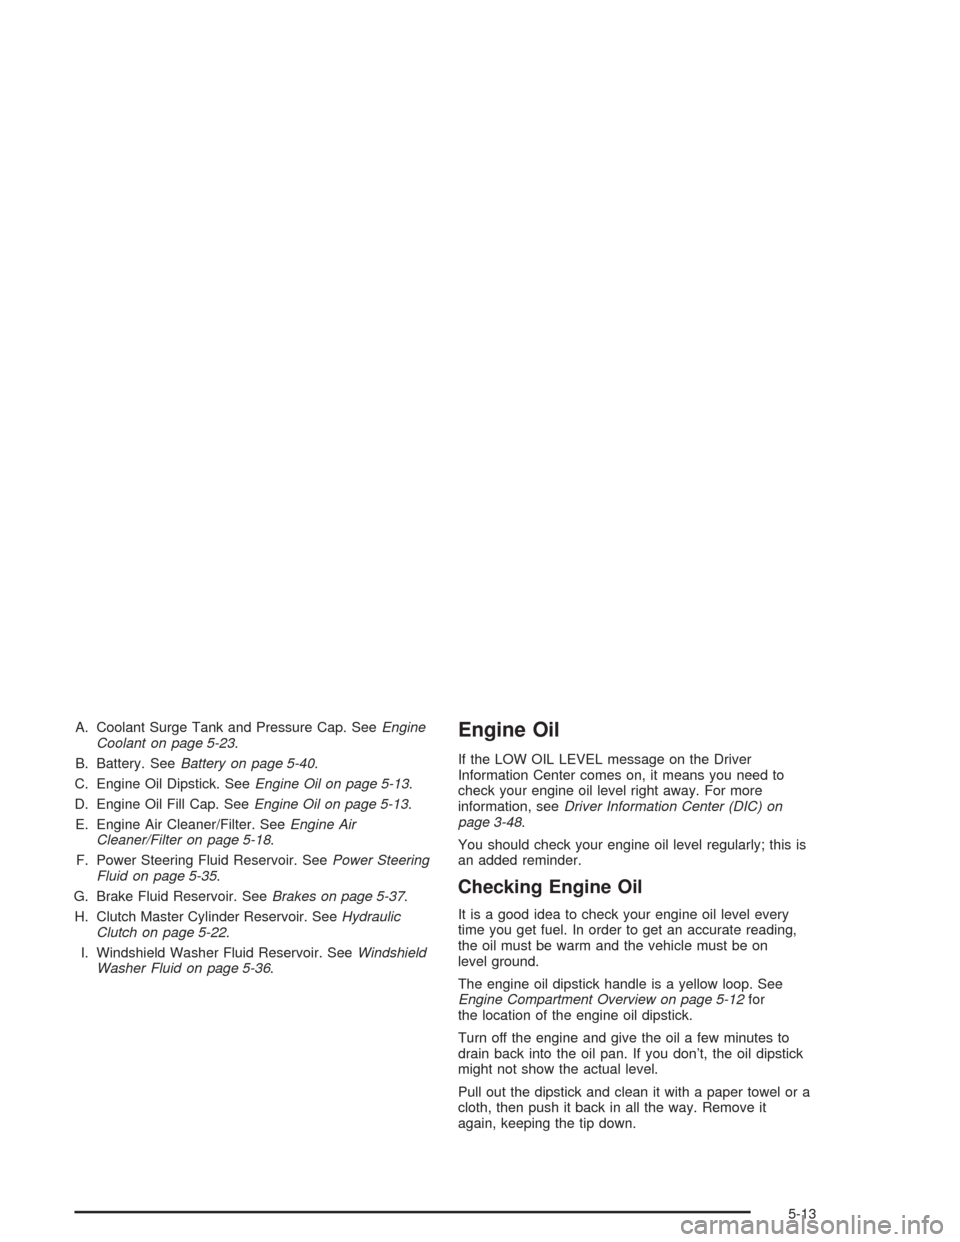
A. Coolant Surge Tank and Pressure Cap. SeeEngine
Coolant on page 5-23.
B. Battery. SeeBattery on page 5-40.
C. Engine Oil Dipstick. SeeEngine Oil on page 5-13.
D. Engine Oil Fill Cap. SeeEngine Oil on page 5-13.
E. Engine Air Cleaner/Filter. SeeEngine Air
Cleaner/Filter on page 5-18.
F. Power Steering Fluid Reservoir. SeePower Steering
Fluid on page 5-35.
G. Brake Fluid Reservoir. SeeBrakes on page 5-37.
H. Clutch Master Cylinder Reservoir. SeeHydraulic
Clutch on page 5-22.
I. Windshield Washer Fluid Reservoir. SeeWindshield
Washer Fluid on page 5-36.Engine Oil
If the LOW OIL LEVEL message on the Driver
Information Center comes on, it means you need to
check your engine oil level right away. For more
information, seeDriver Information Center (DIC) on
page 3-48.
You should check your engine oil level regularly; this is
an added reminder.
Checking Engine Oil
It is a good idea to check your engine oil level every
time you get fuel. In order to get an accurate reading,
the oil must be warm and the vehicle must be on
level ground.
The engine oil dipstick handle is a yellow loop. See
Engine Compartment Overview on page 5-12for
the location of the engine oil dipstick.
Turn off the engine and give the oil a few minutes to
drain back into the oil pan. If you don’t, the oil dipstick
might not show the actual level.
Pull out the dipstick and clean it with a paper towel or a
cloth, then push it back in all the way. Remove it
again, keeping the tip down.
5-13
Page 284 of 384
1. Check the other vehicle. It must have a 12-volt
battery with a negative ground system.
Notice:If the other vehicle’s system is not a 12-volt
system with a negative ground, both vehicles can
be damaged. Only use vehicles with 12-volt systems
with negative grounds to jump start your vehicle.
2. Get the vehicles close enough so the jumper cables
can reach, but be sure the vehicles are not touching
each other. If they are, it could cause a ground
connection you do not want. You would not be able
to start your vehicle, and the bad grounding
could damage the electrical systems.
To avoid the possibility of the vehicles rolling, set
the parking brake firmly on both vehicles involved in
the jump start procedure. Put an automatic
transmission in PARK (P) or a manual transmission
in NEUTRAL before setting the parking brakes.Notice:If you leave your radio or other accessories
on during the jump starting procedure, they could
be damaged. The repairs would not be covered
by your warranty. Always turn off your radio and
other accessories when jump starting your vehicle.
3. Turn off the ignition on both vehicles. Unplug
unnecessary accessories plugged into the cigarette
lighter or in the accessory power outlet. Turn off
the radio and all lamps that are not needed. This will
avoid sparks and help save both batteries. And it
could save your radio!
4. Open the hoods and locate the batteries. Find the
positive (+) and negative (−) terminal locations on
each vehicle. SeeEngine Compartment Overview
on page 5-12for more information on location.
{CAUTION:
An electric fan can start up even when the
engine is not running and can injure you. Keep
hands, clothing and tools away from any
underhood electric fan.
5-42
Page 364 of 384
Roadside Assistance Program
Security While You Travel
1-800-CHEV-USA (243-8872)
As the proud owner of a new Chevrolet vehicle, you are
automatically enrolled in the Chevrolet Roadside
Assistance program. This value-added service is
intended to provide you with peace of mind as you drive
in the city or travel the open road. Chevrolet’s Roadside
Assistance toll-free number is staffed by courteous
and capable Roadside Assistance Representatives who
are available 24 hours a day, 365 days a year.
We will provide the following services during the
Bumper-to-Bumper warranty period, at no expense
to you:
•Fuel Delivery:Delivery of enough fuel
($5 maximum) for the customer to get to the
nearest service station.
•Lock-out Service (identi�cation required):
Replacement keys or locksmith service will
be covered at no charge if you are unable to gain
entry into your vehicle. Delivery of the replacement
key will be covered within 10 miles.
•Emergency Tow:Tow to the nearest dealership for
warranty service or in the event of a
vehicle-disabling accident. Assistance when the
vehicle is mired in sand, mud or snow.
•Flat Tire Change:Installation of a spare tire will be
covered at no charge. (The customer is responsible
for the repair or replacement of the tire if not
covered by a warrantable failure.)
•Jump Start:No-start occurrences which require a
battery jump start will be covered at no charge.
•Dealer Locator Service
In many instances, mechanical failures are covered
under Chevrolet’s Bumper-to-Bumper warranty.
However, when other services are utilized, our Roadside
Assistance Representatives will explain any payment
obligations you might incur.
For prompt and efficient assistance when calling, please
provide the following to the Roadside Assistance
Representative:
•Your name, home address, and home telephone
number
•Telephone number of your location
•Location of the vehicle
•Model, year, color, and license plate number
•Mileage, Vehicle Identification Number and delivery
date of the vehicle
•Description of the problem
7-6