2004 CHEVROLET CLASSIC spare tire
[x] Cancel search: spare tirePage 203 of 348
Service............................................................5-3
Doing Your Own Service Work.........................5-3
Adding Equipment to the Outside of Your
Vehicle......................................................5-4
Fuel................................................................5-4
Gasoline Octane............................................5-4
Gasoline Specifications....................................5-5
California Fuel...............................................5-5
Additives.......................................................5-6
Fuels in Foreign Countries...............................5-6
Filling Your Tank............................................5-7
Filling a Portable Fuel Container.......................5-9
Checking Things Under the Hood....................5-10
Hood Release..............................................5-10
Engine Compartment Overview.......................5-12
Engine Oil...................................................5-13
Engine Air Cleaner/Filter................................5-17
Automatic Transaxle Fluid..............................5-19
Engine Coolant.............................................5-19
Coolant Surge Tank Pressure Cap..................5-22
Engine Overheating.......................................5-22
Cooling System............................................5-25
Power Steering Fluid.....................................5-31
Windshield Washer Fluid................................5-32Brakes........................................................5-34
Battery........................................................5-38
Jump Starting...............................................5-39
Bulb Replacement..........................................5-45
Halogen Bulbs..............................................5-45
Headlamps..................................................5-45
Front Turn Signal Lamps...............................5-47
Center High-Mounted Stoplamp (CHMSL).........5-47
Taillamps, Turn Signal, Stoplamps and
Back-up Lamps.........................................5-48
Replacement Bulbs.......................................5-50
Windshield Wiper Blade Replacement..............5-51
Tires..............................................................5-52
Inflation - Tire Pressure.................................5-59
Tire Inspection and Rotation...........................5-60
When It Is Time for New Tires.......................5-62
Buying New Tires.........................................5-62
Uniform Tire Quality Grading..........................5-63
Wheel Alignment and Tire Balance..................5-65
Wheel Replacement......................................5-65
Tire Chains..................................................5-66
If a Tire Goes Flat........................................5-67
Changing a Flat Tire.....................................5-68
Compact Spare Tire......................................5-79
Section 5 Service and Appearance Care
5-1
Page 254 of 348
Tires
Your new vehicle comes with high-quality tires made by
a leading tire manufacturer. If you ever have questions
about your tire warranty and where to obtain service,
see your GM Warranty booklet for details. For additional
information refer to the tire manufacturer’s booklet
included with your vehicle’s Owner’s Manual.
{CAUTION:
Poorly maintained and improperly used tires
are dangerous.
Overloading your tires can cause
overheating as a result of too much
friction. You could have an air-out and a
serious accident. See “Loading Your
Vehicle” in the Index.
Underin�ated tires pose the same danger
as overloaded tires. The resulting accident
could cause serious injury. Check all tires
frequently to maintain the recommended
pressure. Tire pressure should be checked
when your tires are cold.
CAUTION: (Continued)
CAUTION: (Continued)
Overin�ated tires are more likely to be
cut, punctured or broken by a sudden
impact — such as when you hit a pothole.
Keep tires at the recommended pressure.
Worn, old tires can cause accidents. If
your tread is badly worn, or if your tires
have been damaged, replace them.
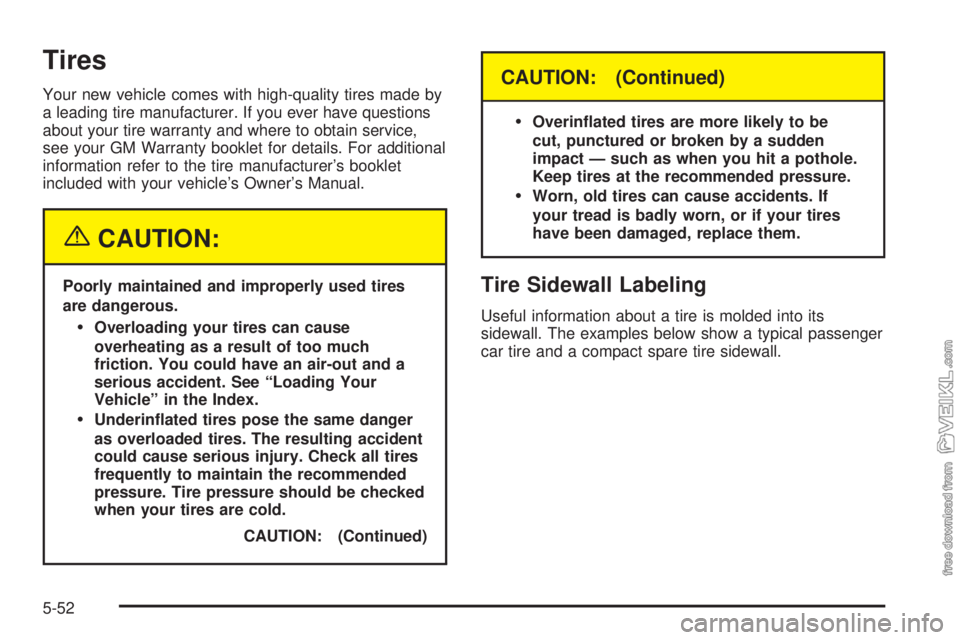
Tire Sidewall Labeling
Useful information about a tire is molded into its
sidewall. The examples below show a typical passenger
car tire and a compact spare tire sidewall.
5-52
Page 256 of 348
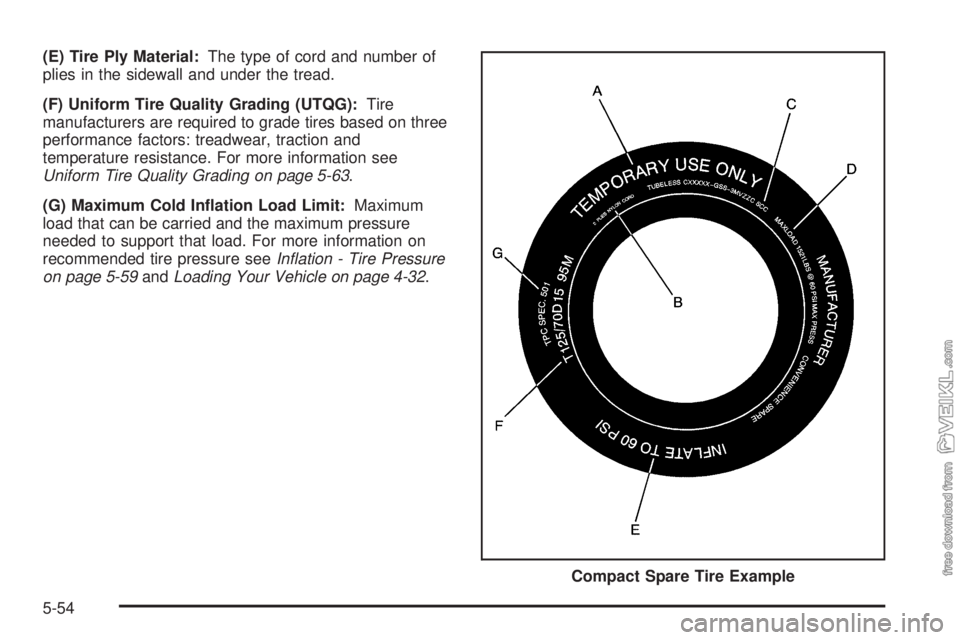
(E) Tire Ply Material:The type of cord and number of
plies in the sidewall and under the tread.
(F) Uniform Tire Quality Grading (UTQG):Tire
manufacturers are required to grade tires based on three
performance factors: treadwear, traction and
temperature resistance. For more information see
Uniform Tire Quality Grading on page 5-63.
(G) Maximum Cold In�ation Load Limit:Maximum
load that can be carried and the maximum pressure
needed to support that load. For more information on
recommended tire pressure seeIn�ation - Tire Pressure
on page 5-59andLoading Your Vehicle on page 4-32.
Compact Spare Tire Example
5-54
Page 257 of 348
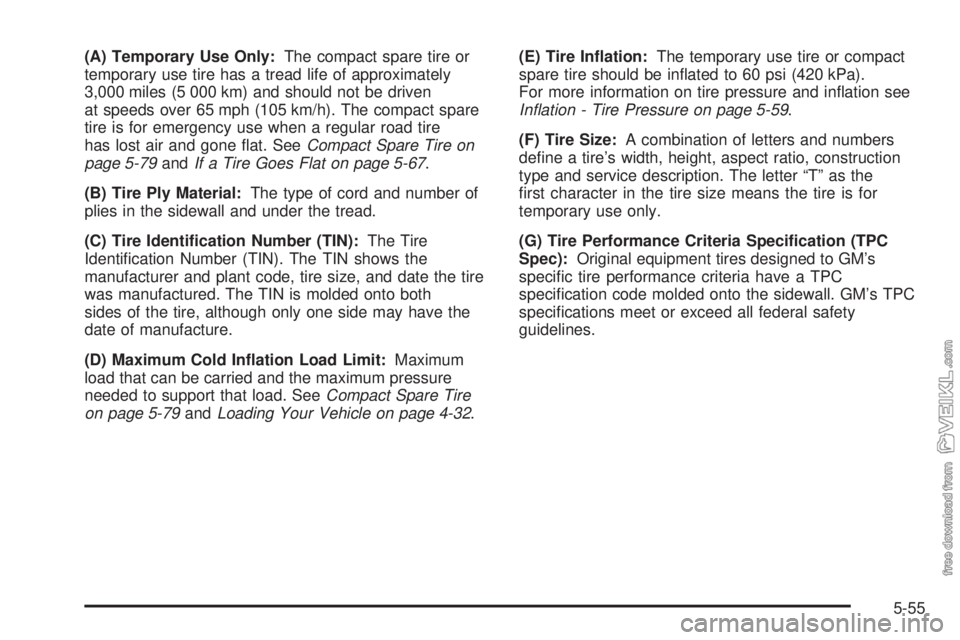
(A) Temporary Use Only:The compact spare tire or
temporary use tire has a tread life of approximately
3,000 miles (5 000 km) and should not be driven
at speeds over 65 mph (105 km/h). The compact spare
tire is for emergency use when a regular road tire
has lost air and gone flat. SeeCompact Spare Tire on
page 5-79andIf a Tire Goes Flat on page 5-67.
(B) Tire Ply Material:The type of cord and number of
plies in the sidewall and under the tread.
(C) Tire Identi�cation Number (TIN):The Tire
Identification Number (TIN). The TIN shows the
manufacturer and plant code, tire size, and date the tire
was manufactured. The TIN is molded onto both
sides of the tire, although only one side may have the
date of manufacture.
(D) Maximum Cold In�ation Load Limit:Maximum
load that can be carried and the maximum pressure
needed to support that load. SeeCompact Spare Tire
on page 5-79andLoading Your Vehicle on page 4-32.(E) Tire In�ation:The temporary use tire or compact
spare tire should be inflated to 60 psi (420 kPa).
For more information on tire pressure and inflation see
In�ation - Tire Pressure on page 5-59.
(F) Tire Size:A combination of letters and numbers
define a tire’s width, height, aspect ratio, construction
type and service description. The letter “T” as the
first character in the tire size means the tire is for
temporary use only.
(G) Tire Performance Criteria Speci�cation (TPC
Spec):Original equipment tires designed to GM’s
specific tire performance criteria have a TPC
specification code molded onto the sidewall. GM’s TPC
specifications meet or exceed all federal safety
guidelines.
5-55
Page 262 of 348
When to Check
Check your tires once a month or more.
Don’t forget your compact spare tire. It should be at
60 psi (420 kPa).
How to Check
Use a good quality pocket-type gage to check tire
pressure. You can’t tell if your tires are properly inflated
simply by looking at them. Radial tires may look
properly inflated even when they’re underinflated. Check
the tire’s inflation pressure when the tires are cold.
Cold means your vehicle has been sitting for at least
three hours or driven no more than 1 mile (1.6 km).
Remove the valve cap from the tire valve stem. Press
the tire gage firmly onto the valve to get a pressure
measurement. If the cold tire inflation pressure matches
the recommended pressure on the Tire and Loading
Information label, no further adjustment is necessary. If
the inflation pressure is low, add air until you reach
the recommended amount.
If you overfill the tire, release air by pushing on the
metal stem in the center of the tire valve. Recheck the
tire pressure with the tire gage.
Be sure to put the valve caps back on the valve stems.
They help prevent leaks by keeping out dirt and
moisture.
Tire Inspection and Rotation
Tires should be rotated every 5,000 to 8,000 miles
(8 000 to 13 000 km).
Any time you notice unusual wear, rotate your tires as
soon as possible and check wheel alignment. Also
check for damaged tires or wheels. SeeWhen It Is Time
for New Tires on page 5-62andWheel Replacement
on page 5-65for more information.
The purpose of regular rotation is to achieve more
uniform wear for all tires on the vehicle. The first rotation
is the most important. SeePart A: Scheduled
Maintenance Services on page 6-4, for scheduled
rotation intervals.
5-60
Page 263 of 348
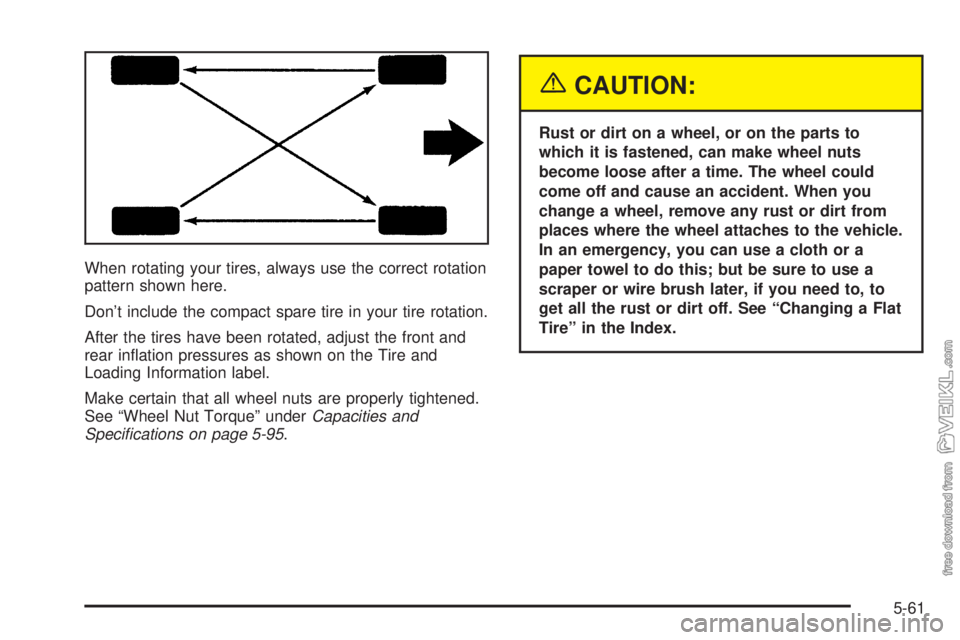
When rotating your tires, always use the correct rotation
pattern shown here.
Don’t include the compact spare tire in your tire rotation.
After the tires have been rotated, adjust the front and
rear inflation pressures as shown on the Tire and
Loading Information label.
Make certain that all wheel nuts are properly tightened.
See “Wheel Nut Torque” underCapacities and
Speci�cations on page 5-95.
{CAUTION:
Rust or dirt on a wheel, or on the parts to
which it is fastened, can make wheel nuts
become loose after a time. The wheel could
come off and cause an accident. When you
change a wheel, remove any rust or dirt from
places where the wheel attaches to the vehicle.
In an emergency, you can use a cloth or a
paper towel to do this; but be sure to use a
scraper or wire brush later, if you need to, to
get all the rust or dirt off. See “Changing a Flat
Tire” in the Index.
5-61
Page 265 of 348
{CAUTION:
Mixing tires could cause you to lose control
while driving. If you mix tires of different sizes
or types (radial and bias-belted tires), the
vehicle may not handle properly, and you
could have a crash. Using tires of different
sizes may also cause damage to your vehicle.
Be sure to use the same size and type tires on
all wheels. It’s all right to drive with your
compact spare temporarily, it was developed
for use on your vehicle. See “Compact Spare
Tire” in the index.
{CAUTION:
If you use bias-ply tires on your vehicle, the
wheel rim �anges could develop cracks after
many miles of driving. A tire and/or wheel
could fail suddenly, causing a crash. Use only
radial-ply tires with the wheels on your vehicle.
Uniform Tire Quality Grading
Quality grades can be found where applicable on the
tire sidewall between tread shoulder and maximum
section width. For example:
Treadwear 200 Traction AA Temperature A
The following information relates to the system
developed by the United States National Highway
Traffic Safety Administration, which grades tires by
treadwear, traction and temperature performance. (This
applies only to vehicles sold in the United States.)
The grades are molded on the sidewalls of most
passenger car tires. The Uniform Tire Quality Grading
system does not apply to deep tread, winter-type
snow tires, space-saver or temporary use spare tires,
tires with nominal rim diameters of 10 to 12 inches
(25 to 30 cm), or to some limited-production tires.
While the tires available on General Motors passenger
cars and light trucks may vary with respect to these
grades, they must also conform to federal safety
requirements and additional General Motors Tire
Performance Criteria (TPC) standards.
5-63
Page 271 of 348
Removing the Spare Tire and Tools
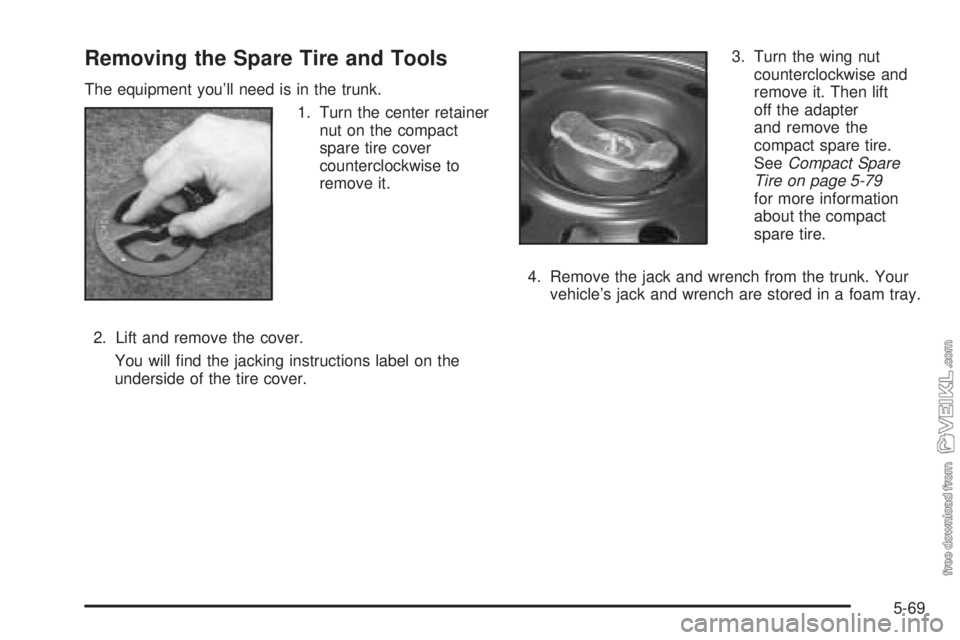
The equipment you’ll need is in the trunk.
1. Turn the center retainer
nut on the compact
spare tire cover
counterclockwise to
remove it.
2. Lift and remove the cover.
You will find the jacking instructions label on the
underside of the tire cover.3. Turn the wing nut
counterclockwise and
remove it. Then lift
off the adapter
and remove the
compact spare tire.
SeeCompact Spare
Tire on page 5-79
for more information
about the compact
spare tire.
4. Remove the jack and wrench from the trunk. Your
vehicle’s jack and wrench are stored in a foam tray.
5-69