2004 CHEVROLET CAVALIER instrument cluster
[x] Cancel search: instrument clusterPage 56 of 354

There is an air bag
readiness light on the
instrument panel cluster,
which shows the air
bag symbol.
The system checks the air bag electrical system for
malfunctions. The light tells you if there is an electrical
problem. SeeAir Bag Readiness Light on page 3-23
for more information.Where Are the Air Bags?
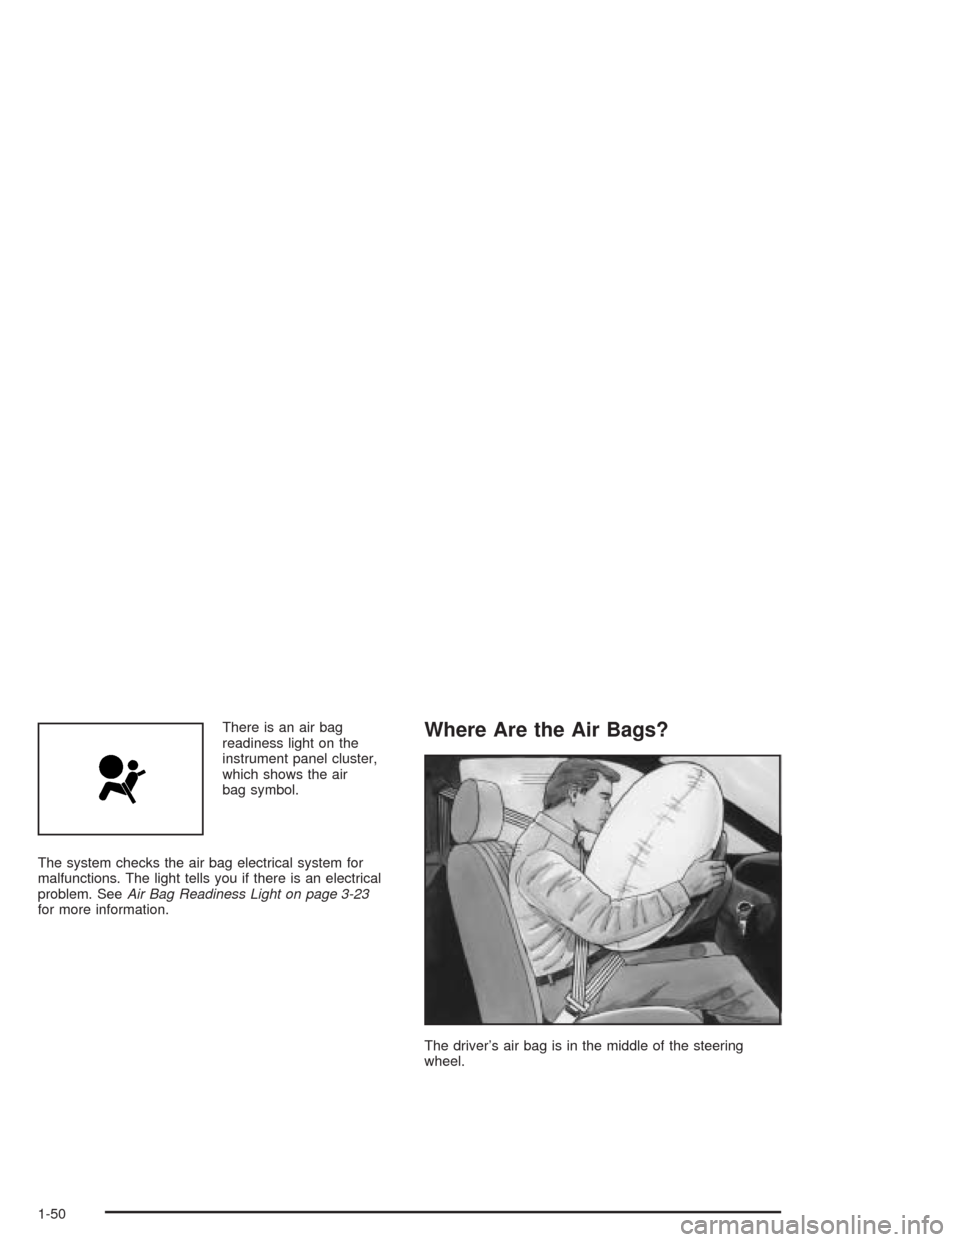
The driver’s air bag is in the middle of the steering
wheel.
1-50
Page 99 of 354

Instrument Panel Overview...............................3-2
Hazard Warning Flashers................................3-4
Other Warning Devices...................................3-5
Horn.............................................................3-5
Tilt Wheel.....................................................3-5
Turn Signal/Multifunction Lever.........................3-6
Exterior Lamps.............................................3-11
Interior Lamps..............................................3-14
Accessory Power Outlets...............................3-15
Ashtrays and Cigarette Lighter........................3-16
Climate Controls............................................3-16
Climate Control System.................................3-16
Outlet Adjustment.........................................3-19
Warning Lights, Gages, and Indicators............3-20
Instrument Panel Cluster................................3-21
Speedometer and Odometer...........................3-22
Tachometer.................................................3-22
Safety Belt Reminder Light.............................3-23
Air Bag Readiness Light................................3-23
Charging System Light..................................3-24
Up-Shift Light...............................................3-25
Brake System Warning Light..........................3-25
Anti-Lock Brake System Warning Light.............3-26
Enhanced Traction System Warning Light.........3-27
Enhanced Traction System Active Light............3-28
Engine Coolant Temperature Gage..................3-28Low Coolant Warning Light............................3-29
Malfunction Indicator Lamp.............................3-29
Oil Pressure Light.........................................3-32
Passlock
®Warning Light................................3-33
Check Gages Warning Light...........................3-33
Service Vehicle Soon Light............................3-34
Fuel Gage...................................................3-34
Audio System(s).............................................3-35
Setting the Time for Radios without
Radio Data Systems (RDS)........................3-35
Setting the Time for Radios with Radio
Data Systems (RDS)..................................3-36
AM-FM Radio...............................................3-36
Radio with CD (Base Level)...........................3-39
Radio with CD (Up Level)..............................3-43
Radio with CD (MP3)....................................3-52
Personal Choice Radio Controls......................3-66
Theft-Deterrent Feature (Non RDS Radios).......3-67
Theft-Deterrent Feature (RDS Radios).............3-67
Radio Reception...........................................3-67
Care of Your CDs.........................................3-68
Care of Your CD Player................................3-68
Fixed Mast Antenna......................................3-68
XM™ Satellite Radio Antenna System.............3-68
Chime Level Adjustment................................3-68
Section 3 Instrument Panel
3-1
Page 101 of 354

The main components of your instrument panel are the following:
A. Fog Lamp Button. See “Fog Lamps” underExterior
Lamps on page 3-11.
B. Instrument Panel Brightness Control. See
“Instrument Panel Brightness” underInterior Lamps
on page 3-14.
C. Turn Signal/Multifunction Lever. SeeTurn
Signal/Multifunction Lever on page 3-6.
D. Instrument Panel Cluster. SeeInstrument Panel
Cluster on page 3-21.
E. Hazard Warning Flashers Switch. SeeHazard
Warning Flashers on page 3-4.
F. Ignition Switch. SeeIgnition Positions on page 2-16.
G. Windshield Wiper/Washer Controls. See “Windshield
Wipers” and “Windshield Washers” underTurn
Signal/Multifunction Lever on page 3-6.
H. Cigarette Lighter. SeeAshtrays and Cigarette
Lighter on page 3-16.
I. Audio System. SeeAudio System(s) on page 3-35.J. Climate Controls and Rear Window Defogger. See
Climate Control System on page 3-16.
K. Fuse Panel. See “Instrument Panel Fuse Block”
underFuses and Circuit Breakers on page 5-81.
L. Remote Trunk Release Button. See “Remote Trunk
Release” underTrunk on page 2-10.
M. Hood Release Lever. SeeHood Release on
page 5-10.
N. Tilt Steering Wheel Lever. SeeTilt Wheel on
page 3-5.
O. Parking Brake Lever. SeeParking Brake on
page 2-25.
P. Accessory Power Outlet. SeeAccessory Power
Outlets on page 3-15.
Q. Shift Lever. SeeAutomatic Transaxle Operation on
page 2-20andManual Transaxle Operation on
page 2-23.
3-3
Page 104 of 354

Turn Signal/Multifunction Lever
The lever on the left side of the steering column
includes the following:
Turn and Lane-Change Signals
Headlamp High/Low-Beam Changer
Flash-to-Pass
Cruise Control
For information on the exterior lamps, seeExterior
Lamps on page 3-11.
Turn and Lane-Change Signals
The turn signal has two upward (for right) and two
downward (for left) positions. These positions allow you
to signal a turn or a lane change.
To signal a turn, move the lever all the way up or down.
When the turn is �nished, the lever will return
automatically.
An arrow on the instrument
panel cluster will �ash in
the direction of the
turn or lane change.
To signal a lane change, just raise or lower the lever
until the arrow starts to �ash. Hold it there until you
complete your lane change. The lever will return by itself
when you release it.
As you signal a turn or a lane change, if the arrows
�ash rapidly, a signal bulb may be burned out and other
drivers will not see your turn signal. If a bulb is burned
out, replace it to help avoid an accident.
If the arrows do not go on at all when you signal a turn,
check the fuse. SeeFuses and Circuit Breakers on
page 5-81.
3-6
Page 105 of 354

Headlamp High/Low-Beam Changer
To change the headlamps from low beam to high or high
beam to low, pull the turn signal lever all the way
toward you. Then release it.
When the high beams are
on, this light on the
instrument panel cluster
will also be on.
Flash-to-Pass
This feature lets you use your high-beam headlamps to
signal a driver in front of you that you want to pass.
To use it, pull the turn signal/multifunction lever toward
you until the high-beam headlamps come on, then
release the lever to turn them off.
Cruise Control
If your vehicle has this feature, you can maintain a
speed of about 25 mph (40 km/h) or more without
keeping your foot on the accelerator. This can really
help on long trips. Cruise control does not work at
speeds below about 25 mph (40 km/h).When you apply your brakes, or the clutch pedal if you
have a manual transaxle, the cruise control shuts off.
{CAUTION:
Cruise control can be dangerous where you
can not drive safely at a steady speed. So, do
not use your cruise control on winding roads
or in heavy traffic.
Cruise control can be dangerous on slippery
roads. On such roads, fast changes in tire
traction can cause needless wheel spinning,
and you could lose control. Do not use cruise
control on slippery roads.
If your vehicle is in cruise control when the optional
enhanced traction system begins to limit wheel spin, the
cruise control will automatically disengage. See
Enhanced Traction System (ETS) on page 4-8. When
road conditions allow you to safely use it again, you may
turn the cruise control back on.
3-7
Page 110 of 354

<(Parking Lamps):Turning the band to this position
turns on the parking lamps, together with the following:
Sidemarker Lamps
Taillamps
Instrument Panel Lights
4(Headlamps):Turning the band to this position
turns on the headlamps, together with the previously
listed lamps and lights.
Lamps On Reminder
If you open the driver’s door with the ignition off and the
lamps on, you will hear a warning chime.
Daytime Running Lamps
Daytime Running Lamps (DRL) can make it easier for
others to see the front of your vehicle during the
day. DRL can be helpful in many different driving
conditions, but they can be especially helpful in the short
periods after dawn and before sunset. Fully functional
daytime running lamps are required on all vehicles
�rst sold in Canada.The DRL system will make your low-beam headlamps
come on at a reduced brightness in daylight when
the following conditions are met:
The ignition is on.
The exterior lamp band is in OFF or in the parking
lamp position.
The parking brake is released.
The transaxle is not in PARK (P), on models with
an automatic transaxle only.
This indicator light on your
instrument panel cluster
will come on when the DRL
are on.
A �ashing DRL telltale indicates a possible burned out
headlamp, or that the vehicle may need service to repair
a stuck DRL relay.
3-12
Page 119 of 354

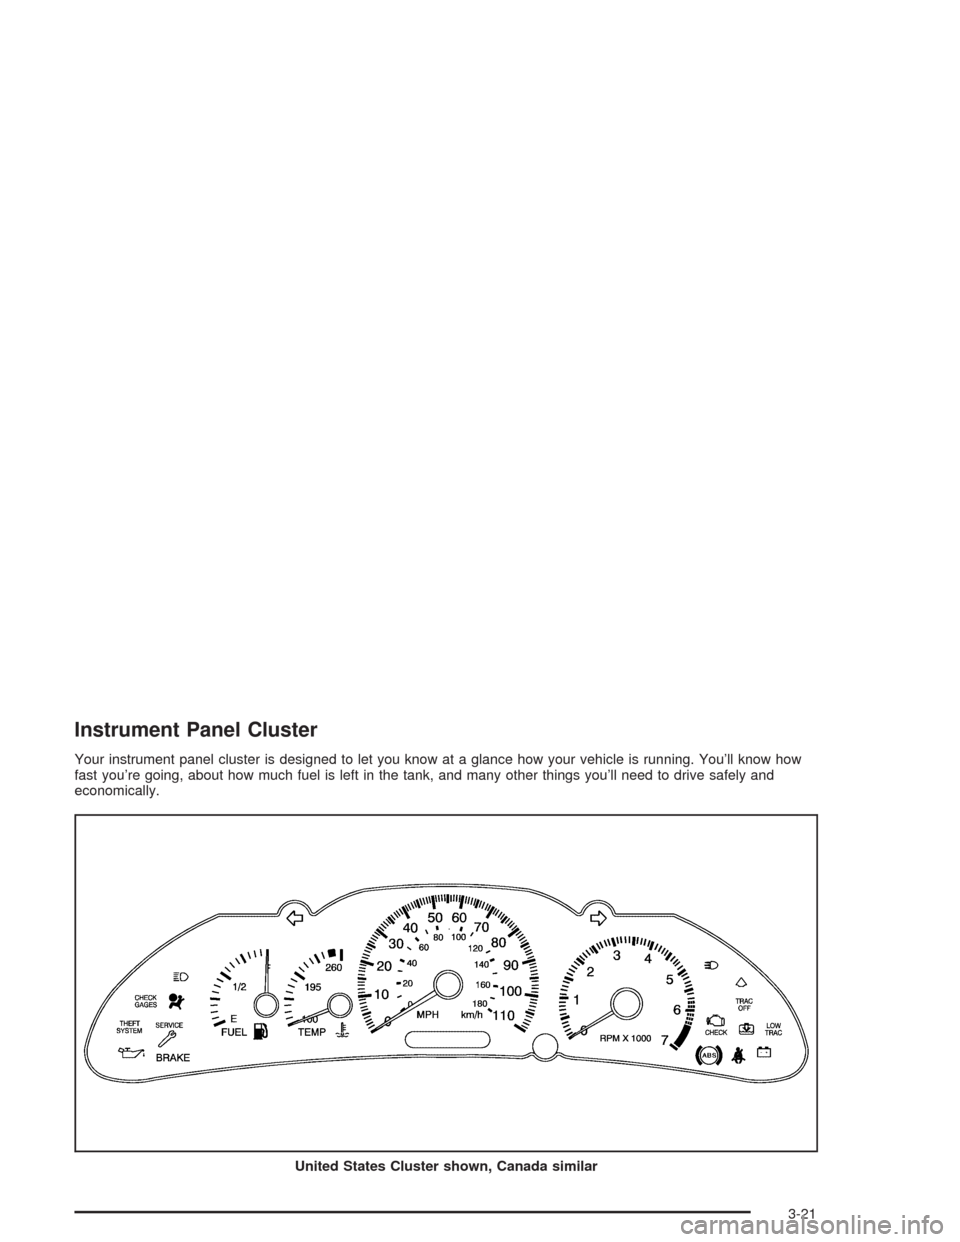
Instrument Panel Cluster
Your instrument panel cluster is designed to let you know at a glance how your vehicle is running. You’ll know how
fast you’re going, about how much fuel is left in the tank, and many other things you’ll need to drive safely and
economically.
United States Cluster shown, Canada similar
3-21
Page 223 of 354

A. Coolant Surge Tank. SeeCooling System on
page 5-25.
B. Engine Oil Dipstick. See “Checking Engine Oil”
underEngine Oil on page 5-13.
C. Engine Oil Fill Cap. See “When to Add Engine Oil”
underEngine Oil on page 5-13.
D. Brake Fluid Reservoir. See “Brake Fluid” under
Brakes on page 5-32.
E. Power Steering Fluid Reservoir. SeePower Steering
Fluid on page 5-30.
F. Clutch Master Cylinder Reservoir (If Equipped) (Not
Shown). SeeHydraulic Clutch on page 5-19.
G. Battery. SeeBattery on page 5-36.
H. Engine Air Cleaner/Filter. SeeEngine Air
Cleaner/Filter on page 5-17.
I. Windshield Washer Fluid Reservoir. SeeWindshield
Washer Fluid on page 5-31.
J. Engine Compartment Fuse Block. See “Engine
Compartment Fuse Block” underFuses and Circuit
Breakers on page 5-81.Engine Oil
If the oil pressure light
appears on the instrument
cluster, it means you
need to check your engine
oil level right away.
For more information, seeOil Pressure Light on
page 3-32.
You should check your engine oil level regularly; this is
an added reminder.
Checking Engine Oil
It is a good idea to check your engine oil every time you
get fuel. In order to get an accurate reading, the oil
must be warm and the vehicle must be on level ground.
The engine oil dipstick handle is a yellow loop. See
Engine Compartment Overview on page 5-12for
the location of the engine oil dipstick.
Turn off the engine and give the oil several minutes to
drain back into the oil pan. If you don’t, the oil
dipstick might not show the actual level.
5-13