2004 CHEVROLET AVEO belt
[x] Cancel search: beltPage 129 of 334

Clock
Your vehicle has a digital clock. The clock is located in
the secondary instrument cluster on the center of
the instrument panel, above the center air outlets.
When the ignition is turned to ACC or ON, the time is
displayed in the digital clock. There are two adjusting
buttons for the digital clock:
H (Hour):To go forward one hour, press the H button
once. To go forward more than one hour, press and hold
the button until the correct hour is reached.
M (Minute):To go forward one minute, press the
M button once. To go forward more than one minute,
press and hold the button until the correct minute
is reached.
After disconnecting the battery or replacing the fuse,
reset the clock.
Safety Belt Reminder Light
The safety belt light will
come on and stay on until
the driver’s safety belt
is buckled.
If the driver’s belt is already buckled, the light will not
come on.
3-25
Page 131 of 334

Charging System Light
The charging system light
will come on briefly when
you turn on the ignition,
and the engine is not
running, as a check
to show you it is working.
Then it should go out when the engine is started.
If it stays on, or comes on while you are driving, you
may have a problem with the electrical charging system.
It could indicate that you have a loose generator drive
belt, or another electrical problem. Have it checked right
away. Driving while this light is on could drain your
battery.
If you must drive a short distance with the light on, be
certain to turn off all your accessories, such as the radio
and air conditioner.
Anti-Lock Brake System Warning
Light
If your vehicle has an
anti-lock brake system, this
light will come on when the
ignition is turned to ON and
may stay on for several
seconds. That is normal.
If the light stays on, turn the ignition to LOCK. Or, if the
light comes on, stop as soon as possible and turn
the ignition off. Then start the engine again to reset the
system. If the light still stays on, or comes on again
while you are driving, your vehicle needs service. If the
regular brake system warning light is not on, you still
have brakes, but you do not have anti-lock brakes. If the
regular brake system warning light is also on, you do
not have anti-lock brakes and there is a problem with
your regular brakes. SeeBrake System Warning
Light on page 3-20.
The anti-lock brake system warning light will come on
briefly when you turn the ignition key to ON. This is
normal. If the light does not come on then, have it fixed
so it will be ready to warn you if there is a problem.
3-27
Page 150 of 334

Your Driving, the Road, and
Your Vehicle
Defensive Driving
The best advice anyone can give about driving is:
Drive defensively.
Please start with a very important safety device in your
vehicle: Buckle up. SeeSafety Belts: They Are for
Everyone on page 1-10.
Defensive driving really means “be ready for anything.”
On city streets, rural roads or freeways, it means
“always expect the unexpected.”
Assume that pedestrians or other drivers are going to
be careless and make mistakes. Anticipate what
they might do. Be ready for their mistakes.Rear-end collisions are about the most preventable of
accidents. Yet they are common. Allow enough following
distance. It is the best defensive driving maneuver,
in both city and rural driving. You never know when
the vehicle in front of you is going to brake or turn
suddenly.
Defensive driving requires that a driver concentrate on
the driving task. Anything that distracts from the
driving task — such as concentrating on a cellular
telephone call, reading, or reaching for something on
the floor — makes proper defensive driving more difficult
and can even cause a collision, with resulting injury.
Ask a passenger to help do things like this, or pull off the
road in a safe place to do them yourself. These simple
defensive driving techniques could save your life.
4-2
Page 159 of 334

Steering in Emergencies
There are times when steering can be more effective
than braking. For example, you come over a hill and find
a truck stopped in your lane, or a car suddenly pulls
out from nowhere, or a child darts out from between
parked cars and stops right in front of you. You can
avoid these problems by braking — if you can stop in
time. But sometimes you can not; there is not room.
That is the time for evasive action — steering around the
problem.
Your vehicle can perform very well in emergencies like
these. First apply your brakes — but, unless you
have anti-lock, not enough to lock your wheels.
SeeBraking on page 4-6. It is better to remove as much
speed as you can from a possible collision. Then steer
around the problem, to the left or right depending on the
space available.An emergency like this requires close attention and a
quick decision. If you are holding the steering wheel at
the recommended 9 and 3 o’clock positions, you
can turn it a full 180 degrees very quickly without
removing either hand. But you have to act fast, steer
quickly, and just as quickly straighten the wheel
once you have avoided the object.
The fact that such emergency situations are always
possible is a good reason to practice defensive driving
at all times and wear safety belts properly.
4-11
Page 188 of 334

Tires..............................................................5-51
Inflation - Tire Pressure.................................5-59
Tire Inspection and Rotation...........................5-60
When It Is Time for New Tires.......................5-61
Buying New Tires.........................................5-62
Uniform Tire Quality Grading..........................5-63
Wheel Alignment and Tire Balance..................5-64
Wheel Replacement......................................5-64
Tire Chains..................................................5-66
If a Tire Goes Flat........................................5-66
Changing a Flat Tire.....................................5-67
Compact Spare Tire......................................5-75
Appearance Care............................................5-76
Cleaning the Inside of Your Vehicle.................5-76
Care of Safety Belts......................................5-79
Weatherstrips...............................................5-79
Cleaning the Outside of Your Vehicle..............5-79Sheet Metal Damage.....................................5-81
Finish Damage.............................................5-81
Underbody Maintenance................................5-82
Chemical Paint Spotting.................................5-82
Vehicle Care/Appearance Materials..................5-82
Vehicle Identi�cation......................................5-83
Vehicle Identification Number (VIN).................5-83
Service Parts Identification Label.....................5-84
Electrical System............................................5-84
Add-On Electrical Equipment..........................5-84
Headlamp Wiring..........................................5-84
Windshield Wiper Fuses................................5-84
Power Windows and Other Power Options.......5-84
Fuses and Circuit Breakers............................5-85
Capacities and Speci�cations..........................5-91
Section 5 Service and Appearance Care
5-2
Page 241 of 334

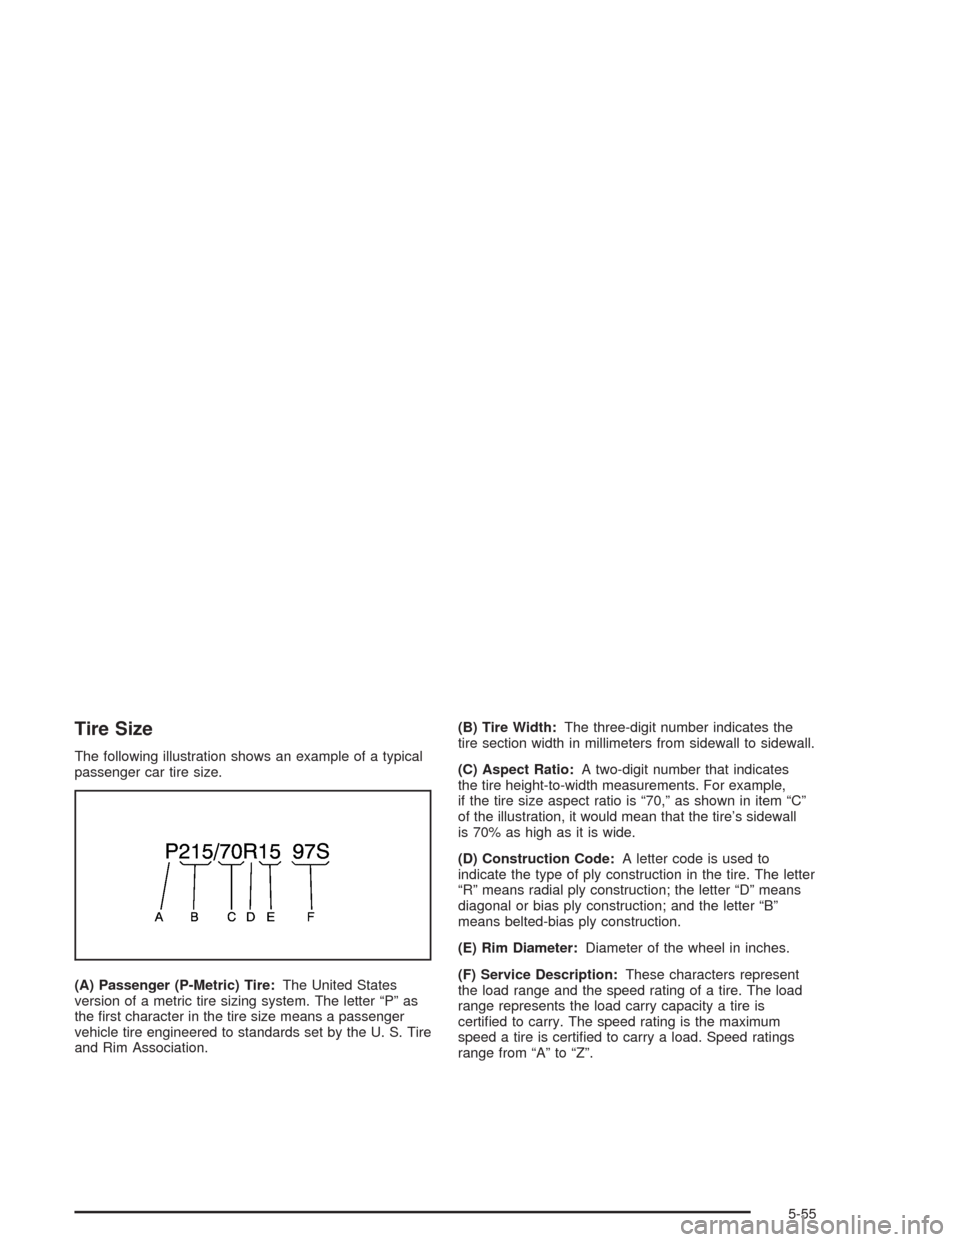
Tire Size
The following illustration shows an example of a typical
passenger car tire size.
(A) Passenger (P-Metric) Tire:The United States
version of a metric tire sizing system. The letter “P” as
the first character in the tire size means a passenger
vehicle tire engineered to standards set by the U. S. Tire
and Rim Association.(B) Tire Width:The three-digit number indicates the
tire section width in millimeters from sidewall to sidewall.
(C) Aspect Ratio:A two-digit number that indicates
the tire height-to-width measurements. For example,
if the tire size aspect ratio is “70,” as shown in item “C”
of the illustration, it would mean that the tire’s sidewall
is 70% as high as it is wide.
(D) Construction Code:A letter code is used to
indicate the type of ply construction in the tire. The letter
“R” means radial ply construction; the letter “D” means
diagonal or bias ply construction; and the letter “B”
means belted-bias ply construction.
(E) Rim Diameter:Diameter of the wheel in inches.
(F) Service Description:These characters represent
the load range and the speed rating of a tire. The load
range represents the load carry capacity a tire is
certified to carry. The speed rating is the maximum
speed a tire is certified to carry a load. Speed ratings
range from “A” to “Z”.
5-55
Page 242 of 334

Tire Terminology and De�nitions
Air Pressure:The amount of air inside the tire pressing
outward on each square inch of the tire. Air pressure
is expressed in pounds per square inch (psi) or
kilopascal (kPa).
Accessory Weight:This means the combined weight
of optional accessories. Some examples of optional
accessories are, automatic transmission, power steering,
power brakes, power windows, power seats, and air
conditioning.
Aspect Ratio:The relationship of a tire’s height to
its width.
Belt:A rubber coated layer of cords that is located
between the plies and the tread. Cords may be made
from steel or other reinforcing materials.
Bead:The tire bead contains steel wires that hold the
tire onto the rim.
Bias Ply Tire:A pneumatic tire in which the plies are
laid at alternate angles, less than 90 degrees to the
centerline of the tread.Cold In�ation Pressure:The amount of air pressure
in a tire, measured in pounds per square inch (psi)
or kilopascal (kPa), before a tire has built up heat from
driving. SeeInflation - Tire Pressure on page 5-59.
Curb Weight:This means the weight of a motor vehicle
with standard and optional equipment including the
maximum capacity of fuel, oil and coolant, but without
passengers and cargo.
DOT Markings:A code molded into the sidewall of a
tire signifying that the tire is in compliance with the
U.S. Department of Transportation motor vehicle safety
standards. The DOT code includes the Tire Identification
Number (TIN), an alphanumeric designator which can
also identify the tire manufacturer, production plant,
brand and date of production.
GVWR:Gross Vehicle Weight Rating, seeLoading
Your Vehicle on page 4-32.
GAWR FRT:Gross Axle Weight Rating for the front
axle, seeLoading Your Vehicle on page 4-32.
GAWR RR:Gross Axle Weight Rating for the rear axle,
seeLoading Your Vehicle on page 4-32.
5-56
Page 248 of 334

Buying New Tires
To find out what kind and size of tires you need, look at
the Tire-Loading Information label.
Make sure the replacements are the same size, load
range, speed rating and construction type (bias,
bias-belted or radial) as your original tires.
{CAUTION:
Mixing tires could cause you to lose control
while driving. If you mix tires of different sizes
or types (radial and bias-belted tires), the
vehicle may not handle properly, and you
could have a crash. Using tires of different
sizes may also cause damage to your vehicle.
Be sure to use the same size and type tires on
all wheels. It’s all right to drive with your
compact spare temporarily, it was developed
for use on your vehicle. See “Compact Spare
Tire” in the Index.
{CAUTION:
If you use bias-ply tires on your vehicle, the
wheel rim �anges could develop cracks after
many miles of driving. A tire and/or wheel
could fail suddenly, causing a crash. Use only
radial-ply tires with the wheels on your vehicle.
5-62