2004 CHEVROLET AVALANCHE radio
[x] Cancel search: radioPage 182 of 548

Automatic Headlamp System
When it is dark enough outside and the headlamp
switch is in AUTO, your automatic headlamp system will
turn on your headlamps at the normal brightness
along with other lamps such as the taillamps,
sidemarker, parking lamps, roof marker lamps and the
instrument panel lights. The radio lights will also be dim.
To turn off the automatic headlamp system, turn the
exterior lamps switch to the off position and then
release.
Your vehicle has a light sensor located on the top of the
instrument panel. Be sure it is not covered, or the
system will be on whenever the ignition is on.
The system may also turn on your headlamps when
driving through a parking garage, heavy overcast
weather or a tunnel. This is normal.
There is a delay in the transition between the daytime
and nighttime operation of the Daytime Running
Lamps (DRL) and the automatic headlamp systems so
that driving under bridges or bright overhead street
lights does not affect the system. The DRL and
automatic headlamp system will only be affected when
the light sensor sees a change in lighting lasting
longer than the delay.If you start your vehicle in a dark garage, the automatic
headlamp system will come on immediately. Once
you leave the garage, it will take approximately
one minute for the automatic headlamp system to
change to DRL if it is light outside. During that delay,
your instrument panel cluster may not be as bright
as usual. Make sure your instrument panel brightness
control is in the full bright position. See “Instrument
Panel Brightness” underInterior Lamps on page 3-20.
Lamps On Reminder
If a door is open, a reminder chime will sound when
your headlamps or parking lamps are manually turned
on and your key is out of the ignition. To turn off
the chime, turn the headlamp switch to off or AUTO and
then back on. In the automatic mode, the headlamps
turn off once the ignition is in LOCK and the headlamps
on at exit delay ends (if enabled in the DIC).
3-16
Page 186 of 548

Interior Lamps
Instrument Panel Brightness
The thumbwheel for this feature is located next to the
exterior lamps control.
D(Instrument Panel Lights):Turn the thumbwheel,
located next to the exterior lamps control, up or
down to brighten or dim the instrument panel lights and
the radio display. This will only work if the headlamps
or parking lamps are on.
To turn on the dome lamps, with the vehicle doors
closed, turn the thumbwheel all the way up.
Dome Lamps
The dome lamps will come on when you open a door
and will slowly dim to off when all doors are closed.
You can also turn the dome lamps on by turning
the thumbwheel, located next to the exterior lamp
control, all the way up. In this position, the dome lamps
will remain on whether a door is opened or closed.
E(Dome Override):Press this button, located below
the exterior lamp control, to turn dome lamps off even
when a door is opened. To return the lamps to automatic
operation, press the button again and it will return to
the out position. In this position, the dome lamps
will come on when you open a door.
Entry Lighting and Exit Lighting
Your vehicle is equipped with an illuminated entry and
exit feature.
When a door is opened, the dome lamps and puddle
lamps will come on if the dome override button is in the
out position. If the dome override button is pressed
in, the lamps will not come on.
With exit lighting, the interior lamps will come on when
you remove the key from the ignition. The lamps will not
come on if the dome override button is pressed in.
3-20
Page 206 of 548

Charging System Light
The charging system light
will come on brie�y when
you turn on the ignition,
but the engine is not
running, as a check to
show you it is working.
It should go out once the engine is running. If it stays on,
or comes on while you are driving, you may have a
problem with the charging system. It could indicate that
you have problems with a generator drive belt, or another
electrical problem. Have it checked right away. Driving
while this light is on could drain your battery.When this light comes on the DIC will also display the
battery not charging message. SeeDIC Warnings
and Messages on page 3-65.
If you must drive a short distance with the light on, be
certain to turn off all your accessories, such as the radio
and air conditioner.
3-40
Page 238 of 548
CHECK TIRE PRESSURE
If a low tire pressure is detected in any of the vehicle’s
tires, this message will appear on the DIC. Press
the select button or trip stem to acknowledge the
message and clear it from the DIC display.
SeeTires on page 5-68for more information on tires
and the correct in�ation pressures.
This message will appear at each ignition cycle until the
tires are in�ated to the correct in�ation pressure.
SERVICE TIRE MONITOR
This message will be displayed if any of the tire monitor
sensors have malfunctioned, or if the tire monitor
sensors have not been programmed correctly. For more
information on programming the tire pressure monitor
system seeTire Pressure Monitor System on page 5-77.
Press the select button to acknowledge the message
and clear it from the DIC display.
This message will appear at each ignition cycle until the
tire pressure monitor system has been serviced.
Audio System(s)
Notice:Before adding any sound equipment to your
vehicle, like a tape player, CB radio, mobile
telephone, or two-way radio, make sure that it can be
added by checking with your dealer. Also, check
federal rules covering mobile radio and telephone
units. If sound equipment can be added, it is very
important to do it properly. Added sound equipment
may interfere with the operation of your vehicle’s
engine, radio, or other systems, and even damage
them. Your vehicle’s systems may interfere with the
operation of sound equipment that has been added
improperly.
Figure out which audio system is in your vehicle, �nd
out what your audio system can do, and how to operate
all of its controls.
Your vehicle may have a feature called Retained
Accessory Power (RAP). With RAP, the audio system
can be played even after the ignition is turned off.
See “Retained Accessory Power (RAP)” underIgnition
Positions on page 2-31.
3-72
Page 239 of 548
Setting the Time
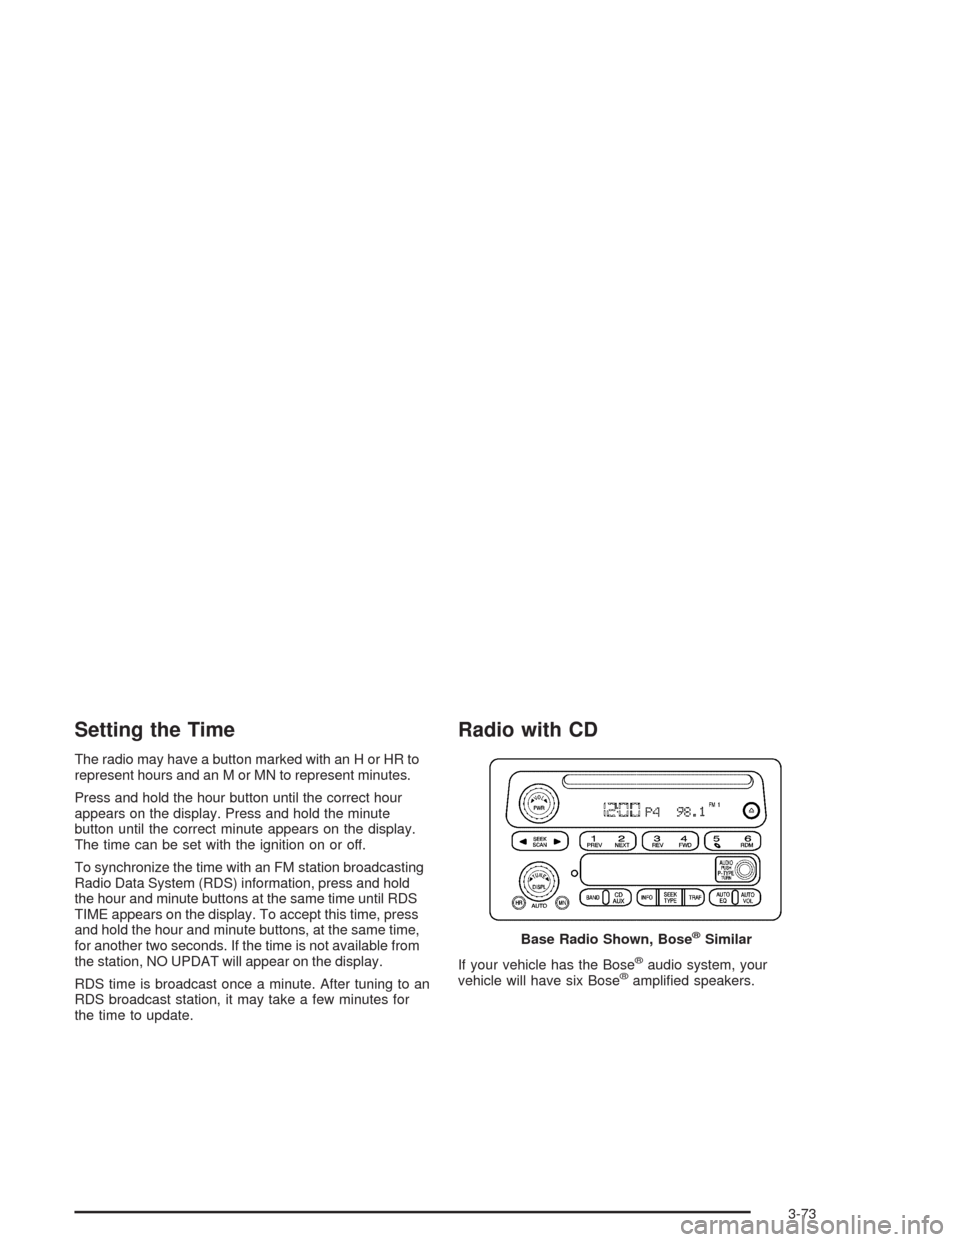
The radio may have a button marked with an H or HR to
represent hours and an M or MN to represent minutes.
Press and hold the hour button until the correct hour
appears on the display. Press and hold the minute
button until the correct minute appears on the display.
The time can be set with the ignition on or off.
To synchronize the time with an FM station broadcasting
Radio Data System (RDS) information, press and hold
the hour and minute buttons at the same time until RDS
TIME appears on the display. To accept this time, press
and hold the hour and minute buttons, at the same time,
for another two seconds. If the time is not available from
the station, NO UPDAT will appear on the display.
RDS time is broadcast once a minute. After tuning to an
RDS broadcast station, it may take a few minutes for
the time to update.
Radio with CD
If your vehicle has the Bose®audio system, your
vehicle will have six Bose®ampli�ed speakers. Base Radio Shown, Bose
®Similar
3-73
Page 240 of 548
Radio Data System (RDS)
The audio system has a Radio Data System (RDS).
RDS features are available for use only on FM stations
that broadcast RDS information.
With RDS, the radio can do the following:
Seek to stations broadcasting the selected type of
programming
Receive announcements concerning local and
national emergencies
Display messages from radio stations
Seek to stations with traffic announcements
This system relies upon receiving speci�c information
from these stations and will only work when the
information is available. In rare cases, a radio station
may broadcast incorrect information that will cause
the radio features to work improperly. If this happens,
contact the radio station.
While the radio is tuned to an RDS station, the station
name or call letters will appear on the display instead of
the frequency. RDS stations may also provide the time of
day, a program type (PTY) for current programming, and
the name of the program being broadcast.
XM™ Satellite Radio Service
XM™ is a satellite radio service that is based in the 48
contiguous United States. XM™ offers 100 coast to coast
channels including music, news, sports, talk, and
children’s programming. XM™ provides digital quality
audio and text information that includes song title and
artist name. A service fee is required in order to receive
the XM™ service. For more information, contact XM™ at
www.xmradio.com or call 1-800-852-XMXM (9696).
Playing the Radio
PWR (Power):Press this knob to turn the system on
and off.
VOL (Volume):Turn this knob to increase or to
decrease the volume.
AUTO VOL (Automatic Volume):With automatic
volume, the audio system will adjust automatically to
make up for road and wind noise as you drive by
increasing the volume as vehicle speed increases.
Set the volume at the desired level. Press this button to
select LOW, MEDIUM, or HIGH. AVOL will appear
on the display. Each higher setting will provide more
volume compensation at faster vehicle speeds. To turn
automatic volume off, press this button until AVOL
OFF appears on the display.
3-74
Page 241 of 548
DISPL (Display):Press this knob to switch the display
between the radio station frequency and the time. When
the ignition is off, press this knob to display the time.
For RDS, press the DISPL knob to change what appears
on the display while using RDS. The display options are
station name, RDS station frequency, PTY, and the name
of the program (if available).
For XM™ (if equipped), press the DISPL knob while in
XM™ mode to retrieve four different categories of
information related to the current song or channel:
Artist, Song Title, Category or PTY, Channel Number/
Channel Name.
To change the default on the display, press the DISPL
knob until you see the display you want, then hold the
knob for two seconds. The radio will produce one beep
and the selected display will now be the default.Finding a Station
BAND:Press this button to switch between FM1, FM2,
AM, or XM1 or XM2 (if equipped). The display will
show the selection.
TUNE:Turn this knob to select radio stations.
qSEEKr:Press the right or the left arrow to go to
the next or to the previous station and stay there.
The radio will only seek stations with a strong signal
that are in the selected band.
qSCANr:Press and hold either arrow for more
than two seconds. SCAN will appear on the display and
you will hear a beep. The radio will go to a station,
play for a few seconds, then go on to the next station.
Press either arrow again to stop scanning.
To scan preset stations, press and hold either arrow for
more than four seconds. PSCN will appear on the
display and you will hear two beeps. The radio will go to
the �rst preset station, play for a few seconds, then
go on to the next preset station. Press either arrow again
or one of the pushbuttons to stop scanning.
The radio will only scan stations with a strong signal
that are in the selected band.
3-75
Page 242 of 548
Setting Preset Stations
Up to 30 stations (six FM1, six FM2, and six AM,
six XM1 and six XM2 (if equipped)), can be programmed
on the six numbered pushbuttons, by performing the
following steps:
1. Turn the radio on.
2. Press BAND to select FM1, FM2, AM, or XM1
or XM2.
3. Tune in the desired station.
4. Press AUTO EQ to select the equalization.
5. Press and hold one of the six numbered
pushbuttons until you hear a beep. Whenever that
numbered pushbutton is pressed, the station
that was set will return and the equalization that
was selected will be stored for that pushbutton.
6. Repeat the steps for each pushbutton.
Setting the Tone (Bass/Treble)
AUDIO:Push and release the AUDIO knob until BASS
or TREB appears on the display. Turn the knob to
increase or to decrease. The display will show the bass
or treble level. If a station is weak or noisy, decrease
the treble.
To adjust the bass and treble to the middle position, push
and hold the AUDIO knob. The radio will produce one
beep and adjust the display level to the middle position.
To adjust all tone and speaker controls to the middle
position, push and hold the AUDIO knob when no tone or
speaker control is displayed. ALL will appear on the
display, you will hear a beep, and the display level will be
adjusted to the middle position.
AUTO EQ (Automatic Equalization):Press this button
to select customized equalization settings designed
for country/western, jazz, talk, pop, rock, and classical.
Selecting CUSTOM or changing bass or treble,
returns the EQ to the manual bass and treble settings.
The radio will save separate AUTO EQ settings for
each preset and source.
If the radio is equipped with the Bose audio system,
the equalization settings are either CUSTOM or TALK.
3-76