2004 CADILLAC SEVILLE maintenance reset
[x] Cancel search: maintenance resetPage 165 of 410
•AVG MPH (Average Miles per Hour):This
message shows the average speed you have
traveled at since the last time you reset the value.
To reset the value, press the INFO button to
display AVG MPH then press and hold the INFO
RESET button until 0.0 AVG MPH is displayed.
•TIMER:This feature is like a stopwatch, in that you
can clock the time it takes to get from one point to
another.
To operate, press the INFO button to display
TIMER. Each of the fields for the hours, minutes
and seconds are two numeric digits.
Once TIMER 00:00:00 is displayed, press the
ON/OFF button to start the timing feature. Press the
ON/OFF button again to stop it. If you will be starting
and stopping your vehicle, during a trip for instance,
the TIMER feature will automatically start timing
where it left off when you last stopped. To reset it,
press and hold the INFO RESET button until the
display reads TIMER 00:00:00. Press the INFO
button to exit from the TIMER display.
•ENGINE OIL LIFE:Press the INFO button to display
ENGINE OIL LIFE, then press and hold the INFO
RESET button until 100% ENGINE OIL LIFE is
displayed. (This only needs to be reset after you
have had the oil changed.)
•TRANSMISSION FLUID LIFE MONITOR:Under
normal conditions, the rate of deterioration of the
transmission fluid is slow. SeeScheduled
Maintenance on page 6-4for proper fluid and change
intervals. To reset the transmission fluid life, press
the INFO button to display TRANS FLUID LIFE, then
press and hold the INFO RESET button until 100%
TRANS FLUID LIFE is displayed. (This only needs to
be reset after you have had the fluid changed.)
ON/OFF:Pressing this button turns the Personalization
Features on and off. (FEATURE PROGRAMMING must
be displayed on the DIC to begin actual programming.)
This button also starts and stops the timer.
OUTSIDE TEMP (Temperature):This message shows
the outside temperature. After this display has been on
the DIC for about five seconds, the words OUTSIDE
TEMP will disappear so that only the temperature
remains.
3-53
Page 168 of 410
CHANGE ENGINE OIL – 82:This means that the life
of the engine oil has expired and it should be changed
within 200 miles. After an oil change, the Oil Life
Indicator must be reset. SeeOil Life Indicator on
page 3-74. SeeEngine Oil on page 5-13.
CHANGE TRANS FLUID – 47:This message will
appear when it is time to change the transaxle fluid. See
Scheduled Maintenance on page 6-4for the proper
fluid and change intervals.
CHECK BRAKE FLUID – 37:This message will
display if the ignition is in ON to inform the driver that
the brake fluid level is low. Have the brake system
serviced by a technician as soon as possible. SeeBrake
System Warning and Parking Brake Indicator Light on
page 3-43.
CHECK COOLANT LEVEL – 2:This message will
appear when there is a low level of engine coolant. Have
the cooling system serviced by a technician as soon
as possible. SeeEngine Coolant on page 5-23.
CHECK FUEL GAGE – 50:This message will appear
when the fuel supply is less than 5 gallons (18.9 L)
and the display is turned off. A single chime will also
sound when this message is displayed.CHECK GAS CAP – 61:This message will appear if
the gas cap has not been fully tightened. You should
recheck your gas cap to ensure that it is on properly.
CHECK OIL LEVEL – 36:For correct operation of the
low oil sensing system, your vehicle should be on a
level surface. A false CHECK OIL LEVEL message may
appear if the vehicle is parked on a grade. The oil
level sensing system does not check for actual oil level
if the engine has been off for a short period of time,
and the oil level is never checked while the engine is
running. If the CHECK OIL LEVEL message appears,
and your vehicle has been parked on level ground
with the engine off for at least 30 minutes, the oil level
should be checked by observing the oil dipstick. Prior to
checking the oil level, be sure the engine has been
off for a few minutes and your vehicle is on a level
surface. Then check the dipstick and add oil if
necessary. SeeEngine Oil on page 5-13.
3-56
Page 186 of 410
Driver’s Name Set/Recall
If your vehicle has the optional memory package, you
will have this feature. This feature allows individual
driver’s names to be displayed in the DIC when
the ignition is turned to ON. This feature only works
when the remote keyless entry transmitter is used
to unlock the vehicle or when buttons 1 or 2 on the
driver’s door are pressed. See your dealer for assistance
in programming this feature.
Exiting Feature Programming
To exit FEATURE PROGRAMMING, press the INFO
RESET or INFO button.
Trip Computer
Oil Life Indicator
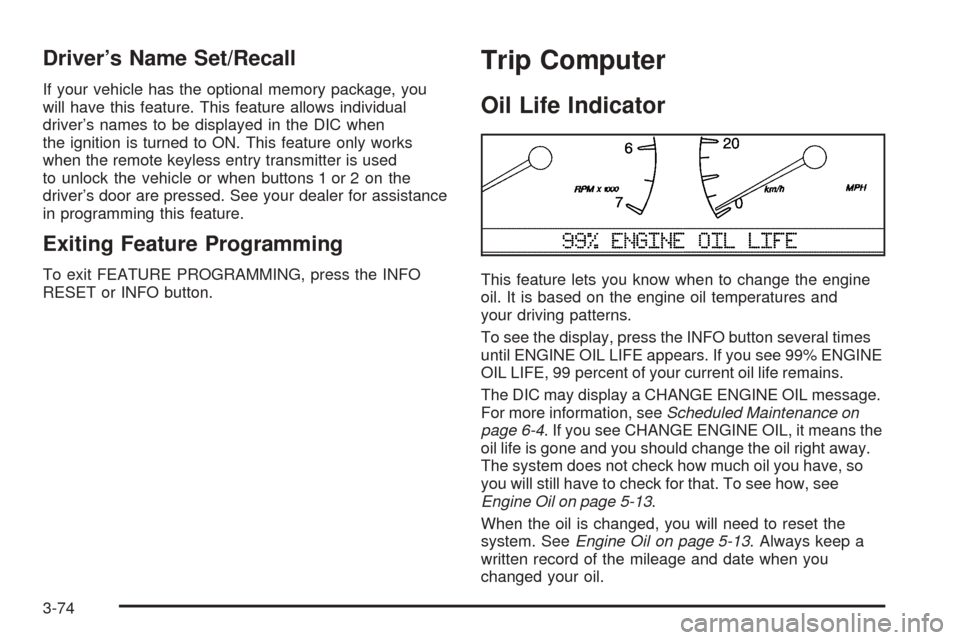
This feature lets you know when to change the engine
oil. It is based on the engine oil temperatures and
your driving patterns.
To see the display, press the INFO button several times
until ENGINE OIL LIFE appears. If you see 99% ENGINE
OIL LIFE, 99 percent of your current oil life remains.
The DIC may display a CHANGE ENGINE OIL message.
For more information, seeScheduled Maintenance on
page 6-4. If you see CHANGE ENGINE OIL, it means the
oil life is gone and you should change the oil right away.
The system does not check how much oil you have, so
you will still have to check for that. To see how, see
Engine Oil on page 5-13.
When the oil is changed, you will need to reset the
system. SeeEngine Oil on page 5-13. Always keep a
written record of the mileage and date when you
changed your oil.
3-74
Page 283 of 410
How to Add Fluid
Refer to the Maintenance Schedule to determine what
kind of transaxle fluid to use. SeeRecommended Fluids
and Lubricants on page 6-12.
If the fluid level is low, add only enough of the proper
fluid to bring the level into the cross-hatched area on the
dipstick.
1. Pull out the dipstick.
2. Using a long-neck funnel, add enough fluid at the
dipstick hole to bring it to the proper level.
It does not take much fluid, generally less than one
pint (0.5 L). Do not overfill.
Notice:Use of automatic transaxle fluid labeled
other than DEXRON
®-III may damage your vehicle,
and the damages may not be covered by your
warranty. Always use DEXRON
®-III labeled automatic
transaxle fluid.
3. After adding fluid, recheck the fluid level as
described underHow to Check.
4. When the correct fluid level is obtained, push the
dipstick back in all the way and turn the handle
clockwise. Reinstall the engine air cleaner/filter
assembly.
How to Reset the Transaxle Fluid
Change Indicator
Once the transaxle fluid has been changed, the
transaxle fluid change indicator must be reset. Use the
following steps to reset the indicator:
1. Press the INFO button on the Driver Information
Center (DIC) until TRANS FLUID LIFE is displayed.
2. Press and hold the INFO RESET button until 100%
is displayed.
The indicator is now reset. The percentage of transaxle
fluid life remaining may be checked at any time by
pressing the INFO button several times until the TRANS
FLUID LIFE message appears.
Engine Coolant
The cooling system in your vehicle is filled with
DEX-COOL®engine coolant. This coolant is designed
to remain in your vehicle for 5 years or 150,000 miles
(240 000 km), whichever occurs first, if you add
only DEX-COOL
®extended life coolant.
The following explains your cooling system and how to
add coolant when it is low. If you have a problem
with engine overheating, seeEngine Overheating on
page 5-26.
5-23
Page 331 of 410
Anytime you replace one or more tires or rotate your
tires, the TPM system will need to be reset. A special
tool is needed to reset the sensor identification
codes. See your dealer for service.
Your vehicle was delivered from the factory with
aluminum valve stem caps. If you ever have to replace
the valve stem caps on your vehicle, you should
replace them with aluminum or plastic caps.
The TPM system can alert you about a low or high tire
pressure condition, but it does not replace normal
tire maintenance. SeeTires on page 5-61.
Tire Inspection and Rotation
Tires should be rotated every 5,000 to 8,000 miles
(8 000 to 13 000 km).
Any time you notice unusual wear, rotate your tires as
soon as possible and check wheel alignment. Also
check for damaged tires or wheels. SeeWhen It Is Time
for New Tires on page 5-72andWheel Replacement
on page 5-75for more information.The purpose of regular rotation is to achieve more
uniform wear for all tires on the vehicle. The first rotation
is the most important. SeeScheduled Maintenance
on page 6-4for scheduled rotation intervals.
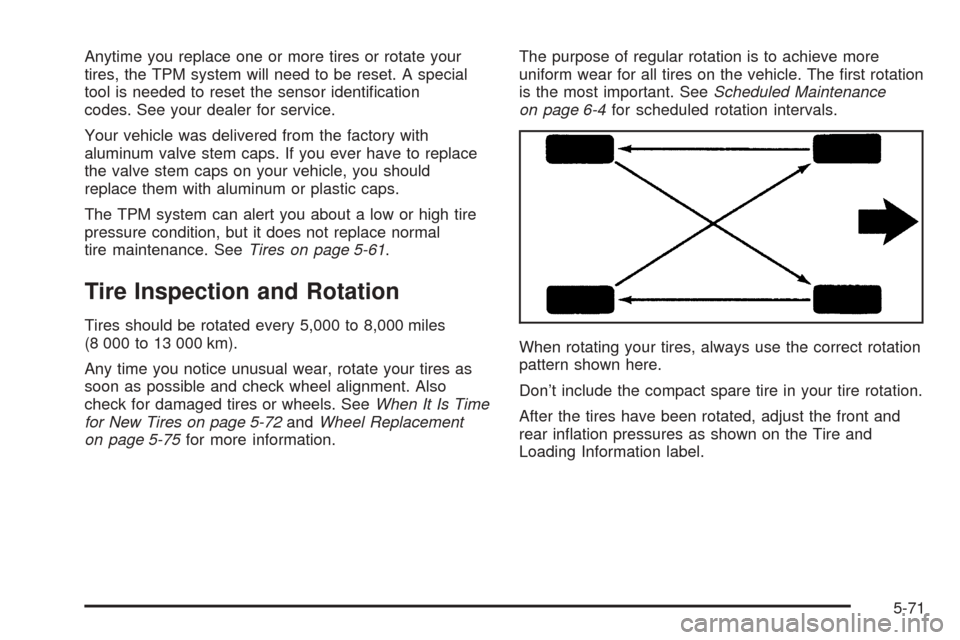
When rotating your tires, always use the correct rotation
pattern shown here.
Don’t include the compact spare tire in your tire rotation.
After the tires have been rotated, adjust the front and
rear inflation pressures as shown on the Tire and
Loading Information label.
5-71
Page 368 of 410
Owner Checks and Services on page 6-8tells you what
should be checked, when to check it and what you
can easily do to help keep your vehicle in good
condition.
The proper replacement parts, fluids and lubricants to
use are listed inRecommended Fluids and Lubricants
on page 6-12andNormal Maintenance Replacement
Parts on page 6-13. When your vehicle is serviced,
make sure these are used. All parts should be replaced
and all necessary repairs done before you or anyone
else drives the vehicle. We recommend the use of
genuine GM parts.
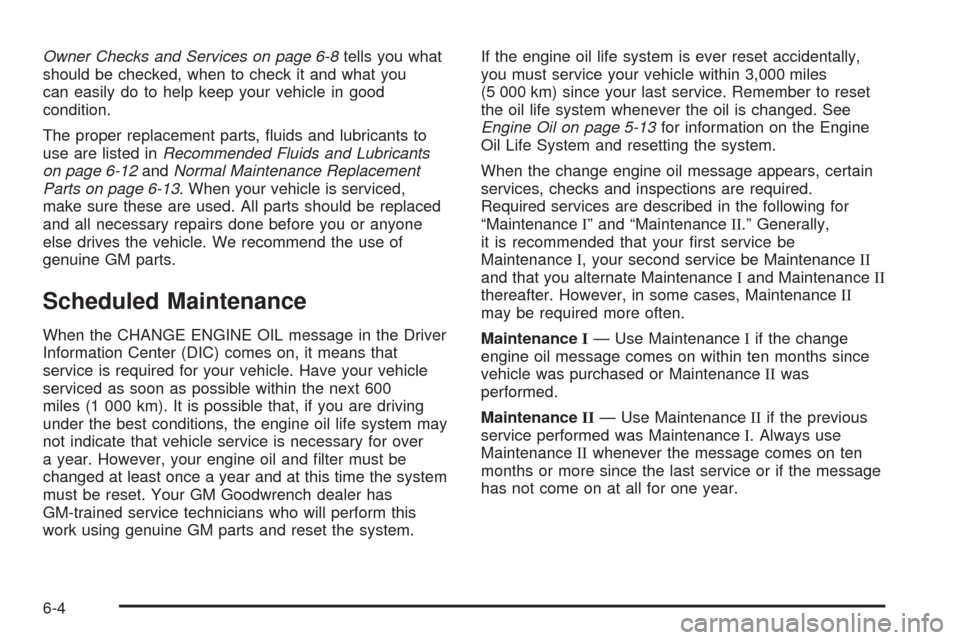
Scheduled Maintenance
When the CHANGE ENGINE OIL message in the Driver
Information Center (DIC) comes on, it means that
service is required for your vehicle. Have your vehicle
serviced as soon as possible within the next 600
miles (1 000 km). It is possible that, if you are driving
under the best conditions, the engine oil life system may
not indicate that vehicle service is necessary for over
a year. However, your engine oil and filter must be
changed at least once a year and at this time the system
must be reset. Your GM Goodwrench dealer has
GM-trained service technicians who will perform this
work using genuine GM parts and reset the system.If the engine oil life system is ever reset accidentally,
you must service your vehicle within 3,000 miles
(5 000 km) since your last service. Remember to reset
the oil life system whenever the oil is changed. See
Engine Oil on page 5-13for information on the Engine
Oil Life System and resetting the system.
When the change engine oil message appears, certain
services, checks and inspections are required.
Required services are described in the following for
“MaintenanceI” and “MaintenanceII.” Generally,
it is recommended that your first service be
MaintenanceI, your second service be MaintenanceII
and that you alternate MaintenanceIand MaintenanceII
thereafter. However, in some cases, MaintenanceII
may be required more often.
MaintenanceI— Use MaintenanceIif the change
engine oil message comes on within ten months since
vehicle was purchased or MaintenanceIIwas
performed.
MaintenanceII— Use MaintenanceIIif the previous
service performed was MaintenanceI. Always use
MaintenanceIIwhenever the message comes on ten
months or more since the last service or if the message
has not come on at all for one year.
6-4
Page 369 of 410
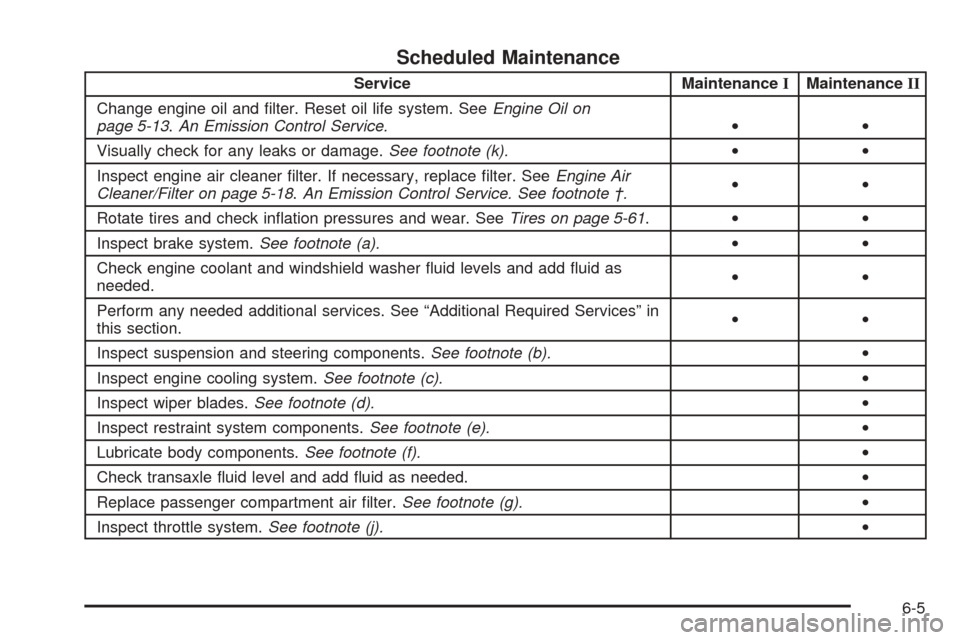
Scheduled Maintenance
Service MaintenanceIMaintenanceII
Change engine oil and filter. Reset oil life system. SeeEngine Oil on
page 5-13.An Emission Control Service.••
Visually check for any leaks or damage.See footnote (k).••
Inspect engine air cleaner filter. If necessary, replace filter. SeeEngine Air
Cleaner/Filter on page 5-18.An Emission Control Service. See footnote †.••
Rotate tires and check inflation pressures and wear. SeeTires on page 5-61.••
Inspect brake system.See footnote (a).••
Check engine coolant and windshield washer fluid levels and add fluid as
needed.••
Perform any needed additional services. See “Additional Required Services” in
this section.••
Inspect suspension and steering components.See footnote (b).•
Inspect engine cooling system.See footnote (c).•
Inspect wiper blades.See footnote (d).•
Inspect restraint system components.See footnote (e).•
Lubricate body components.See footnote (f).•
Check transaxle fluid level and add fluid as needed.•
Replace passenger compartment air filter.See footnote (g).•
Inspect throttle system.See footnote (j).•
6-5
Page 406 of 410
Remote Keyless Entry System............................ 2-5
Remote Keyless Entry System, Operation............ 2-6
Remote Recall Memory...................................3-64
Removing the Flat Tire and Installing the
Spare Tire..................................................5-81
Removing the Spare Tire and Tools...................5-79
Replacement Bulbs.........................................5-59
Replacing Brake System Parts..........................5-41
Replacing Restraint System Parts
After a Crash..............................................1-51
Reporting Safety Defects
Canadian Government..................................7-12
General Motors...........................................7-12
United States Government............................7-11
Reprogramming a Single HomeLink
®Button.......2-48
Resetting Defaults...........................................2-48
Restraint System Check
Checking Your Restraint Systems...................1-50
Replacing Restraint System Parts
After a Crash..........................................1-51
Restraint Systems
Checking....................................................1-50
Replacing Parts...........................................1-51
Retained Accessory Power (RAP)......................2-25
Right Front Passenger Position,
Safety Belts................................................1-18
Roadside
Service........................................................ 7-6
Roadside Service Availability.............................. 7-7Roadside Service for the Hearing or
Speech Impaired........................................... 7-7
Rocking Your Vehicle To Get It Out...................4-29
Routing, Engine Drive Belt...............................6-13
Running Your Engine While You Are Parked.......2-36
S
Safety Belt
Pretensioners..............................................1-21
Reminder Light............................................3-41
Safety Belts
Care of......................................................5-90
Driver Position............................................1-11
How to Wear Safety Belts Properly................1-11
Questions and Answers About Safety Belts....... 1-9
Rear Seat Passengers.................................1-18
Right Front Passenger Position......................1-18
Safety Belt Extender....................................1-21
Safety Belt Use During Pregnancy.................1-17
Safety Belts Are for Everyone......................... 1-5
Safety Chains.................................................4-40
Safety Warnings and Symbols.............................. iii
Scheduled Maintenance..................................... 6-4
Seats
Heated Seats............................................... 1-3
Memory.....................................................2-52
Power Lumbar.............................................. 1-2
12