2004 BUICK PARK AVENUE door lock
[x] Cancel search: door lockPage 1 of 410

Seats and Restraint Systems........................... 1-1
Front Seats
............................................... 1-2
Safety Belts
.............................................. 1-6
Child Restraints
.......................................1-27
Air Bag Systems
......................................1-49
Restraint System Check
............................1-58
Features and Controls..................................... 2-1
Keys
........................................................ 2-3
Doors and Locks
......................................2-10
Windows
.................................................2-17
Theft-Deterrent Systems
............................2-19
Starting and Operating Your Vehicle
...........2-23
Mirrors
....................................................2-36
OnStar
®System
......................................2-41
HomeLink®Transmitter
.............................2-43
Storage Areas
.........................................2-47
Sunroof
..................................................2-50
Vehicle Personalization
.............................2-51
Instrument Panel............................................. 3-1
Instrument Panel Overview
.......................... 3-2
Climate Controls
......................................3-24
Warning Lights, Gages and Indicators
.........3-32
Driver Information Center (DIC)
..................3-47
Audio System(s)
.......................................3-57Driving Your Vehicle....................................... 4-1
Your Driving, the Road, and Your Vehicle
..... 4-2
Towing
...................................................4-31
Service and Appearance Care.......................... 5-1
Service
..................................................... 5-3
Fuel
......................................................... 5-4
Checking Things Under the Hood
...............5-10
Headlamp Aiming
.....................................5-49
Bulb Replacement
....................................5-51
Windshield Wiper Blade Replacement
.........5-61
Tires
......................................................5-62
Appearance Care
.....................................5-90
Vehicle Identi�cation
.................................5-98
Electrical System
......................................5-98
Capacities and Speci�cations
...................5-108
Normal Maintenance Replacement Parts
......5-109
Maintenance Schedule..................................... 6-1
Maintenance Schedule
................................ 6-2
Customer Assistance Information.................... 7-1
Customer Assistance Information
.................. 7-2
Reporting Safety Defects
...........................7-10
Index.................................................................1
2004 Buick Park Avenue Owner ManualM
Page 18 of 410

How to Wear Safety Belts Properly
This part is only for people of adult size.
Be aware that there are special things to know about
safety belts and children. And there are different
rules for smaller children and babies. If a child will be
riding in your vehicle, seeOlder Children on page 1-27
orInfants and Young Children on page 1-30. Follow
those rules for everyone’s protection.
First, you’ll want to know which restraint systems your
vehicle has.
We’ll start with the driver position.
Driver Position
This part describes the driver’s restraint system.
Lap-Shoulder Belt
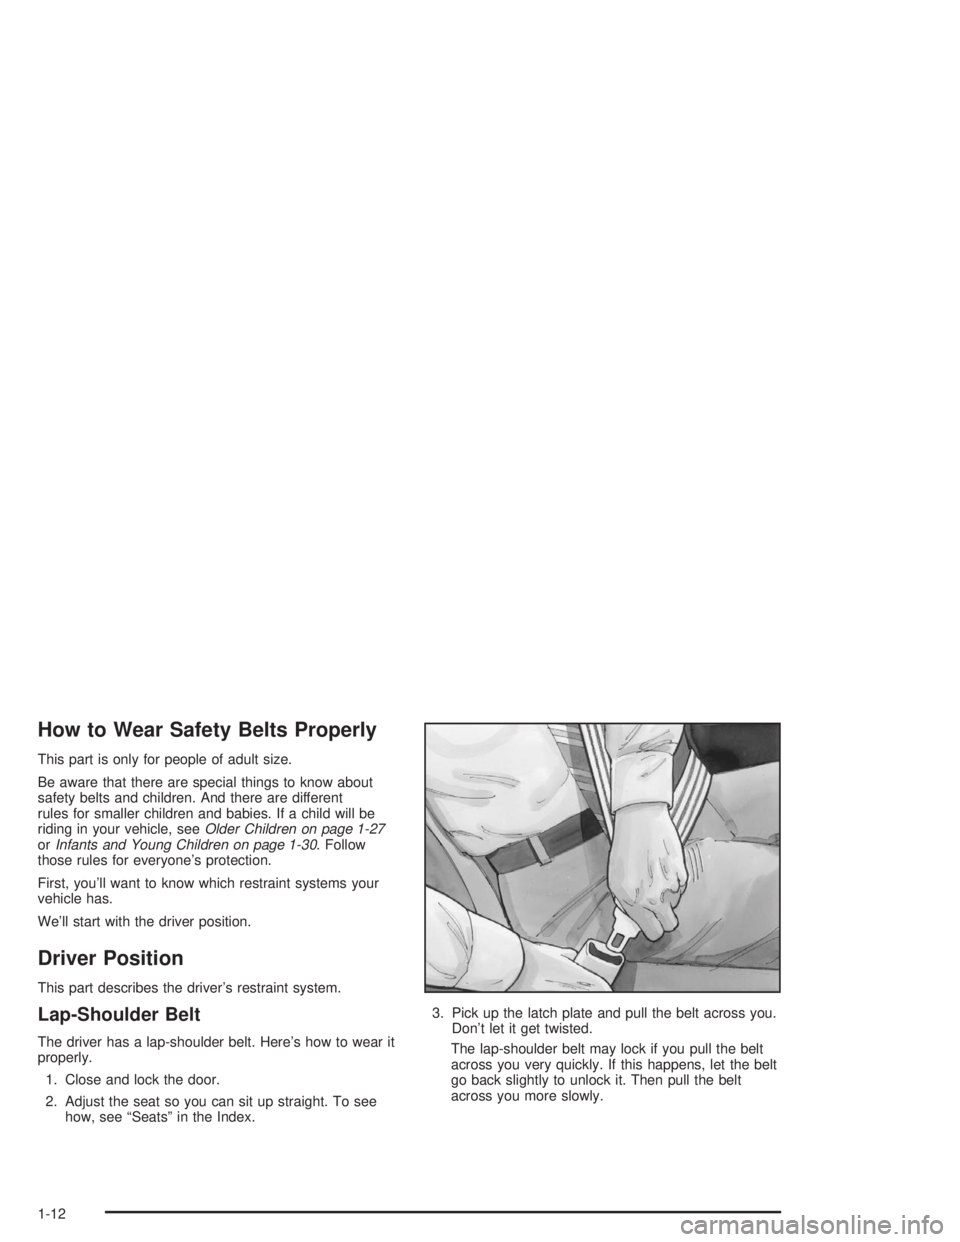
The driver has a lap-shoulder belt. Here’s how to wear it
properly.
1. Close and lock the door.
2. Adjust the seat so you can sit up straight. To see
how, see “Seats” in the Index.3. Pick up the latch plate and pull the belt across you.
Don’t let it get twisted.
The lap-shoulder belt may lock if you pull the belt
across you very quickly. If this happens, let the belt
go back slightly to unlock it. Then pull the belt
across you more slowly.
1-12
Page 59 of 410

The right front passenger’s side impact air bag is in the
side of the passenger’s seatback closest to the door.
{CAUTION:
If something is between an occupant and an
air bag, the bag might not in�ate properly or it
might force the object into that person causing
severe injury or even death. The path of an
in�ating air bag must be kept clear. Don’t put
anything between an occupant and an air bag,
and don’t attach or put anything on the
steering wheel hub or on or near any other air
bag covering. Don’t let seat covers block the
in�ation path of a side impact air bag.
1-53
Page 67 of 410

Keys...............................................................2-3
Remote Keyless Entry System.........................2-5
Remote Keyless Entry System Operation...........2-6
Doors and Locks............................................2-10
Door Locks..................................................2-10
Central Door Unlocking System......................2-11
Power Door Locks........................................2-11
Door Ajar Reminder......................................2-11
Delayed Locking...........................................2-11
Programmable Automatic Door Locks..............2-12
Rear Door Security Locks..............................2-14
Lockout Protection........................................2-14
Leaving Your Vehicle....................................2-14
Trunk..........................................................2-15
Windows........................................................2-17
Power Windows............................................2-18
Sun Visors...................................................2-19
Theft-Deterrent Systems..................................2-19
Content Theft-Deterrent.................................2-19
PASS-Key
®III ..............................................2-21
PASS-Key®III Operation...............................2-22Starting and Operating Your Vehicle................2-23
New Vehicle Break-In....................................2-23
Ignition Positions..........................................2-24
Starting Your Engine.....................................2-25
Engine Coolant Heater..................................2-26
Automatic Transaxle Operation.......................2-27
Parking Brake..............................................2-29
Shifting Into Park (P).....................................2-30
Shifting Out of Park (P).................................2-33
Parking Over Things That Burn.......................2-33
Engine Exhaust............................................2-34
Running Your Engine While You Are
Parked.....................................................2-35
Mirrors...........................................................2-36
Manual Rearview Mirror.................................2-36
Automatic Dimming Rearview Mirror................2-36
Automatic Dimming Rearview
Mirror with Compass..................................2-37
Outside Power Mirrors...................................2-39
Outside Curb View Assist Mirror.....................2-40
Outside Convex Mirror...................................2-40
Outside Automatic Dimming Heated Mirror........2-41
Section 2 Features and Controls
2-1
Page 70 of 410

Your vehicle has a two-key system. One key is the
master and the other is a valet key.
The master key is used for
the ignition, as well as the
driver’s door lock, trunk
and glove box.
The VALET key is used for
the ignition and the driver’s
door only. It will not open
the trunk or glove box. This
is a theft-deterrent feature.
The VALET key should
always be used when valet
parking your vehicle.Your vehicle has the PASS-Key®III vehicle theft
system. Both the master and VALET key have a
transponder in the key head that matches a decoder in
the vehicle’s steering column. If a replacement key
or any additional key is needed, you must purchase this
key from your dealer. The key will have PK3 stamped
on it. Keep the bar code tag that came with the original
keys. Give this tag to your dealer if you need a new
key made.
Any new PASS-Key
®III key must be programmed
before it will start your vehicle. SeePASS-Key®
III Operation on page 2-22for more information on
programming your new key.
If your vehicle is equipped with the OnStar
®System
with an active subscription and you lock your keys inside
the vehicle, OnStar
®may be able to send a command
to unlock your vehicle. SeeOnStar®System on
page 2-41for more information.
Notice:If you ever lock your keys in your vehicle,
you may have to damage the vehicle to get in.
Be sure you have spare keys.
2-4
Page 72 of 410

Remote Keyless Entry System
Operation
If your vehicle has this feature, you can lock and unlock
your doors or unlock your trunk from about 3 feet (1 m)
up to 30 feet (9 m) away using the remote keyless
entry transmitter supplied with your vehicle.
If your vehicle has the Driver Information Center (DIC),
the numbers on the back of the transmitters correspond
to the DIC’s Driver #1 and Driver #2. SeeDriver
Information Center (DIC) on page 3-47for more
information.
W(Unlock):Press this
button to unlock the
driver’s door. Press this
button again within
�ve seconds to unlock all
of the doors.
Q(Lock):Press this button to lock all of the doors.
V(Trunk):Press this button to unlock the trunk
when the ignition is in LOCK or OFF. The trunk button
will also work when the ignition is on, but only while
the transaxle is in PARK (P).
L(Remote Alarm):Your transmitter comes equipped
with a remote alarm. Press this button to make the
horn sound and the exterior lamps �ash for up to
30 seconds. The remote alarm can be turned off by
pressing this button again or by turning the ignition on.
With the content theft-deterrent feature, you may
also turn off the remote alarm by unlocking the vehicle
with a key.
Pressing any button will also illuminate the interior
lamps. See “Entry Lighting” underInterior Lamps on
page 3-15.
2-6
Page 73 of 410

Personalization Features
Each remote keyless entry transmitter can be
programmed to the driver’s preference for automatic
door locks, security feedback, delayed locking, memory
seat, perimeter lighting, outside curb view assist mirror
and window lockout. Each of these personalization
features will be explained in this manual.
If your vehicle is equipped with the Driver Information
Center (DIC), you can also program any of these features
through the DIC. SeeDriver Information Center (DIC) on
page 3-47.
You can also personalize your climate control
temperature, air delivery mode and fan speed.
SeeClimate Controls Personalization on page 3-31.
Security Feedback
This feature provides feedback when the vehicle
receives a command from the remote keyless entry
transmitter. The following modes may be selected:
Mode 0:No feedback when locking or unlocking
vehicle.
Mode 1:No feedback when locking; exterior lamps
�ash when unlocking vehicle.
Mode 2:Exterior lamps �ash when locking; no feedback
when unlocking vehicle.
Mode 3:Exterior lamps �ash when locking and when
unlocking vehicle.
Mode 4:Exterior lamps �ash and horn chirps when
locking; no feedback when unlocking vehicle.
Mode 5:Exterior lamps �ash and horn chirps when
locking; exterior lamps �ash when unlocking vehicle.
2-7
Page 74 of 410

Each remote keyless entry transmitter can be
programmed to a different mode according to the user’s
preference. To change to another mode do the following:
1. Press and hold LOCK on the power door lock switch
on the driver’s door throughout the procedure.
2. Press the trunk button on the transmitter. The horn
will chirp and the transmitter will remain in its
current mode.
3. Press the trunk button again. Each time the trunk
button is pressed, the horn will chirp and the
transmitter will advance to the next mode.
4. Release the power door lock switch.
If your vehicle is equipped with the Driver Information
Center (DIC), you can also program these features
through the DIC. SeeDriver Information Center (DIC)
on page 3-47.Theft-Deterrent System
The remote keyless entry transmitter will arm the
theft-deterrent system whenever the doors are closed
and you push the lock button when the ignition is off.
It will disarm the system when you push the unlock
button.
Matching Transmitter(s) to Your Vehicle
Each remote keyless entry transmitter is coded to
prevent another transmitter from unlocking your vehicle.
If a transmitter is lost or stolen, a replacement can
be purchased through your dealer. Remember to bring
any remaining transmitters with you when you go to
your dealer. When the dealer matches the replacement
transmitter to your vehicle, any remaining transmitters
must also be matched. Once your dealer has coded the
new transmitter, the lost transmitter will not unlock
your vehicle. Each vehicle can have a maximum of four
transmitters matched to it.
See your dealer to match additional transmitters to your
vehicle.
2-8