2004 BUICK PARK AVENUE CD changer
[x] Cancel search: CD changerPage 119 of 410

Instrument Panel Overview...............................3-2
Hazard Warning Flashers................................3-4
Other Warning Devices...................................3-4
Horn.............................................................3-5
Tilt Wheel.....................................................3-5
Turn Signal/Multifunction Lever.........................3-5
Exterior Lamps.............................................3-12
Interior Lamps..............................................3-15
Head-Up Display (HUD).................................3-18
Ultrasonic Rear Parking Assist (URPA)............3-20
Accessory Power Outlets...............................3-22
Ashtrays and Cigarette Lighter........................3-23
Climate Controls............................................3-24
Dual Automatic Climate Control System...........3-24
Outlet Adjustment.........................................3-29
Passenger Compartment Air Filter...................3-30
Steering Wheel Climate Controls.....................3-30
Climate Controls Personalization.....................3-31
Warning Lights, Gages and Indicators.............3-32
Instrument Panel Cluster................................3-33
Speedometer and Odometer...........................3-35
Tachometer.................................................3-35
Safety Belt Reminder Light.............................3-36
Air Bag Readiness Light................................3-36
Battery Warning Light....................................3-37
Brake System Warning Light..........................3-38Anti-Lock Brake System Warning Light.............3-39
Traction Control System (TCS) Warning Light......3-39
Engine Coolant Temperature Gage..................3-40
Malfunction Indicator Lamp.............................3-41
Oil Pressure Light.........................................3-44
Security Light...............................................3-45
Cruise Control Light......................................3-45
Service Vehicle Soon Light............................3-45
Fuel Gage...................................................3-46
Driver Information Center (DIC).......................3-47
DIC Controls and Displays.............................3-47
DIC Warnings and Messages.........................3-50
DIC Vehicle Personalization............................3-51
Audio System(s).............................................3-57
Setting the Time...........................................3-58
Radio with Cassette......................................3-58
Radio with Cassette and CD..........................3-63
Trunk-Mounted CD Changer...........................3-71
Personal Choice Radio Controls......................3-75
Theft-Deterrent Feature..................................3-75
Audio Steering Wheel Controls.......................3-78
Understanding Radio Reception......................3-78
Care of Your Cassette Tape Player.................3-79
Care of Your CDs.........................................3-80
Care of Your CD Player................................3-80
Heated Backlite Antenna................................3-80
Section 3 Instrument Panel
3-1
Page 123 of 410

Horn
Press on the center area of the steering wheel to sound
the horn.
Tilt Wheel
A tilt wheel allows you to adjust the steering wheel
before you drive. You can also raise it to the highest
level to give your legs more room when you exit
and enter the vehicle.
The lever that allows you to tilt the steering wheel is
located on the left side of the steering column.
To tilt the wheel, hold the
wheel and pull the lever
toward you. Then move
the steering wheel to
a comfortable position and
release the lever to lock
the wheel in place.
Turn Signal/Multifunction Lever
The lever on the left side of the steering column
includes the following:
Turn and Lane-Change Signals
Headlamp High/Low-Beam Changer
Flash-to-Pass
Windshield Wipers
Windshield Washer
Cruise Control
For information on the exterior lamps, seeExterior
Lamps on page 3-12.
3-5
Page 125 of 410

Headlamp High/Low-Beam Changer
To change the headlamps from low beam to high or
high to low, pull the turn signal lever toward you,
then release it.
When the high beams are
on, a light on the instrument
panel cluster will also
be on. If your vehicle is
equipped with HUD, this
light will also appear in
the display area.
Flash-To-Pass
This feature lets you use your high-beam headlamps to
signal a driver in front of you that you want to pass.
It works even if your headlamps are off.
To use it, pull the turn signal lever toward you, but not
so far that you hear a click.
If your headlamps are off or on low beam, your
high-beam headlamps will turn on. They will stay on as
long as you hold the lever toward you and the high-beam
indicator on the instrument panel cluster will come on.
Release the lever to turn the high-beam headlamps off.
Windshield Wipers
The windshield wipers are controlled by turning the
band marked WIPER.
OFF:Turn the band to OFF to turn the wipers off.
MIST:For a single wiping cycle, turn the band to MIST.
Hold it there until the wipers start, then let go.
The wipers will stop after one cycle. If you want more
cycles, hold the band on MIST longer.
LO (Low Speed):Turn the band to LO for steady
wiping at a slow speed.
HI (High Speed):Turn the band to HI for steady wiping
at a high speed.
The wiper speed may be set for a long or short delay
between wipes. Turn the band to choose the delay time.
The closer to LO, the shorter the delay.
Heavy snow or ice can overload your wiper motor.
A circuit breaker will stop the motor until it cools.
Clear away snow or ice to prevent an overload.
Keep in mind that damaged wiper blades may prevent
you from seeing well enough to drive safely. To avoid
damage, be sure to clear ice and snow from the
wiper blades before using them. If your blades do
become damaged, get new blades or blade inserts.
3-7
Page 189 of 410

Trunk-Mounted CD Changer
With the optional CD changer, you can play up to
12 CDs continuously. Normal size CDs may be played
using the trays supplied in the magazine.
The small CDs (8 cm) can be played only with specially
designed trays.
Notice:Placing heavy objects, which may shift or
slide while driving, in the trunk could damage
the CD changer. If your vehicle has the optional
CD changer, do not put heavy objects in the trunk.
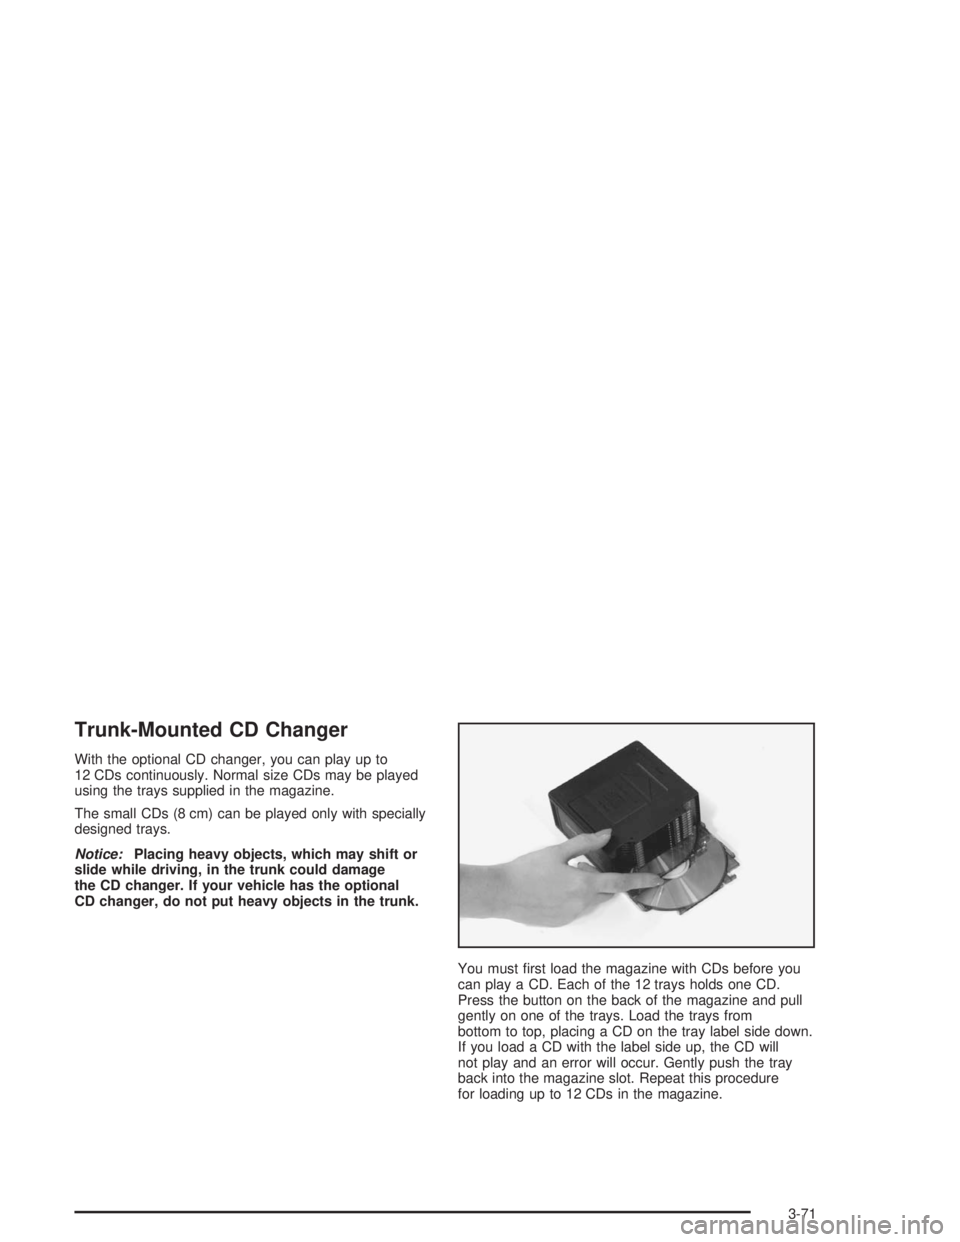
You must �rst load the magazine with CDs before you
can play a CD. Each of the 12 trays holds one CD.
Press the button on the back of the magazine and pull
gently on one of the trays. Load the trays from
bottom to top, placing a CD on the tray label side down.
If you load a CD with the label side up, the CD will
not play and an error will occur. Gently push the tray
back into the magazine slot. Repeat this procedure
for loading up to 12 CDs in the magazine.
3-71
Page 190 of 410

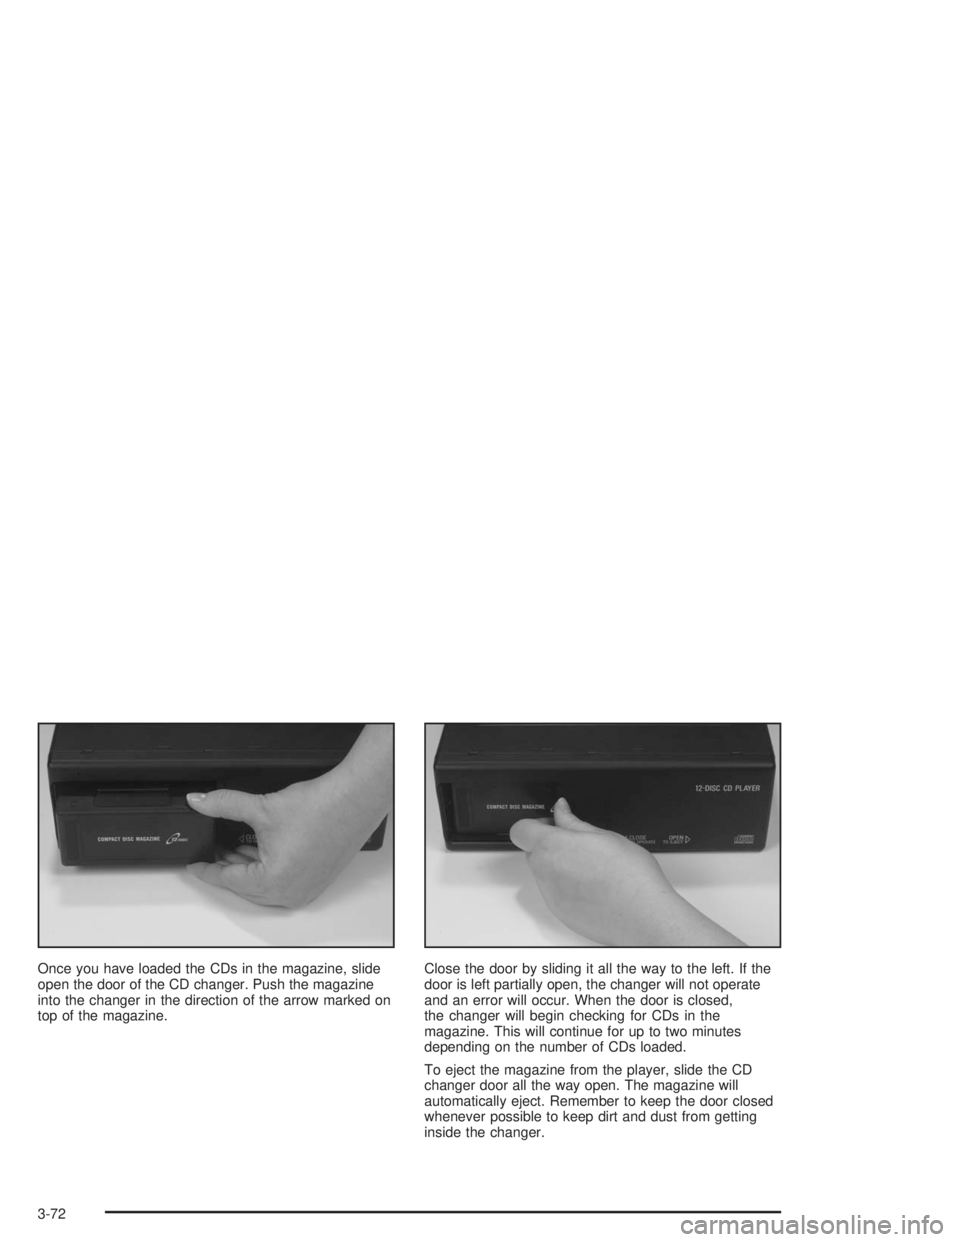
Once you have loaded the CDs in the magazine, slide
open the door of the CD changer. Push the magazine
into the changer in the direction of the arrow marked on
top of the magazine.Close the door by sliding it all the way to the left. If the
door is left partially open, the changer will not operate
and an error will occur. When the door is closed,
the changer will begin checking for CDs in the
magazine. This will continue for up to two minutes
depending on the number of CDs loaded.
To eject the magazine from the player, slide the CD
changer door all the way open. The magazine will
automatically eject. Remember to keep the door closed
whenever possible to keep dirt and dust from getting
inside the changer.
3-72
Page 191 of 410

All of the CD functions are controlled by the radio
buttons except for ejecting the magazine. Whenever a
CD magazine with CDs is loaded in the changer,
CHNGR will appear on the display. If the CD changer is
checking the magazine for CDs, CHNGR will �ash on
the display until the changer is ready to play. When a
CD begins playing, the CD and track number will appear
on the display. The CD numbers are listed on the
front of the magazine.
Playing a CD
If an error appears on the display, see “CD Messages”
later in this section.
1 PREV (Previous):Press this pushbutton to go to the
start of the current track, if more than eight seconds
have played. If you hold this button or press it more than
once, the player will continue moving back through
the CD.
2 NEXT:Press this pushbutton to go to the next track
on the CD. If you hold this button or press it more
than once, the player will continue moving forward
through the CD.3
r(Reverse):Press and hold this pushbutton to
reverse quickly within a track. You will hear sound at
a reduced level. Release the pushbutton to play
the passage.
4
[(Forward):Press and hold this pushbutton to
advance quickly within a track. You will hear sound
at a reduced level. Release the pushbutton to play the
passage.
5 SIDE:Press this pushbutton to select the next CD
in the magazine. Each time you press this button,
the CD number on the radio display will go to that of the
next available CD. If a CD cannot be played, the number
will be skipped when selecting CDs while using this
button.
6 RAND (Random):Press this pushbutton to hear
tracks and CDs in random, rather than sequential, order.
RAND will appear on the display. Press RAND again
to turn off random play.
RECALL:Press this button to see what track is
currently playing. Press it again within �ve seconds to
see how long the track has been playing. EL TM
will appear on the display when in elapsed time mode.
When a new track starts to play, the track number
will appear on the display. Press this button a third time
and the time of day will appear on the display.
3-73
Page 192 of 410

AM-FM:Press this button to listen to the radio when a
CD is playing. The inactive CD(s) will remain safely
inside the radio for future listening.
SOURCE:Press this button to play a CD when
listening to the radio. You can press this button to switch
between a cassette tape, CD, or the CD changer if all
three are loaded.
CD Changer Errors
E (Error):If this message and a number appear on the
display, an error has occurred and the CD temporarily
cannot play.
The CD changer will send an error message to the
receiver to indicate:
E30:Disc Loaded Incorrectly (Label Side Up)
E34:CD Changer Door Open (Completely close
the door to restore normal operation.)
E35:CD Changer Cartridge Empty (Try the
magazine again with a CD loaded on one of
the trays.)If the error occurred while trying to play a CD in the
CD player or changer, it could be for one of the
following reasons:
It is very hot. When the temperature returns to
normal, the CD should play.
You are driving on a very rough road. When the
road becomes smooth, the CD should play.
The CD is dirty, scratched, wet, or upside down.
The air is very humid. If so, wait about an hour and
try again.
There may have been a problem while burning
the CD.
The label may be caught in the CD player.
If any error occurs repeatedly or if an error cannot be
corrected, contact your dealer. If your radio displays
an error number other than the error codes listed
previously, write it down and provide it to your dealer
when reporting the problem.
3-74
Page 350 of 410

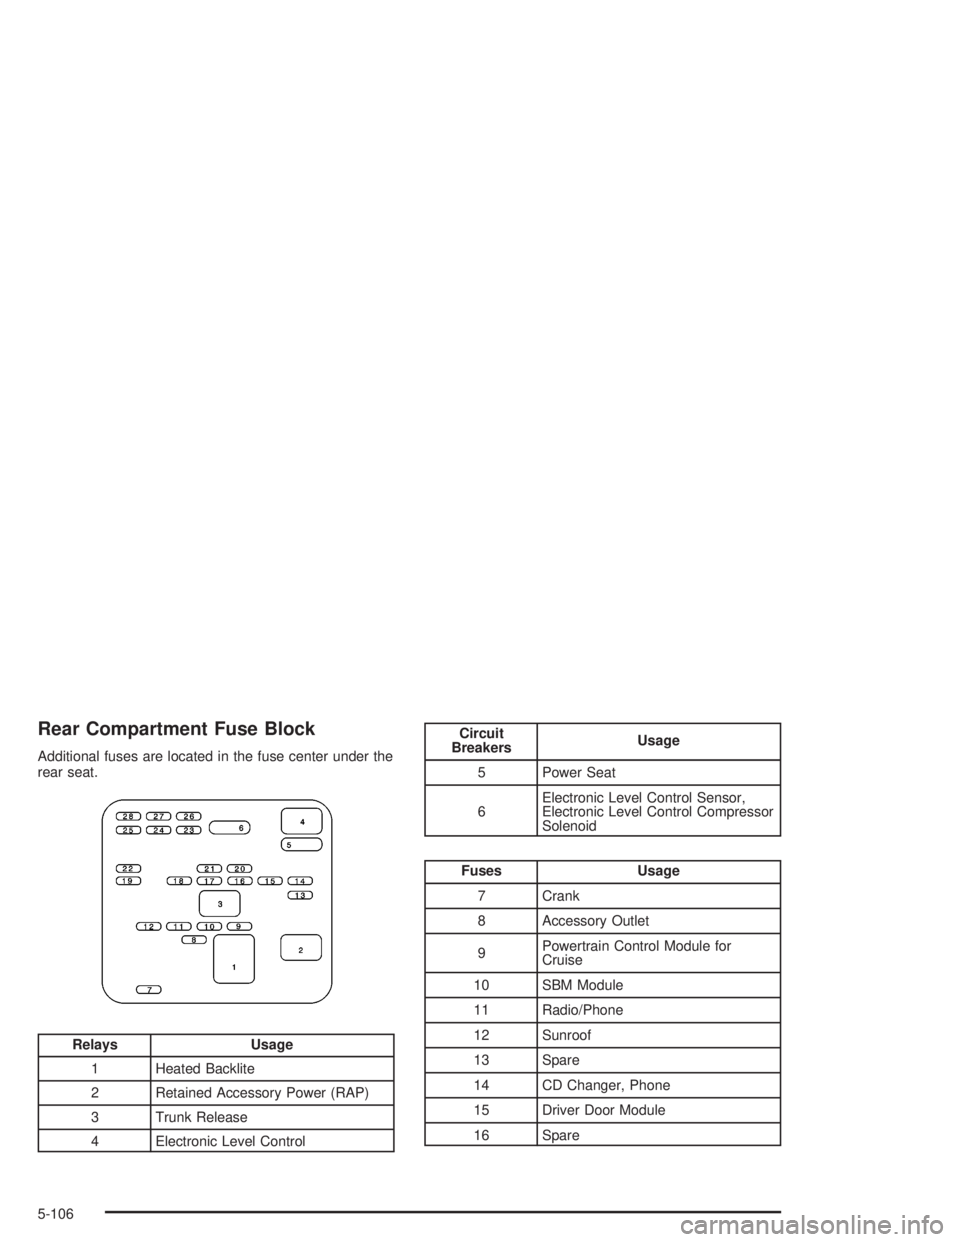
Rear Compartment Fuse Block
Additional fuses are located in the fuse center under the
rear seat.
Relays Usage
1 Heated Backlite
2 Retained Accessory Power (RAP)
3 Trunk Release
4 Electronic Level Control
Circuit
BreakersUsage
5 Power Seat
6Electronic Level Control Sensor,
Electronic Level Control Compressor
Solenoid
Fuses Usage
7 Crank
8 Accessory Outlet
9Powertrain Control Module for
Cruise
10 SBM Module
11 Radio/Phone
12 Sunroof
13 Spare
14 CD Changer, Phone
15 Driver Door Module
16 Spare
5-106