2004 BMW Z4 ROADSTER 3.0I instrument cluster
[x] Cancel search: instrument clusterPage 49 of 120
Reference
At a glance
Controls
Driving tips
Mobility
47
High beams/Standing
lamps
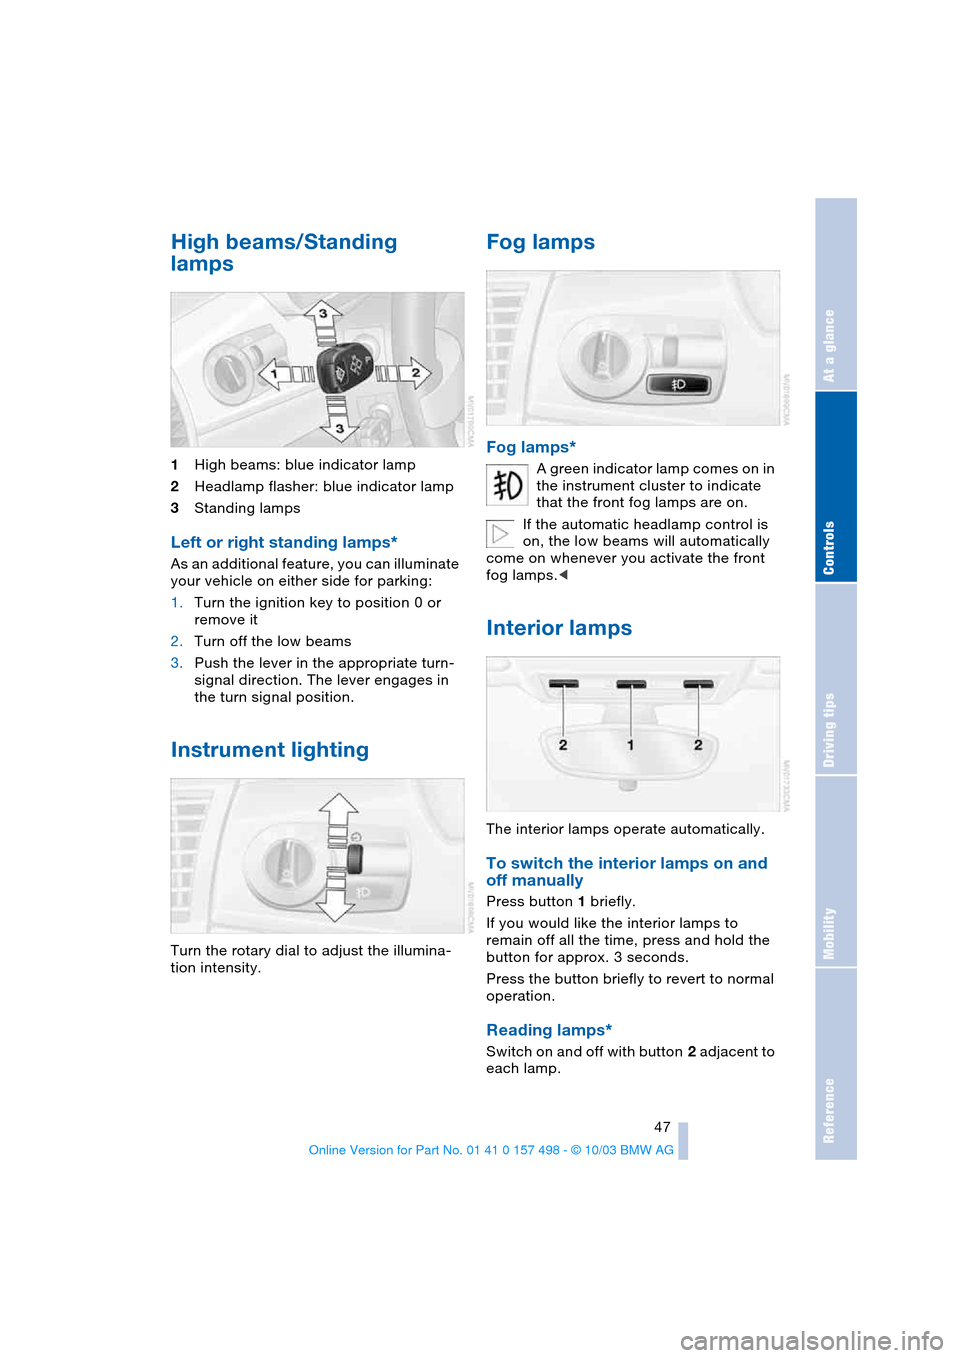
1High beams: blue indicator lamp
2Headlamp flasher: blue indicator lamp
3Standing lamps
Left or right standing lamps*
As an additional feature, you can illuminate
your vehicle on either side for parking:
1.Turn the ignition key to position 0 or
remove it
2.Turn off the low beams
3.Push the lever in the appropriate turn-
signal direction. The lever engages in
the turn signal position.
Instrument lighting
Turn the rotary dial to adjust the illumina-
tion intensity.
Fog lamps
Fog lamps*
A green indicator lamp comes on in
the instrument cluster to indicate
that the front fog lamps are on.
If the automatic headlamp control is
on, the low beams will automatically
come on whenever you activate the front
fog lamps.<
Interior lamps
The interior lamps operate automatically.
To switch the interior lamps on and
off manually
Press button 1 briefly.
If you would like the interior lamps to
remain off all the time, press and hold the
button for approx. 3 seconds.
Press the button briefly to revert to normal
operation.
Reading lamps*
Switch on and off with button 2 adjacent to
each lamp.
Page 50 of 120
Everything under control
48
Everything under control
Odometer
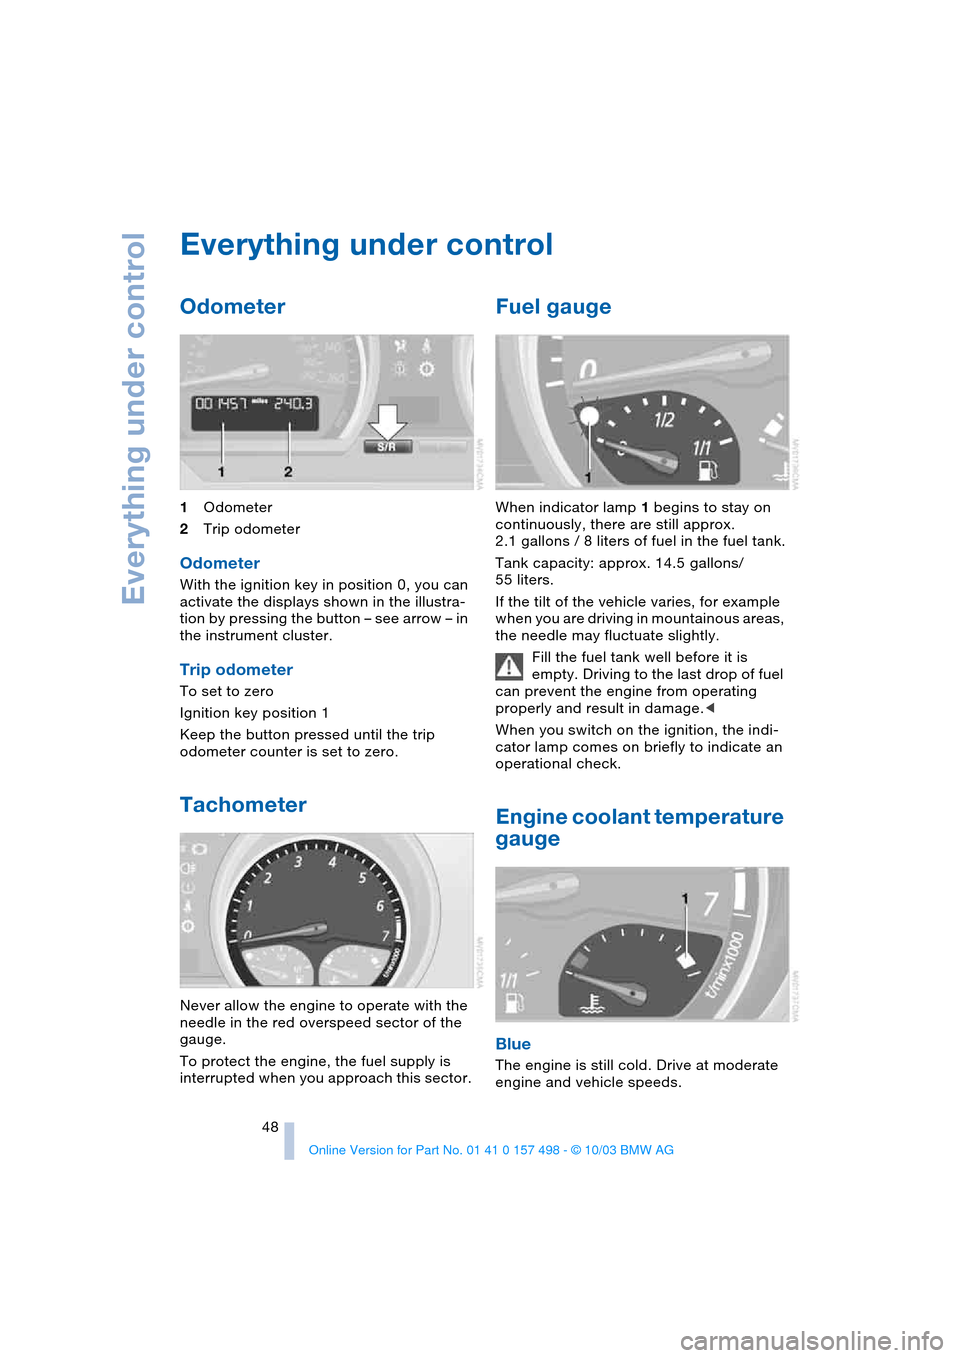
1Odometer
2Trip odometer
Odometer
With the ignition key in position 0, you can
activate the displays shown in the illustra-
tion by pressing the button – see arrow – in
the instrument cluster.
Trip odometer
To set to zero
Ignition key position 1
Keep the button pressed until the trip
odometer counter is set to zero.
Tachometer
Never allow the engine to operate with the
needle in the red overspeed sector of the
gauge.
To protect the engine, the fuel supply is
interrupted when you approach this sector.
Fuel gauge
When indicator lamp 1 begins to stay on
continuously, there are still approx.
2.1 gallons / 8 liters of fuel in the fuel tank.
Tank capacity: approx. 14.5 gallons/
55 liters.
If the tilt of the vehicle varies, for example
when you are driving in mountainous areas,
the needle may fluctuate slightly.
Fill the fuel tank well before it is
empty. Driving to the last drop of fuel
can prevent the engine from operating
properly and result in damage.<
When you switch on the ignition, the indi-
cator lamp comes on briefly to indicate an
operational check.
Engine coolant temperature
gauge
Blue
The engine is still cold. Drive at moderate
engine and vehicle speeds.
Page 51 of 120
Reference
At a glance
Controls
Driving tips
Mobility
49
Between the blue and red zones
Normal operating range. The needle may
rise as far as the edge of the red sector dur-
ing normal operation.
Red
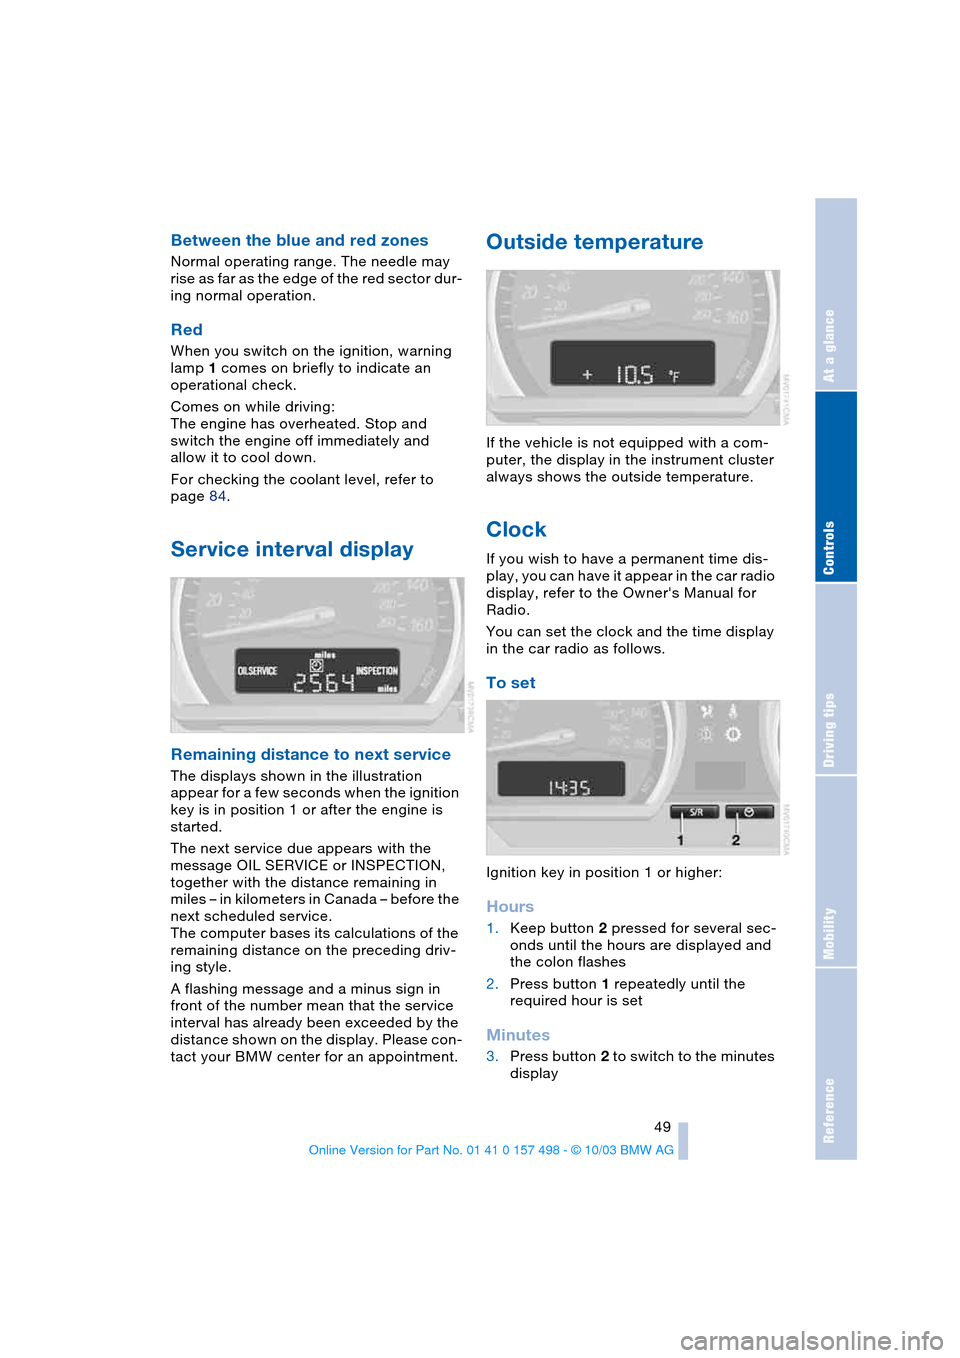
When you switch on the ignition, warning
lamp 1 comes on briefly to indicate an
operational check.
Comes on while driving:
The engine has overheated. Stop and
switch the engine off immediately and
allow it to cool down.
For checking the coolant level, refer to
page 84.
Service interval display
Remaining distance to next service
The displays shown in the illustration
appear for a few seconds when the ignition
key is in position 1 or after the engine is
started.
The next service due appears with the
message OIL SERVICE or INSPECTION,
together with the distance remaining in
miles – in kilometers in Canada – before the
next scheduled service.
The computer bases its calculations of the
remaining distance on the preceding driv-
ing style.
A flashing message and a minus sign in
front of the number mean that the service
interval has already been exceeded by the
distance shown on the display. Please con-
tact your BMW center for an appointment.
Outside temperature
If the vehicle is not equipped with a com-
puter, the display in the instrument cluster
always shows the outside temperature.
Clock
If you wish to have a permanent time dis-
play, you can have it appear in the car radio
display, refer to the Owner's Manual for
Radio.
You can set the clock and the time display
in the car radio as follows.
To set
Ignition key in position 1 or higher:
Hours
1.Keep button 2 pressed for several sec-
onds until the hours are displayed and
the colon flashes
2.Press button 1 repeatedly until the
required hour is set
Minutes
3.Press button 2 to switch to the minutes
display
Page 52 of 120
Everything under control
50 4.Press button 1 repeatedly until the
required minutes are set
5.Press button 2 to confirm the settings.
The set time of day is transferred to the car
radio display or appears in the instrument
cluster display.
Display mode
In ignition key position 0:
Press button 1.
The time of day is displayed for several
seconds.
Computer*
Mode selection
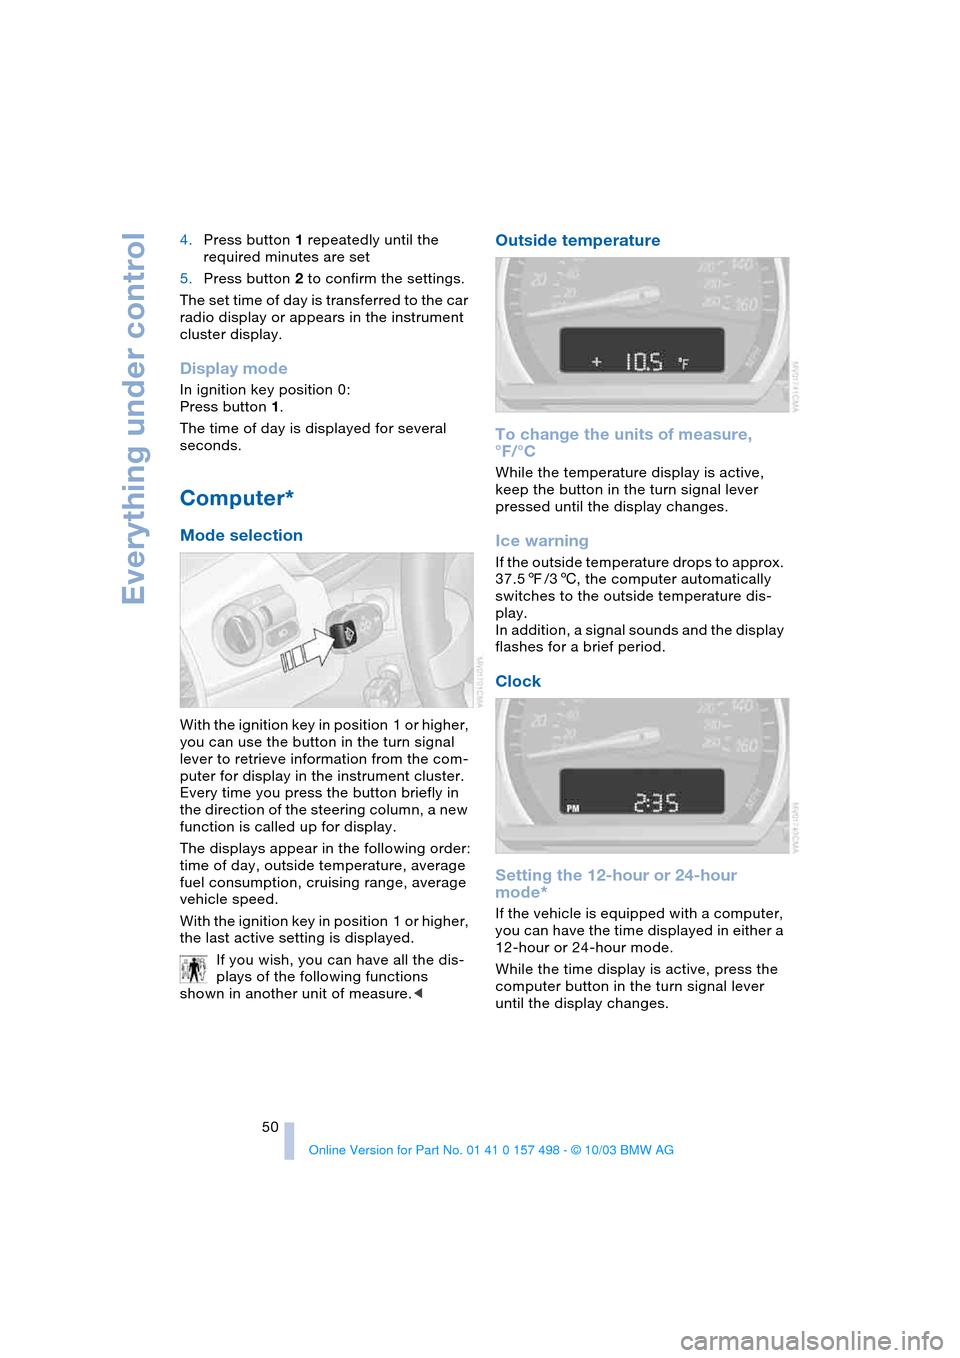
With the ignition key in position 1 or higher,
you can use the button in the turn signal
lever to retrieve information from the com-
puter for display in the instrument cluster.
Every time you press the button briefly in
the direction of the steering column, a new
function is called up for display.
The displays appear in the following order:
time of day, outside temperature, average
fuel consumption, cruising range, average
vehicle speed.
With the ignition key in position 1 or higher,
the last active setting is displayed.
If you wish, you can have all the dis-
plays of the following functions
shown in another unit of measure.<
Outside temperature
To change the units of measure,
°F/°C
While the temperature display is active,
keep the button in the turn signal lever
pressed until the display changes.
Ice warning
If the outside temperature drops to approx.
37.57/36, the computer automatically
switches to the outside temperature dis-
play.
In addition, a signal sounds and the display
flashes for a brief period.
Clock
Setting the 12-hour or 24-hour
mode*
If the vehicle is equipped with a computer,
you can have the time displayed in either a
12-hour or 24-hour mode.
While the time display is active, press the
computer button in the turn signal lever
until the display changes.
Page 57 of 120
Reference
At a glance
Controls
Driving tips
Mobility
55
place in all four tires over an extended
period of time.<
On the other hand, the following situations
can lead to false warning, a delayed detec-
tion of pressure loss and even to the sys-
tem not functioning:
>Driving on snow-covered or slippery
roads
>Performance-oriented driving: slip at
the drive wheels, high levels of lateral
acceleration
>When driving with snow chains, false
warnings and undetected pressure
losses may occur
>If the Flat Tire Monitor was not initial-
ized after the last time the tire inflation
pressures were corrected, undetected
losses in pressure or false warnings
that indicate a non-existent flat tire are
possible.
Initializing the system
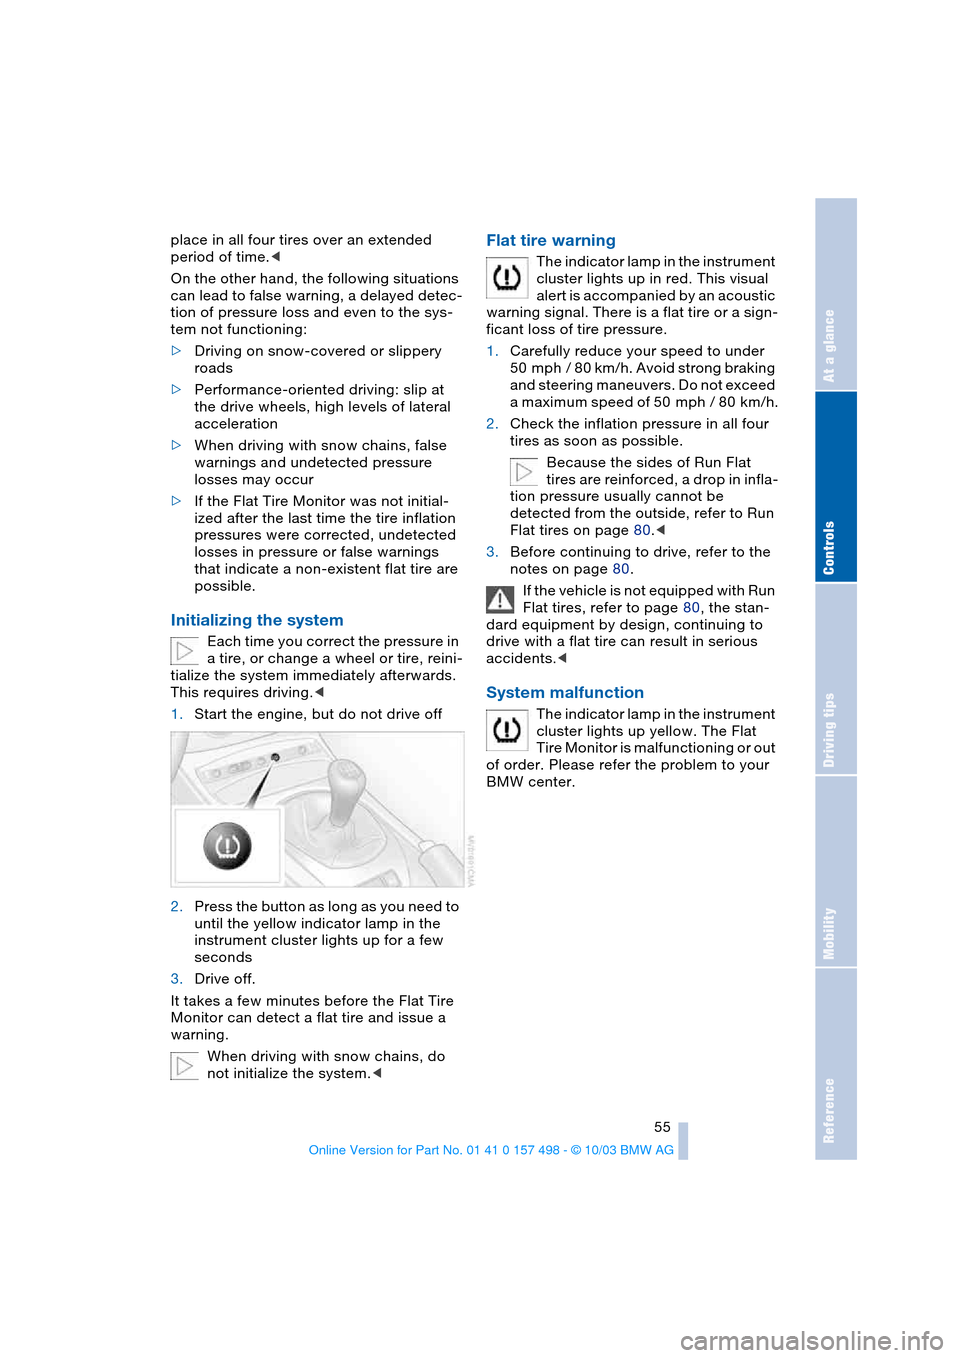
Each time you correct the pressure in
a tire, or change a wheel or tire, reini-
tialize the system immediately afterwards.
This requires driving.<
1.Start the engine, but do not drive off
2.Press the button as long as you need to
until the yellow indicator lamp in the
instrument cluster lights up for a few
seconds
3.Drive off.
It takes a few minutes before the Flat Tire
Monitor can detect a flat tire and issue a
warning.
When driving with snow chains, do
not initialize the system.<
Flat tire warning
The indicator lamp in the instrument
cluster lights up in red. This visual
alert is accompanied by an acoustic
warning signal. There is a flat tire or a sign-
ficant loss of tire pressure.
1.Carefully reduce your speed to under
50 mph / 80 km/h. Avoid strong braking
and steering maneuvers. Do not exceed
a maximum speed of 50 mph / 80 km/h.
2.Check the inflation pressure in all four
tires as soon as possible.
Because the sides of Run Flat
tires are reinforced, a drop in infla-
tion pressure usually cannot be
detected from the outside, refer to Run
Flat tires on page 80.<
3.Before continuing to drive, refer to the
notes on page 80.
If the vehicle is not equipped with Run
Flat tires, refer to page 80, the stan-
dard equipment by design, continuing to
drive with a flat tire can result in serious
accidents.<
System malfunction
The indicator lamp in the instrument
cluster lights up yellow. The Flat
Tire Monitor is malfunctioning or out
of order. Please refer the problem to your
BMW center.
Page 59 of 120
Reference
At a glance
Controls
Driving tips
Mobility
57
them to be deactivated, the airbags have to
be deactivated with the vehicle ignition key
and the key switch on the outer passen-
ger's side of the instrument panel. Apart
from passengers, do not place any addi-
tional objects on the passenger seat. Do
not fit seat covers, seat cushion padding,
ball mats or other items to the passenger
seat unless they are specifically recom-
mended by BMW. Do not place any items
under the seat. Otherwise, the function of
the seat occupation detection could be
impaired.<
Indicator lamps
Airbag system operational
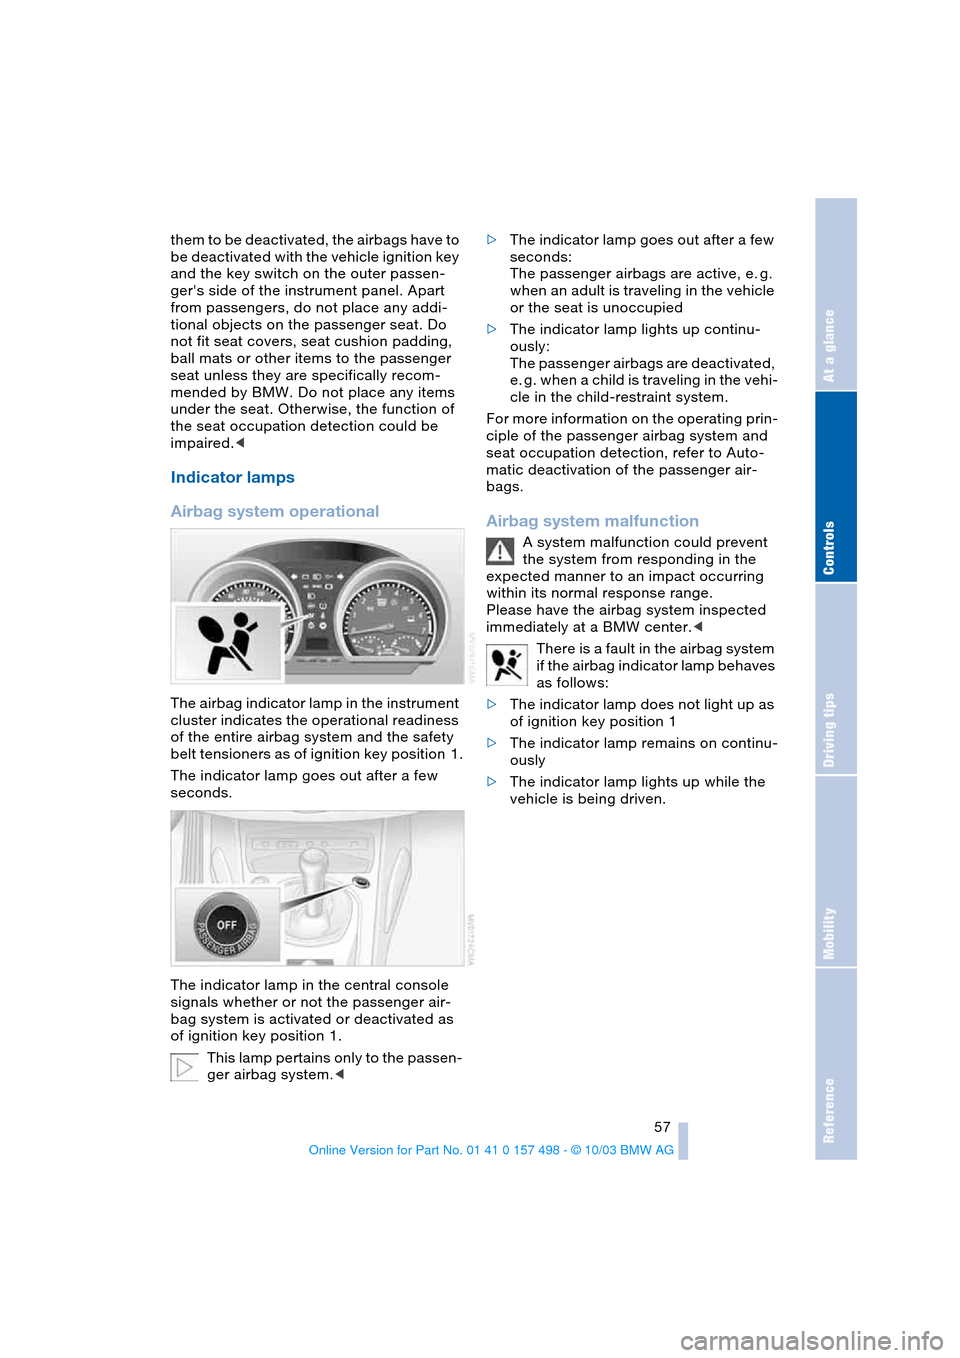
The airbag indicator lamp in the instrument
cluster indicates the operational readiness
of the entire airbag system and the safety
belt tensioners as of ignition key position 1.
The indicator lamp goes out after a few
seconds.
The indicator lamp in the central console
signals whether or not the passenger air-
bag system is activated or deactivated as
of ignition key position 1.
This lamp pertains only to the passen-
ger airbag system.<>The indicator lamp goes out after a few
seconds:
The passenger airbags are active, e. g.
when an adult is traveling in the vehicle
or the seat is unoccupied
>The indicator lamp lights up continu-
ously:
The passenger airbags are deactivated,
e. g. when a child is traveling in the vehi-
cle in the child-restraint system.
For more information on the operating prin-
ciple of the passenger airbag system and
seat occupation detection, refer to Auto-
matic deactivation of the passenger air-
bags.
Airbag system malfunction
A system malfunction could prevent
the system from responding in the
expected manner to an impact occurring
within its normal response range.
Please have the airbag system inspected
immediately at a BMW center.<
There is a fault in the airbag system
if the airbag indicator lamp behaves
as follows:
>The indicator lamp does not light up as
of ignition key position 1
>The indicator lamp remains on continu-
ously
>The indicator lamp lights up while the
vehicle is being driven.
Page 108 of 120
Everything from A to Z
106 Condensation, removing
from windows
– air conditioning 60
– automatic climate
control 62
Configuring settings, refer
to Vehicle Memory,
Key Memory 31
Connecting a vacuum
cleaner, refer to Cigarette
lighter 65
Consumption, refer to
Average consumption 51
Consumption display, refer
to Fuel gauge 48
Control elements, refer to
Cockpit 10
Convenience operation
– convertible top 18
– from outside 18
– windows 18
Convertible top 21, 22
– care, refer to the Caring
for your vehicle brochure
– convenience operation 18
– electrical fault 23
– emergency closing 23
– fully automatic 22
– malfunction 23
– manual 21
Convertible top
compartment panel 20
Coolant 84
– indicator lamp 13
– level 84
– temperature 48
Coolant water, refer to
Coolant 84
Cooling, maximum 62
Cooling, refer to Air
conditioning mode 59, 62
Cooling system, refer to
Capacities 103
Cruise control 45
Cruising range 51
Cup holders, refer to
Beverage holders 65
Curb weight, refer to
Weights 101
Cylinders, refer to Engine
data 100
D
Data, technical 100
– capacities 103
– dimensions 102
– engine data 100
– weights 101
Daytime driving lamps 46
DBC Dynamic Brake
Control 53
– indicator lamp 13, 52
Defective bulb 46
Defrosting rear window
– air conditioning 59
– automatic climate
control 63
Defrosting windows 60, 62
– air conditioning 60
– automatic climate
control 62
Defrosting windows and
removing condensation
– air conditioning 60
– automatic climate
control 62
Defrosting windshield, refer
to Defrosting
windows 60, 62
Defrost position, refer to
Defrosting
windows 60, 62
Differential
– break-in procedures 68
Digital clock 49
Dimensions 102
Dimming mirror 31
Dipstick, engine oil 83
Directional indicators, refer
to Turn signal
indicators 43
Disc brakes 69
Displacement, refer to
Engine data 100
Display elements 12
Display lighting,
refer to Instrument
lighting 47
Displays, refer to
Instrument cluster 12Disposal
– oil 84
– vehicle battery 92
Distance remaining, refer to
Range 51
Door key 16
Door lock 18
Doors, unlocking and
locking
– from inside 18
– from outside 17, 18
DOT quality grades 77
Draft-free ventilation 59, 63
Driving Dynamic Control 42
Driving light, refer to
Parking lamps/Low
beams 46
Driving notes 69
– break-in procedures 68
– driving tips 69
Driving stability control 52
Dry air, refer to Air
conditioning mode 59, 62
DSC Dynamic Stability
Control 52
– indicator lamp 13, 52
DTC Dynamic Traction
Control 53
– indicator lamp 13, 52
Dynamic Brake Control
DBC 53
– indicator lamp 13, 52
Dynamic Stability Control
DSC 52
– indicator lamp 13, 52
Dynamic Traction Control
DTC 53
– indicator lamp 13, 52
E
Electrical fault
– automatic transmission
with Steptronic 40
– convertible top 23
– door lock 18
– driver's door 18
– fuel filler door 74
– luggage compartment
lid 19
– storage compartments 64
Page 110 of 120

Everything from A to Z
108 Hazard warning flashers 10
Headlamp cover, care,
refer to the Caring for
your vehicle brochure
Headlamp flasher 43
– indicator lamp 13
Headlamps
– bulb replacement 88
– care, refer to the Caring
for your vehicle brochure
– cleaning 44
Headlamps, automatic
control 46
Headlamp washer
reservoir 83
– content, refer to
Capacities 103
Headlamp washer
system
– cleaning the
headlamps 44
– washing fluids 83
Head restraints 28
Heated mirrors 31
Heated seats 30
Heating 58
– exterior mirrors 31
– rear window 59, 63
– seats 30
Heavy loads, refer to
Stowing cargo 70
Height, refer to
Dimensions 102
Height adjustment
– seats 28
– steering wheel 30
High beams 47
– bulb replacement 89
– headlamp flasher 43
– indicator lamp 13
High Performance
Synthetic Oil 84
– alternative oils 84
– approved oils 84
High temperatures 69
Holders for beverages 65
Hood 81
Horn 10
Hydraulic Brake Assistant,
refer to Dynamic Brake
Control DBC 52Hydraulics
– brakes 85
Hydroplaning 69
I
Ice warning 50
Identification mark
– Run Flat tires 80
Ignition 36
Ignition key 16
Ignition lock 36
Inclines 69
Index 104
Indicator/warning lamp
– airbags 57
– alarm system 26
– brakes 13
– coolant temperature 49
– DSC 52
– engine temperature 48
– Flat Tire Monitor 55
– fog lamps 47
– passenger airbags 34
– please fasten safety
belts 30
– reserve 48
Indicator and warning
lamps, overview 12
Individual air
distribution 59, 62
Individual settings, refer to
Vehicle Memory,
Key Memory 31
Inflation pressure, tires 75
Inflation pressure
monitoring, refer to Flat
Tire Monitor 54
INSPECTION 49
Instrument cluster 12
Instrument lighting 47
Instrument panel, refer to
Cockpit 10
Interior lamps 47
– remote control 17
Interior motion sensor 26
Interior rearview mirror 31
– automatic dimming
feature 31
Interior temperature
– adjusting 59, 62Interlock, refer to
Steering lock 36
Intermittent
– operation, wipers 44
Interval
– display, service 49
J
Jack 91
Jacking points 91
Jets, refer to
Ventilation 59, 63
Jump-starting 94
K
Key Memory 31
Keys 16
Key switch for passenger
airbags 33
Kickdown 39
Knock control 74
L
Lamps 46
Lamps and bulbs 88
LATCH, child-restraint
mounting system 35
Leather care, refer to the
Caring for your vehicle
brochure
Length, refer to
Dimensions 102
License plate lamps
– bulb replacement 91
Light-alloy wheels, care,
refer to the Caring for
your vehicle brochure
Lighter 65
Lighting
– of the instruments 47
Lighting of the instruments,
refer to Instrument
lighting 47
LIGHTS ON warning 46
Light switch 46
Loads, refer to Cargo
loading 70
Loads, securing 70