Page 105 of 168
6103
Maintenance
Without BMW Integral ABS:
• Press the handbrake lever firmly a number of times until
the resistance point is
noticeable.
With BMW Integral ABS
OE:
• Switch on the ignition.
• Wait for self-diagnosis to complete
(b
59).
• Firmly pull the handbrake
lever a number of times, until
the pressure point is
perceptible.
Braking efficiency is im-
paired if the brake pads
are not correctly bedded
against the discs.
Before riding off, always check
that the brakes start to bite
immediately. c
Removing rear wheel
The types of screw used
are listed on (
b
128).c
• Place the motorcycle on the centre stand
OE or a suitable
auxiliary stand.
It is advisable to use the
BMW rear wheel stand
for this purpose (b
108). c •Remove screw
1 from
silencer cover 2.
• Pull the cover to the rear to remove.
•Slacken clamp 3 on the
silencer.
Do not remove the seal-
ing grease from the
clamp. c
Page 106 of 168
Maintenance6104
• Remove screw 4 for the
bracket of the end silencer
from the rear footrest.
• Turn the end silencer out.
• Engage first gear. • Remove studs
5 from the
rear wheel while supporting
the wheel.
• If you are using a BMW Motorrad rear wheel stand
(
b
108): remove the lock
washer.
• Lower the rear wheel to the ground.
• Roll the rear wheel out toward the rear.
• If you are using a BMW Motorrad rear wheel stand
(
b
108): reinstall the lock
washer.
Installing rear wheel
The types of screw used
are listed, complete with
tightening torques, on
(
b
128). c
Threaded fasteners not
tightened to the specified
torque can work loose or their
threads can suffer damage. Al-
ways have the security of the
fasteners checked, preferably
by an authorised BMW motor-
cycle dealer. c
• If you are using a BMW Motorrad rear wheel stand
(b
108): remove the lock
washer.
Page 107 of 168
6105
Maintenance
• Roll the rear wheel onto the rear wheel support.
• Place the rear wheel on the rear wheel support.
• If the BMW Motorrad rear wheel stand is used: attach
the retaining disc again. • Install studs
5 and tighten in
diagonally opposite
sequence to 60 Nm. • Turn the end silencer to its
initial position.
•Install screw 4 for the
bracket of the end silencer in
the rear footrest, but do not
tighten it at this point.
• Align clamp 3 on the end
silencer with mark A (arrow)
on the oxygen sensor B.
• Tighten clamp 3 on the end
silencer to 35 Nm.
Page 108 of 168
Maintenance6106
• Tighten screw4 for the
bracket of the end silencer in
the rear footrest to 16 Nm. A lack of clearance
between the rear wheel
and the end silencer can result
in damage to the rear wheel.
The clearance between rear
wheel and end silencer is cor-
rect when the handle of the
screwdriver from the toolkit
can be slipped between the
two. c • Push silencer cover
2 with
guides A into brackets B.
• Install screw 1 and hand-
tighten.
• Remove the auxiliary stand, if used.
Page 109 of 168

6107
Maintenance
Front-wheel standA front-wheel stand for simple,
safe changing of the front
wheel is available from
BMW Motorrad. The BMW
special tool number is 36 3 971
and the front-wheel stand is
available from your authorised
BMW motorcycle dealer. In
addition, you require the
adapters with BMW special
tool number 36 3 973.Installing front-wheel
stand
• Place the motorcycle on the centre stand
OE or a suitable
auxiliary stand such as the
BMW Motorrad rear-wheel
stand
(b
108).
• Slacken adjusting screws 1.
• Push pins 2 apart until the
front forks fit between them.
• Use locating pins 3 to set the
front-wheel stand to the
desired height.
• Centre the front-wheel stand
relative to the front wheel
and push it against the front
axle. • Push both pins
2 in through
the triangles of the brake cal-
iper supports until there is
just enough room for the
front wheel to be rolled
between them.
Take care not to damage
the ABS sensor ring if the
motorcycle is fitted with BMW
Integral ABS.
Do not push the pin in too far;
make sure that it does not
touch the sensor ring of the
BMW Integral ABS. c
• Tighten adjusting screws 1.
Page 110 of 168
Maintenance6108
• Apply uniform pressure to push the front-wheel stand
down and raise the motor-
cycle.
When the motorcycle is
standing on its centre
stand: if the motorcycle is
raised too far at the front the
centre stand will lift clear of the
ground and the motorcycle
could topple to one side. When you raise the motorcy-
cle, make sure that the centre
stand remains on the
ground.
c
Rear wheel standBMW Motorrad offers a rear-
wheel stand for working on a
motorcycle that does not have
a centre stand. The BMW spe-
cial tool number is 36 3 980
and the rear-wheel stand is
available from your authorised
BMW motorcycle dealer.
Installing rear-wheel
stand• Use screws 1 to set the rear-
wheel stand to the desired
height.
• Press release button 3 and
remove lock washer 2.
Page 111 of 168
6109
Maintenance
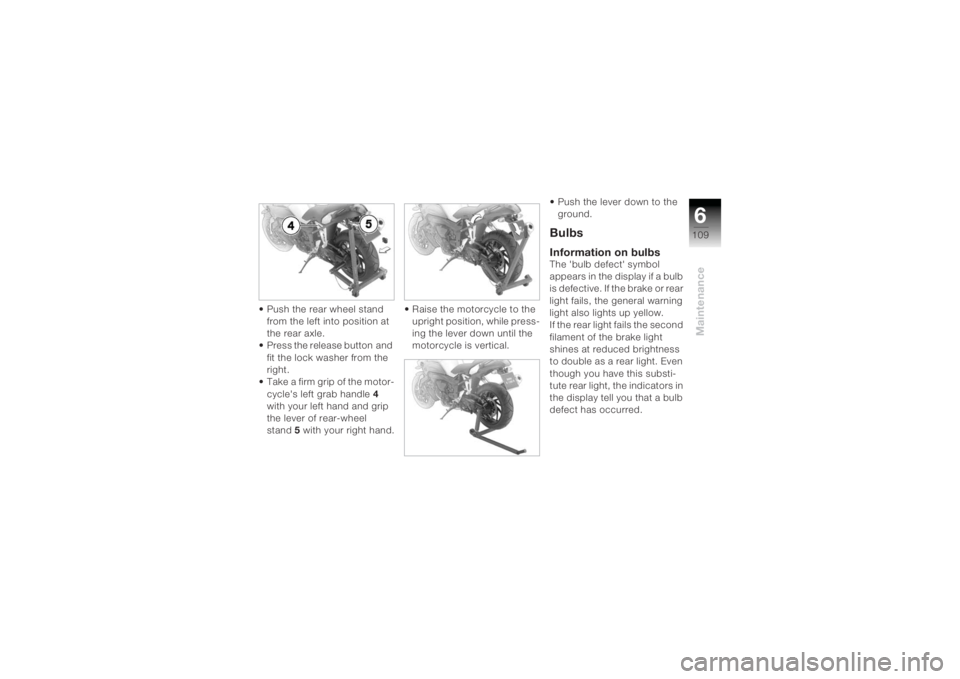
• Push the rear wheel stand from the left into position at
the rear axle.
• Press the release button and
fit the lock washer from the
right.
• Take a firm grip of the motor- cycle's left grab handle 4
with your left hand and grip
the lever of rear-wheel
stand 5 with your right hand. • Raise the motorcycle to the
upright position, while press-
ing the lever down until the
motorcycle is vertical. • Push the lever down to the
ground.
BulbsInformation on bulbsThe 'bulb defect' symbol
appears in the display if a bulb
is defective. If the brake or rear
light fails, the general warning
light also lights up yellow.
If the rear light fails the second
filament of the brake light
shines at reduced brightness
to double as a rear light. Even
though you have this substi-
tute rear light, the indicators in
the display tell you that a bulb
defect has occurred.
Page 112 of 168

Maintenance6110
A defective bulb places
your safety at risk be-
cause it is easier for other road
users to oversee you and your
motorcycle.
Replace defective bulbs as
soon as possible; always carry
a complete set of spare bulbs
if possible. c
The types of bulb used
are listed on (
b
139). c
Do not touch the glass of
new bulbs with your fin-
gers. Use a clean, dry cloth to
hold the bulbs when handling
them. Dirt deposits, in particu-
lar oil and grease, interfere
with heat radiation from the
bulb. This leads to overheating
and shortens the bulb’s oper-
ating life. c The types of threaded
fastener used are listed
on (
b
128). c
Replacing low-beam
headlight bulb
If it is not standing firmly,
the motorcycle could
topple in the course of the
operations described below.
Make sure that the motorcycle
is steady on its stand. c
The bulb is pressurised
and can cause injury if
damaged.
Wear protective goggles and
gloves when changing
bulbs. c
Turn the handlebars to
the right to facilitate
access. c High-beam headlight
1 and
low-beam headlight 2 are
accessible from behind.
• Switch off the ignition.
•Turn cover 3 counter-clock-
wise and remove it.