2004 BMW 645CI COUPE rear entertainment
[x] Cancel search: rear entertainmentPage 17 of 216

At a glance
15Reference
Controls
Driving tips
Communications
Navigation
Entertainment
Mobility
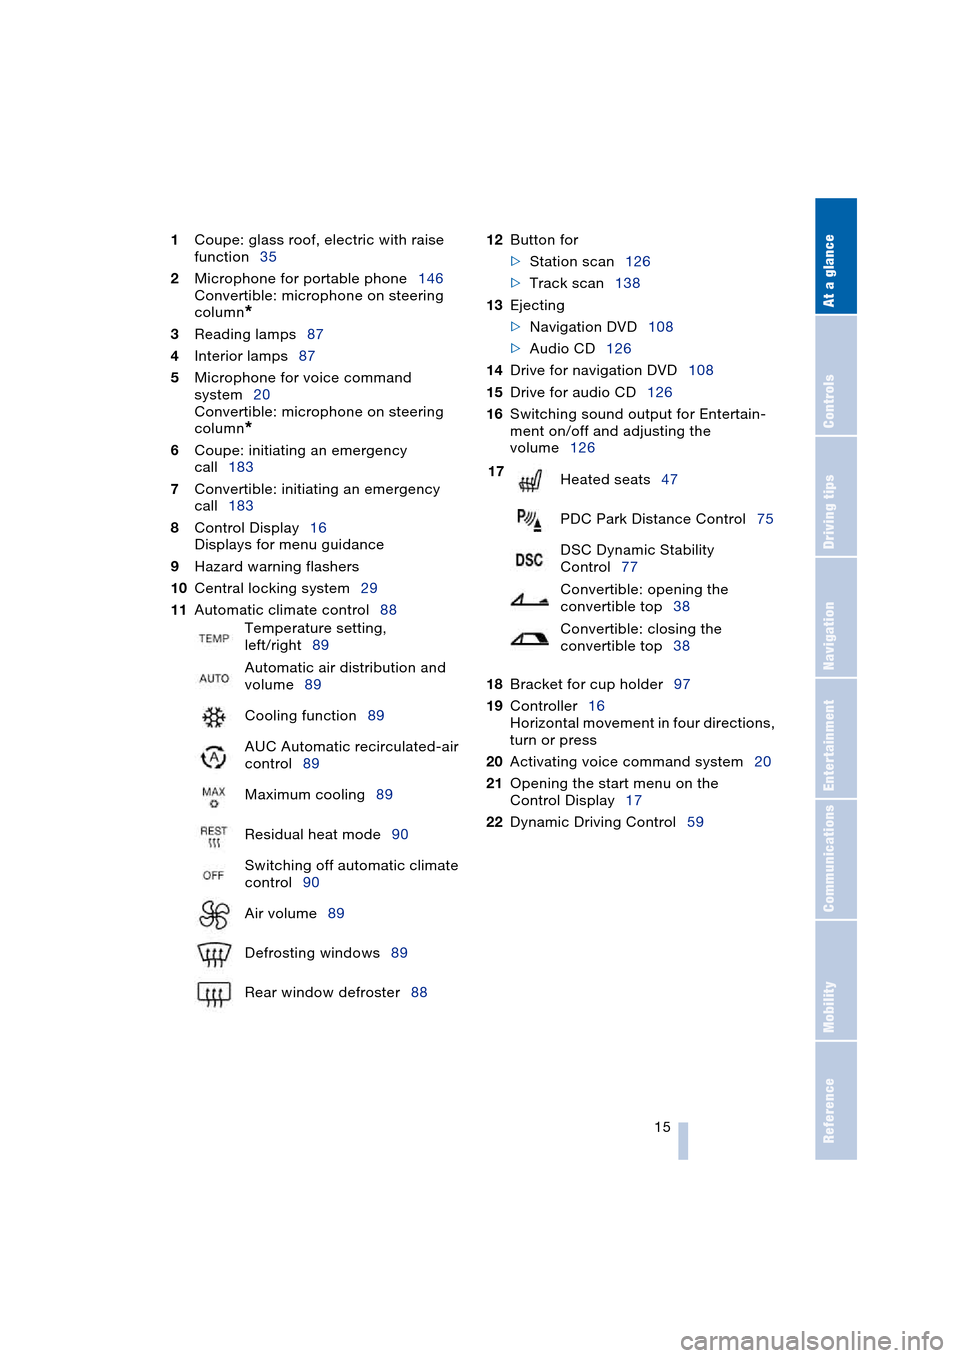
1Coupe: glass roof, electric with raise
function35
2Microphone for portable phone146
Convertible: microphone on steering
column
*
3Reading lamps87
4Interior lamps87
5Microphone for voice command
system20
Convertible: microphone on steering
column
*
6Coupe: initiating an emergency
call183
7Convertible: initiating an emergency
call183
8Control Display16
Displays for menu guidance
9Hazard warning flashers
10Central locking system29
11Automatic climate control8812Button for
>Station scan126
>Track scan138
13Ejecting
>Navigation DVD108
>Audio CD126
14Drive for navigation DVD108
15Drive for audio CD126
16Switching sound output for Entertain-
ment on/off and adjusting the
volume126
18Bracket for cup holder97
19Controller16
Horizontal movement in four directions,
turn or press
20Activating voice command system20
21Opening the start menu on the
Control Display17
22Dynamic Driving Control59 Temperature setting,
left/right89
Automatic air distribution and
volume89
Cooling function89
AUC Automatic recirculated-air
control89
Maximum cooling89
Residual heat mode90
Switching off automatic climate
control90
Air volume89
Defrosting windows89
Rear window defroster88
17
Heated seats47
PDC Park Distance Control75
DSC Dynamic Stability
Control77
Convertible: opening the
convertible top38
Convertible: closing the
convertible top38
Page 31 of 216

Controls
29Reference
At a glance
Driving tips
Communications
Navigation
Entertainment
Mobility
Using door lock
One turn of the key in the driver's door lock
unlocks the driver's door only.
Turning the key a second time unlocks all of
the remaining doors, the luggage compart-
ment lid and the fuel filler door.
Convenience operation
The windows, the glass roof on the Coupe,
the rear window and top on the convertible
can also be operated via the door lock:
>To open:
With the door closed, turn the key to the
Unlock position and hold it there
>To close:
With the door closed, turn the key to the
Lock position and hold it there.
Watch during the closing process to
be sure that no one is injured. Releas-
ing the key stops the operation.<
Manual operation
In the event of an electrical malfunction,
you can turn the key all the way to the right
or left in the door lock to lock or unlock the
driver's door.
Opening and closing: from
inside
You can operate the central locking system
with this button when the doors are closed.
This only unlocks or locks the doors and
luggage compartment lid, but the anti-theft
system is not activated. The fuel filler door
remains unlocked to enable refueling, as
does the compartment in the front center
console to ensure access to personal
items.
You can also make the following settings:
>The central locking system automati-
cally locks the vehicle as soon as you
drive off
>The central locking system automati-
cally locks the vehicle after a short time
when no door has been opened.
Control Center, for principle details, refer to
page 16:
1.Open the menu
2.Select "Vehicle settings" and press the
controller
3.Select "Door locks" and press the con-
troller
4.Select "Central locking" and press the
controller
5.Select "Lock after driving"
or
"Relock door if not opened"
Page 35 of 216

Controls
33Reference
At a glance
Driving tips
Communications
Navigation
Entertainment
Mobility
Indicator lamp displays
>The indicator lamp below the interior
rearview mirror flashes continuously:
the system is armed
>The indicator lamp flashes on locking:
door(s) or luggage compartment lid are
not completely closed. Even if you do
not close the alerted area, the system
begins to monitor the remaining areas,
and the indicator lamp flashes continu-
ously after approx.10 seconds. How-
ever, the interior motion sensor is not
activated
>The indicator lamp goes out on unlock-
ing: no manipulation or attempted intru-
sions have been detected in the period
since the system was armed
>The indicator lamp flashes on unlocking
before the remote control is inserted in
the ignition lock, but for no more than
roughly 5 minutes: an attempted entry
has been detected in the period since
the system was armed.
Following triggering of an alarm, the indica-
tor lamp will flash continuously.
Tilt alarm sensor and interior motion
sensor
Tilt alarm sensor
Monitors the inclination of the vehicle. The
alarm system reacts, for example, if some-
one attempts to steal the wheels or tow the
vehicle.
Interior motion sensor
Coupe:
In order for the interior motion sensor to
function properly, the windows and glass
roof must be completely closed.
Convertible:
Monitors the interior up to the height of the
seat cushions. This means that the alarm
system, including the interior motion sen-
sor, is armed even if the convertible top is
open. Falling objects, e.g. leaves, can trig-
ger false alarms, refer to Avoiding uninten-
tional alarms.
Avoiding unintentional alarms
The tilt alarm sensor and interior motion
sensor may be switched off at the same
time. This is how you prevent unintentional
alarms, e.g. in the following situations:
>In garages with elevator ramps
>During transport on automobile trans-
port trains
>If animals are to remain in the vehicle.
Switching off tilt alarm sensor and
interior motion sensor
Press the button on the remote con-
trol once again directly after locking.
The indicator lamp lights up briefly and
then flashes continuously. The tilt alarm
sensor and the interior motion sensor are
switched off until the vehicle is unlocked
and locked again.
Windows
To prevent injuries, exercise care
when closing the windows and keep
them in your field of vision until they are
shut.
When leaving the vehicle, always remove
the ignition key and close the doors to pre-
vent children from operating the windows
and injuring themselves etc.<
Page 37 of 216

Controls
35Reference
At a glance
Driving tips
Communications
Navigation
Entertainment
Mobility
Rear window
Ignition key as of position 1:
1.Briefly press button 1:
The LEDs in button 1 and at switch 2
light up
2.Press switch 2:
>Up to the resistance point:
The rear window continues to move
downward as long as you continue
to hold the switch.
You can close the rear window in the
same manner by pulling the switch
>Briefly press the switch beyond the
resistance point:
The rear window moves downwards
automatically. Briefly press the
switch again to stop the opening
movement.
Briefly press button 1 again to deactivate
the function. The LEDs go out.
The rear window opens and closes
automatically when you open or close
the convertible top.<
After switching off ignition
You can still operate the windows:
>Ignition key in position 1 for approx.
15 minutes
>In position 0 or with the ignition key
removed for approx. 1 minute, as long
as a door has not been opened.
To open, press the switch beyond the
resistance point.
When leaving the vehicle, remove the
master key with remote control and
close the doors, as otherwise children
could operate the windows and injure
themselves etc.
remote control, refer to page 27 or 29.
Anti-trapping mechanism
If the closing force rises beyond a pre-
defined threshold during closing, the sys-
tem will immediately stop moving the win-
dow prior to lowering it slightly.
Convertible: the back windows and
rear window are not equipped with an
anti-trapping mechanism.<
Despite the anti-trapping mechanism,
you should always inspect the front
side window's travel path prior to closing it,
as the safety feature might fail to detect
certain kinds of obstructions, such as very
thin objects, and the window would con-
tinue closing.
Pulling the switch beyond the resistance
point and holding it limits the response of
the anti-trapping mechanism. Under these
conditions, the window will respond to
forces beyond a defined threshold by only
opening a few inches/millimeters.
If you again pull the switch past the resis-
tance point and hold it in position within a
period of roughly 4 seconds, the anti-trap-
ping mechanism will be deactivated.<
Accessories in window area
After installing any accessory – such as a
clamp-on antenna for a portable phone –
within the window's travel range, you will
need to have the system reinitialized for
use under the new conditions. Please con-
tact your BMW center for assistance.
Coupe:
Glass roof, electric with
raise function*
To prevent injuries, exercise care
when closing the glass roof and keep
it in your field of vision until it is shut.
When leaving the vehicle, always remove
the key and close the doors, as otherwise
children could operate the roof and injure
themselves etc.<
Page 41 of 216

Controls
39Reference
At a glance
Driving tips
Communications
Navigation
Entertainment
Mobility
If the opening or closing action is inter-
rupted, it can happen that the luggage
compartment lid cannot be opened.<
Convenience operation using remote
control and driver's door lock
Refer to pages 27 and 29.
Manual closing in the event of an
electrical malfunction
Only close the convertible top manu-
ally if absolutely necessary; never
open it manually. The convertible top com-
partment lid cannot be locked in the event
of an electrical malfunction and would
open while the vehicle is being driven.
Improper handling can lead to damage.<
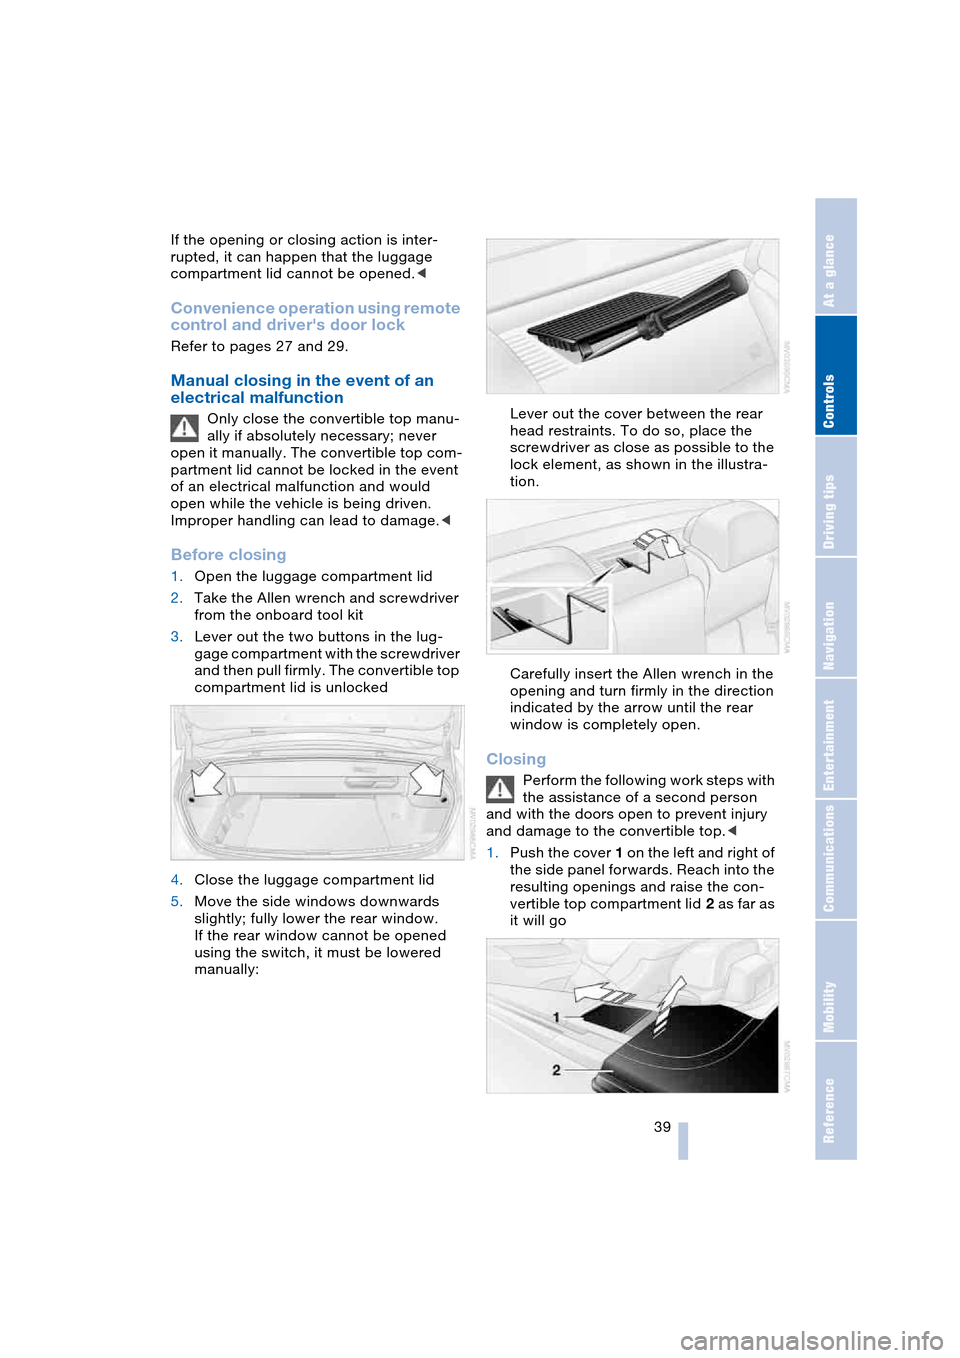
Before closing
1.Open the luggage compartment lid
2.Take the Allen wrench and screwdriver
from the onboard tool kit
3.Lever out the two buttons in the lug-
gage compartment with the screwdriver
and then pull firmly. The convertible top
compartment lid is unlocked
4.Close the luggage compartment lid
5.Move the side windows downwards
slightly; fully lower the rear window.
If the rear window cannot be opened
using the switch, it must be lowered
manually:Lever out the cover between the rear
head restraints. To do so, place the
screwdriver as close as possible to the
lock element, as shown in the illustra-
tion.
Carefully insert the Allen wrench in the
opening and turn firmly in the direction
indicated by the arrow until the rear
window is completely open.
Closing
Perform the following work steps with
the assistance of a second person
and with the doors open to prevent injury
and damage to the convertible top.<
1.Push the cover 1 on the left and right of
the side panel forwards. Reach into the
resulting openings and raise the con-
vertible top compartment lid 2 as far as
it will go
Page 43 of 216

Controls
41Reference
At a glance
Driving tips
Communications
Navigation
Entertainment
Mobility
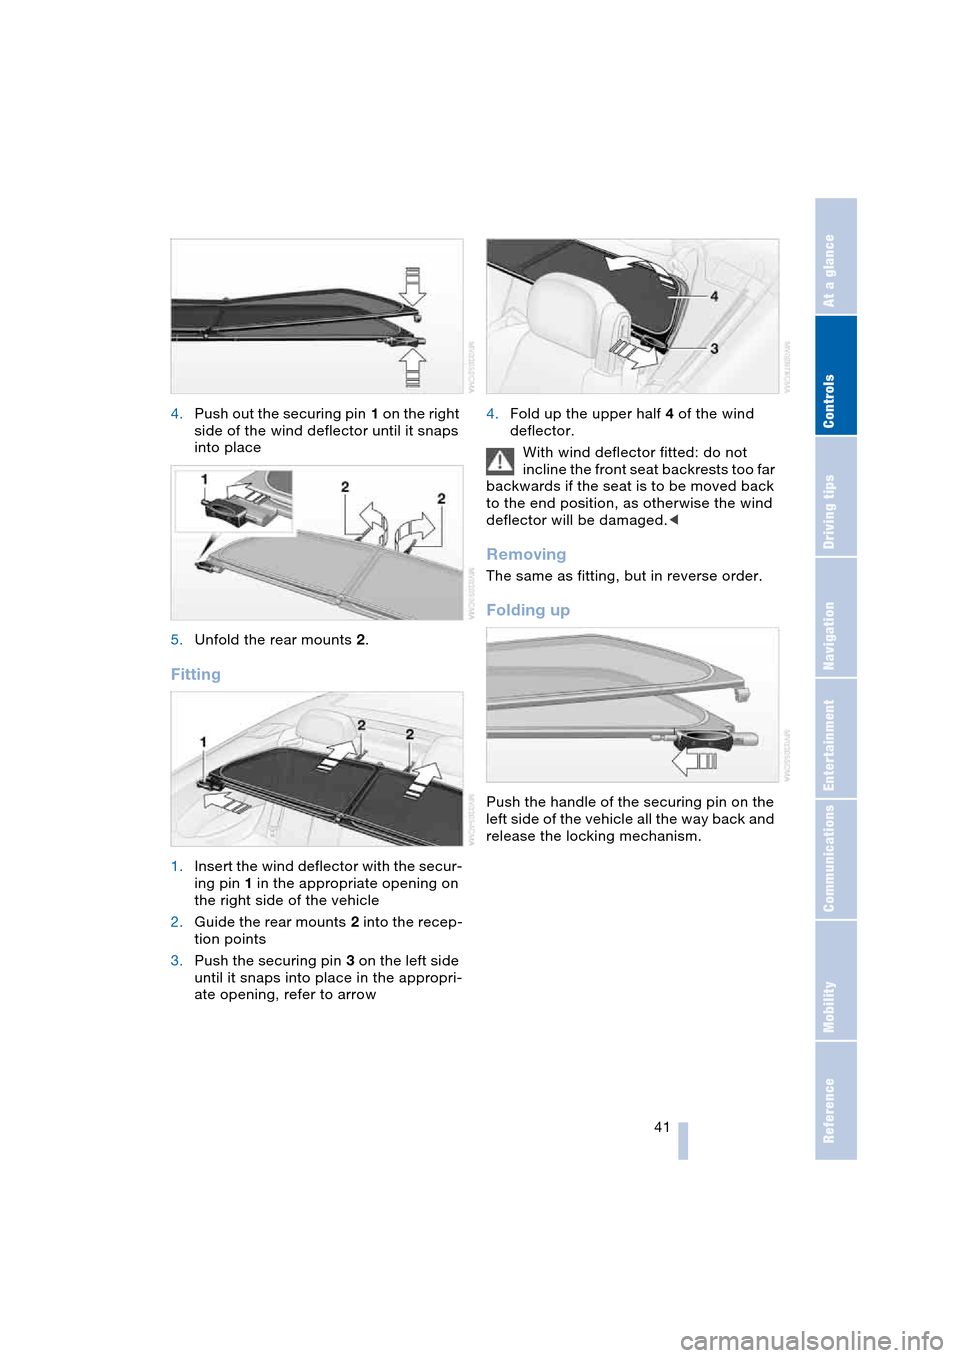
4.Push out the securing pin 1 on the right
side of the wind deflector until it snaps
into place
5.Unfold the rear mounts 2.
Fitting
1.Insert the wind deflector with the secur-
ing pin 1 in the appropriate opening on
the right side of the vehicle
2.Guide the rear mounts 2 into the recep-
tion points
3.Push the securing pin 3 on the left side
until it snaps into place in the appropri-
ate opening, refer to arrow4.Fold up the upper half 4 of the wind
deflector.
With wind deflector fitted: do not
incline the front seat backrests too far
backwards if the seat is to be moved back
to the end position, as otherwise the wind
deflector will be damaged.<
Removing
The same as fitting, but in reverse order.
Folding up
Push the handle of the securing pin on the
left side of the vehicle all the way back and
release the locking mechanism.
Page 45 of 216

Controls
43Reference
At a glance
Driving tips
Communications
Navigation
Entertainment
Mobility
Seats
Note before adjusting
Never attempt to adjust your seat
while operating the vehicle. The seat
could respond with unexpected move-
ment, and the ensuing loss of vehicle con-
trol could lead to an accident.
On the front passenger side as well, do not
tilt the backrest too far toward the rear
while driving. Failure to observe this pre-
caution can prevent the belt from providing
effective protection against injury, as the
passenger could slide under the belt in an
accident.
Make sure that the footwell behind the
driver's and front passenger's seat is empty
and unobstructed. If you fail to do so, any
persons or objects behind the seat could
be injured or damaged by a rearward
movement of the seat.<
Also observe the instructions regarding
damage to the safety belt on page 47.
Convertible: with the wind deflector
fitted, do not incline the front seat
backrests too far backwards if the seat is to
be moved back to the end position, as oth-
erwise the wind deflector will be dam-
aged.<
Seat adjustment
To ensure that the safety systems
continue to provide optimized protec-
tion, please observe the adjustment
instructions above.<
1Inclination
2Longitudinal direction
3Height4Backrest
5Convertible: head restraints, refer to
page 45
With the sports seat
*, you can also adjust
the thigh support manually:
Pull the lever and move the thigh support in
a longitudinal direction.
Lumbar support* adjustment
You can also adjust the contours of the
backrest to obtain additional support in the
lumbar region.
The upper hips and spinal column receive
supplementary support to help you main-
tain a relaxed, upright sitting position.
>Press the switch forwards or back-
wards: increase or decrease curvature
>Press the switch up or down: shift cur-
vature at top or bottom.
Page 53 of 216

Controls
51Reference
At a glance
Driving tips
Communications
Navigation
Entertainment
Mobility
Transporting children safely
The right place for children
Children always in the rear
Accident research shows that the safest
place for children in a vehicle is in the rear
seat.
Older children should be tightly secured
with a safety belt, after they have outgrown
a booster seat that is appropriate for their
age, height and weight.
Child-restraint system in the rear
Children under 13 years of age and
children less than 5 ft/150 cm tall
should always ride in the rear and the
restraint systems should be secured with
the vehicle's safety belts.<
Younger children should be secured in an
appropriate forward-facing child-restraint
system that has first been properly
secured. We strongly urge you to carefully
read and comply with the instructions for
installation and use provided by the child-
restraint's manufacturer whenever you use
such a device.
All rear sitting positions in your vehicle
meet the recommendations of SAE J1819,
an industry-recommended practice for
securing child-restraint systems in motor
vehicles.
Exception for front passenger seat
Should it become necessary to use
a child-restraint system on the front
passenger seat, the airbags on the passen-
ger's side must be deactivated. Deactivat-
ing the passenger airbags is only possible
on the Coupe. Your BMW center will be
glad to advise you.
ger seat of this vehicle if the passenger air-
bag is not deactivated. If you do so, the
child could be severely injured when the
airbag is triggered.
Your vehicle is equipped with an airbag
supplemental restraint system for the front
passenger. Because the backrest on any
rearward-facing child-restraint system – of
the kind designed for infants under 1 year
and 20 Ibs./9 kg – would be within the air-
bag's deployment range, you should never
mount such a system in the front passenger
seat, since the impact of the airbag against
the child restraint's backrest could lead to
serious or fatal injuries.<
Installing child-restraint
systems
Before installing any child-restraint system
or child seat, read the following:
Observe the child-restraint system
manufacturer's instructions for instal-
lation and use. Otherwise the degree of
protection can be reduced.
After an accident, have all parts of the
child-restraint system and of the relevant
vehicle safety belt system checked by a
BMW center and replaced if necessary.<
Commercially-available child-restraint sys-
tems are designed to be secured with a lap
belt or with the lap belt portion of a combi-
nation lap/shoulder belt. Improperly or
inadequately installed restraint systems
can increase the risk of injury to children.
Always read and follow the instructions that
come with the system.