2004 BMW 645CI COUPE radio
[x] Cancel search: radioPage 96 of 216

Practical interior accessories
94
Practical interior accessories
Integrated universal remote
control*
The concept
The integrated universal remote control
replaces up to three different hand-held
transmitters for various items of radio-con-
trolled equipment such as door openers
and house alarm systems. The integrated
universal remote control registers and
stores signals from the original hand-held
transmitters.
The signal of an original hand-held trans-
mitter can be programmed on one of the
three memory buttons 1. Then the respec-
tive device can be actuated with the mem-
ory button 1 programmed for its use with
the ignition key in position 2. The indicator
lamp 2 flashes to confirm transmission of
the signal.
If you sell your vehicle one day, delete the
saved programs beforehand for your own
security, refer to page 95.
To prevent possible damage or injury,
before programming or using the inte-
grated universal remote control, always
inspect the immediate area to make certain
that no people, animals or objects are
within the travel range of the device. Also,
comply with the safety precautions of the
original hand-held transmitter.<
Checking compatibility
If you see this symbol on the pack-
aging or in the manual supplied with
the original hand-held transmitter, it
is safe to assume that it is compatible with
the integrated universal remote control.
If you have additional questions, please
consult your BMW Sports Activity Vehicle
Center or call 1-800-355-3515.
You can also visit these websites:
www.bmwusa.com or
www.homelink.com. HomeLink is a registered trademark owned
by Johnson Controls, Inc.
Programming
1Memory buttons
2Indicator lamp
Fixed-code hand-held transmitters
1.Ignition key in position 2
2.When using for the first time: press both
outer buttons 1 for approx. 20 seconds,
maintaining pressure until the indicator
lamp 2 starts to flash. The three mem-
ory buttons 1 are cleared
3.Hold the original hand-held transmitter
at a distance of approx. 2 in/5 cm to
8 in/20 cm to the memory buttons 1
The required distance between
the hand-held transmitter and the
memory buttons 1 depends on the rele-
vant system of the original hand-held
transmitter used.<
4.Simultaneously press the transmit but-
ton on the original hand-held transmit-
ter and the desired memory button 1 on
the integrated universal remote control.
Initially, the indicator lamp 2 flashes
slowly. Release both buttons as soon
as the indicator lamp 2 flashes rapidly.
If the indicator lamp 2 does not flash
rapidly after approx. 15 seconds,
change the distance
5.To program other original hand-held
transmitters, repeat steps 3 and 4.
Page 127 of 216

Entertainment
Operation of the radio and CD
as well as their tone settings
are described in this chapter.
Page 128 of 216

On/off and tone
126
On/off and tone
The following equipment has shared con-
trols and setting options:
>Radio Business
>CD player
>CD changer
*.
Controls
The audio sources can be operated using:
>Buttons on the CD player
>Control Center
>Buttons on the steering wheel, refer to
page 11.
Buttons on CD player
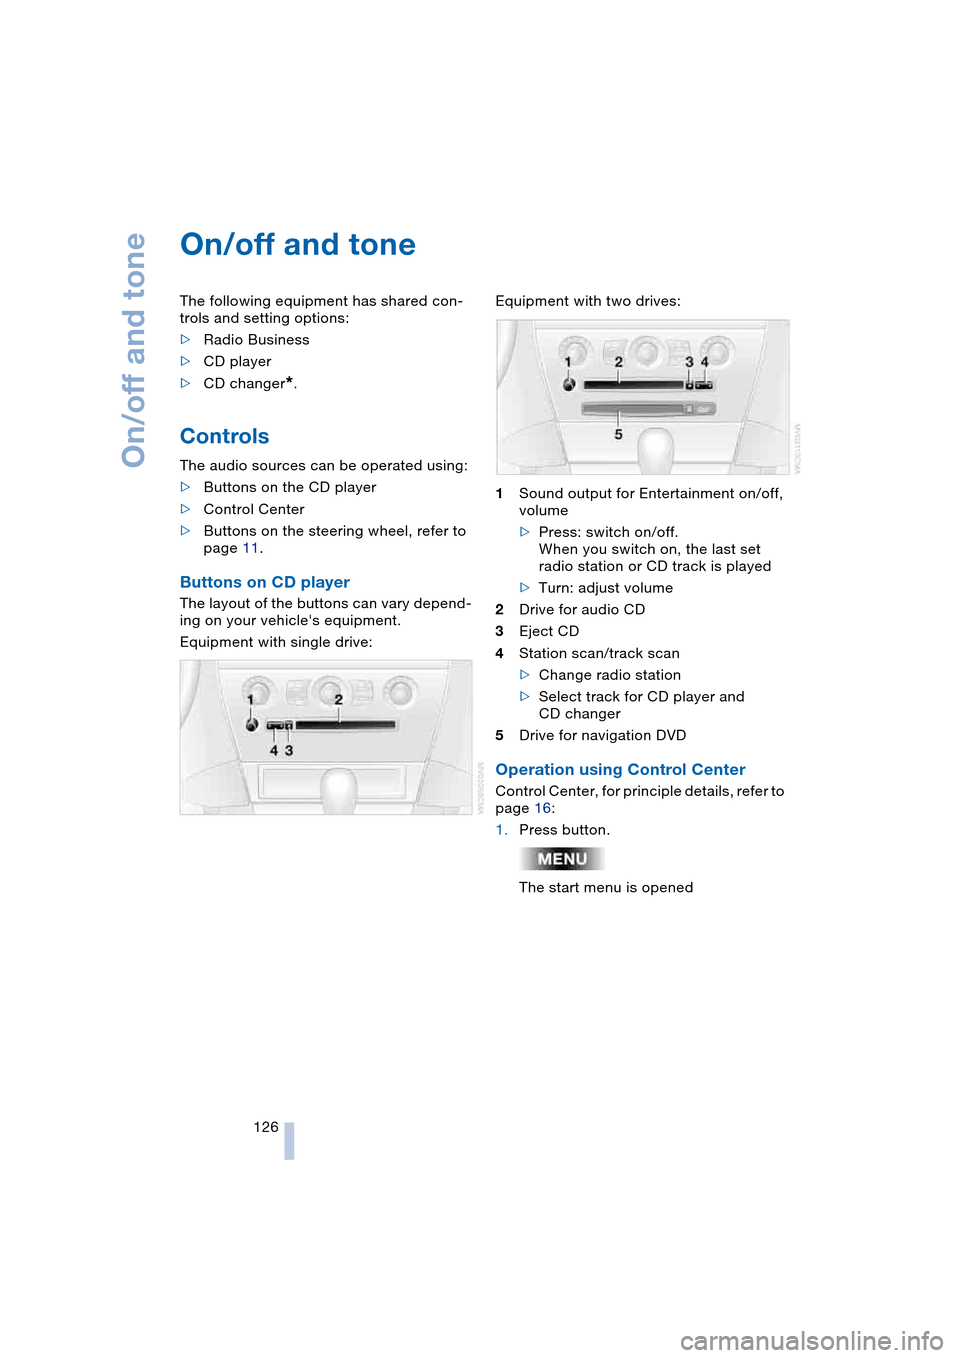
The layout of the buttons can vary depend-
ing on your vehicle's equipment.
Equipment with single drive:Equipment with two drives:
1Sound output for Entertainment on/off,
volume
>Press: switch on/off.
When you switch on, the last set
radio station or CD track is played
>Turn: adjust volume
2Drive for audio CD
3Eject CD
4Station scan/track scan
>Change radio station
>Select track for CD player and
CD changer
5Drive for navigation DVD
Operation using Control Center
Control Center, for principle details, refer to
page 16:
1.Press button.
The start menu is opened
Page 129 of 216

Navigation
Entertainment
Driving tips
127Reference
At a glance
Controls
Communications
Mobility
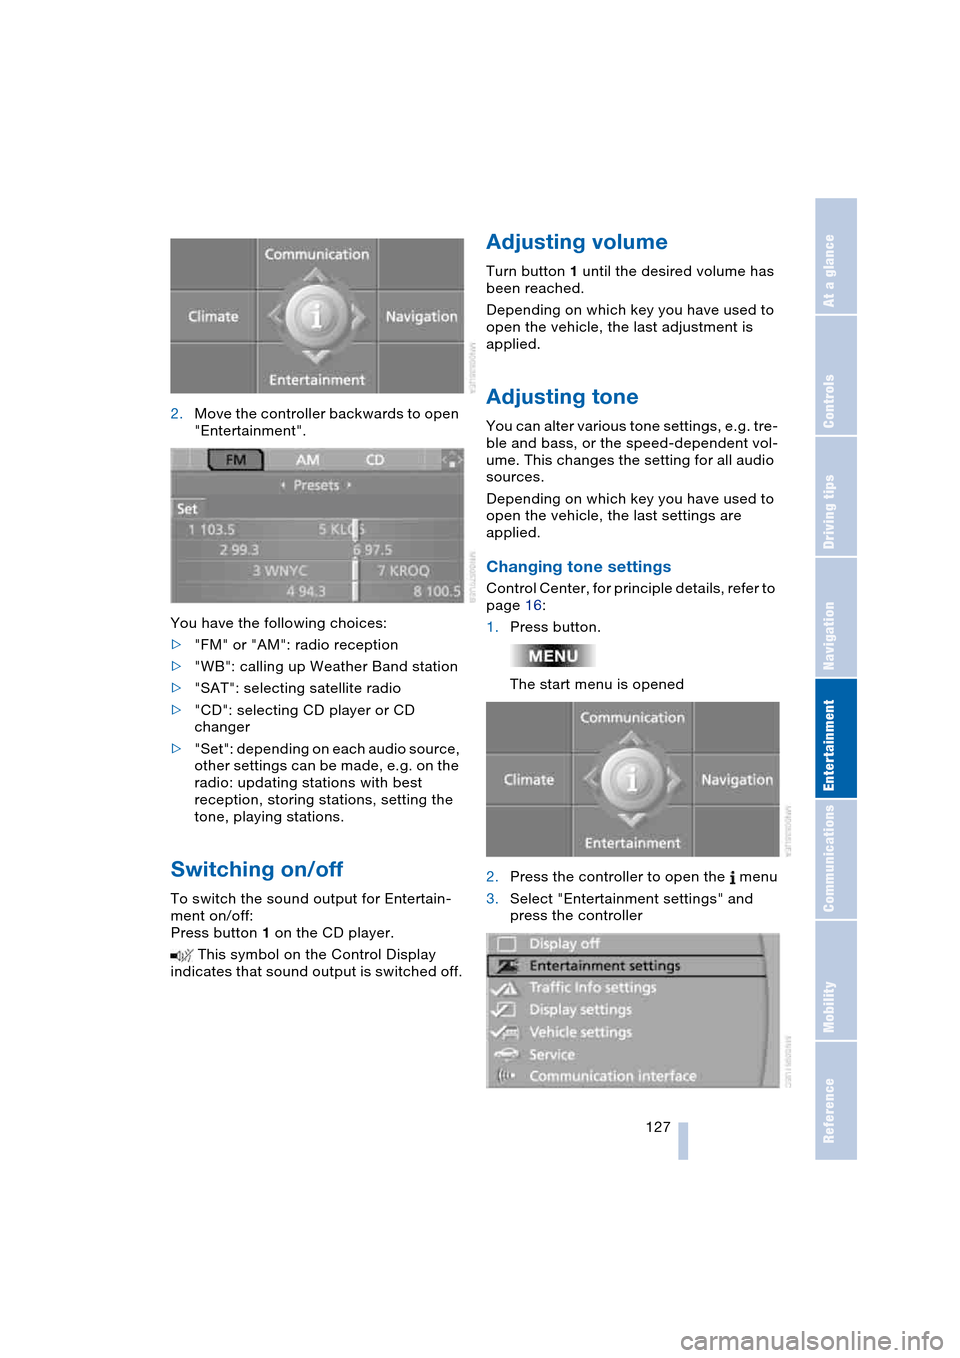
2.Move the controller backwards to open
"Entertainment".
You have the following choices:
>"FM" or "AM": radio reception
>"WB": calling up Weather Band station
>"SAT": selecting satellite radio
>"CD": selecting CD player or CD
changer
>"Set": depending on each audio source,
other settings can be made, e.g. on the
radio: updating stations with best
reception, storing stations, setting the
tone, playing stations.
Switching on/off
To switch the sound output for Entertain-
ment on/off:
Press button 1 on the CD player.
This symbol on the Control Display
indicates that sound output is switched off.
Adjusting volume
Turn button 1 until the desired volume has
been reached.
Depending on which key you have used to
open the vehicle, the last adjustment is
applied.
Adjusting tone
You can alter various tone settings, e.g. tre-
ble and bass, or the speed-dependent vol-
ume. This changes the setting for all audio
sources.
Depending on which key you have used to
open the vehicle, the last settings are
applied.
Changing tone settings
Control Center, for principle details, refer to
page 16:
1.Press button.
The start menu is opened
2.Press the controller to open the menu
3.Select "Entertainment settings" and
press the controller
Page 132 of 216

Radio
130
Radio
Your radio provides reception of the FM
and AM wavebands.
Listening to the radio
Press the button if the sound output is
switched off.
Control Center, for principle details, refer to
page 16:
1.Press button.
The start menu is opened
2.Move the controller backwards to open
"Entertainment"
3.Select "FM" or "AM"4.Press the controller.
Stations are shown on the Control Display
on the basis of various selection criteria,
e.g. "Presets".
If no station is displayed, update the sta-
tions with the best reception, refer to
page 132.
Changing station
Turn the controller.
In addition to the stations currently dis-
played, you can have stations with another
selection criterion displayed.
You can choose from the following selec-
tion criteria:
>"Autostore":
The six strongest stations, refer to
page 132
>"Presets":
Stations you have stored, refer to
page 132.
Page 133 of 216

Navigation
Entertainment
Driving tips
131Reference
At a glance
Controls
Communications
Mobility
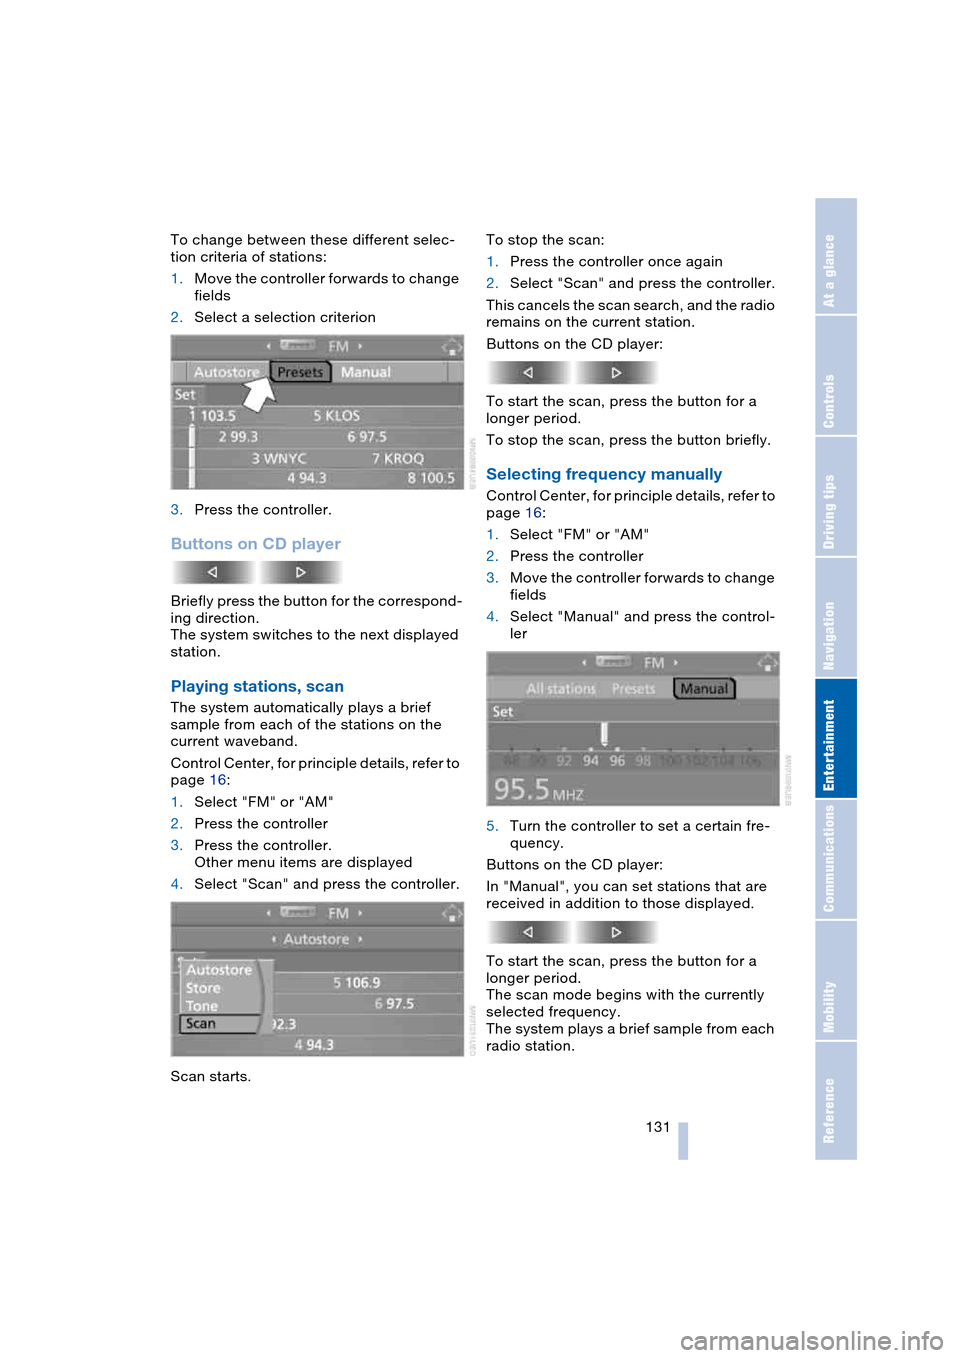
To change between these different selec-
tion criteria of stations:
1.Move the controller forwards to change
fields
2.Select a selection criterion
3.Press the controller.
Buttons on CD player
Briefly press the button for the correspond-
ing direction.
The system switches to the next displayed
station.
Playing stations, scan
The system automatically plays a brief
sample from each of the stations on the
current waveband.
Control Center, for principle details, refer to
page 16:
1.Select "FM" or "AM"
2.Press the controller
3.Press the controller.
Other menu items are displayed
4.Select "Scan" and press the controller.
Scan starts.To stop the scan:
1.Press the controller once again
2.Select "Scan" and press the controller.
This cancels the scan search, and the radio
remains on the current station.
Buttons on the CD player:
To start the scan, press the button for a
longer period.
To stop the scan, press the button briefly.
Selecting frequency manually
Control Center, for principle details, refer to
page 16:
1.Select "FM" or "AM"
2.Press the controller
3.Move the controller forwards to change
fields
4.Select "Manual" and press the control-
ler
5.Turn the controller to set a certain fre-
quency.
Buttons on the CD player:
In "Manual", you can set stations that are
received in addition to those displayed.
To start the scan, press the button for a
longer period.
The scan mode begins with the currently
selected frequency.
The system plays a brief sample from each
radio station.
Page 134 of 216

Radio
132 To stop the scan at the desired frequency
or station:
Press button.
Updating stations with best
reception
If you are on a longer journey and leave the
transmission range of the stations originally
set, you can update the list of stations with
the best reception.
Control Center, for principle details, refer to
page 16:
1.Select "FM" or "AM"
2.Press the controller
3.Move the controller forwards to change
fields
4.Select "Autostore" and press the con-
troller
5.Press the controller.
Other menu items are displayed
6.Select "Autostore" and press the con-
troller.
The display of the stations with the stron-
gest reception is updated. The stations are
displayed based on their frequencies.
Storing stations
Control Center, for principle details, refer to
page 16:
1.Select "FM" or "AM"
2.Select the desired station.
"Set" has been selected
3.Press the controller.
Other menu items are displayed
4.Select "Store" and press the controller.
"Presets" is displayed
5.Turn the controller until the desired
memory location is selected.
The number of the memory location
appears beside the name or frequency
of the station
6.Press the controller.
The station is stored.
Page 135 of 216

Navigation
Entertainment
Driving tips
133Reference
At a glance
Controls
Communications
Mobility
The stations of the last selection criterion
are displayed once again after a short time.
Depending on which key you have used to
open the vehicle, other stored stations are
displayed.
Changing a memory location
Control Center, for principle details, refer to
page 16:
1.Select "Presets" and press the control-
ler
2.Select the desired station
3.Press the controller.
Other menu items are displayed
4.Select "Store" and press the controller
5.Turn the controller until the desired
memory location is selected.
The number of the memory location
appears beside the name or frequency
of the station
6.Press the controller.
The station is stored.
RDS Radio Data System
RDS transmits additional information in the
FM frequency range. RDS stations have the
following properties:
>In the case of broadcasting networks
that transmit over a number of frequen-
cies, there is an automatic switch to the
frequency with the best reception qual-
ity
>If the reception conditions are good, the
station names are shown on the Control
Display. If the reception is weak or dis-
rupted, it can take some time before the
station names appear.
Weather Band*
Weather Radio is a service of the National
Oceanic and Atmospheric Administration –
NOAA – of the U.S. Department of Com-
merce. Weather messages are repeated
every four to six minutes and are routinely
revised every one to three hours, or more
frequently if needed. Most of the stations
operate 24 hours daily. During severe
weather, National Weather Service fore-
casters can interrupt the routine weather
broadcasts and substitute special warning
messages. If you have a question concern-
ing NOAA Weather Radio, please contact
your nearest National Weather Service
Office, or write to National Weather Service
– Attn: W/OM11 –, National Oceanic and
Atmospheric Administration, 1325 East-
West Highway, Silver Spring, MD. 20910.
Selecting Weather Band
Control Center, for principle details, refer to
page 16:
1.Select "WB" and press the controller
2.Select the Weather Band station and
press the controller.
It can occur that the Weather Band station
is not available in some regions.
Satellite radio*
You can receive up to 100 different chan-
nels with high tone quality.
The channels are offered to you in pre-
defined combinations. To receive the chan-
nels of your choice, you must have this
combination enabled.