2004 BMW 645CI COUPE&CONVERTIBLE rear entertainment
[x] Cancel search: rear entertainmentPage 107 of 216
Driving tips
105Reference
At a glance
Controls
Communications
Navigation
Entertainment
Mobility
Stowing cargo
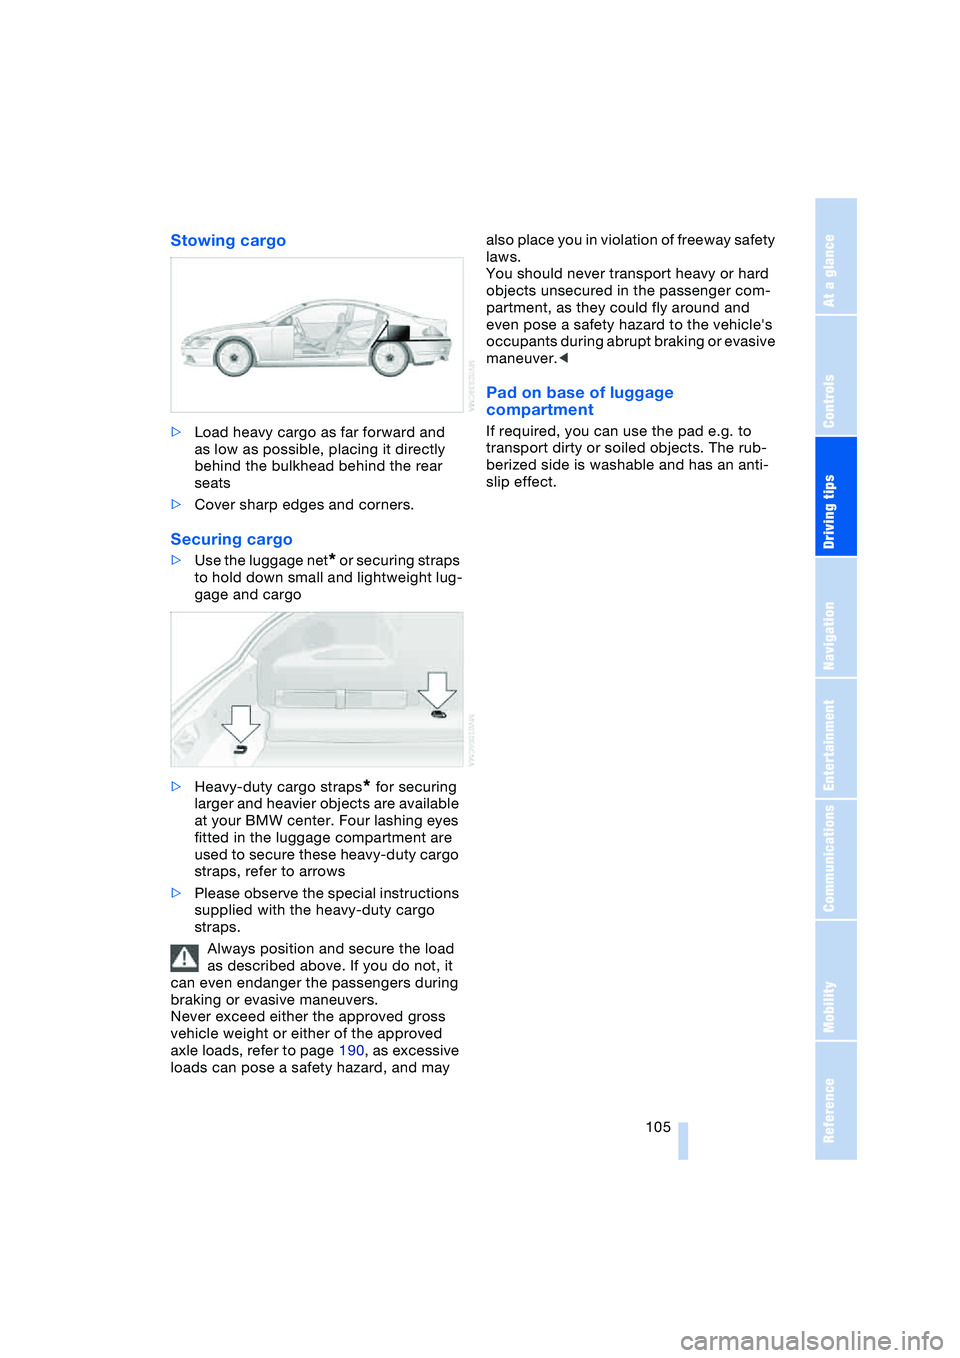
>Load heavy cargo as far forward and
as low as possible, placing it directly
behind the bulkhead behind the rear
seats
>Cover sharp edges and corners.
Securing cargo
>Use the luggage net* or securing straps
to hold down small and lightweight lug-
gage and cargo
>Heavy-duty cargo straps
* for securing
larger and heavier objects are available
at your BMW center. Four lashing eyes
fitted in the luggage compartment are
used to secure these heavy-duty cargo
straps, refer to arrows
>Please observe the special instructions
supplied with the heavy-duty cargo
straps.
Always position and secure the load
as described above. If you do not, it
can even endanger the passengers during
braking or evasive maneuvers.
Never exceed either the approved gross
vehicle weight or either of the approved
axle loads, refer to page 190, as excessive
loads can pose a safety hazard, and may also place you in violation of freeway safety
laws.
You should never transport heavy or hard
objects unsecured in the passenger com-
partment, as they could fly around and
even pose a safety hazard to the vehicle's
occupants during abrupt braking or evasive
maneuver.<
Pad on base of luggage
compartment
If required, you can use the pad e.g. to
transport dirty or soiled objects. The rub-
berized side is washable and has an anti-
slip effect.
Page 130 of 216
On/off and tone
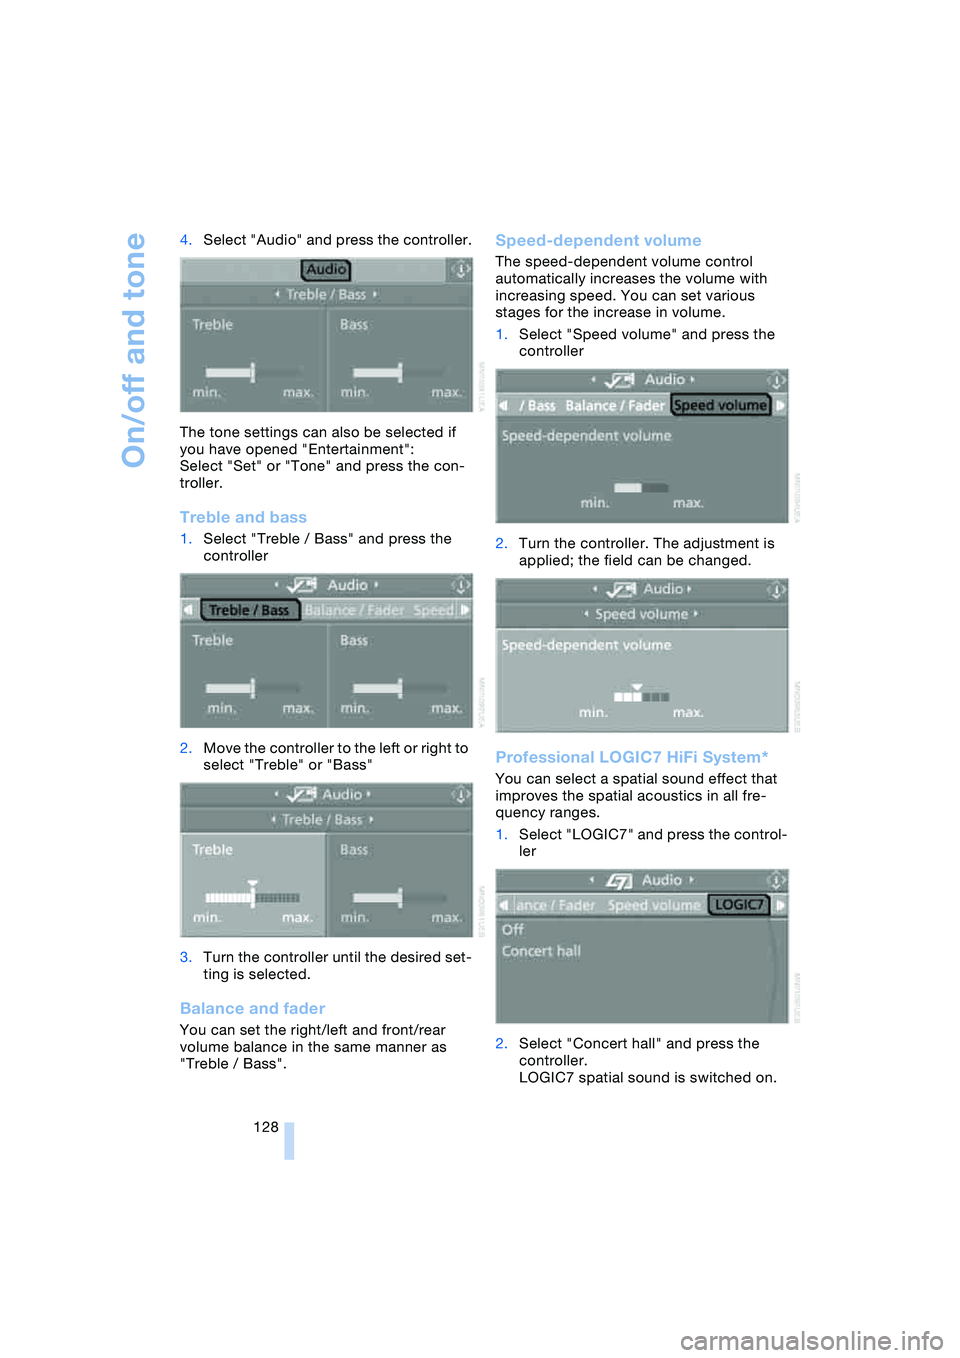
128 4.Select "Audio" and press the controller.
The tone settings can also be selected if
you have opened "Entertainment":
Select "Set" or "Tone" and press the con-
troller.
Treble and bass
1.Select "Treble / Bass" and press the
controller
2.Move the controller to the left or right to
select "Treble" or "Bass"
3.Turn the controller until the desired set-
ting is selected.
Balance and fader
You can set the right/left and front/rear
volume balance in the same manner as
"Treble / Bass".
Speed-dependent volume
The speed-dependent volume control
automatically increases the volume with
increasing speed. You can set various
stages for the increase in volume.
1.Select "Speed volume" and press the
controller
2.Turn the controller. The adjustment is
applied; the field can be changed.
Professional LOGIC7 HiFi System*
You can select a spatial sound effect that
improves the spatial acoustics in all fre-
quency ranges.
1.Select "LOGIC7" and press the control-
ler
2.Select "Concert hall" and press the
controller.
LOGIC7 spatial sound is switched on.
Page 147 of 216
145
Entertainment
Reference
At a glance
Controls
Driving tips Communications
Navigation
Mobility
Batteries
Never attempt to dismantle your
BMW portable phone or its battery.
Use only approved battery types – the
wrong battery can destroy your portable
phone.
To avoid possible short circuits, after
removing a battery you should never allow
it to come into contact with metallic sur-
faces of any kind.<
Disposing of used batteries
Return used batteries to a recycling
collection point or to your BMW cen-
ter.<
Care instructions
You can find what you need to know about
caring for your portable phone in the Caring
for your vehicle brochure and in the sepa-
rate portable phone Owner's Manual.
Operating options
You can operate the BMW portable phone*
with:
>The steering wheel, refer to page 11
>The Control Center, refer to page 146
>Voice control, refer to page 151.
Telephoning with car phone:
BMW Assist calls
You can use the car phone via the hands-
free system for BMW Assist calls.
When the status information "Car Phone" is
displayed in "Communication", only BMW
Assist calls are possible.
Activating the
BMW portable phone*
Requirements for portable phones with
SIM card:
>Enter a Personal Identification Number,
PIN, if necessary
>Remove all keypad locks, refer to sepa-
rate Owner's Manual.
Before starting off, place the BMW portable
phone in the cradle. If a connection to
BMW Assist has been established, you
cannot use the BMW portable phone until
this connection has been terminated.
Inserting portable phone
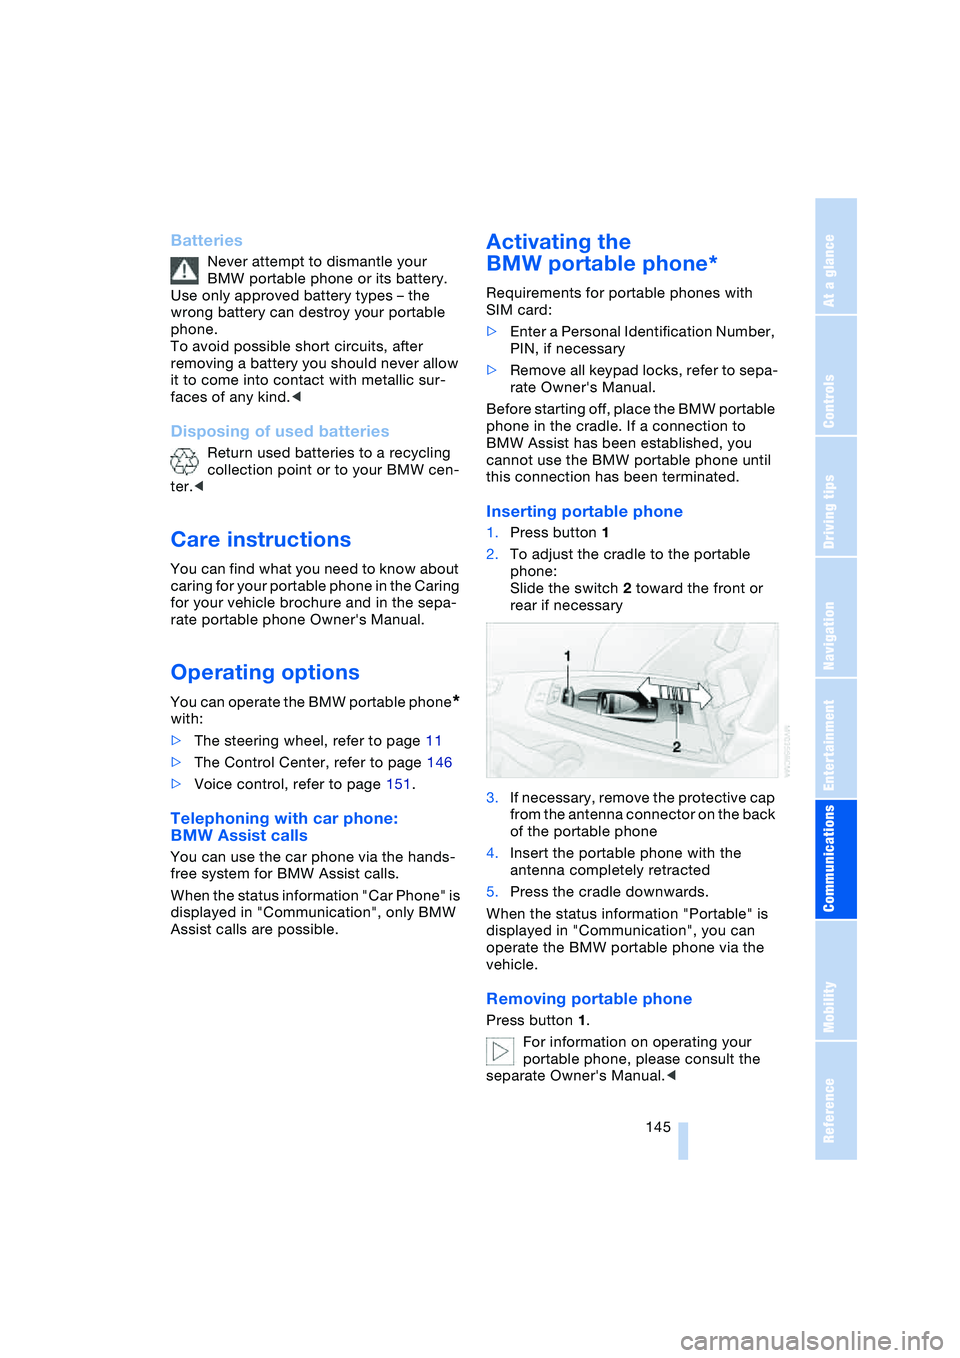
1.Press button 1
2.To adjust the cradle to the portable
phone:
Slide the switch 2 toward the front or
rear if necessary
3.If necessary, remove the protective cap
from the antenna connector on the back
of the portable phone
4.Insert the portable phone with the
antenna completely retracted
5.Press the cradle downwards.
When the status information "Portable" is
displayed in "Communication", you can
operate the BMW portable phone via the
vehicle.
Removing portable phone
Press button 1.
For information on operating your
portable phone, please consult the
separate Owner's Manual.<
Page 167 of 216
Mobility
165Reference
At a glance
Controls
Driving tips
Communications
Navigation
Entertainment
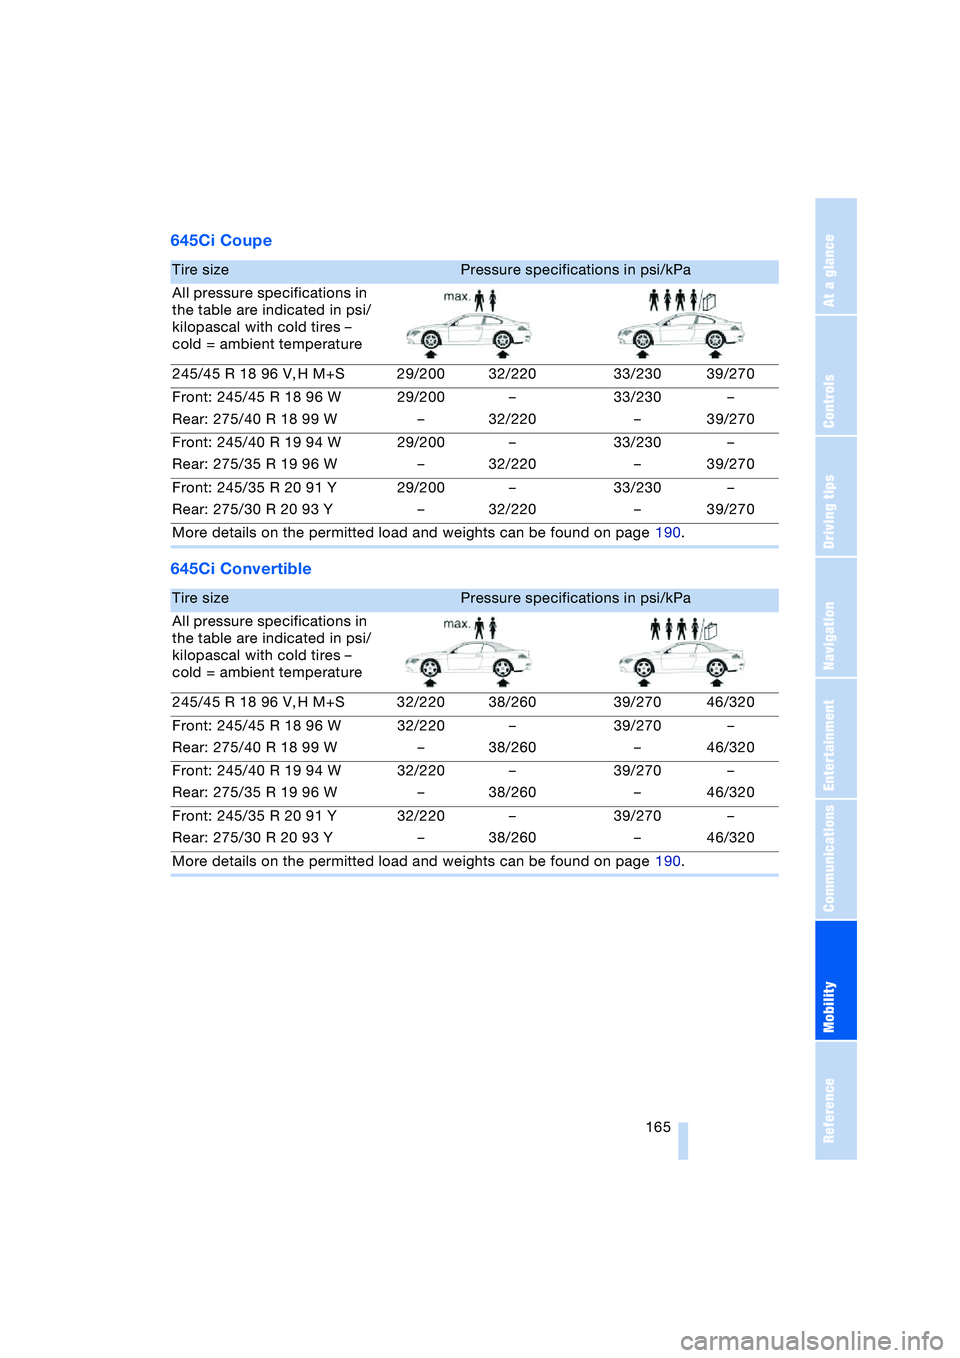
645Ci Coupe
645Ci Convertible
Tire sizePressure specifications in psi/kPa
All pressure specifications in
the table are indicated in psi/
kilopascal with cold tires –
cold = ambient temperature
245/45 R 18 96 V, H M+S 29/200 32/220 33/230 39/270
Front: 245/45 R 18 96 W
Rear: 275/40 R 18 99 W29/200
––
32/22033/230
––
39/270
Front: 245/40 R 19 94 W
Rear: 275/35 R 19 96 W29/200
––
32/22033/230
––
39/270
Front: 245/35 R 20 91 Y
Rear: 275/30 R 20 93 Y29/200
––
32/22033/230
––
39/270
More details on the permitted load and weights can be found on page 190.
Tire sizePressure specifications in psi/kPa
All pressure specifications in
the table are indicated in psi/
kilopascal with cold tires –
cold = ambient temperature
245/45 R 18 96 V, H M+S 32/220 38/260 39/270 46/320
Front: 245/45 R 18 96 W
Rear: 275/40 R 18 99 W32/220
––
38/26039/270
––
46/320
Front: 245/40 R 19 94 W
Rear: 275/35 R 19 96 W32/220
––
38/26039/270
––
46/320
Front: 245/35 R 20 91 Y
Rear: 275/30 R 20 93 Y32/220
––
38/26039/270
––
46/320
More details on the permitted load and weights can be found on page 190.
Page 171 of 216
Mobility
169Reference
At a glance
Controls
Driving tips
Communications
Navigation
Entertainment
Recommended tire sizes and makes
BMW tests certain tire brands for each tire
size, classifies them as road-safe and
approves them. You can find out about
these at specialized dealers or at your
BMW center. Observe any country-specific
regulations, e.g. on making a correspond-
ing entry in the vehicle documents.
The factory-mounted tires have been spe-
cially selected to provide optimized perfor-
mance when installed on your vehicle; if
properly cared for, they will provide a com-
bination of safety and excellent ride com-
fort.
Run-flat tires
In the event of replacement, use run-flat
tires, refer to page 168, as there is no spare
wheel available for flats.
For safety reasons, BMW recom-
mends that you do not have damaged
run-flat tires repaired; they should be
replaced.<
Special characteristics of winter
tires
BMW recommends winter tires for use in
cold winter driving conditions. Although all-
season M+S tires provide better winter
traction than summer tires, they generally
fail to provide the same levels of cold-
weather performance as winter tires.
Run-flat tires
If you switch from summer to winter tires,
or vice versa, use run-flat tires, refer to
page 168, as in the event of a flat tire there
is no spare tire available. Your BMW center
will be glad to advise you.
Observing speed ratings
Never exceed the maximum speed for
which the winter tires are rated.
Unprofessional attempts by laymen to ser-
vice tires can lead to damage and acci-
dents. Have this work performed by skilled
professionals only. The technicians at your
BMW center will be glad to assist you with the required professional knowledge and
specialized equipment.<
Storage
Always store wheels and tires in a cool, dry
place with as little exposure to light as pos-
sible. Always protect tires against all con-
tact with oil, grease and fuels. Do not
exceed the maximum tire inflation pressure
indicated on the side wall of the tire.
Snow chains*
BMW only tests certain snow chains, clas-
sifies them as road-safe and approves
them. Consult your BMW center for more
information. BMW recommends using
these approved, narrow-link snow chains.
These snow chains are approved exclu-
sively for use in pairs on the rear wheels
with the tire size 245/45 R 18.
Observe the manufacturer's instructions
when mounting snow chains.
Do not exceed a vehicle speed of 30 mph/
50 km/h with the chains mounted.
Do not initialize the Runflat Indicator
after mounting snow chains.
When you are driving with snow chains, it
can be beneficial to switch off DSC briefly,
refer to page 77.<
Page 181 of 216
Mobility
179Reference
At a glance
Controls
Driving tips
Communications
Navigation
Entertainment
High beams, parking lamps
The illustration shows the front left side of
the engine compartment.
High beams
Bulb 55 watts, H 7
1.Remove the cover cap 1 by pressing
the tab and removing the cover cap
upward
2.Press the bulb holder from above to
release it
3.Remove the bulb holder
4.Remove and replace the bulb.
Parking lamps
Bulb 10 watts
Bulb holder and reflector are one unit
and are replaced together.<
1.Turn the bulb holder 2 to the right and
remove
2.Press the detent on the plug connector,
pull off the bulb holder and replace.
Front turn signal, sidemarker
Your BMW is equipped with two turn signal
lamps per side in the front. Turn signal
lamp 1 can be replaced via the engine
compartment, and turn signal lamp 2 via
the wheel well.
Turn signal lamp 1
Bulb 21 watts, WY 21 SV
The illustration shows the front right side of
the engine compartment.
1.The lever shown:
>Right turn signal: press downwards
>Left turn signal: press upwards
2.Remove the bulb holder towards the
rear
3.Remove and replace the bulb.
Turn signal lamp 2
Bulb 21 watts, WY 21 SV
The bulb of the turn signal lamp 2 can be
replaced via a cover at the front of the
wheel well.
The illustration shows the left side of the
vehicle.
1.Turn the steering all the way to lock to
obtain access to the cover, refer to
illustration
2.Remove the cover by unscrewing the
two bolts with an open-end wrench
from the onboard tool kit
3.Location of the bulb holder of turn sig-
nal lamp 2, refer to arrow
Page 203 of 216
Reference 201
At a glance
Controls
Driving tips
Communications
Navigation
Entertainment
Mobility
Destination address
– deleting 115
– entering 110
Destination for navigation
– destination list 113
– entry 110
– selecting from address
book 115
– selecting using
information 113
– storing 114
Destination guidance 118
– bypassing route
sections 120
– canceling voice
instructions 50
– changing specified
route 116
– displaying route 119
– distance and arrival 118
– interrupting 118
– starting 118
– terminating/
continuing 118
– voice instructions 119
– volume of voice
instructions 119
Destination list 113
Destinations recently
driven to 113
"Dial" for portable
phone 147
"Dial number" 147
Digital clock 64
Dimensions
– Convertible 192
– Coupe 191
Dipstick for engine oil 171
Directional indicators, refer
to Turn signals 60
Direction announcements,
refer to Voice
instructions 119
Direction instructions, refer
to Voice instructions 119
Directory, refer to
Phone book 148
Directory for navigation,
refer to Address
book 114
Disc brakes 103Displacement, refer to
Engine data 190
Display, refer to
Control Center 16
"Display off" 19
Displays, refer to
Instrument cluster 12
"Display settings" 72
Displays on the windshield,
refer to Head-Up
Display 83
Disposal, vehicle
battery 181
Distance, refer to
Computer 70
Distance to destination,
refer to Computer 70
Distance warning, refer to
PDC Park Distance
Control 75
"Dist. to destination" 70
Door entry lighting 87
Door keys 26
Door lock 29
"Door locks" 27
Doors
– manual operation 29
– remote control 27
DOT Quality Grades 166
Draft-free ventilation 92
"Driver's door only" 27
Driving lamps, refer to
Parking lamps/
low beams 85
Driving notes 102
Driving route, refer to
Displaying the route 119
Driving stability control
systems 77
Driving through water 103
Driving tips, refer to
Driving notes 102
Drying the air, refer to
Cooling function 89
DSC Dynamic Stability
Control 77
– indicator lamp 13, 77
DTC Dynamic Traction
Control 77
– activating 77
– indicator lamp 13, 77DVD for navigation 108
Dynamic Brake Control,
DBC 78
Dynamic Driving Control 59
"Dynamic route" for
navigation 116
Dynamic Stability Control,
DSC 77
Dynamic Traction Control,
DTC 77
E
Easy Entry, refer to
Entry to the rear 46, 52
EBV Electronic brake-force
distribution 76
"Edit address" for
navigation 115
Eject button, refer to
Buttons on CD player 126
Electrical malfunction
– automatic transmission
with Steptronic 59
– convertible top 39
– door lock 29
– driver's door 29
– fuel filler door 162
– glass roof 36
– luggage compartment
lid 31
– SMG Sequential manual
transmission 58
Electric steering wheel
adjustment 48
Electronic brake-force
distribution, EBV 76
Emergency assistance,
refer to Roadside
Assistance 184
Emergency call 183
Emergency operation, refer
to Manual operation
– convertible top 39
– door lock 29
– driver's door 29
– fuel filler door 162
– glass roof 36
– luggage compartment
lid 30, 31
Page 204 of 216
Everything from A to Z
202 Emergency services, refer
to Roadside
Assistance 184
"Emission inspect." 66
"Enable services" 156
"End call" 148
Engine
– break-in procedure 102
– data 190
– speed 190
– starting 54
– starting difficulties 54
– switching off 55
Engine compartment 171
Engine coolant 172
Engine hood 170
Engine oil
– checking the oil level 171
– specified engine oils 172
– temperature 65
– temperature gauge 65
– topping up 172
Engine output, refer to
Engine data 190
Engine speed, refer to
Engine specifications 190
Engine starting, refer to
Starting engine 54
"Enter address" for
navigation 110
Entering activation times of
independent ventilation/
heating 93
Entering destination 111
Entering the address 110
Entering the
intersection 111
Entering the town/city for
navigation 111
Entering zip code for
navigation 111
"Entertainment" 127
"Entertainment
settings" 127
Entry map for
destination 112
Entry to the rear 46
"Equalizer", refer to
Adjusting the tone 129
"ESN" 134ESP Electronic Stability
Program, refer to DSC
Dynamic Stability
Control 77
Exhaust system 102
Exterior mirrors 48
– automatic dimming
feature 48
– automatic heating 48
Eye for towing, refer to
Tow fitting 186
F
Fader, refer to
Adjusting the tone 128
Failure messages, refer to
Check Control 66
False alarms, refer to
Avoiding unintentional
alarms 33
False alarms with Flat Tire
Monitor 79
Fastening safety belts, refer
to Safety belts 47
Fastest route for
navigation 116
"Fast route" for
navigation 116
First aid, refer to
First-aid kit 184
First-aid kit 184
First-aid pouch, refer to
First-aid kit 184
Flashing on locking/
unlocking 28
Flashlight, refer to
Rechargeable
flashlight 95
Flat tire
– Flat Tire Monitor 79
– run-flat tires 80, 168
Flat Tire Monitor 79
– false alarms 79
– initializing the system 79
– limits of system 79
– malfunction 80
– warning lamp 80
Flooding, refer to
Water on roads 103"FM", reception
range 127, 130
FM, waveband 130
Fog lamps 86
– indicator lamp 86
Folding up the convertible
top compartment floor,
convertible 32
Footwell lamps 87
Forward, fast
– CD changer 140
– CD player 140
For your own safety 6
Front airbags 81
Front head restraints 45
Front seat adjustment 43
"FTM" 79
Fuel
– average consumption 69
– display 65
– fuel specifications 163
– high-quality brands 163
– quality 163
– tank capacity 162
Fuel display, refer to
Fuel gauge 65
Fuel filler door 162
– releasing in the event of
an electrical
malfunction 162
Fuel gauge 65
Fuel specifications 163
Fuses 182
G
Garage-door opener, refer
to Integrated universal
remote control 94
Gasoline
– refer to Fuel
specifications 163
– refer to Required fuel 163
Gasoline display, refer to
Fuel gauge 65
Gear changes
– automatic transmission
with Steptronic 58
– SMG Sequential manual
transmission 57