2004 BMW 545I SEDAN light
[x] Cancel search: lightPage 94 of 220
A congenial climate
92 rarily suspending the supply of outside air.
The system then recirculates the air cur-
rently within the vehicle. AUC executes this
function automatically.
Press the button repeatedly to run through
the following control sequence:
>Indicator lamps off: outside air flows in
>Right indicator lamp on, AUC mode: the
system detects pollutants in the outside
air and responds by blocking the supply
of outside air when required. The sys-
tem then recirculates the air currently
within the vehicle.
Depending upon air quality require-
ments, in the automatic mode the sys-
tem alternates between its outside-air
and recirculated-air modes
>Left indicator lamp on, recirculated-air
mode: the supply of outside air is per-
manently blocked. The system then
recirculates the air currently within the
vehicle.
If condensation starts to form on the
inside window surfaces during opera-
tion in the recirculated-air mode, you
should switch it off while also increasing
the air volume as required.
The recirculated-air mode should not be
used over a sustained longer period of
time, as the air quality inside the vehicle
deteriorates continuously.<
Residual heat mode
The system uses the warmth
stored in the engine to heat the
interior when the ignition is off,
for instance, while the vehicle is
stopped at a school to pick up a
child.
You can adjust the automatic climate con-
trol settings in ignition key position 1.
Provided that the engine has warmed
to its normal operating temperature
and the battery is charged, you can use this
function for up to 15 minutes after switch-
ing off the ignition. The LED within the but-
ton lights up to confirm compliance with
these conditions.<
Switching automatic climate control
off
The air volume, the heater and
the cooling function are all
switched off. You can restart
the automatic climate control
by pressing any of its buttons
except the REST button.
Settings using the Control Center
You can make the settings for each specific
key.
Control Center, for principle details, refer to
page 16:
1.Turn the ignition key to position 2
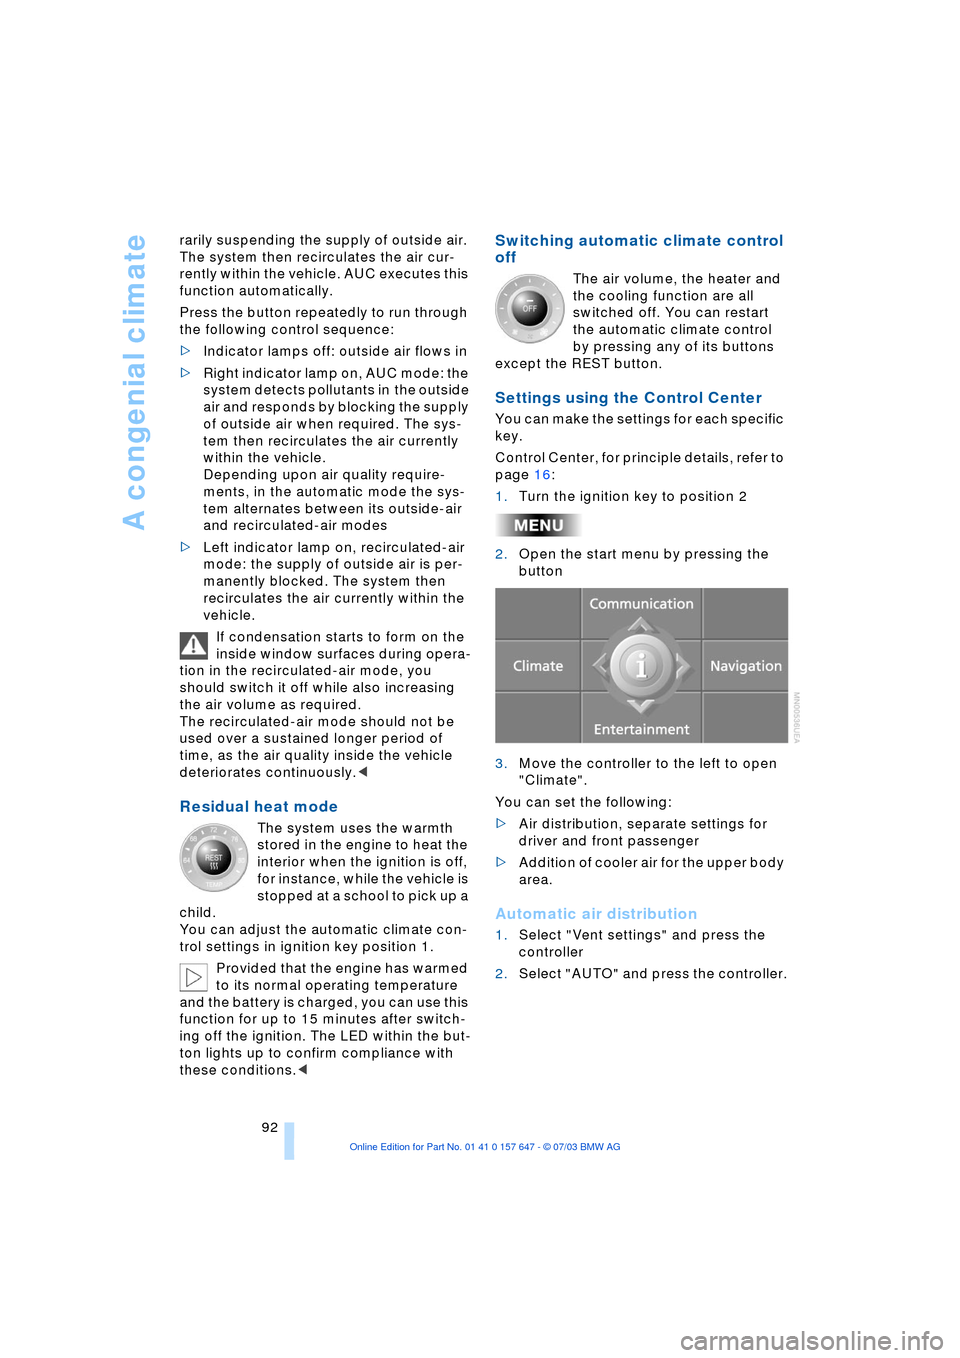
2.Open the start menu by pressing the
button
3.Move the controller to the left to open
"Climate".
You can set the following:
>Air distribution, separate settings for
driver and front passenger
>Addition of cooler air for the upper body
area.
Automatic air distribution
1.Select "Vent settings" and press the
controller
2.Select "AUTO" and press the controller.
Page 97 of 220
Controls
95Reference
At a glance
Driving tips
Communications
Navigation
Entertainment
Mobility
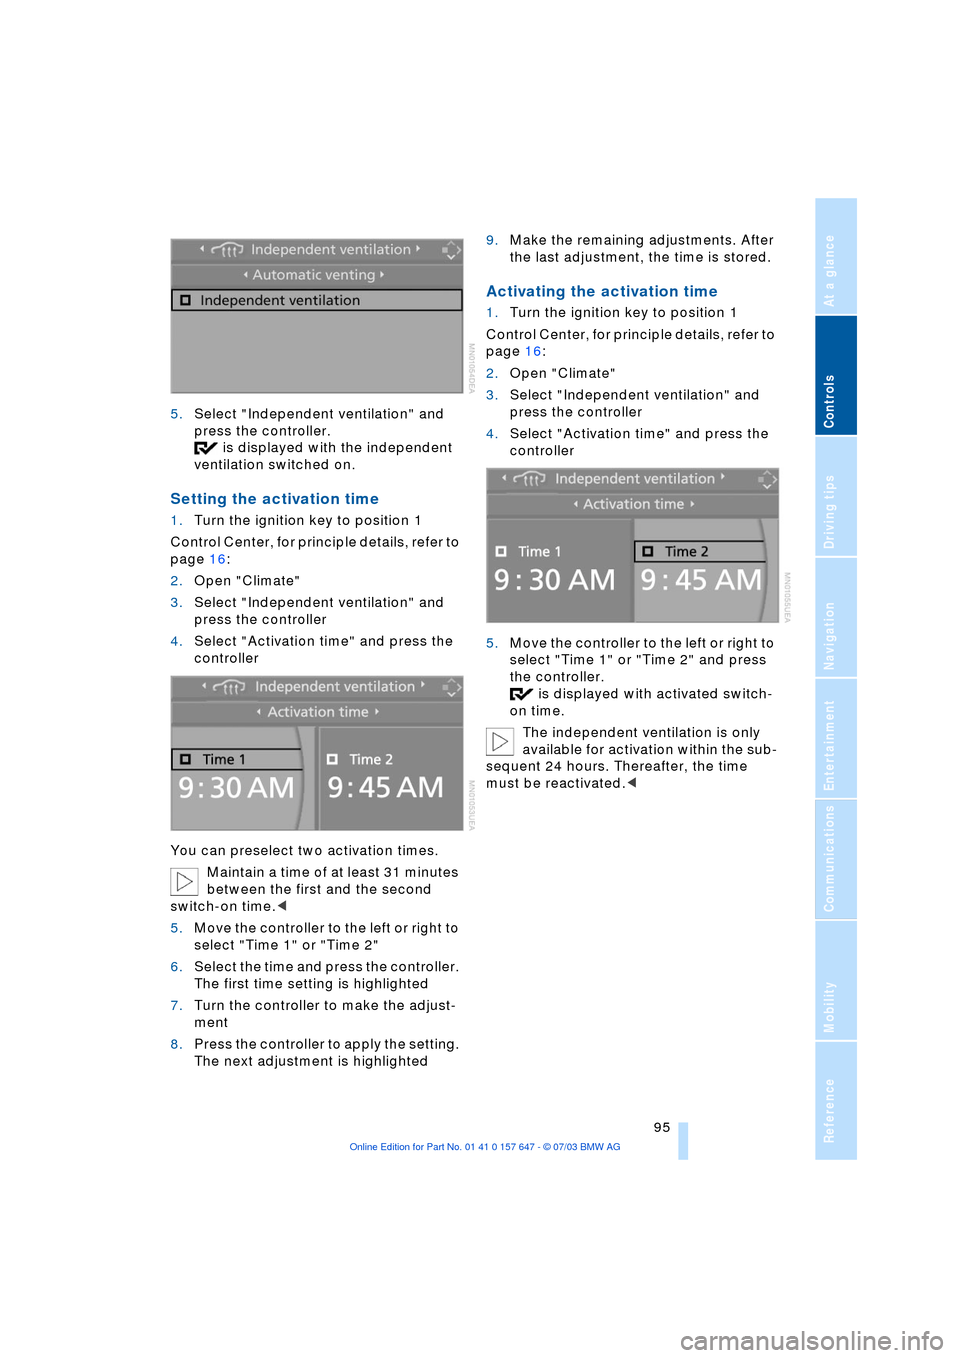
5.Select "Independent ventilation" and
press the controller.
is displayed with the independent
ventilation switched on.
Setting the activation time
1.Turn the ignition key to position 1
Control Center, for principle details, refer to
page 16:
2.Open "Climate"
3.Select "Independent ventilation" and
press the controller
4.Select "Activation time" and press the
controller
You can preselect two activation times.
Maintain a time of at least 31 minutes
between the first and the second
switch-on time.<
5.Move the controller to the left or right to
select "Time 1" or "Time 2"
6.Select the time and press the controller.
The first time setting is highlighted
7.Turn the controller to make the adjust-
ment
8.Press the controller to apply the setting.
The next adjustment is highlighted9.Make the remaining adjustments. After
the last adjustment, the time is stored.
Activating the activation time
1.Turn the ignition key to position 1
Control Center, for principle details, refer to
page 16:
2.Open "Climate"
3.Select "Independent ventilation" and
press the controller
4.Select "Activation time" and press the
controller
5.Move the controller to the left or right to
select "Time 1" or "Time 2" and press
the controller.
is displayed with activated switch-
on time.
The independent ventilation is only
available for activation within the sub-
sequent 24 hours. Thereafter, the time
must be reactivated.<
Page 99 of 220
Controls
97Reference
At a glance
Driving tips
Communications
Navigation
Entertainment
Mobility
The equipment can be used as of ignition
key position 2.
If the device cannot be used even
after repeated programming, check
whether the original hand-held transmitter
is equipped with an alternating-code sys-
tem. Here, either read the instructions for
the original hand-held transmitter or hold
down the programmed memory button 1 of
the integrated universal remote control. If
the indicator lamp 2 on the integrated uni-
versal remote control flashes rapidly for a
short time then lights up for approx. 2 sec-
onds, this indicates that the original hand-
held transmitter uses an alternating-code
system. In the case of an alternating-code
system, program the memory buttons 1 as
described at Alternating-code hand-held
transmitters.<
Alternating-code hand-held
transmitters
To program the integrated universal remote
control, consult the operating instructions
for the equipment to be set. You will find
information there on the possibilities for
synchronization.
When programming hand-held transmitters
that employ an alternating code, please
observe the following supplementary
instructions:
Programming will be easier with the
aid of a second person.<
1.Park your vehicle within the range of the
remote-controlled device
2.Program the integrated universal
remote control as described above at
Fixed-code hand-held transmitters
3.Locate the button at the receiver of the
equipment to be set, e.g. on the drive
4.Press the button on the receiver of the
device you want to set up. After step 4,
you have approx. 30 seconds for step 5
5.Press the programmed memory
button 1 of the integrated universal
remote control three times. The corresponding memory button 1 is now
programmed with the signal of the original
hand-held transmitter.
If you have any additional questions,
please contact your BMW center.<
Clearing the memory buttons
Press both outer buttons 1 of the inte-
grated universal remote control for approx.
20 seconds until the indicator lamp 2
flashes. All memory buttons will be cleared.
The memory of individual memory
buttons 1 cannot be cleared.
Roller sun blinds*
Roller sun blind for rear window
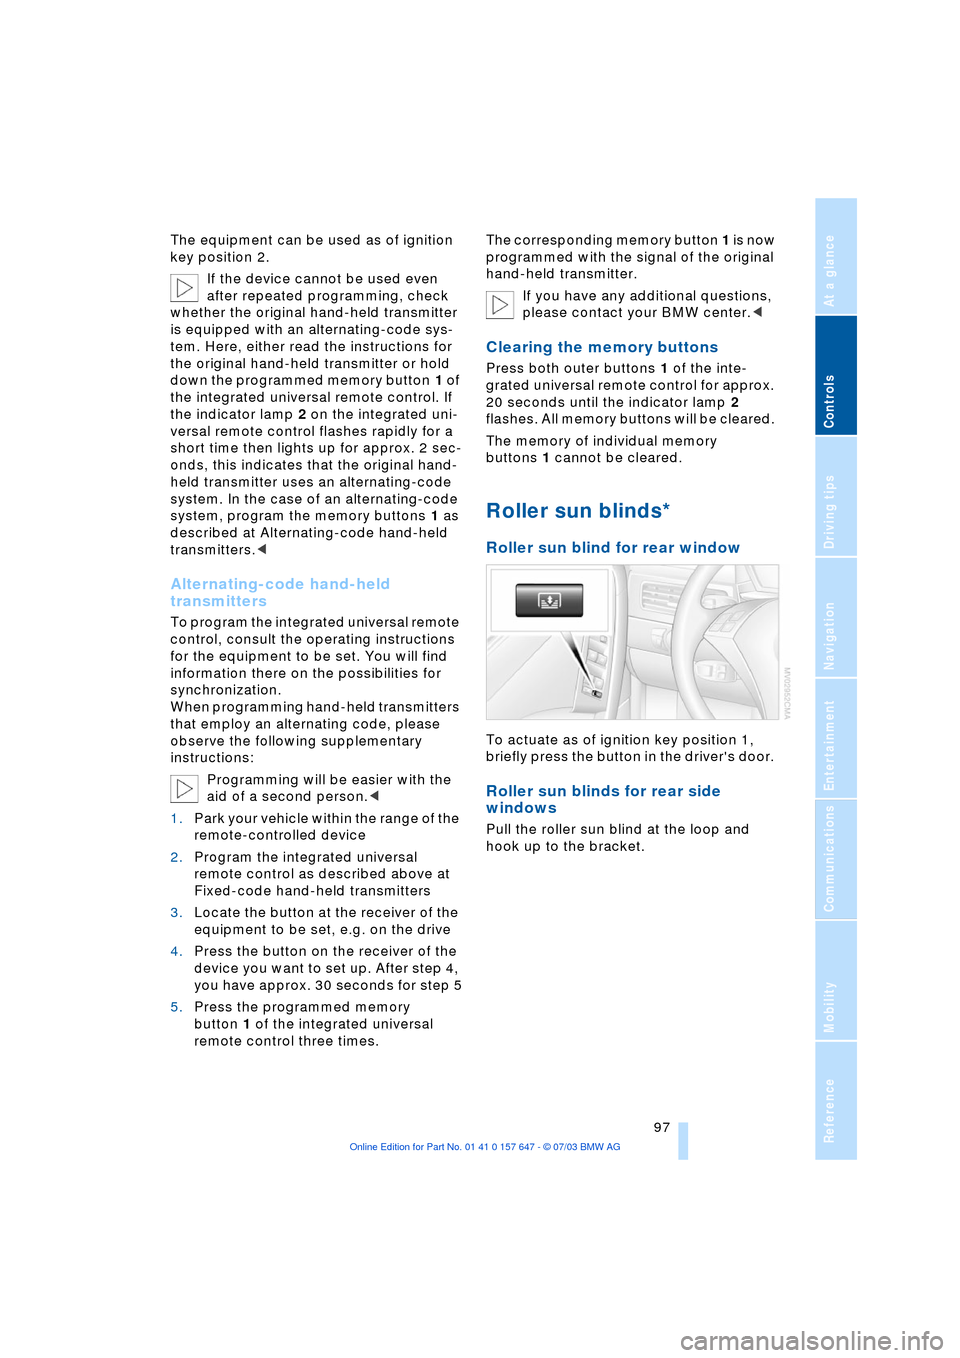
To actuate as of ignition key position 1,
briefly press the button in the driver's door.
Roller sun blinds for rear side
windows
Pull the roller sun blind at the loop and
hook up to the bracket.
Page 100 of 220
Practical interior accessories
98
Glove compartment
Opening
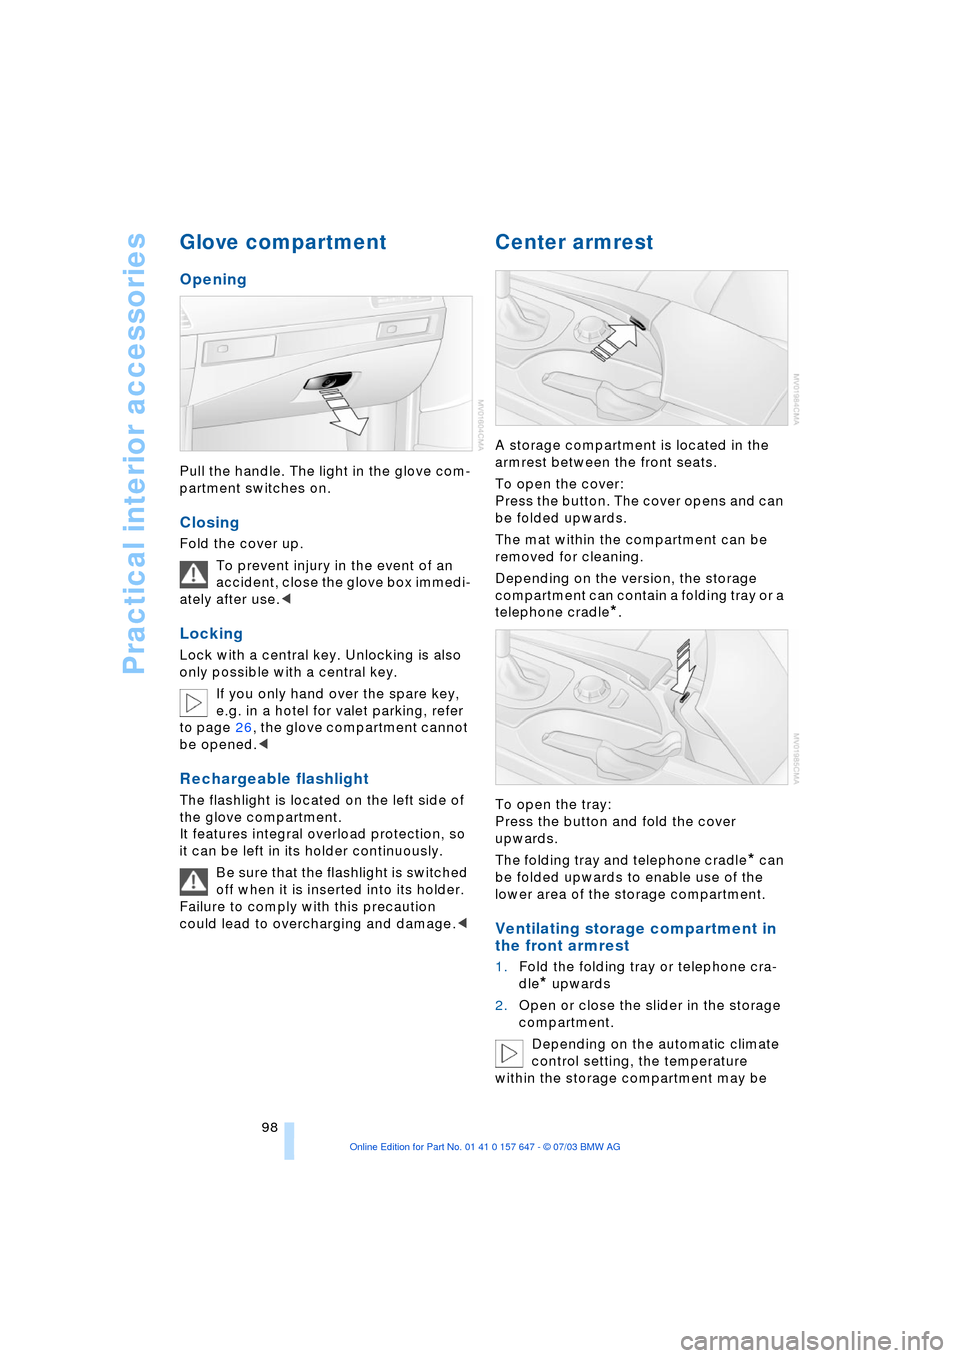
Pull the handle. The light in the glove com-
partment switches on.
Closing
Fold the cover up.
To prevent injury in the event of an
accident, close the glove box immedi-
ately after use.<
Locking
Lock with a central key. Unlocking is also
only possible with a central key.
If you only hand over the spare key,
e.g. in a hotel for valet parking, refer
to page 26, the glove compartment cannot
be opened.<
Rechargeable flashlight
The flashlight is located on the left side of
the glove compartment.
It features integral overload protection, so
it can be left in its holder continuously.
Be sure that the flashlight is switched
off when it is inserted into its holder.
Failure to comply with this precaution
could lead to overcharging and damage.<
Center armrest
A storage compartment is located in the
armrest between the front seats.
To open the cover:
Press the button. The cover opens and can
be folded upwards.
The mat within the compartment can be
removed for cleaning.
Depending on the version, the storage
compartment can contain a folding tray or a
telephone cradle
*.
To open the tray:
Press the button and fold the cover
upwards.
The folding tray and telephone cradle
* can
be folded upwards to enable use of the
lower area of the storage compartment.
Ventilating storage compartment in
the front armrest
1.Fold the folding tray or telephone cra-
dle
* upwards
2.Open or close the slider in the storage
compartment.
Depending on the automatic climate
control setting, the temperature
within the storage compartment may be
Page 102 of 220
Practical interior accessories
100
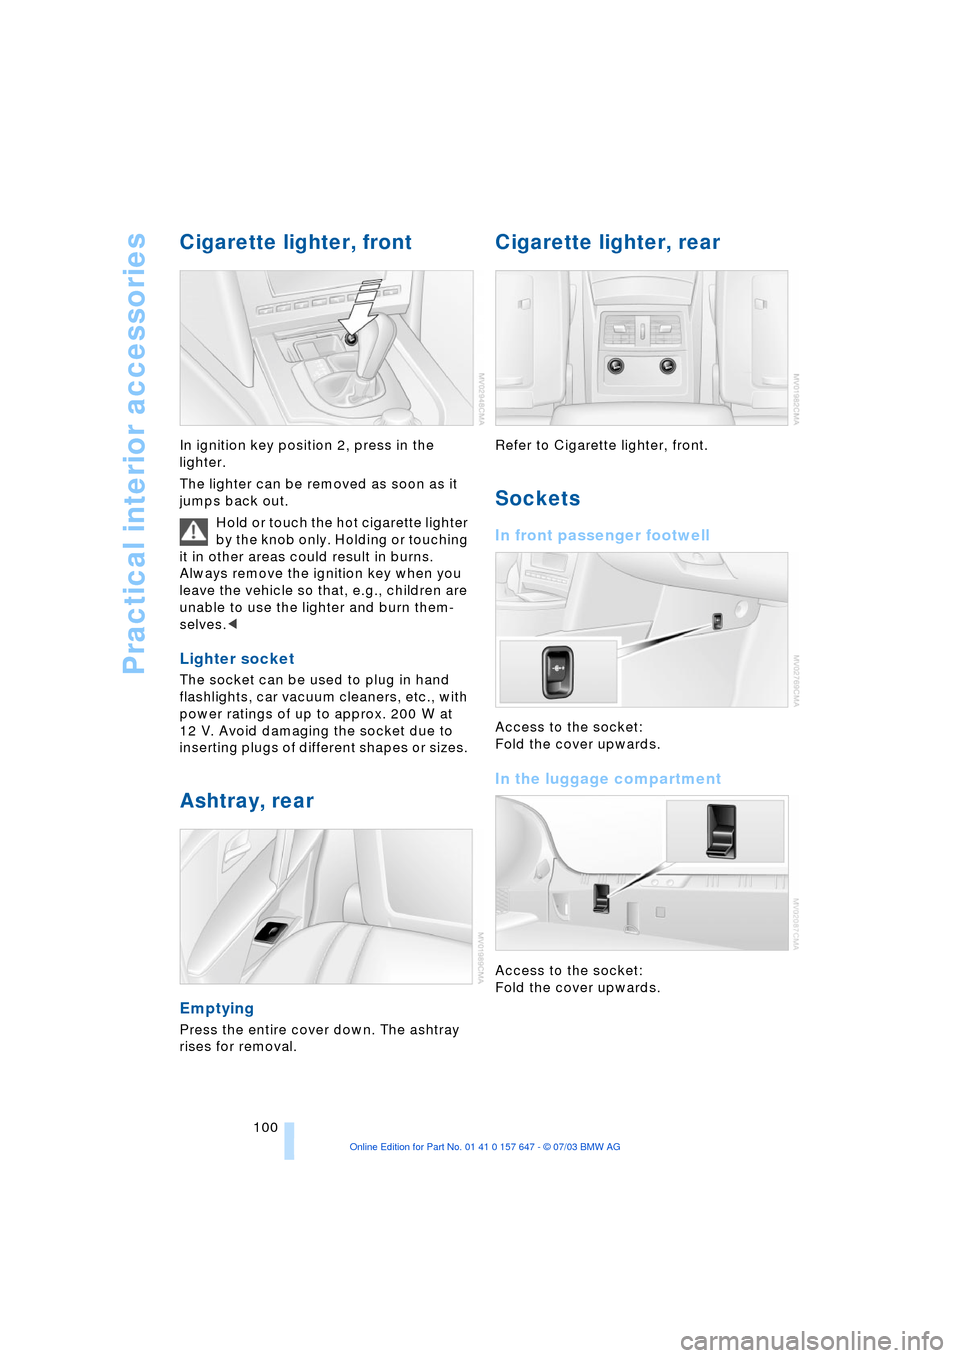
Cigarette lighter, front
In ignition key position 2, press in the
lighter.
The lighter can be removed as soon as it
jumps back out.
Hold or touch the hot cigarette lighter
by the knob only. Holding or touching
it in other areas could result in burns.
Always remove the ignition key when you
leave the vehicle so that, e.g., children are
unable to use the lighter and burn them-
selves.<
Lighter socket
The socket can be used to plug in hand
flashlights, car vacuum cleaners, etc., with
power ratings of up to approx. 200 W at
12 V. Avoid damaging the socket due to
inserting plugs of different shapes or sizes.
Ashtray, rear
Emptying
Press the entire cover down. The ashtray
rises for removal.
Cigarette lighter, rear
Refer to Cigarette lighter, front.
Sockets
In front passenger footwell
Access to the socket:
Fold the cover upwards.
In the luggage compartment
Access to the socket:
Fold the cover upwards.
Page 103 of 220
Controls
101Reference
At a glance
Driving tips
Communications
Navigation
Entertainment
Mobility
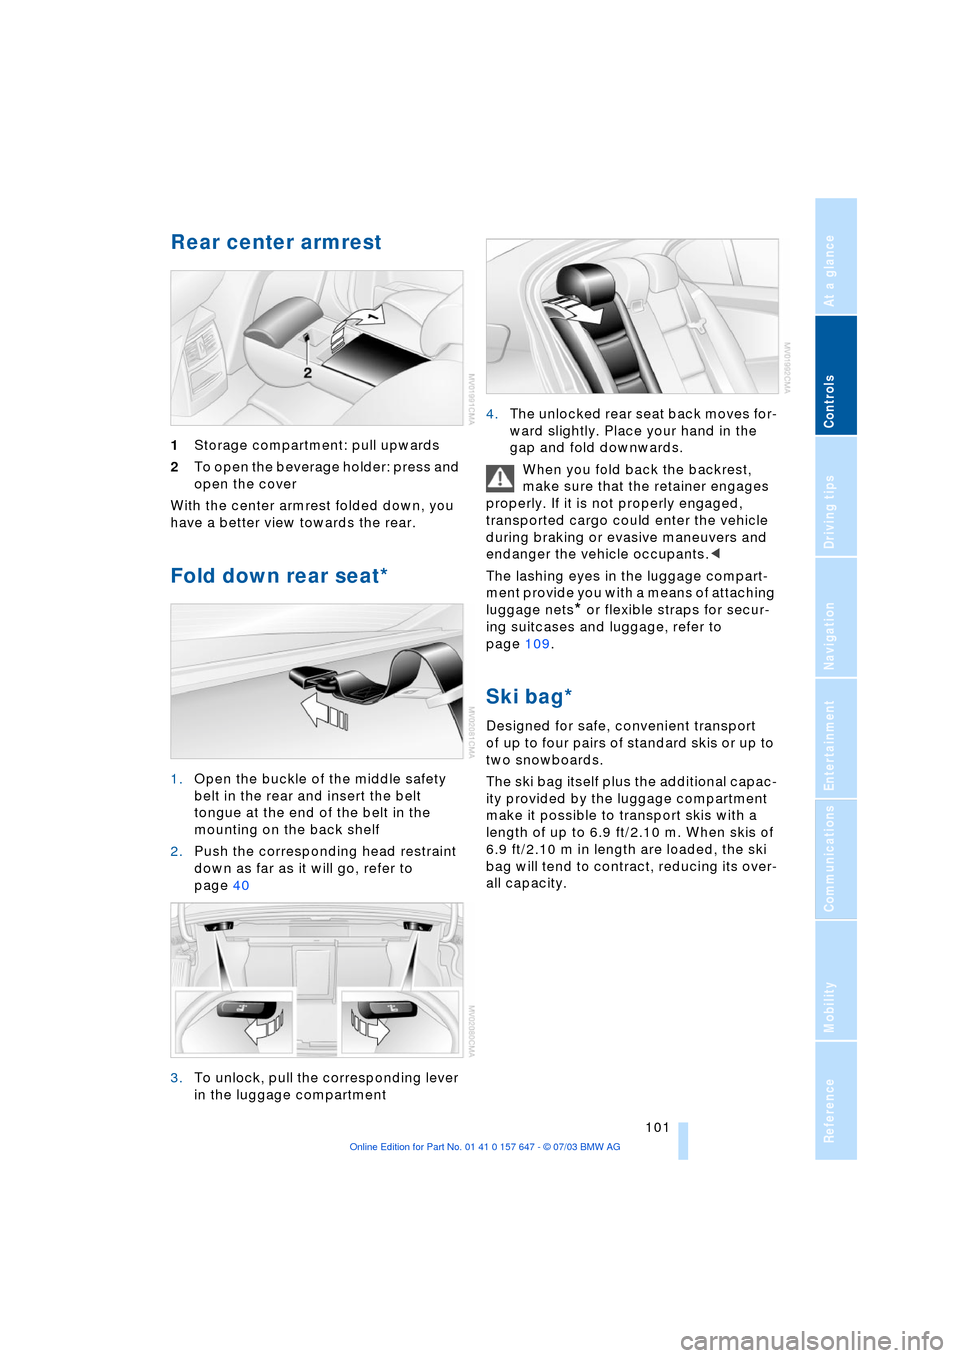
Rear center armrest
1Storage compartment: pull upwards
2To open the beverage holder: press and
open the cover
With the center armrest folded down, you
have a better view towards the rear.
Fold down rear seat*
1.Open the buckle of the middle safety
belt in the rear and insert the belt
tongue at the end of the belt in the
mounting on the back shelf
2.Push the corresponding head restraint
down as far as it will go, refer to
page 40
3.To unlock, pull the corresponding lever
in the luggage compartment 4.The unlocked rear seat back moves for-
ward slightly. Place your hand in the
gap and fold downwards.
When you fold back the backrest,
make sure that the retainer engages
properly. If it is not properly engaged,
transported cargo could enter the vehicle
during braking or evasive maneuvers and
endanger the vehicle occupants.<
The lashing eyes in the luggage compart-
ment provide you with a means of attaching
luggage nets
* or flexible straps for secur-
ing suitcases and luggage, refer to
page 109.
Ski bag*
Designed for safe, convenient transport
of up to four pairs of standard skis or up to
two snowboards.
The ski bag itself plus the additional capac-
ity provided by the luggage compartment
make it possible to transport skis with a
length of up to 6.9 ft/2.10 m. When skis of
6.9 ft/2.10 m in length are loaded, the ski
bag will tend to contract, reducing its over-
all capacity.
Page 109 of 220

Driving tips
107Reference
At a glance
Controls
Communications
Navigation
Entertainment
Mobility
The risk of hydroplaning increases as the
tread depth of the tires decreases, refer
also to Tire tread on page 173.
Water on the road
Do not drive through water on the
road if it is deeper than 1 ft/30 cm,
and then only at walking speed at the most.
Otherwise, the vehicle's engine, the electri-
cal systems and the transmission may be
damaged.<
Brakes
Your BMW is equipped with ABS as stan-
dard. The best way to achieve optimized
response from the ABS is to apply maxi-
mum pressure to the brake pedal during
emergency: panic stops. Since the vehicle
maintains steering responsiveness, you
can nevertheless avoid possible obstacles
with a minimum of steering effort.
Pulsation at the brake pedal combines with
sounds from the hydraulic circuits to indi-
cate to the driver that ABS is in its active
mode.
Do not drive with your foot resting on
the brake pedal. Even light but con-
sistent pedal pressure can lead to high
temperatures, brake wear and possibly
even brake failure.<
Driving in wet conditions
While driving in wet conditions and in
heavy rain, it is a good idea to apply light
pressure to the brake pedal every few
miles. Monitor traffic conditions to ensure
that this maneuver does not endanger
other road users. The heat generated in this
process helps dry the pads and rotors to
ensure that full braking efficiency will then
be available when you need it.
Hills
You can retain full and unimpaired braking
efficiency by downshifting to a gear in
which only minimal brake applications are
needed when descending long or steep
downhill stretches. You can further enhance the engine's brak-
ing effect by selecting a lower gear in the
automatic transmission's manual mode,
downshifting as far as first gear on
extremely steep stretches, refer to
pages 50 and 55. This strategy helps you
avoid placing excessive loads on the brake
system.
Never drive with the clutch pressed or
allow the vehicle to coast with the
transmission in Neutral Ð or with the engine
switched off Ð there is no engine braking
when the transmission is in Neutral, and no
power-assist for brakes and steering when
the engine is not running.
Never allow floor mats, carpets or any other
objects to protrude into the area around the
accelerator and brake pedals and obstruct
their movement.<
Corrosion on the brake rotors
When the vehicle is driven only occasion-
ally, during extended periods when the
vehicle is not used at all, and in operating
conditions where brake applications are
less frequent, there is an increased ten-
dency for corrosion to form on rotors, while
contaminants accumulate on the brake
pads. This occurs because the minimum
pressure which must be exerted by the
pads during brake applications to clean the
rotors is not reached.
Should corrosion form on the brake rotors,
the brakes will tend to respond with a pul-
sating effect that even extended applica-
tion will fail to cure.
Brake pads
The brake pad wear warning lamp
lights up and a message appears on
the Check Control. Please note any
supplementary information that appears
there.
Warning lamp for Canadian models.
The brake pads have reached their mini-
mum pad thickness. Have them replaced at
your BMW center as soon as possible.
Page 111 of 220
Driving tips
109Reference
At a glance
Controls
Communications
Navigation
Entertainment
Mobility
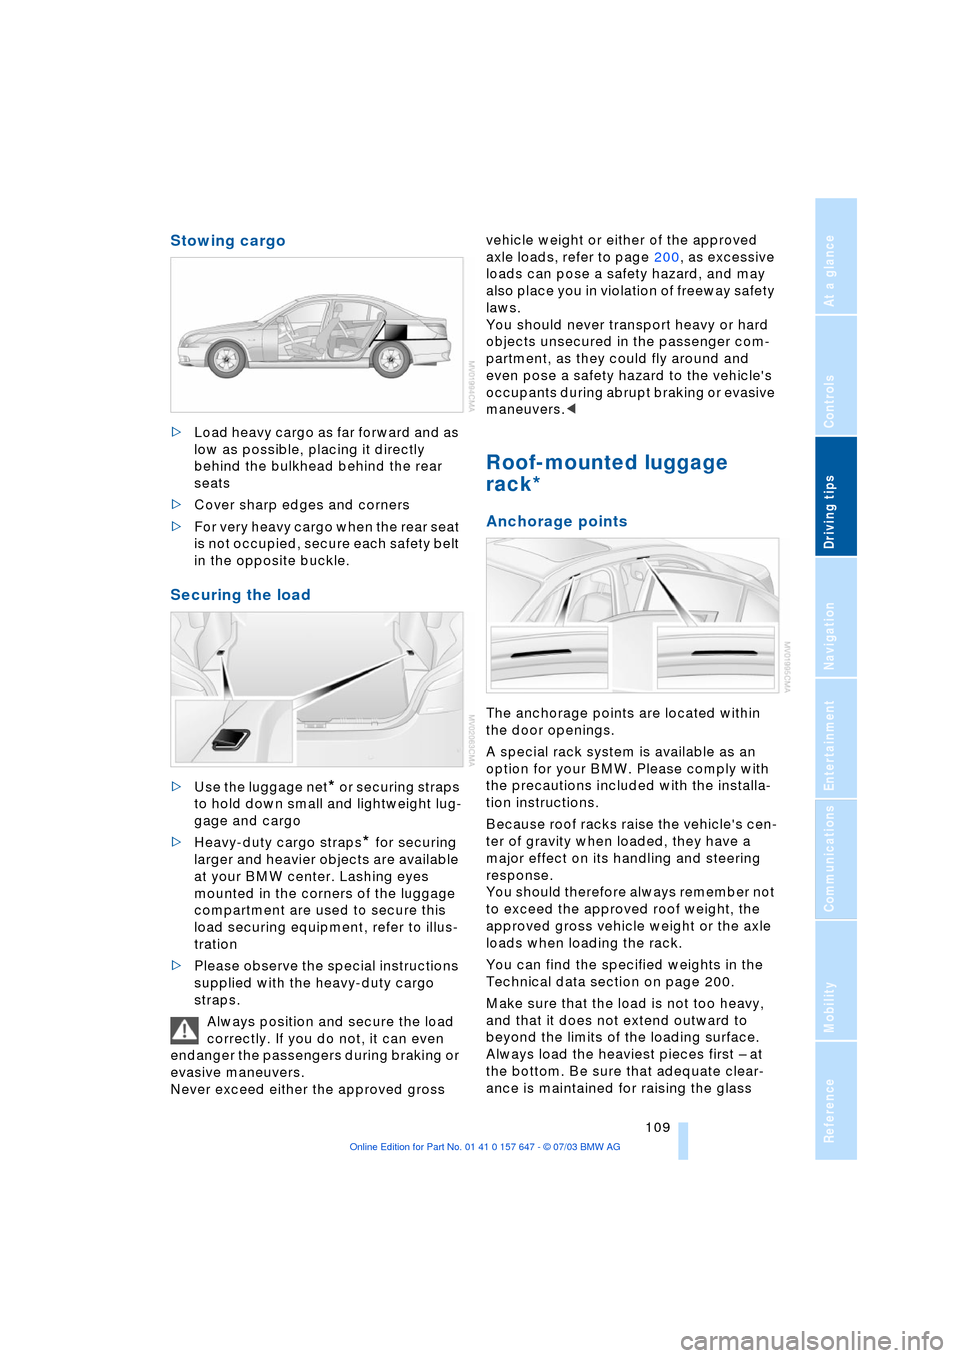
Stowing cargo
>Load heavy cargo as far forward and as
low as possible, placing it directly
behind the bulkhead behind the rear
seats
>Cover sharp edges and corners
>For very heavy cargo when the rear seat
is not occupied, secure each safety belt
in the opposite buckle.
Securing the load
>Use the luggage net* or securing straps
to hold down small and lightweight lug-
gage and cargo
>Heavy-duty cargo straps
* for securing
larger and heavier objects are available
at your BMW center. Lashing eyes
mounted in the corners of the luggage
compartment are used to secure this
load securing equipment, refer to illus-
tration
>Please observe the special instructions
supplied with the heavy-duty cargo
straps.
Always position and secure the load
correctly. If you do not, it can even
endanger the passengers during braking or
evasive maneuvers.
Never exceed either the approved gross vehicle weight or either of the approved
axle loads, refer to page 200, as excessive
loads can pose a safety hazard, and may
also place you in violation of freeway safety
laws.
You should never transport heavy or hard
objects unsecured in the passenger com-
partment, as they could fly around and
even pose a safety hazard to the vehicle's
occupants during abrupt braking or evasive
maneuvers.<
Roof-mounted luggage
rack*
Anchorage points
The anchorage points are located within
the door openings.
A special rack system is available as an
option for your BMW. Please comply with
the precautions included with the installa-
tion instructions.
Because roof racks raise the vehicle's cen-
ter of gravity when loaded, they have a
major effect on its handling and steering
response.
You should therefore always remember not
to exceed the approved roof weight, the
approved gross vehicle weight or the axle
loads when loading the rack.
You can find the specified weights in the
Technical data section on page 200.
Make sure that the load is not too heavy,
and that it does not extend outward to
beyond the limits of the loading surface.
Always load the heaviest pieces first Ð at
the bottom. Be sure that adequate clear-
ance is maintained for raising the glass