2004 BMW 545I SEDAN lock
[x] Cancel search: lockPage 57 of 220
Controls
55Reference
At a glance
Driving tips
Communications
Navigation
Entertainment
Mobility
Changing the selector-lever
positions
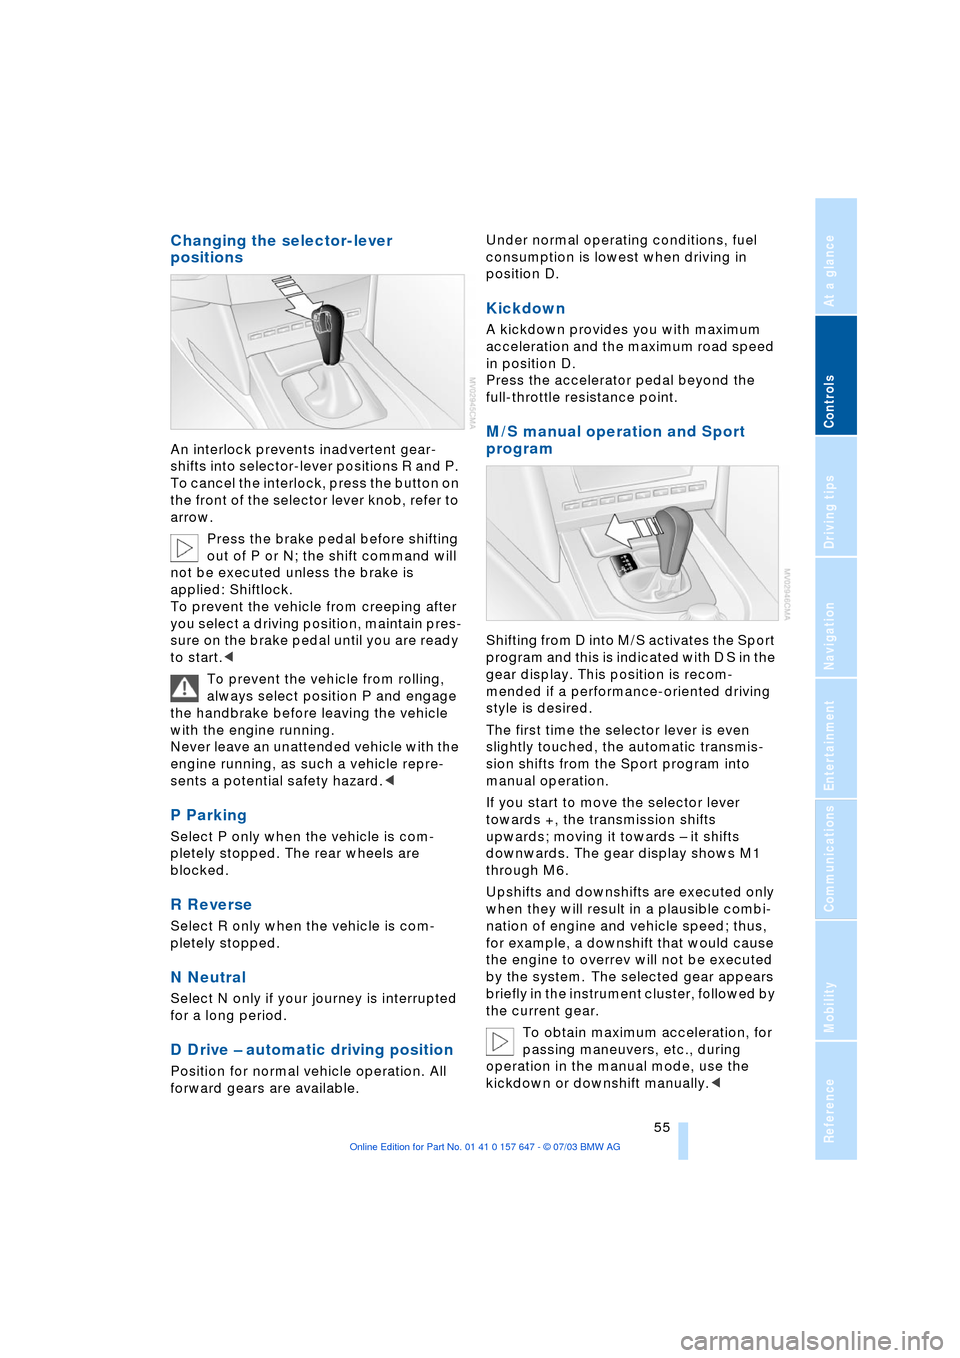
An interlock prevents inadvertent gear-
shifts into selector-lever positions R and P.
To cancel the interlock, press the button on
the front of the selector lever knob, refer to
arrow.
Press the brake pedal before shifting
out of P or N; the shift command will
not be executed unless the brake is
applied: Shiftlock.
To prevent the vehicle from creeping after
you select a driving position, maintain pres-
sure on the brake pedal until you are ready
to start.<
To prevent the vehicle from rolling,
always select position P and engage
the handbrake before leaving the vehicle
with the engine running.
Never leave an unattended vehicle with the
engine running, as such a vehicle repre-
sents a potential safety hazard.<
P Parking
Select P only when the vehicle is com-
pletely stopped. The rear wheels are
blocked.
R Reverse
Select R only when the vehicle is com-
pletely stopped.
N Neutral
Select N only if your journey is interrupted
for a long period.
D Drive Ð automatic driving position
Position for normal vehicle operation. All
forward gears are available.Under normal operating conditions, fuel
consumption is lowest when driving in
position D.
Kickdown
A kickdown provides you with maximum
acceleration and the maximum road speed
in position D.
Press the accelerator pedal beyond the
full-throttle resistance point.
M/S manual operation and Sport
program
Shifting from D into M/S activates the Sport
program and this is indicated with D S in the
gear display. This position is recom-
mended if a performance-oriented driving
style is desired.
The first time the selector lever is even
slightly touched, the automatic transmis-
sion shifts from the Sport program into
manual operation.
If you start to move the selector lever
towards +, the transmission shifts
upwards; moving it towards Ð it shifts
downwards. The gear display shows M1
through M6.
Upshifts and downshifts are executed only
when they will result in a plausible combi-
nation of engine and vehicle speed; thus,
for example, a downshift that would cause
the engine to overrev will not be executed
by the system. The selected gear appears
briefly in the instrument cluster, followed by
the current gear.
To obtain maximum acceleration, for
passing maneuvers, etc., during
operation in the manual mode, use the
kickdown or downshift manually.<
Page 67 of 220
Controls
65Reference
At a glance
Driving tips
Communications
Navigation
Entertainment
Mobility
Everything under control
Odometer, outside
temperature display, clock
When the ignition is switched off you can
briefly activate the time, outside tempera-
ture and odometer displays by pressing the
button at the lower left of the instrument
cluster.
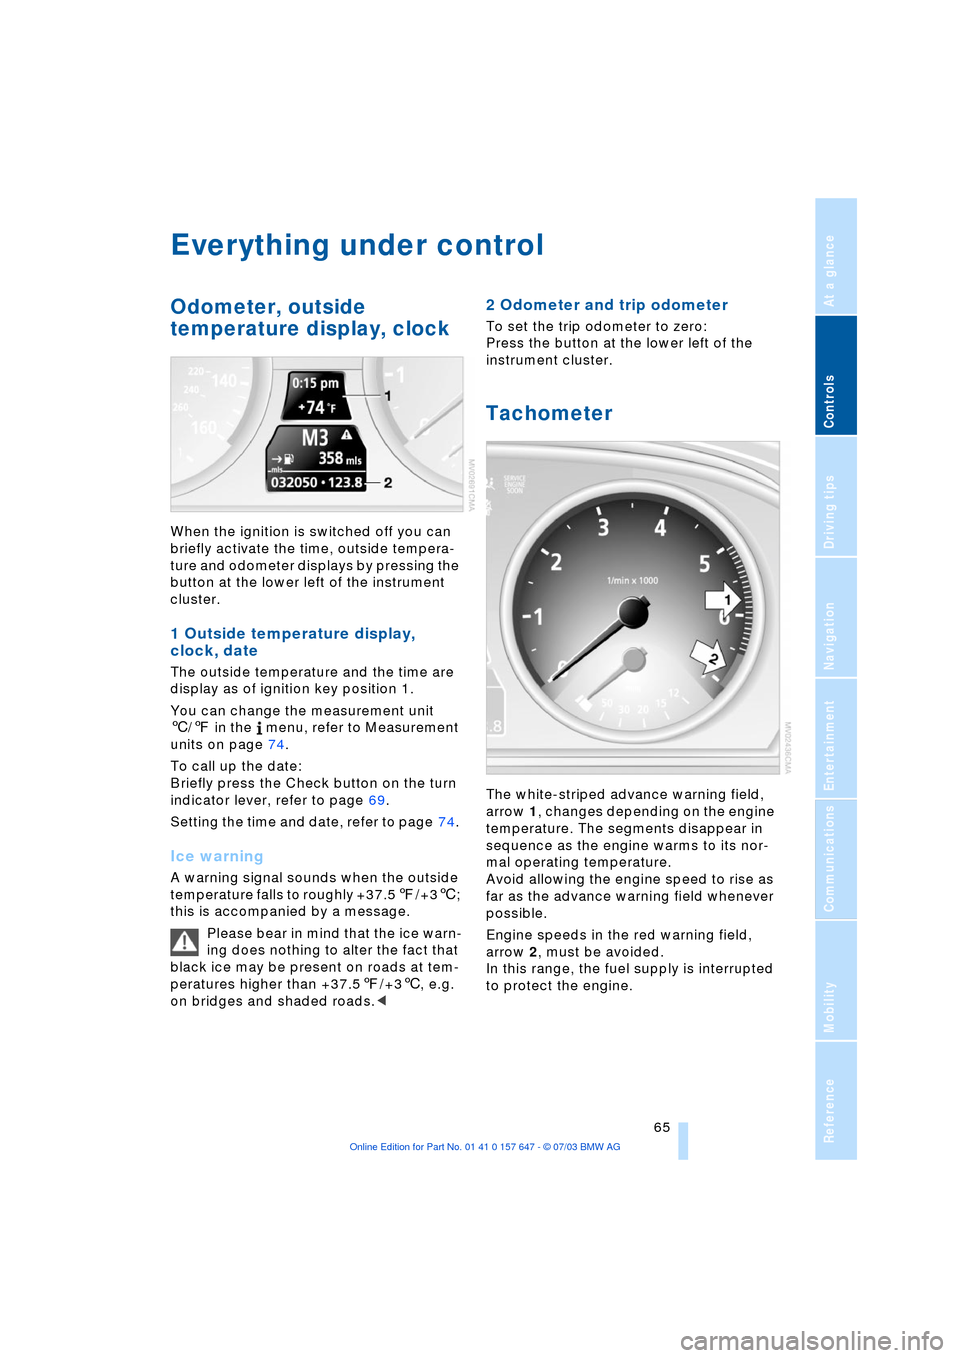
1 Outside temperature display,
clock, date
The outside temperature and the time are
display as of ignition key position 1.
You can change the measurement unit
6/7 in the menu, refer to Measurement
units on page 74.
To call up the date:
Briefly press the Check button on the turn
indicator lever, refer to page 69.
Setting the time and date, refer to page 74.
Ice warning
A warning signal sounds when the outside
temperature falls to roughly +37.57/+36;
this is accompanied by a message.
Please bear in mind that the ice warn-
ing does nothing to alter the fact that
black ice may be present on roads at tem-
peratures higher than +37.57/+36, e.g.
on bridges and shaded roads.<
2 Odometer and trip odometer
To set the trip odometer to zero:
Press the button at the lower left of the
instrument cluster.
Tachometer
The white-striped advance warning field,
arrow 1, changes depending on the engine
temperature. The segments disappear in
sequence as the engine warms to its nor-
mal operating temperature.
Avoid allowing the engine speed to rise as
far as the advance warning field whenever
possible.
Engine speeds in the red warning field,
arrow 2, must be avoided.
In this range, the fuel supply is interrupted
to protect the engine.
Page 76 of 220

Everything under control
74
Measurement units
You can change the measurement units for
consumption, distances, temperature and
pressure for each specific key.
1.Open the menu
2.Select "Display settings" and press the
controller
3.Select "Units" and press the controller
4.Select the menu item to be adjusted
and press the controller
5.Select the desired measurement unit
and press the controller.
Language
The language on the Control Center can be
set for each specific key.
Control Center, for principle details, refer to
page 16:
1.Open the menu
2.Select "Display settings" and press the
controller
3.Select "Languages" and press the con-
troller
4.Select "Text language" and press the
controller. You can select a different
language for the text displays5.Select the desired language and press
the controller.
Setting the time
Control Center, for principle details, refer to
page 16:
1.Open the menu
2.Select "Display settings" and press the
controller
3.Select "Time" and press the controller
4.Select "Set time" and press the control-
ler. The first time setting is highlighted
5.Turn the controller to make the adjust-
ment
6.Press the controller to apply the setting.
The next adjustment is highlighted
7.Make the remaining adjustments. After
the last adjustment, the time is stored.
Changing the display format
The display mode of the clock can be set
for each specific key.
1.Select "Time format" and press the
controller
2.Select the desired format and press the
controller.
Page 79 of 220
Controls
77Reference
At a glance
Driving tips
Communications
Navigation
Entertainment
Mobility
ence of objects in green before they are
close enough to generate a signal tone.
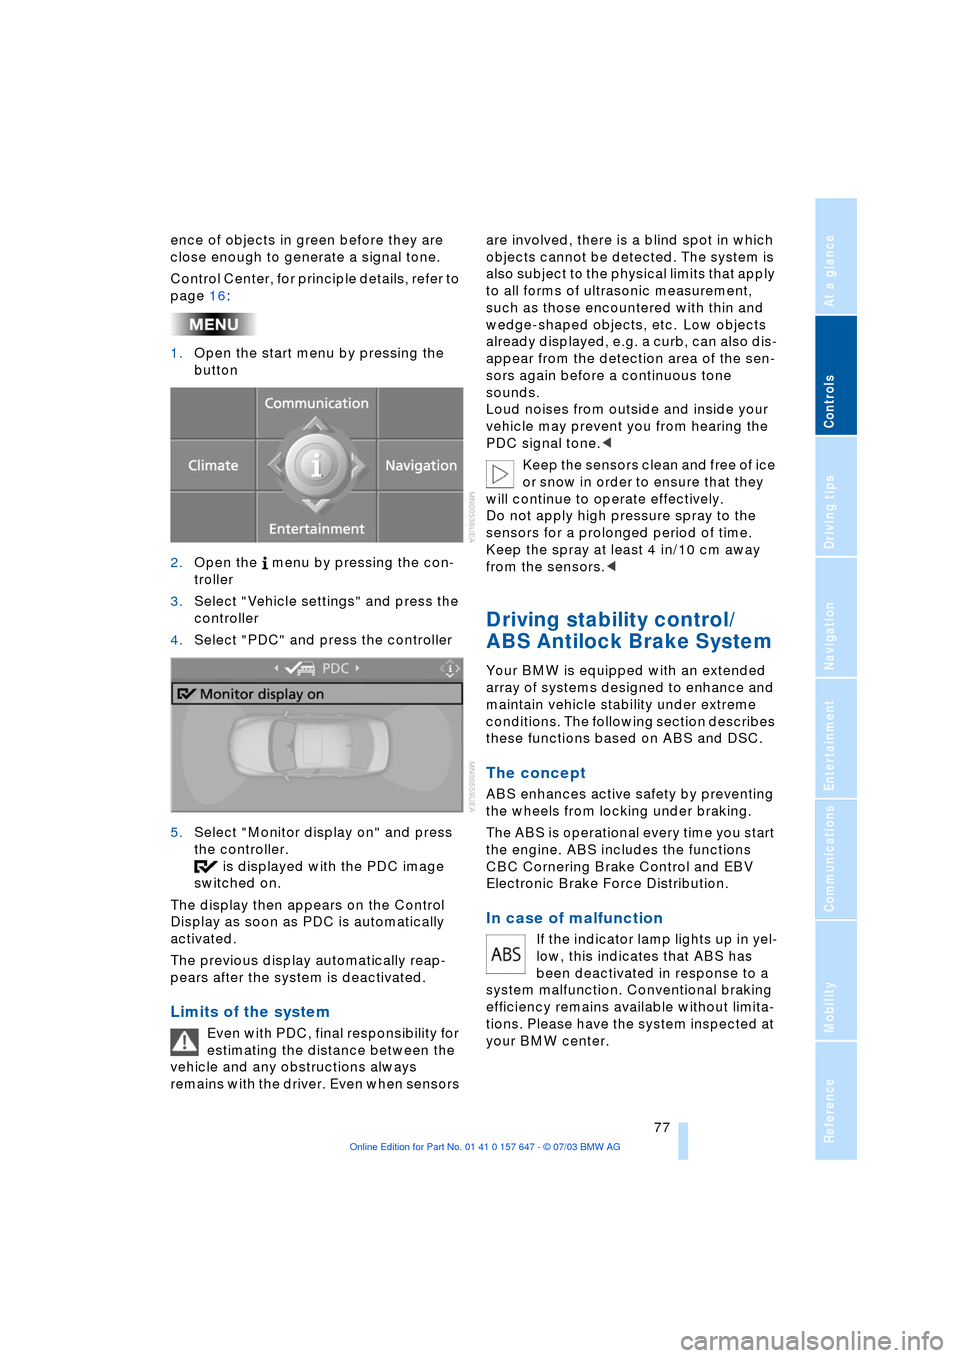
Control Center, for principle details, refer to
page 16:
1.Open the start menu by pressing the
button
2.Open the menu by pressing the con-
troller
3.Select "Vehicle settings" and press the
controller
4.Select "PDC" and press the controller
5.Select "Monitor display on" and press
the controller.
is displayed with the PDC image
switched on.
The display then appears on the Control
Display as soon as PDC is automatically
activated.
The previous display automatically reap-
pears after the system is deactivated.
Limits of the system
Even with PDC, final responsibility for
estimating the distance between the
vehicle and any obstructions always
remains with the driver. Even when sensors are involved, there is a blind spot in which
objects cannot be detected. The system is
also subject to the physical limits that apply
to all forms of ultrasonic measurement,
such as those encountered with thin and
wedge-shaped objects, etc. Low objects
already displayed, e.g. a curb, can also dis-
appear from the detection area of the sen-
sors again before a continuous tone
sounds.
Loud noises from outside and inside your
vehicle may prevent you from hearing the
PDC signal tone.<
Keep the sensors clean and free of ice
or snow in order to ensure that they
will continue to operate effectively.
Do not apply high pressure spray to the
sensors for a prolonged period of time.
Keep the spray at least 4 in/10 cm away
from the sensors.<
Driving stability control/
ABS Antilock Brake System
Your BMW is equipped with an extended
array of systems designed to enhance and
maintain vehicle stability under extreme
conditions. The following section describes
these functions based on ABS and DSC.
The concept
ABS enhances active safety by preventing
the wheels from locking under braking.
The ABS is operational every time you start
the engine. ABS includes the functions
CBC Cornering Brake Control and EBV
Electronic Brake Force Distribution.
In case of malfunction
If the indicator lamp lights up in yel-
low, this indicates that ABS has
been deactivated in response to a
system malfunction. Conventional braking
efficiency remains available without limita-
tions. Please have the system inspected at
your BMW center.
Page 94 of 220
A congenial climate
92 rarily suspending the supply of outside air.
The system then recirculates the air cur-
rently within the vehicle. AUC executes this
function automatically.
Press the button repeatedly to run through
the following control sequence:
>Indicator lamps off: outside air flows in
>Right indicator lamp on, AUC mode: the
system detects pollutants in the outside
air and responds by blocking the supply
of outside air when required. The sys-
tem then recirculates the air currently
within the vehicle.
Depending upon air quality require-
ments, in the automatic mode the sys-
tem alternates between its outside-air
and recirculated-air modes
>Left indicator lamp on, recirculated-air
mode: the supply of outside air is per-
manently blocked. The system then
recirculates the air currently within the
vehicle.
If condensation starts to form on the
inside window surfaces during opera-
tion in the recirculated-air mode, you
should switch it off while also increasing
the air volume as required.
The recirculated-air mode should not be
used over a sustained longer period of
time, as the air quality inside the vehicle
deteriorates continuously.<
Residual heat mode
The system uses the warmth
stored in the engine to heat the
interior when the ignition is off,
for instance, while the vehicle is
stopped at a school to pick up a
child.
You can adjust the automatic climate con-
trol settings in ignition key position 1.
Provided that the engine has warmed
to its normal operating temperature
and the battery is charged, you can use this
function for up to 15 minutes after switch-
ing off the ignition. The LED within the but-
ton lights up to confirm compliance with
these conditions.<
Switching automatic climate control
off
The air volume, the heater and
the cooling function are all
switched off. You can restart
the automatic climate control
by pressing any of its buttons
except the REST button.
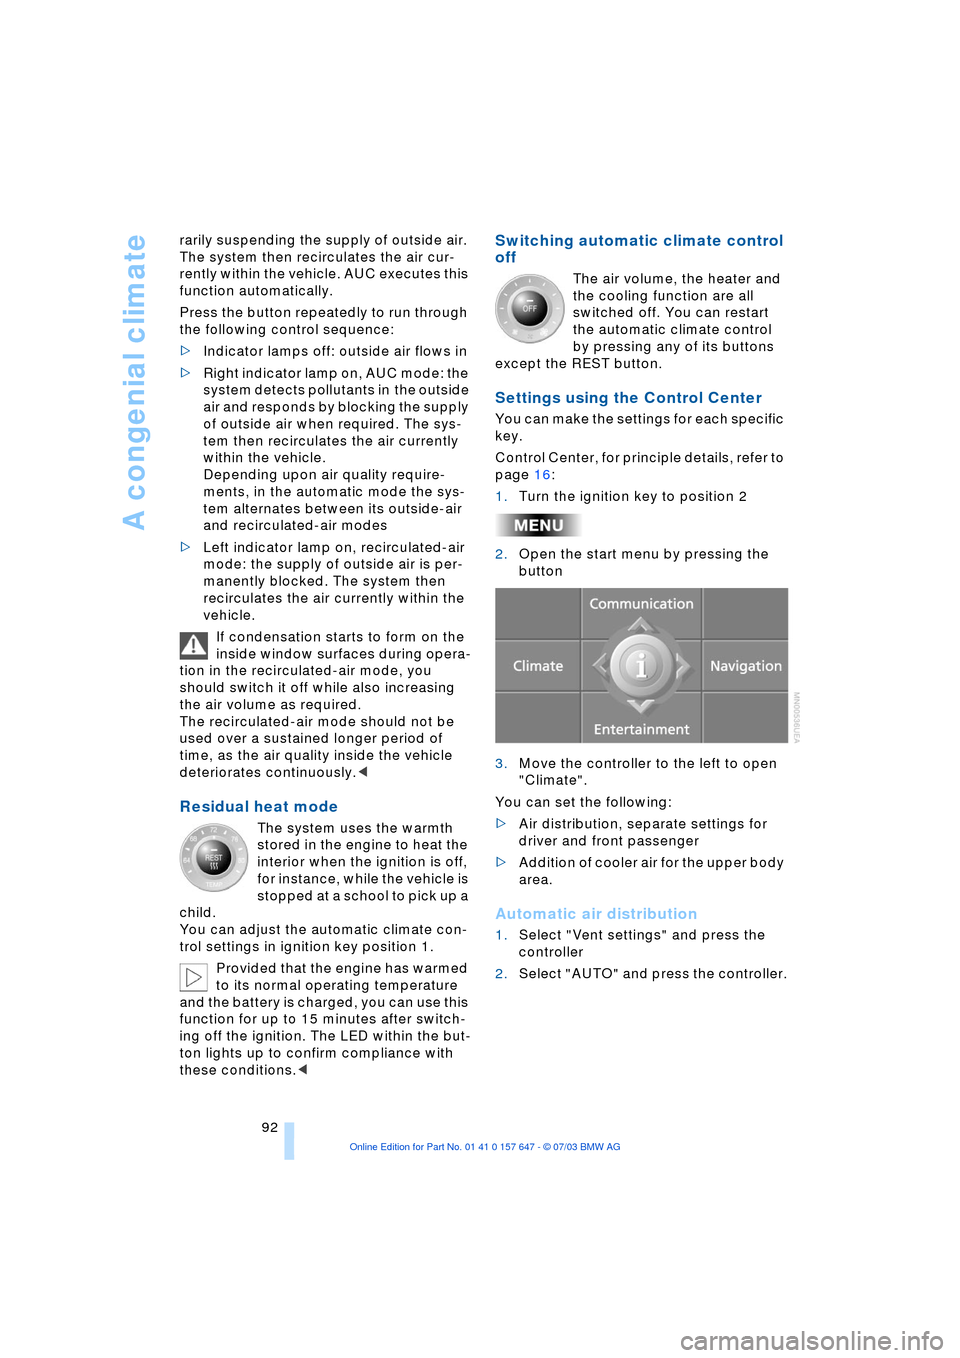
Settings using the Control Center
You can make the settings for each specific
key.
Control Center, for principle details, refer to
page 16:
1.Turn the ignition key to position 2
2.Open the start menu by pressing the
button
3.Move the controller to the left to open
"Climate".
You can set the following:
>Air distribution, separate settings for
driver and front passenger
>Addition of cooler air for the upper body
area.
Automatic air distribution
1.Select "Vent settings" and press the
controller
2.Select "AUTO" and press the controller.
Page 100 of 220
Practical interior accessories
98
Glove compartment
Opening
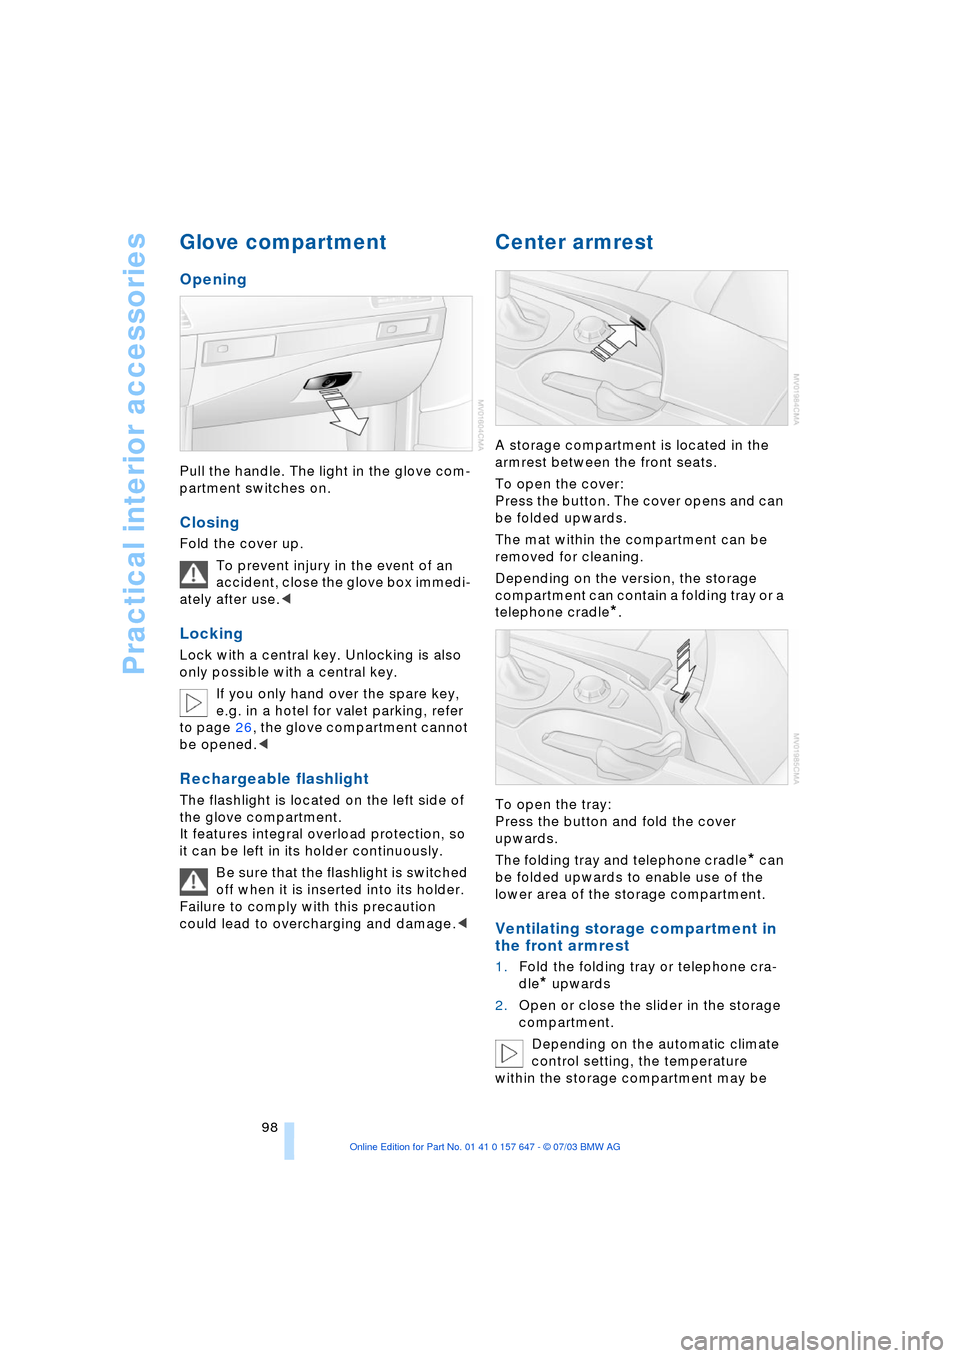
Pull the handle. The light in the glove com-
partment switches on.
Closing
Fold the cover up.
To prevent injury in the event of an
accident, close the glove box immedi-
ately after use.<
Locking
Lock with a central key. Unlocking is also
only possible with a central key.
If you only hand over the spare key,
e.g. in a hotel for valet parking, refer
to page 26, the glove compartment cannot
be opened.<
Rechargeable flashlight
The flashlight is located on the left side of
the glove compartment.
It features integral overload protection, so
it can be left in its holder continuously.
Be sure that the flashlight is switched
off when it is inserted into its holder.
Failure to comply with this precaution
could lead to overcharging and damage.<
Center armrest
A storage compartment is located in the
armrest between the front seats.
To open the cover:
Press the button. The cover opens and can
be folded upwards.
The mat within the compartment can be
removed for cleaning.
Depending on the version, the storage
compartment can contain a folding tray or a
telephone cradle
*.
To open the tray:
Press the button and fold the cover
upwards.
The folding tray and telephone cradle
* can
be folded upwards to enable use of the
lower area of the storage compartment.
Ventilating storage compartment in
the front armrest
1.Fold the folding tray or telephone cra-
dle
* upwards
2.Open or close the slider in the storage
compartment.
Depending on the automatic climate
control setting, the temperature
within the storage compartment may be
Page 103 of 220
Controls
101Reference
At a glance
Driving tips
Communications
Navigation
Entertainment
Mobility
Rear center armrest
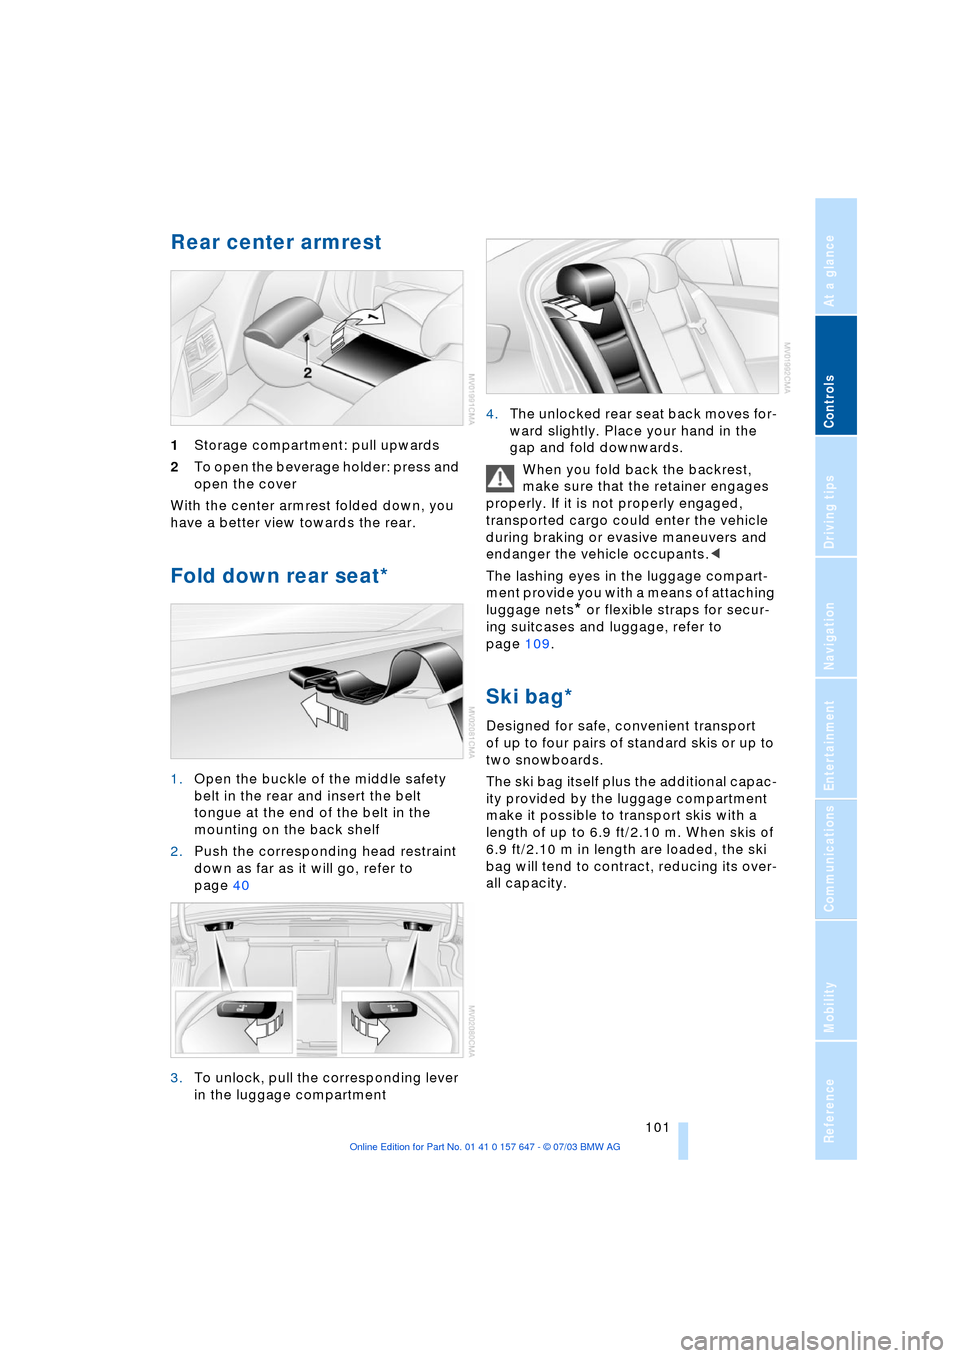
1Storage compartment: pull upwards
2To open the beverage holder: press and
open the cover
With the center armrest folded down, you
have a better view towards the rear.
Fold down rear seat*
1.Open the buckle of the middle safety
belt in the rear and insert the belt
tongue at the end of the belt in the
mounting on the back shelf
2.Push the corresponding head restraint
down as far as it will go, refer to
page 40
3.To unlock, pull the corresponding lever
in the luggage compartment 4.The unlocked rear seat back moves for-
ward slightly. Place your hand in the
gap and fold downwards.
When you fold back the backrest,
make sure that the retainer engages
properly. If it is not properly engaged,
transported cargo could enter the vehicle
during braking or evasive maneuvers and
endanger the vehicle occupants.<
The lashing eyes in the luggage compart-
ment provide you with a means of attaching
luggage nets
* or flexible straps for secur-
ing suitcases and luggage, refer to
page 109.
Ski bag*
Designed for safe, convenient transport
of up to four pairs of standard skis or up to
two snowboards.
The ski bag itself plus the additional capac-
ity provided by the luggage compartment
make it possible to transport skis with a
length of up to 6.9 ft/2.10 m. When skis of
6.9 ft/2.10 m in length are loaded, the ski
bag will tend to contract, reducing its over-
all capacity.
Page 127 of 220
Navigation
Driving tips
125Reference
At a glance
Controls
Communications
Entertainment
Mobility
or press
on the steering wheel for a longer period.
Programing button functions, refer to
page 44.
Repeating an instruction
To repeat the last voice instruction:
or press
on the steering wheel briefly.
Programing button functions, refer to
page 44.
Suppressing voice instructions
To prevent the navigation system from
interrupting other audio sources, such as a
news program or traffic bulletin, you can
deactivate the voice instructions.
During an instruction, press
or press
on the steering wheel briefly.
Programing button functions, refer to
page 44.
Adjusting volume
You can adjust the volume of the voice
instructions for each specific key:
1.To repeat the last voice instruction, if
required:
or press
on the steering wheel briefly.2.Turn the button during an instruction to
select the desired volume.
The navigation system's voice guidance
will continue to issue instructions at this
volume level, even if the radio is set to min-
imum volume.
Blocking sections of a route
During destination guidance you can revise
the navigation system's route recommen-
dations to avoid particular stretches of
road. Enter the number of miles/kilometers
that you want to travel before returning to
the original route.
Control Center, for principle details, refer to
page 16:
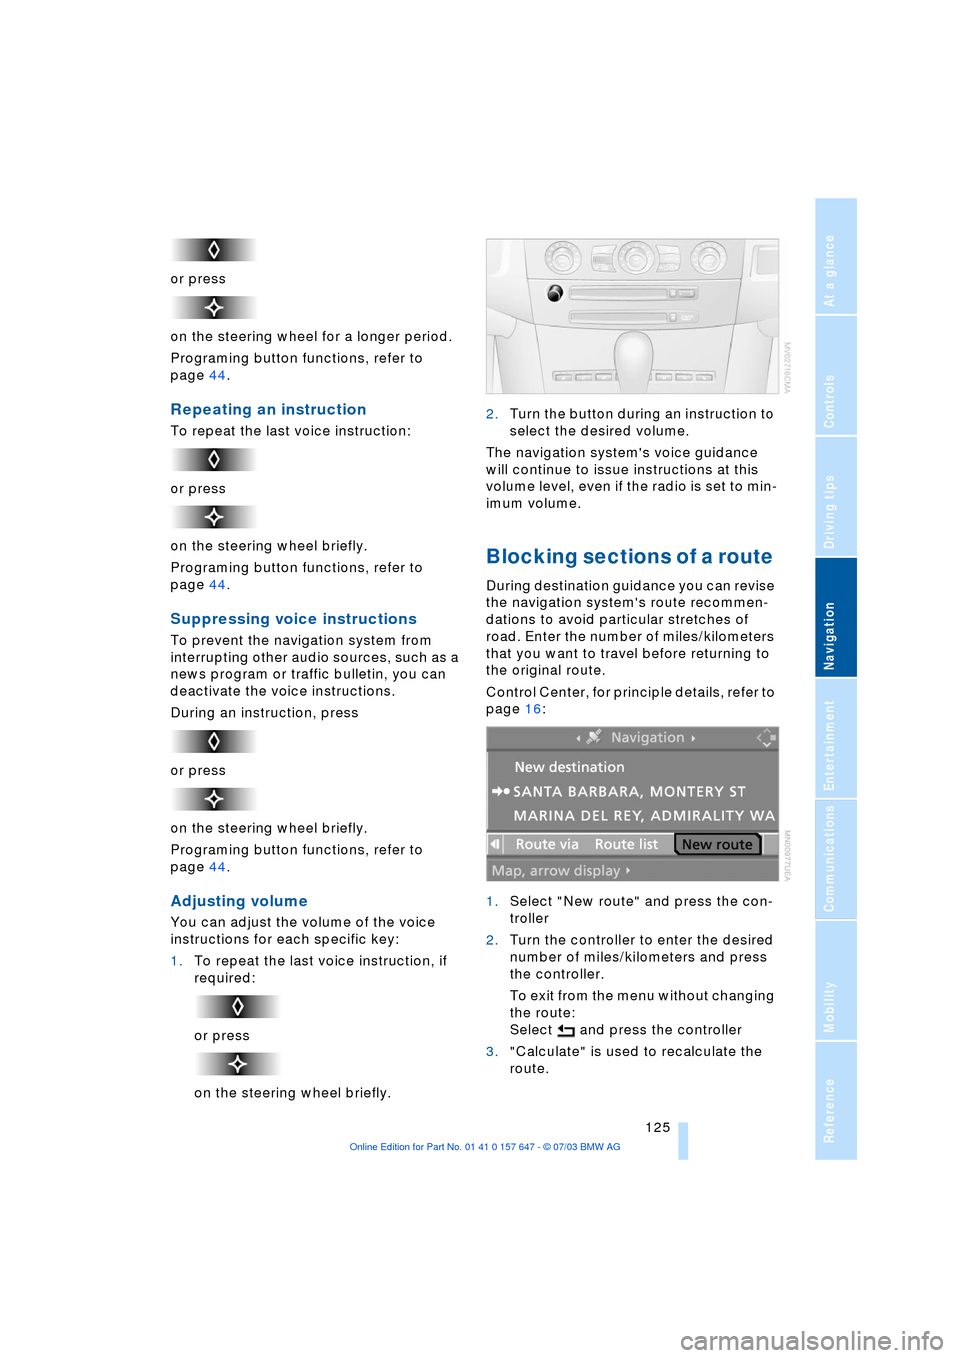
1.Select "New route" and press the con-
troller
2.Turn the controller to enter the desired
number of miles/kilometers and press
the controller.
To exit from the menu without changing
the route:
Select and press the controller
3."Calculate" is used to recalculate the
route.