2004 BMW 525I SEDAN seat memory
[x] Cancel search: seat memoryPage 18 of 220

Control Center
16
Control Center
The Control Center groups the functions of
a large number of switches. This means
that these functions can be operated from
a central position. The following section
provides an introduction to the principle of
the menu guidance. How you control the
individual functions is described in the con-
text of the relevant equipment.
Controls
1Controller: you navigate through the
menus of the Control Center and make
adjustments by turning, pressing and
moving it to the left, right, forwards or
backwards
2Opening the start menu from any menu
item
3Control Display
When you turn the controller, you feel a
clicking. This helps you to select the
desired menu item.
To avoid posing an unnecessary haz-
ard due to inattention, both to your
own vehicle's occupants and to other road users: never attempt to use the controls or
make entries unless traffic and road condi-
tions allow.<
Menu overview
You can call up all the functions in the Con-
trol Center using five menu items.
Communication
>Portable phone*
>BMW Assist* or TeleService*.
Navigation or onboard information
>Navigation system*
>Onboard information, e.g. for display of
the average fuel consumption.
Entertainment
>Radio
>CD.
Climate
>Air distribution
>Seat air conditioning
*
>Independent ventilation
*.
Menu item
>Switching off the Control Display
>Traffic information
>Sound and display settings
>Settings for your vehicle, e.g. Key
Memory
>Display of the maintenance requirement
and dates for statutory emission and
vehicle inspections.
Page 29 of 220

Controls
27Reference
At a glance
Driving tips
Communications
Navigation
Entertainment
Mobility
Examples of Key Memory functions
>Automatic adjustment of the electric
driver's seat
>Locking the vehicle after moving off
>When unlocking with the remote con-
trol, either unlock only the driver's door
or the entire vehicle
>Activating optical warning for Park Dis-
tance Control PDC
>Setting the volume.
Central locking system
The concept
The central locking system is ready for
operation whenever the driver's door is
closed. This simultaneously engages and
releases the locks on the following:
>Doors
>Luggage compartment lid
>Fuel filler door.
The central locking system can be oper-
ated from the outside
>via the remote control
>via the driver's door lock
and from inside via the button for the cen-
tral locking system.
When the system is locked from inside, the
fuel filler door remains unlocked, refer to
page 30.
The anti-theft system is automatically acti-
vated whenever you operate the central
locking system from outside the vehicle. It
prevents the doors from being unlocked
using the safety lock buttons or door han-
dles. The alarm system is armed/disarmed
at the same time.
In the event of an accident, the central
locking system automatically unlocks the
vehicle. In addition, the hazard warning
flashers and interior lamps come on.
Opening and closing: from
outside
Using the remote control
The remote control provides two additional
functions for the central locking system:
>Switching on the interior lamps, refer to
page 28.
You can also use this function to locate
your vehicle in parking garages etc.
>Opening the luggage compartment lid,
refer to page 28.
The luggage compartment lid opens,
regardless of whether it was previously
locked or unlocked.
In addition, the remote control offers you
another function:
>Panic mode
In case of danger, you can trigger an
alarm.
When you lock/unlock the vehicle, you
simultaneously activate/deactivate the
anti-theft system, arm/disarm the alarm
system, and switch the interior lamps on/
off.
Protect the remote control against
unauthorized use by handing over
only the spare key, for example when using
hotel valet parking.<
Because any persons or animals left
unattended in a parked vehicle could
lock the doors from the inside, you should
always keep the remote control with you;
this precaution ensures that you will remain
able to unlock the vehicle from the outside
at all times.<
Unlocking
Press the button.
You can set which doors are to be
unlocked for each specific key:
Control Center, for principle details, refer to
page 16:
1.Open the menu
2.Select "Vehicle settings" and press the
controller
Page 39 of 220
Controls
37Reference
At a glance
Driving tips
Communications
Navigation
Entertainment
Mobility
ment, and the ensuing loss of vehicle con-
trol could lead to an accident.
On the front passenger side as well, do not
tilt the backrest too far toward the rear
while driving. Failure to observe this pre-
caution can prevent the belt from providing
effective protection against injury, as the
passenger could slide under the belt in an
accident.
Make sure that the footwell behind the
driver's and front passenger's seat is empty
and unobstructed. If you fail to do so, any
persons or objects behind the seat could
be injured or damaged by a rearward
movement of the seat.<
Please observe the information on damage
to safety belts provided on page 41 and the
information on the active head restraints on
page 40.
Seat adjustment
To ensure that the safety systems
continue to provide optimized protec-
tion, please observe the adjustment
instructions on page 36.<
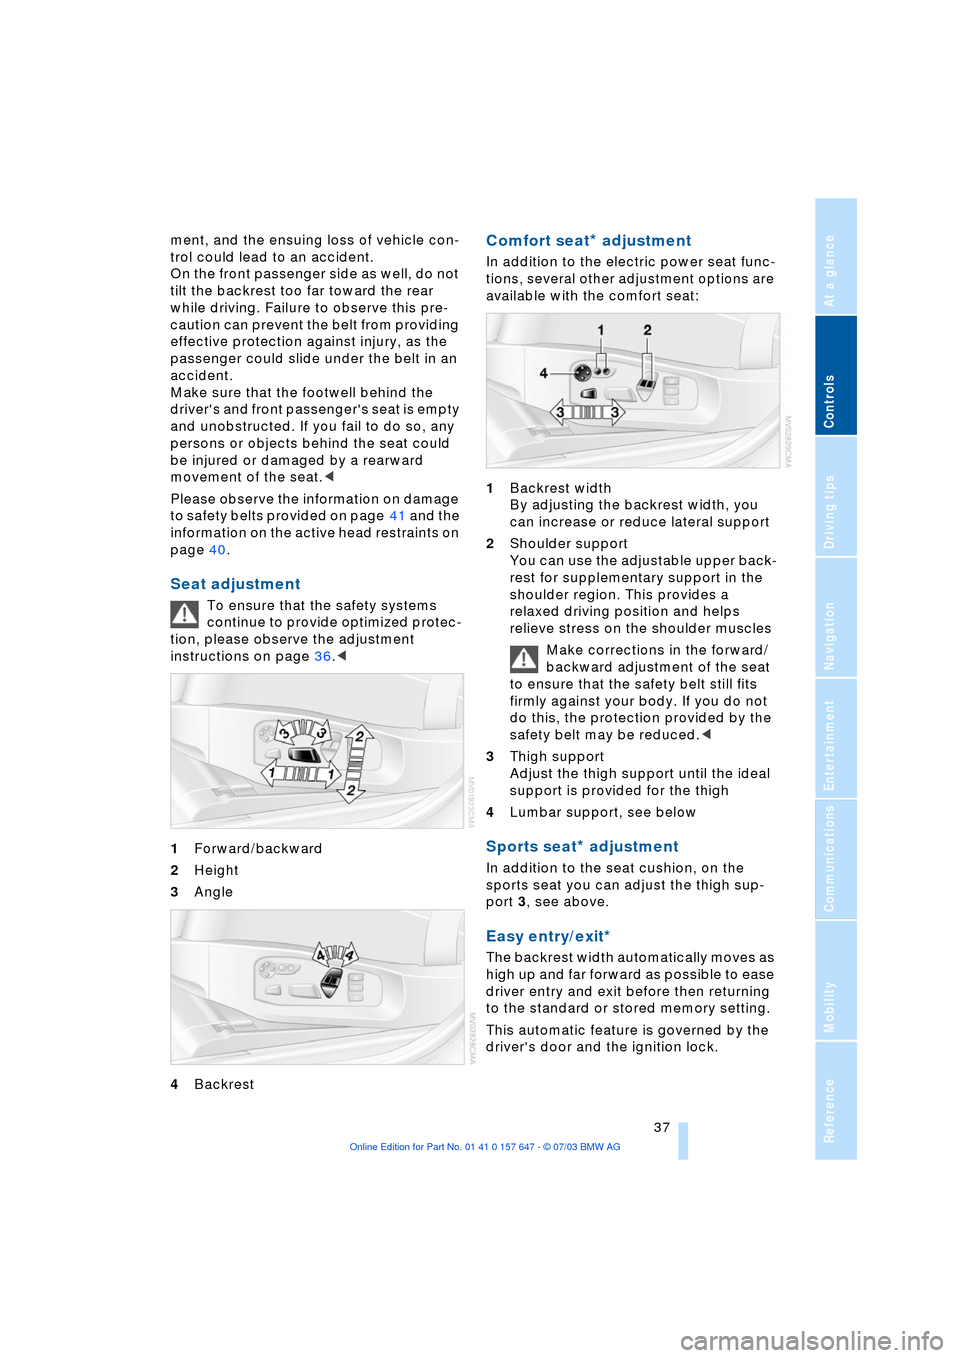
1Forward/backward
2Height
3Angle
4Backrest
Comfort seat* adjustment
In addition to the electric power seat func-
tions, several other adjustment options are
available with the comfort seat:
1Backrest width
By adjusting the backrest width, you
can increase or reduce lateral support
2Shoulder support
You can use the adjustable upper back-
rest for supplementary support in the
shoulder region. This provides a
relaxed driving position and helps
relieve stress on the shoulder muscles
Make corrections in the forward/
backward adjustment of the seat
to ensure that the safety belt still fits
firmly against your body. If you do not
do this, the protection provided by the
safety belt may be reduced.<
3Thigh support
Adjust the thigh support until the ideal
support is provided for the thigh
4Lumbar support, see below
Sports seat* adjustment
In addition to the seat cushion, on the
sports seat you can adjust the thigh sup-
port 3, see above.
Easy entry/exit*
The backrest width automatically moves as
high up and far forward as possible to ease
driver entry and exit before then returning
to the standard or stored memory setting.
This automatic feature is governed by the
driver's door and the ignition lock.
Page 40 of 220
Adjustments
38
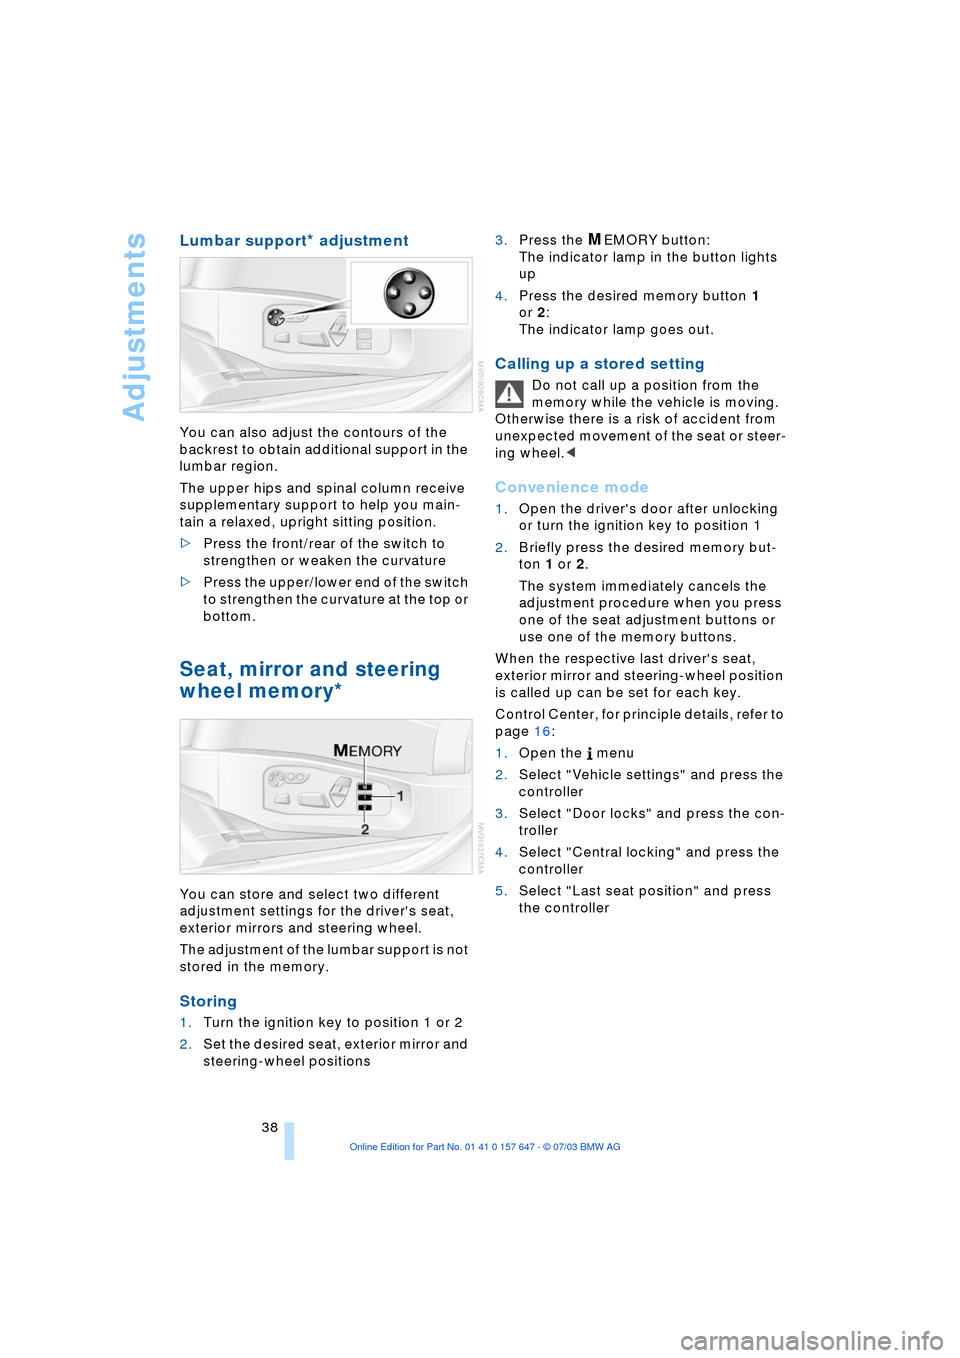
Lumbar support* adjustment
You can also adjust the contours of the
backrest to obtain additional support in the
lumbar region.
The upper hips and spinal column receive
supplementary support to help you main-
tain a relaxed, upright sitting position.
>Press the front/rear of the switch to
strengthen or weaken the curvature
>Press the upper/lower end of the switch
to strengthen the curvature at the top or
bottom.
Seat, mirror and steering
wheel memory*
You can store and select two different
adjustment settings for the driver's seat,
exterior mirrors and steering wheel.
The adjustment of the lumbar support is not
stored in the memory.
Storing
1.Turn the ignition key to position 1 or 2
2.Set the desired seat, exterior mirror and
steering-wheel positions 3.Press the
MEMORY button:
The indicator lamp in the button lights
up
4.Press the desired memory button 1
or 2:
The indicator lamp goes out.
Calling up a stored setting
Do not call up a position from the
memory while the vehicle is moving.
Otherwise there is a risk of accident from
unexpected movement of the seat or steer-
ing wheel.<
Convenience mode
1.Open the driver's door after unlocking
or turn the ignition key to position 1
2.Briefly press the desired memory but-
ton 1 or 2.
The system immediately cancels the
adjustment procedure when you press
one of the seat adjustment buttons or
use one of the memory buttons.
When the respective last driver's seat,
exterior mirror and steering-wheel position
is called up can be set for each key.
Control Center, for principle details, refer to
page 16:
1.Open the menu
2.Select "Vehicle settings" and press the
controller
3.Select "Door locks" and press the con-
troller
4.Select "Central locking" and press the
controller
5.Select "Last seat position" and press
the controller
Page 41 of 220
Controls
39Reference
At a glance
Driving tips
Communications
Navigation
Entertainment
Mobility
6.Select "After unlocking" or "After door
is opened" and press the controller.
displays the selected setting.
When using this Key Memory feature,
always make sure that the footwell
behind the driver's seat is empty and unob-
structed. If you fail to do so, any persons or
objects behind the seat could be injured or
damaged by a rearward movement of the
seat.<
Safety feature
1.Close the driver's door and turn the
ignition key to position 0 or 2
2.Press the desired memory button 1 or 2
and maintain pressure until the adjust-
ment process has been completed.
If the
MEMORY button is pressed acciden-
tally:
Press the button a second time, the indica-
tor lamp goes out.
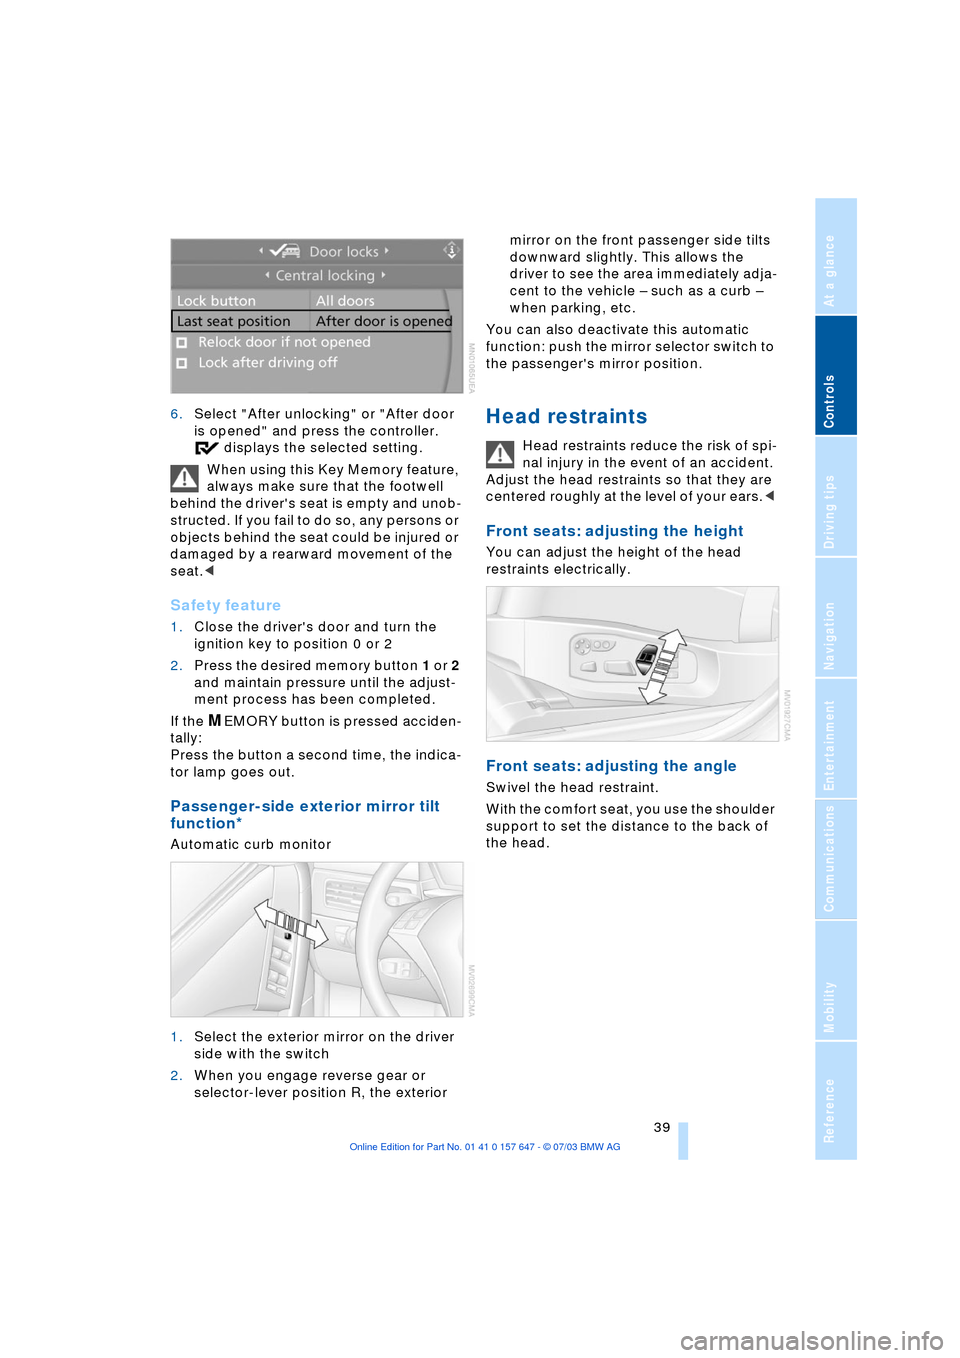
Passenger-side exterior mirror tilt
function*
Automatic curb monitor
1.Select the exterior mirror on the driver
side with the switch
2.When you engage reverse gear or
selector-lever position R, the exterior mirror on the front passenger side tilts
downward slightly. This allows the
driver to see the area immediately adja-
cent to the vehicle Ð such as a curb Ð
when parking, etc.
You can also deactivate this automatic
function: push the mirror selector switch to
the passenger's mirror position.
Head restraints
Head restraints reduce the risk of spi-
nal injury in the event of an accident.
Adjust the head restraints so that they are
centered roughly at the level of your ears.<
Front seats: adjusting the height
You can adjust the height of the head
restraints electrically.
Front seats: adjusting the angle
Swivel the head restraint.
With the comfort seat, you use the shoulder
support to set the distance to the back of
the head.
Page 45 of 220
Controls
43Reference
At a glance
Driving tips
Communications
Navigation
Entertainment
Mobility
You can also adjust the mirrors manually by
pressing against the outer edges of their
lenses.
Storing the mirror positions, refer to Seat,
mirror and steering wheel memory on
page 38.
The mirror on the passenger's side
features a lens with a more convex
surface than the mirror installed on the
driver's side. When estimating the distance
between yourself and other traffic, bear in
mind that the objects reflected in the mirror
are closer than they appear. This means
that estimations of the distance to following
traffic should not be regarded as precise.<
Self-defrosting mirrors
Both exterior mirrors are automatically
heated in ignition key position 2.
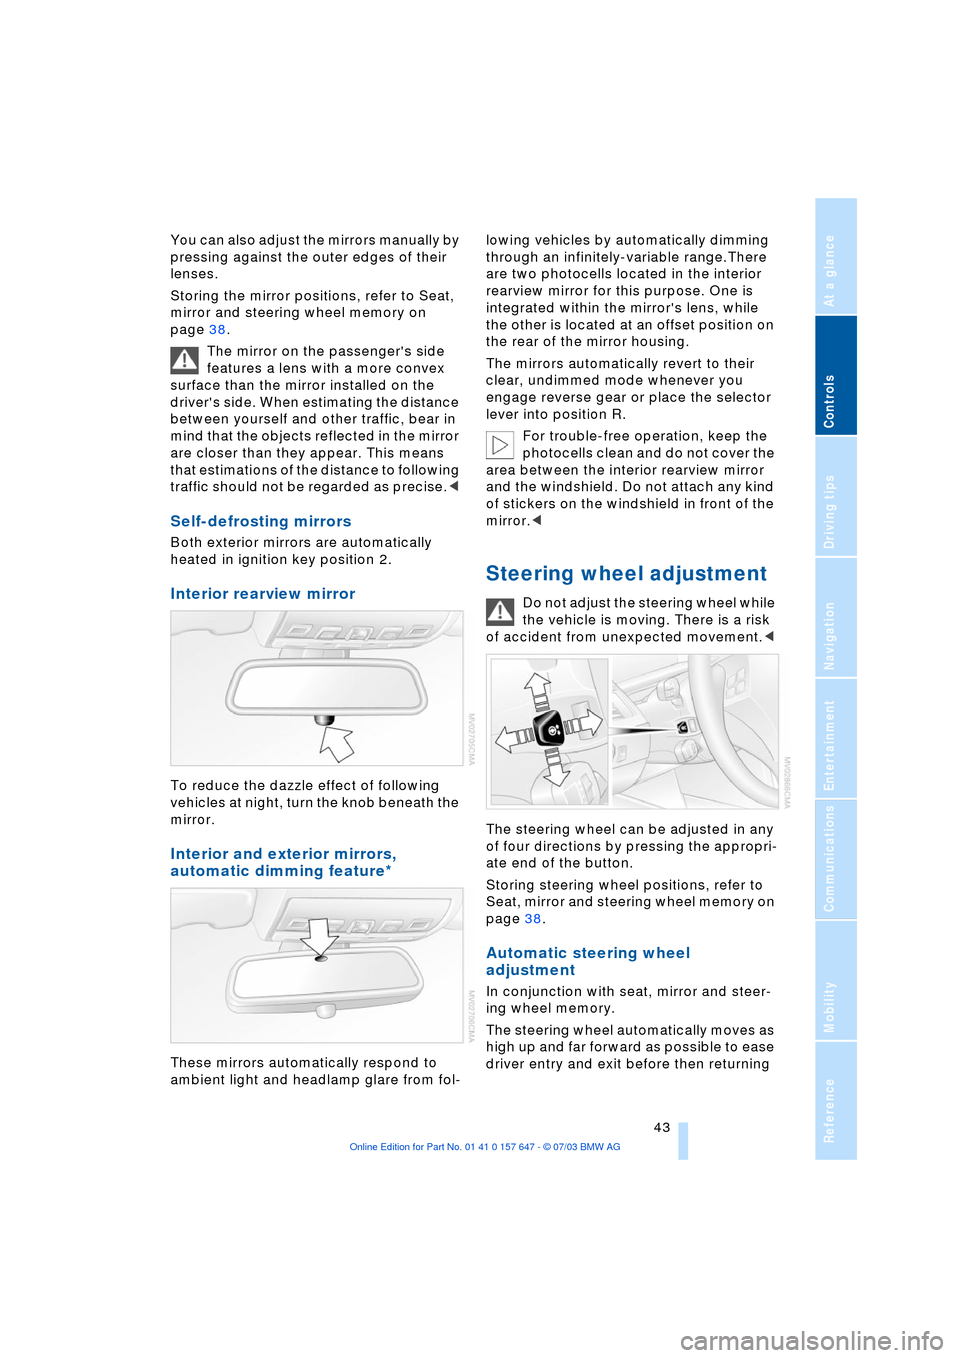
Interior rearview mirror
To reduce the dazzle effect of following
vehicles at night, turn the knob beneath the
mirror.
Interior and exterior mirrors,
automatic dimming feature*
These mirrors automatically respond to
ambient light and headlamp glare from fol-lowing vehicles by automatically dimming
through an infinitely-variable range.There
are two photocells located in the interior
rearview mirror for this purpose. One is
integrated within the mirror's lens, while
the other is located at an offset position on
the rear of the mirror housing.
The mirrors automatically revert to their
clear, undimmed mode whenever you
engage reverse gear or place the selector
lever into position R.
For trouble-free operation, keep the
photocells clean and do not cover the
area between the interior rearview mirror
and the windshield. Do not attach any kind
of stickers on the windshield in front of the
mirror.<
Steering wheel adjustment
Do not adjust the steering wheel while
the vehicle is moving. There is a risk
of accident from unexpected movement.<
The steering wheel can be adjusted in any
of four directions by pressing the appropri-
ate end of the button.
Storing steering wheel positions, refer to
Seat, mirror and steering wheel memory on
page 38.
Automatic steering wheel
adjustment
In conjunction with seat, mirror and steer-
ing wheel memory.
The steering wheel automatically moves as
high up and far forward as possible to ease
driver entry and exit before then returning
Page 210 of 220
Everything from A to Z
208 Heating 90
Ð mirrors 43
Ð steering wheel 44
Heating while stopped 92
Heavy cargo, refer to
Stowing cargo 109
Height, refer to
Dimensions 199
Height adjustment
Ð head restraints 39
Ð seats 37
Ð steering wheel 43
High beams 88
Ð headlight flasher 88
Ð indicator lamp 13
Ð replacing the bulbs 185
Hills 107
Holder for beverages 99
"Horn" 44
Horn 10
"Hour memo" 75
"House number" for
destination entry 117
Hydraulic brake assistant,
refer to DBC 79
Hydroplaning 106, 174
I
Ice warning 65
iDrive, refer to Control
Center 16
Ignition key 26
Ignition key positions, refer
to Ignition lock 49
Ignition lock 49
Independent ventilation
Ð switching on and off
directly 94
Independent ventilation/
heating
Ð entering switch-on
times 95
Ð preselecting switch-on
times 95Indicator/warning lamp
Ð active steering 82
Ð airbags 84
Ð Flat Tire Monitor 81
Ð front fog lamps 11
Ð overview 13
Ð safety belt warning 40
Individual air distribution 93
Individual button
assignment options on
steering wheel 44
Individual settings, refer to
Key Memory 26
Inflation pressure, refer to
Tire inflation
pressure 170
"Information" for
navigation 118
Information for navigation
Ð on a different city 118
Ð on city of destination 118
Ð on current position 118
"Information on
destination" 119
"Input map" 118
Installation location
Ð CD changer 144
Ð navigation computer 114
Ð portable phone 151
Instructions for navigation
system, refer to Voice
instructions 124
Instrument cluster 12
Instrument combination,
refer to Instrument
cluster 12
Instrument lighting 88
Instrument panel, refer to
Instrument cluster 10
Integrated universal remote
control 96
Interesting destination 118
"Interim time" 73
Interior lamps 89
Ð remote control 28
Interior mirror, refer to
Interior rearview mirror 43
Interior motion sensor 33
Ð switching off 28Interior rearview mirror 43
Ð automatic dimming
feature 43
Interlock, refer to Steering
locked 49
Intermittent mode of the
wipers 57
J
Jacking points 188
Joystick, refer to Control
Center 16
Jump-starting 192
K
Key Memory 26
"Keypad" 156
Keys 26
Key set, refer Central keys
with remote control 26
Kickdown 55
Knock control 169
L
Lamps and bulbs 184
"Languages" 74
"Languages" for
navigation 124
Lashing eyes, refer to
Securing the load 109
"Last seat position" 38
LATCH child-restraint
fixing 47
LEDs light-emitting
diodes 89
Length, refer to
Dimensions 199
Letter symbol on portable
phone 156
License plate light
Ð replacing the bulbs 186
Light-emitting diodes
LEDs 89
Lighter 100
Ð socket 100
"Lighting" 56, 87
Page 211 of 220
Reference 209
At a glance
Controls
Driving tips
Communications
Navigation
Entertainment
Mobility
Lighting
Ð instruments 88
Ð of the vehicle, refer to
Lamps 87
Lighting of the instruments,
refer to Instrument
lighting 88
Lights, refer to Parking
lamps/low beams 87
Lights on warning 87
Light switch 87
Limit speed, refer to
Limit 72
Loading
Ð securing the load 109
Ð stowing cargo 109
Ð vehicle 108
"Lock after driving off" 30
"Lock button" 28
Locking
Ð from inside 30
Ð from outside 28
Locking and unlocking
doors
Ð from inside 30
Ð from outside 27
Ð setting confirmation
signals 28
"LOGIC7", audio
systems 132
Low beams 87
Ð automatic 87
Ð replacing the bulbs 185
Lower back support, refer
to Lumbar support 38
Lug bolts 188
Ð wrench 187
Luggage compartment 31
Ð capacity 200
Ð locking separately 31
Ð opening/closing, refer to
Luggage compartment
lid 31
Ð opening from the
inside 31
Ð opening from the
outside 31
Ð opening with remote
control 28
Ð socket 100
Ð volume 200Luggage compartment
lid 31
Ð emergency release from
inside luggage
compartment 32
Ð locking separately 31
Ð manual operation 31
Ð opening from the
inside 31
Ð opening from the
outside 31
Ð opening with remote
control 28
Ð unlocking manually 31
Luggage rack, refer to
Roof-mounted luggage
rack 109
Lumbar support 38
LW, waveband 134
M
M+S tires, refer to Winter
tires 175
Maintenance, refer also to
Service and Warranty
Information Booklet for
US models or Warranty
and Service Guide
Booklet for Canadian
models
Maintenance system 181
Malfunction
Ð automatic
transmission 56
Ð Sequential manual
transmission SMG 53
Malfunction warnings, refer
to Check Control 68
Manually controlled
recirculated air 91
"Manual" on the radio 135
Manual operation
Ð door lock 29
Ð fuel filler door 168
Ð glass roof 35
Ð luggage compartment
lid 31
Manual operation with
automatic
transmission 55Manual release, refer to
Manual operation
Manual station tuning 135
Manual transmission 51
"Map, arrow display" 123
"Map, direction of
travel" 124
"Map, facing north" 124
Maximum cooling 91
Maximum roof weight 200
Maximum speed
Ð for winter tires 175
Ð with compact wheel 188
Memory
Ð refer to Key Memory 26
Ð refer to Seat, mirror and
steering wheel
memory 38
Menus, refer to Control
Center 16
Message list of traffic
information 126
Microphone for hands-free
system 151
Mirrors 42
Ð automatic curb
monitor 39
Ð dimming feature 43
Ð heating 43
Ð memory, refer to Seat,
mirror and steering wheel
memory 38
"Missed calls" 155
Missed calls 154
Mobile communications in
the vehicle 108
Mobile Service, refer to
Roadside Assistance 191
Monitor, refer to Control
Center 16
"Monitor display on" 77
Monitoring inflation
pressure, refer to Flat Tire
Monitor 80
Multifunction switch
Ð refer to Turn signal
indicators/headlamp
flasher 56
Ð refer to Wiper/washer
system 57