2004 BMW 525I SEDAN change time
[x] Cancel search: change timePage 80 of 220

Technology for comfort, convenience and safety
78
CBC Cornering Brake Control
CBC is a supplement to ABS. It provides
further enhancements in vehicle stability
and steering response during lane changes
and cornering at high rates of lateral accel-
eration.
EBV Electronic Brake Force
Distribution
EBV controls the brake system's applica-
tion pressure at the rear wheels to ensure
stable deceleration.
In case of malfunction
If the brake system warning lamp
lights up in red, appearing together
with the yellow indicator lamps for
ABS and DSC:
The driving stability control has
failed.
If all three lamps light up yellow:
Fault in the driving stability control.
The EBV electronic brake-force distribution
is active.
While you may continue, you should
remember to proceed cautiously and drive
defensively while avoiding full brake appli-
cations.
Please have the system checked at the
nearest BMW center.
If a message appears on the Control Dis-
play, please note the supplementary infor-
mation.
You can find more information on the
Check Control starting on page 68.
Indicator and warning lamps for
Canadian models.
Driving stability control/
DSC Dynamic Stability
Control
The concept
DSC maintains vehicle stability, even in
critical driving situations.
The DSC is operational every time you start
the engine. DSC includes the functionality
of the DTC Dynamic Traction Control and
DBC Dynamic Brake Control, refer to
page 79.
The system optimizes vehicle stability dur-
ing acceleration and when starting from a
full stop, as well as optimizing traction. The
system recognizes any tendency for the
vehicle to assume an unstable attitude
such as oversteer or understeer; it then
counteracts this tendency with a combina-
tion of graduated reductions in engine
torque and selective braking intervention at
individual wheels. DSC provides optimal
stability within the limits defined by the
laws of physics.
Indicator lamps
The indicator lamp in the instrument
cluster goes out soon after you start
the engine.
If the indicator lamp flashes:
DSC is regulating the drive and braking
forces.
If the indicator lamp lights up permanently:
DSC has been switched off using the but-
ton.
If the indicator lamp and the brake
warning lamp light up permanently:
Malfunction in DSC, DTC and DBC.
When the system is off, the stability main-
tenance functions described above are no
longer available. The vehicle will remain
completely operational, however, without
DSC.
Please respond to any malfunctions by
referring the problem to your BMW center.
Page 89 of 220
Controls
87Reference
At a glance
Driving tips
Communications
Navigation
Entertainment
Mobility
Lamps
Parking lamps/low beams
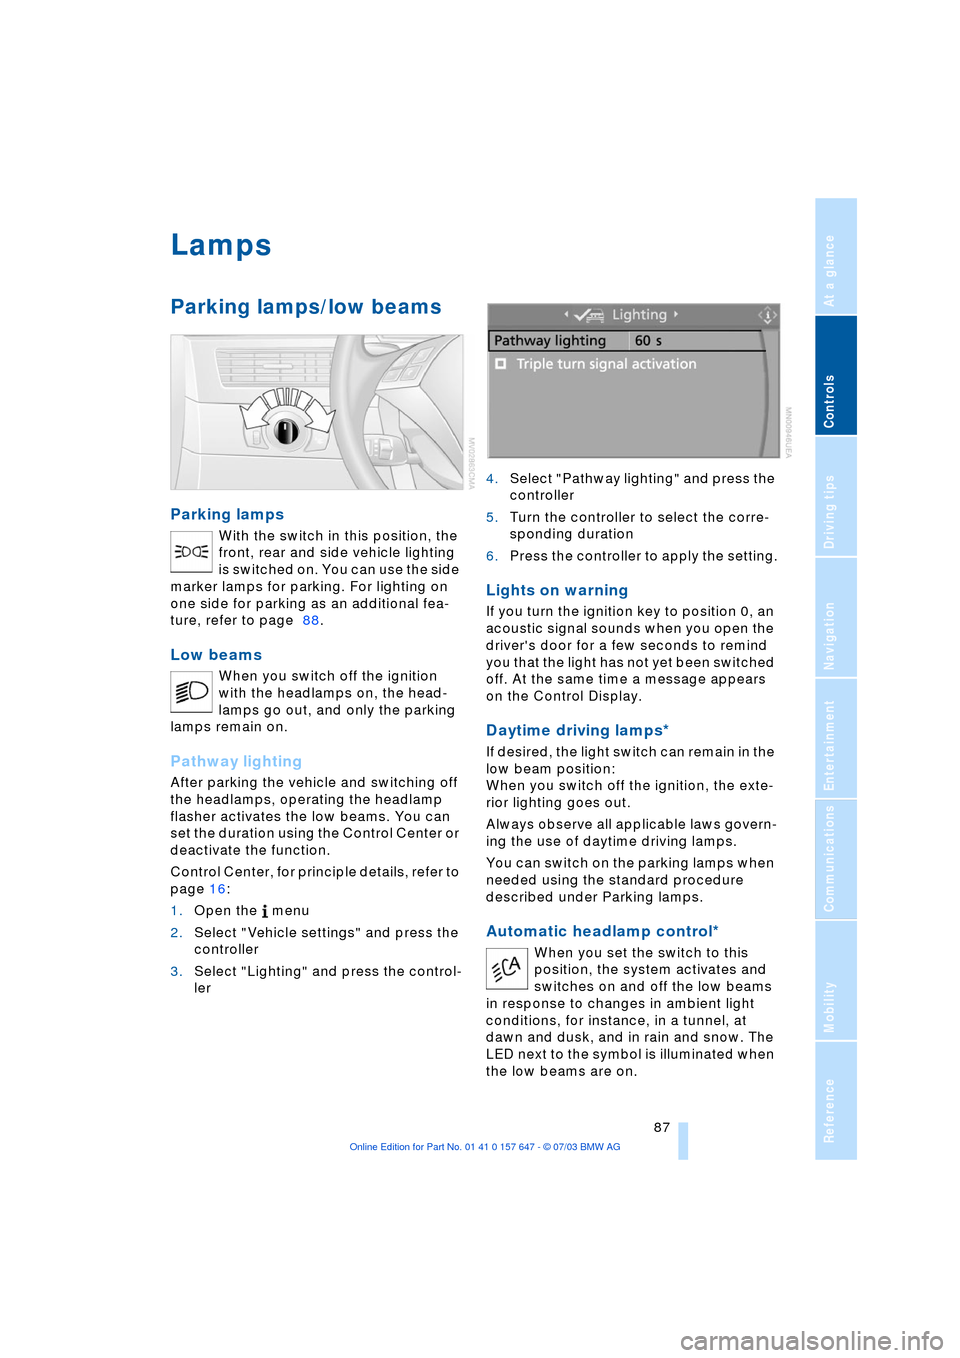
Parking lamps
With the switch in this position, the
front, rear and side vehicle lighting
is switched on. You can use the side
marker lamps for parking. For lighting on
one side for parking as an additional fea-
ture, refer to page 88.
Low beams
When you switch off the ignition
with the headlamps on, the head-
lamps go out, and only the parking
lamps remain on.
Pathway lighting
After parking the vehicle and switching off
the headlamps, operating the headlamp
flasher activates the low beams. You can
set the duration using the Control Center or
deactivate the function.
Control Center, for principle details, refer to
page 16:
1.Open the menu
2.Select "Vehicle settings" and press the
controller
3.Select "Lighting" and press the control-
ler 4.Select "Pathway lighting" and press the
controller
5.Turn the controller to select the corre-
sponding duration
6.Press the controller to apply the setting.
Lights on warning
If you turn the ignition key to position 0, an
acoustic signal sounds when you open the
driver's door for a few seconds to remind
you that the light has not yet been switched
off. At the same time a message appears
on the Control Display.
Daytime driving lamps*
If desired, the light switch can remain in the
low beam position:
When you switch off the ignition, the exte-
rior lighting goes out.
Always observe all applicable laws govern-
ing the use of daytime driving lamps.
You can switch on the parking lamps when
needed using the standard procedure
described under Parking lamps.
Automatic headlamp control*
When you set the switch to this
position, the system activates and
switches on and off the low beams
in response to changes in ambient light
conditions, for instance, in a tunnel, at
dawn and dusk, and in rain and snow. The
LED next to the symbol is illuminated when
the low beams are on.
Page 98 of 220
Practical interior accessories
96
Practical interior accessories
Integrated universal remote
control*
The concept
The integrated universal remote control
replaces up to three different hand-held
transmitters for various remote-controlled
equipment such as door openers and
house alarm systems. The integrated uni-
versal remote control registers and stores
signals from the original hand-held trans-
mitters.
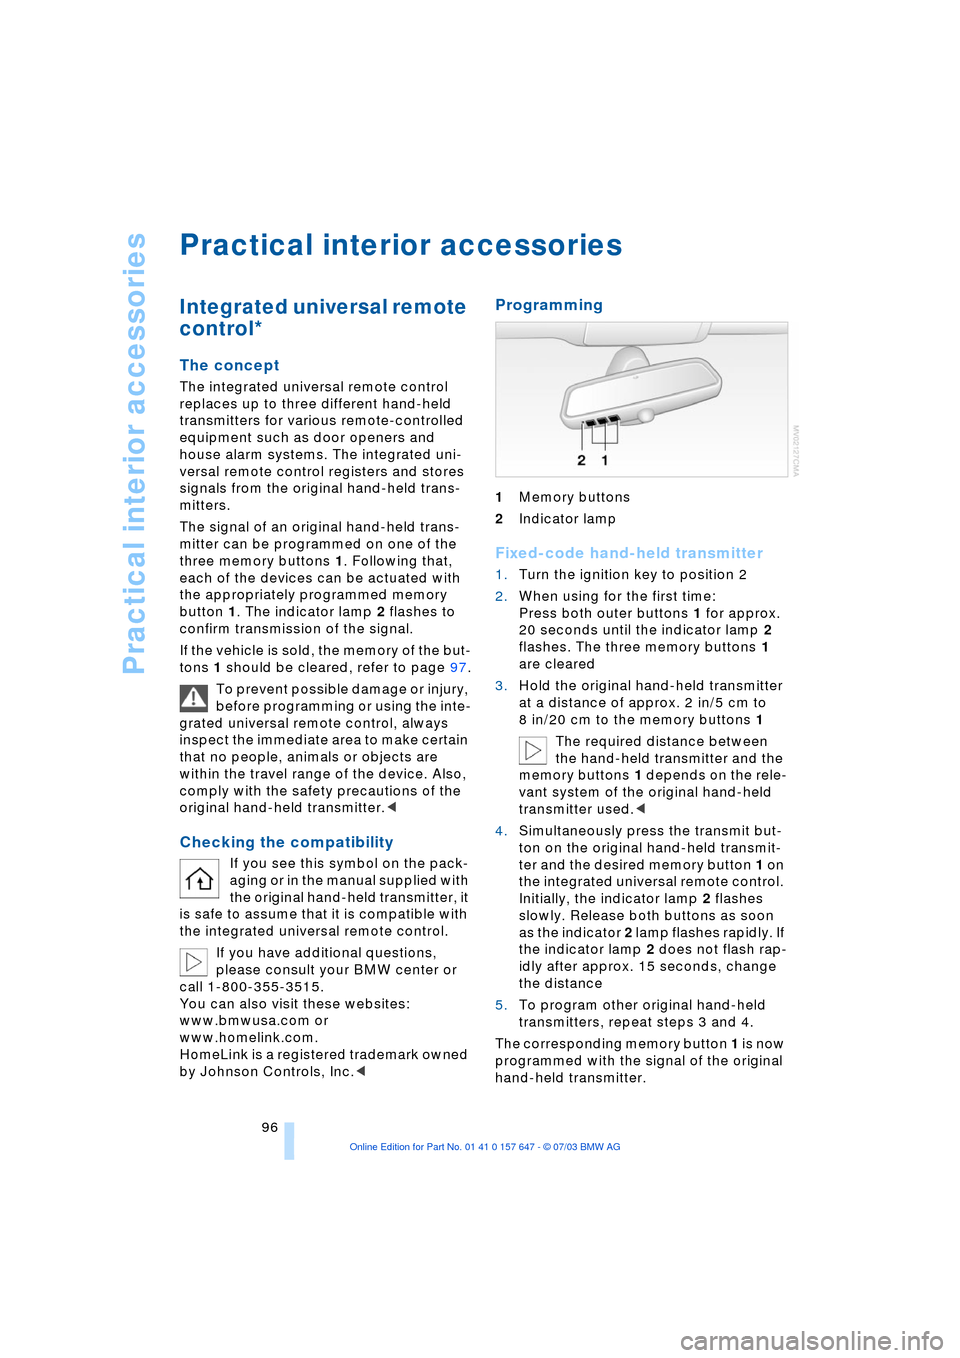
The signal of an original hand-held trans-
mitter can be programmed on one of the
three memory buttons 1. Following that,
each of the devices can be actuated with
the appropriately programmed memory
button 1. The indicator lamp 2 flashes to
confirm transmission of the signal.
If the vehicle is sold, the memory of the but-
tons 1 should be cleared, refer to page 97.
To prevent possible damage or injury,
before programming or using the inte-
grated universal remote control, always
inspect the immediate area to make certain
that no people, animals or objects are
within the travel range of the device. Also,
comply with the safety precautions of the
original hand-held transmitter.<
Checking the compatibility
If you see this symbol on the pack-
aging or in the manual supplied with
the original hand-held transmitter, it
is safe to assume that it is compatible with
the integrated universal remote control.
If you have additional questions,
please consult your BMW center or
call 1-800-355-3515.
You can also visit these websites:
www.bmwusa.com or
www.homelink.com.
HomeLink is a registered trademark owned
by Johnson Controls, Inc.<
Programming
1Memory buttons
2Indicator lamp
Fixed-code hand-held transmitter
1.Turn the ignition key to position 2
2.When using for the first time:
Press both outer buttons 1 for approx.
20 seconds until the indicator lamp 2
flashes. The three memory buttons 1
are cleared
3.Hold the original hand-held transmitter
at a distance of approx. 2 in/5 cm to
8 in/20 cm to the memory buttons 1
The required distance between
the hand-held transmitter and the
memory buttons 1 depends on the rele-
vant system of the original hand-held
transmitter used.<
4.Simultaneously press the transmit but-
ton on the original hand-held transmit-
ter and the desired memory button 1 on
the integrated universal remote control.
Initially, the indicator lamp 2 flashes
slowly. Release both buttons as soon
as the indicator 2 lamp flashes rapidly. If
the indicator lamp 2 does not flash rap-
idly after approx. 15 seconds, change
the distance
5.To program other original hand-held
transmitters, repeat steps 3 and 4.
The corresponding memory button 1 is now
programmed with the signal of the original
hand-held transmitter.
Page 124 of 220
Destination entry
122 You can change the selected route as often
as you like, both when entering your desti-
nation and at any time while the system is
guiding you to it Ð the system revises its
travel recommendations accordingly.
Wordmatch principle
The system supports the wordmatch prin-
ciple to make it easier for you to enter the
names of streets or towns. The system runs
ongoing checks, comparing your destina-
tion entries with the data stored on the nav-
igation CD/DVD as the basis for instant
response. The user benefits include:
>Names of specific locations can also
vary from the official versions provided
that the spelling of the entry corre-
sponds to a standard form used in
another country
Example:
Instead of 'MŸnchen', you can also
enter the English spelling 'Munich' or
the Italian spelling 'Monaco'
>When you are entering the names of
towns and streets the system will com-
plete them automatically as soon as
enough letters are available to ensure
unambiguous identification
>The system only accepts name entries
beginning with letters that are stored on
the navigation CD/DVD. The system will
not accept nonexistent names and
addresses.
Page 125 of 220
Navigation
Driving tips
123Reference
At a glance
Controls
Communications
Entertainment
Mobility
Destination guidance
Starting the destination
guidance
Control Center, for principle details, refer to
page 16:
1.Select "Navigation" and press the con-
troller
2.Select a destination and press the con-
troller
3.Select "Start guidance" and press the
controller. is displayed with the
destination guidance switched on.
indicates the current destination.
After the route has been calculated, desti-
nation guidance is indicated by arrows or a
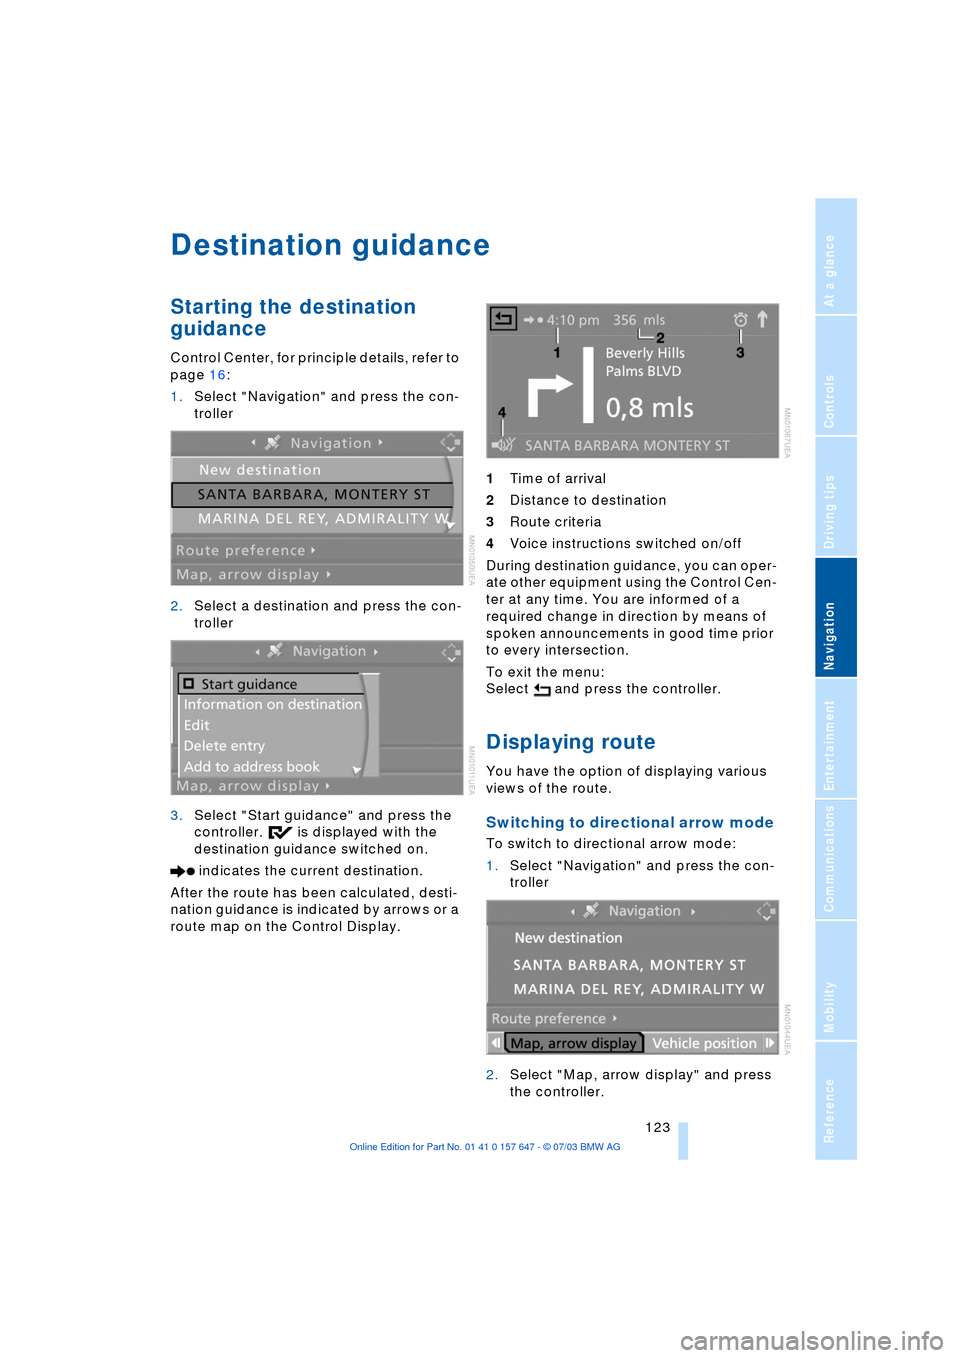
route map on the Control Display. 1Time of arrival
2Distance to destination
3Route criteria
4Voice instructions switched on/off
During destination guidance, you can oper-
ate other equipment using the Control Cen-
ter at any time. You are informed of a
required change in direction by means of
spoken announcements in good time prior
to every intersection.
To exit the menu:
Select and press the controller.
Displaying route
You have the option of displaying various
views of the route.
Switching to directional arrow mode
To switch to directional arrow mode:
1.Select "Navigation" and press the con-
troller
2.Select "Map, arrow display" and press
the controller.
Page 133 of 220
Navigation
Entertainment
Driving tips
131Reference
At a glance
Controls
Communications
Mobility
Operating temperatures
The system is configured for operat-
ing temperatures of 57/Ð156 to
1407/+606. Outside this temperature
range, malfunctions can occur.<
Care instructions
You can find everything you need to know
on this topic by consulting the separate
Caring for your vehicle brochure.
Switching on/off
Press button 1, refer to page 130.
Adjusting the volume
Adjusting the volume for audio
sources
The setting is made in dependence on a
specific key.
Turn button 1 until the desired volume has
been reached.
Tone control
You can change the following tone settings
in dependence on a specific key:
>Treble
>Bass
>Balance:
Right/left volume balance
>Fader:
Front/rear volume balance
>Speed volume:
Raises the volume with increasing
speed
>LOGIC7 spatial sound
*:
Improvement in spatial acoustics in all
frequency ranges
>Equalizer
*:
Setting individual frequency ranges to
include spatial acoustics>Reset:
Resets the tone settings to their stan-
dard default settings.
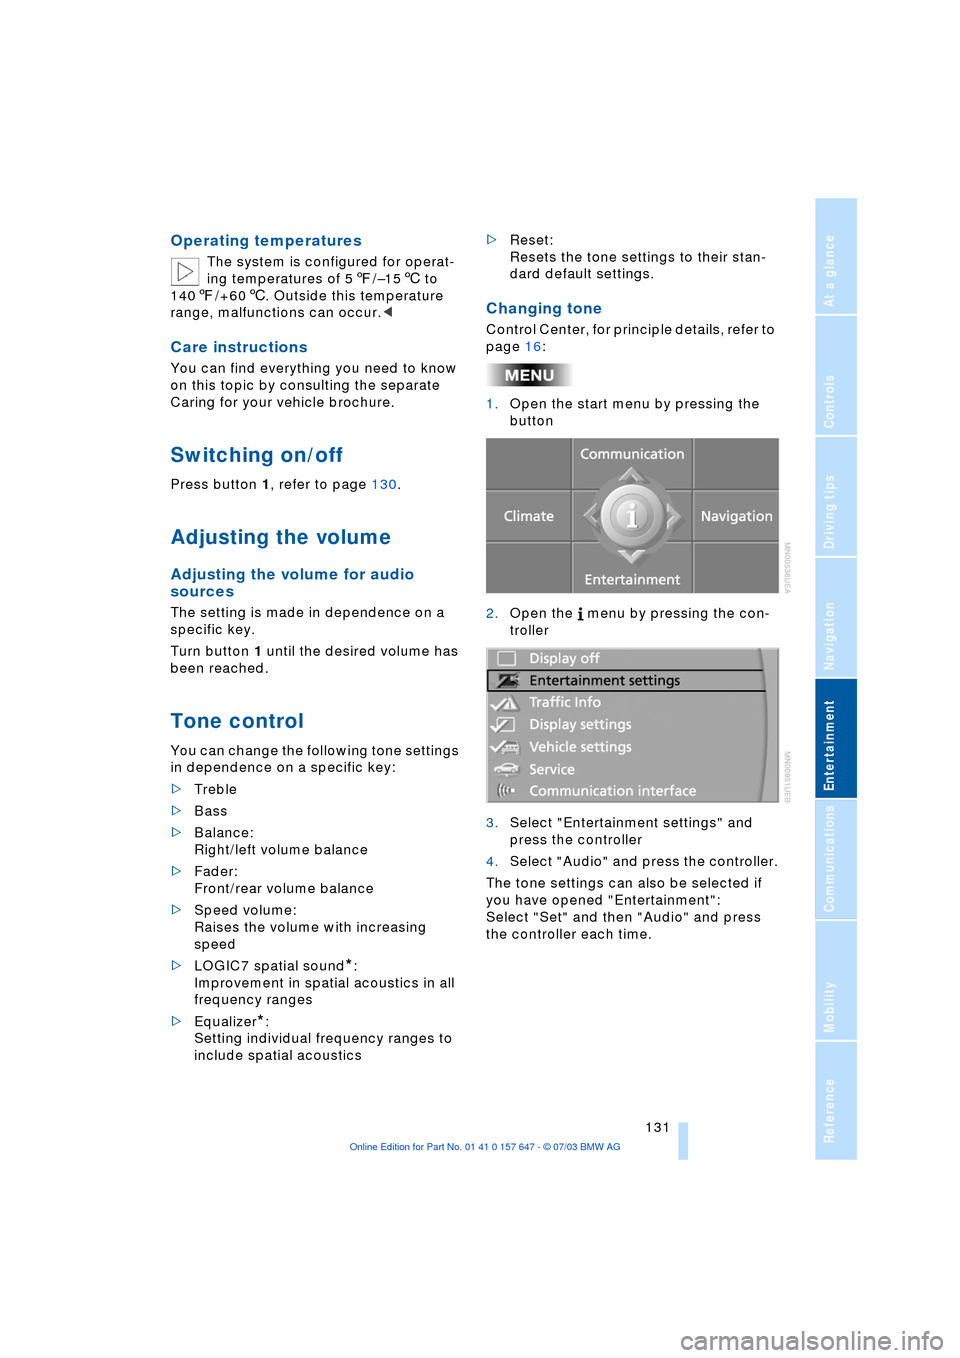
Changing tone
Control Center, for principle details, refer to
page 16:
1.Open the start menu by pressing the
button
2.Open the menu by pressing the con-
troller
3.Select "Entertainment settings" and
press the controller
4.Select "Audio" and press the controller.
The tone settings can also be selected if
you have opened "Entertainment":
Select "Set" and then "Audio" and press
the controller each time.
Page 176 of 220

Wheels and tires
174 even when only small amounts of water are
present on the road surface.
As winter tires display a noticeable loss in
their ability to cope with cold-weather driv-
ing conditions once the tread wears to
below 0.16 in/4 mm, to ensure continued
safety you should always have such tires
replaced.
Wear indicators at the tread-groove base,
refer to arrow, are distributed over the tire's
circumference and are marked on the side
of the tire with TWI Ð Tread Wear Indicator.
These indicators signal at a tread depth of
0.063 in/1.6 mm that the legal wear limit
has been reached.
Tire damage
Unusual vibrations encountered dur-
ing normal vehicle operation can indi-
cate tire failure or some other vehicle
defect. This can, for example, be caused by
driving over curbs. These kinds of prob-
lems may also be signaled by other
changes in vehicle response, such as a
strong tendency to pull to the left or right.
Should this occur, respond by immediately
reducing your speed. Carefully proceed Ð
or have your vehicle towed Ð to the nearest
BMW center or tire dealer to have the
wheels or tires inspected. Tire damage,
extending to sudden and complete loss of
pressure in extreme cases, can pose a
potentially lethal safety hazard for the vehi-
cle's occupants and other road users
alike.<
Replacing wheels/tires
Unprofessional attempts by laymen to
service tires can lead to damage and
accidents. Have this work performed by
skilled professionals only. The technicians
at your BMW center will be glad to assist
you with the required professional knowl-
edge and specialized equipment.<
The correct combination of wheels and
tires is another vital factor in ensuring reli-
able operation of various vehicle systems
such as ABS and DSC.
Have the wheel and tire assemblies bal-
anced every time either a wheel or a tire is
replaced.
BMW does not recommend the use of
retreaded tires, as otherwise driving
safety may be reduced. Possible variations
in the design and the age Ð which could be
substantial Ð of the carcasses can lead to
unusually rapid wear.<
The right wheels and tires
BMW recommends that you use only
wheel and tire combinations that
BMW has tested and approved for your
particular vehicle. Variations in factors such
as manufacturing tolerances mean that
even wheels and tires with identical official
size ratings could actually have different
dimensions than the approved units Ð these
differences could lead to body contact, and
with it the risk of severe accidents. If non-
approved wheels and tires are used, BMW
cannot evaluate their suitability, and there-
fore cannot be held liable for driving
safety.<
To maintain good handling and vehicle
response, use only tires of a single tread
configuration from a single manufacturer.
After a flat tire, always remember to have
the specified wheel and tire combination
remounted on the vehicle as soon as pos-
sible.
Recommended tire brands
BMW tests certain tire brands for each tire
size, classifies them as road-safe and
Page 182 of 220

Under the hood
180
Checking coolant level
Correct coolant level with the engine cold,
approx. +687/206:
1.Turn the cap of the expansion tank
counterclockwise to allow any accumu-
lated pressure to escape, then continue
turning to open
2.The coolant level is correct when the
coolant extends to between the MIN
and MAX marks on the filler neck, refer
to the diagram adjacent to the filler
neck
3.If the coolant is low, slowly add coolant
up to the specified level Ð do not overfill.
Brake fluid
The symbol lights up and a mes-
sage appears on the Control Dis-
play: the brake-fluid level in the
container is too low.
The brake fluid reservoir is located under
the microfilter housing trim panel on the
driver's side of the vehicle. To have brake
fluid added to the system, or to have the
source of any brake fluid loss traced and
rectified, please contact your BMW center,
which can also supply the factory-
approved Ð DOT 4 Ð brake fluids.
Brake fluid is hygroscopic: it absorbs
moisture from the atmosphere over
the course of time.
To ensure that the brake system continues
to provide safe and reliable performance,
remember to have the brake fluid changed
every 2 years at the latest, refer to page 66
and to the Service and Warranty Informa-
tion Booklet for US models or the Warranty and Service Guide Booklet for Canadian
models.
Brake fluid is toxic and also damages vehi-
cle paintwork. Always store these agents in
tightly-closed original containers kept well
away from the reach of children.
Do not spill the fluid and do not refill the
brake fluid reservoir to beyond the MAX
mark. Should it come into contact with hot
engine components, the brake fluid could
ignite and cause personal injury in the form
of burns.<
Always observe all applicable rules
and regulations for environmental
protection when disposing of used brake
fluid.<
Warning lamp for Canadian models.
Brake hydraulic systems
A low brake-fluid level combined with
longer-than-usual pedal travel could be a
sign that one of the brake system's hydrau-
lic circuits has failed.
Proceed to the nearest BMW center.
Remember that pedal travel may be
increased, and there may also be a sub-
stantial increase in the amount of pedal
pressure required to brake the vehicle.
Please adapt your driving style accord-
ingly.<