2004 BMW 525I wheel
[x] Cancel search: wheelPage 174 of 220
Wheels and tires
172
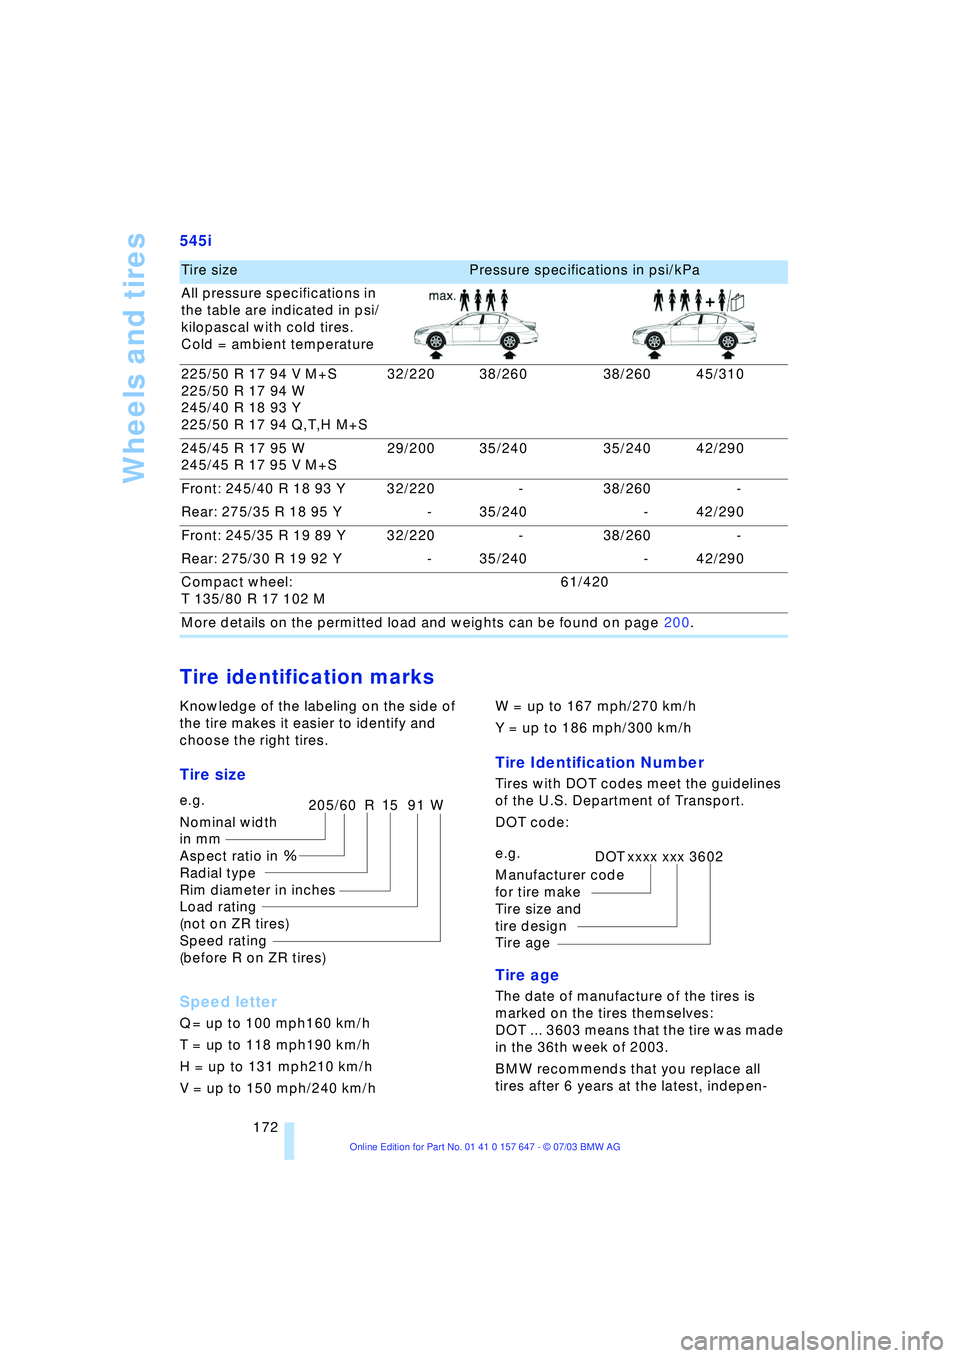
545i
Tire identification marks
Knowledge of the labeling on the side of
the tire makes it easier to identify and
choose the right tires.
Tire size
Speed letter
Q = up to 100 mph160 km/h
T = up to 118 mph190 km/h
H = up to 131 mph210 km/h
V = up to 150 mph/240 km/hW = up to 167 mph/270 km/h
Y = up to 186 mph/300 km/h
Tire Identification Number
Tires with DOT codes meet the guidelines
of the U.S. Department of Transport.
DOT code:
Tire age
The date of manufacture of the tires is
marked on the tires themselves:
DOT ... 3603 means that the tire was made
in the 36th week of 2003.
BMW recommends that you replace all
tires after 6 years at the latest, indepen-
Tire size Pressure specifications in psi/kPa
All pressure specifications in
the table are indicated in psi/
kilopascal with cold tires.
Cold = ambient temperature
225/50 R 17 94 V M+S
225/50 R 17 94 W
245/40 R 18 93 Y
225/50 R 17 94 Q,T,H M+S32/220 38/260 38/260 45/310
245/45 R 17 95 W
245/45 R 17 95 V M+S29/200 35/240 35/240 42/290
Front: 245/40 R 18 93 Y 32/220 - 38/260 -
Rear: 275/35 R 18 95 Y - 35/240 - 42/290
Front: 245/35 R 19 89 Y 32/220 - 38/260 -
Rear: 275/30 R 19 92 Y - 35/240 - 42/290
Compact wheel:
T 135/80 R 17 102 M61/420
More details on the permitted load and weights can be found on page 200.
e.g.
Nominal width
in mm
Aspect ratio in X
Radial type
Rim diameter in inches
Load rating
(not on ZR tires)
Speed rating
(before R on ZR tires)205/60 R1591W
e.g.
Manufacturer code
for tire make
Tire size and
tire design
Tire ageDOT xxxx xxx 3602
Page 175 of 220
Mobility
173Reference
At a glance
Controls
Driving tips
Communications
Navigation
Entertainment
dently of the fact that tires can reach an age
of 10 years.
Uniform Tire Quality Grading
Quality grades can be found where appli-
cable on the tire sidewall between tread
shoulder and maximum section width. For
example:
Treadwear 200 Traction AA
Temperature A
DOT Quality Grades
Treadwear
Traction AA A B C
Temperature A B C
All passenger car tires must conform
to Federal Safety Requirements in
addition to these grades.<
Treadwear
The treadwear grade is a comparative rat-
ing based on the wear rate of the tire when
tested under controlled conditions on a
specified government test course.
For example, a tire graded 150 would wear
one and one-half (1 g) times as well on the
government course as a tire graded 100.
The relative performance of tires depends
upon the actual conditions of their use,
however, and may depart significantly from
the norm due to variations in driving habits,
service practices and differences in road
characteristics and climate.
Traction
The traction grades, from highest to lowest,
are AA, A, B, and C.
Those grades represent the tire's ability to
stop on wet pavement as measured under
controlled conditions on specified govern-
ment test surfaces of asphalt and concrete.
A tire marked C may have poor traction
performance.
The traction grade assigned to this
tire is based on straight-ahead brak-
ing traction tests, and does not include
acceleration, cornering, hydroplaning, or
peak traction characteristics.<
Temperature
The temperature grades are A Ð the
highest Ð B, and C, representing the tire's
resistance to the generation of heat and its
ability to dissipate heat when tested under
controlled conditions on a specified indoor
laboratory test wheel.
Sustained high temperature can cause the
material of the tire to degenerate and
reduce tire life, and excessive temperature
can lead to sudden tire failure. The grade C
corresponds to a level of performance
which all passenger car tires must meet
under the Federal Motor Vehicle Safety
Standard No. 109. Grades B and A repre-
sent higher levels of performance on the
laboratory test wheel than the minimum
required by law.
The temperature grade for this tire is
established for a tire that is properly
inflated and not overloaded. Excessive
speed, underinflation, or excessive load-
ing, either separately or in combination,
can cause heat buildup and possible tire
failure.<
RSC Ð Run-flat tires
You will recognize run-flat tires by a circular
symbol containing the letters RSC on the
side of the tire, refer to page 175.
M+S
Winter and all-season tires.
These have better winter properties than
summer tires.
Tire condition
Inspect your tires frequently for treadwear,
signs of damage and for foreign objects
lodged in the tread. Check the tread depth.
Tire tread
The tread depth should not drop below
0.12 in/3 mm, although, for example, Euro-
pean legislation only specifies a minimum
tread depth of 0.063 in/1.6 mm. At tread
depths below 0.12 in/3 mm there is an
increased risk of high-speed hydroplaning,
Page 176 of 220
Wheels and tires
174 even when only small amounts of water are
present on the road surface.
As winter tires display a noticeable loss in
their ability to cope with cold-weather driv-
ing conditions once the tread wears to
below 0.16 in/4 mm, to ensure continued
safety you should always have such tires
replaced.
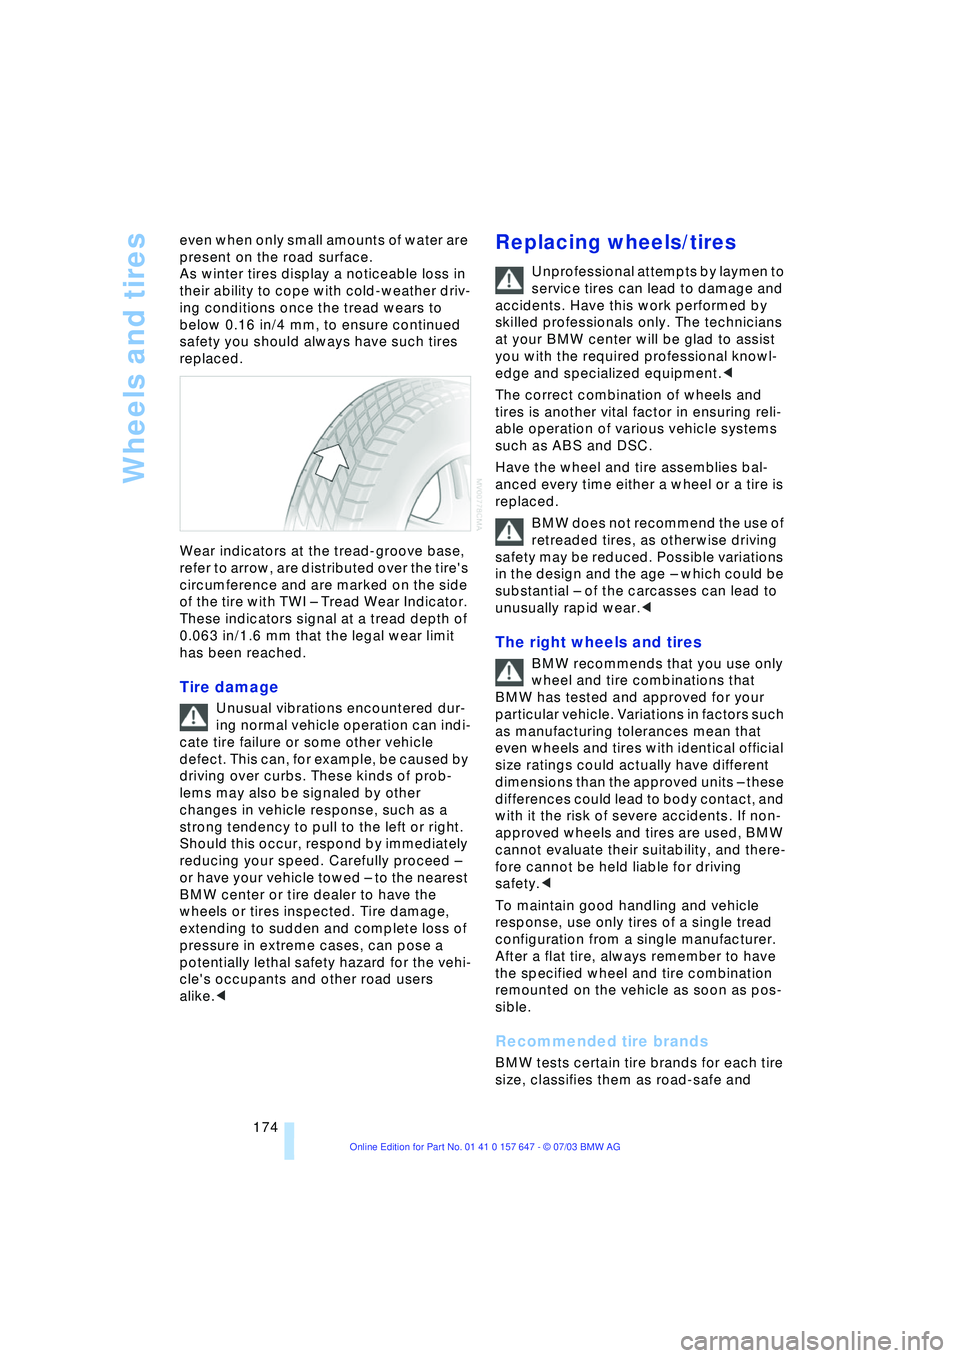
Wear indicators at the tread-groove base,
refer to arrow, are distributed over the tire's
circumference and are marked on the side
of the tire with TWI Ð Tread Wear Indicator.
These indicators signal at a tread depth of
0.063 in/1.6 mm that the legal wear limit
has been reached.
Tire damage
Unusual vibrations encountered dur-
ing normal vehicle operation can indi-
cate tire failure or some other vehicle
defect. This can, for example, be caused by
driving over curbs. These kinds of prob-
lems may also be signaled by other
changes in vehicle response, such as a
strong tendency to pull to the left or right.
Should this occur, respond by immediately
reducing your speed. Carefully proceed Ð
or have your vehicle towed Ð to the nearest
BMW center or tire dealer to have the
wheels or tires inspected. Tire damage,
extending to sudden and complete loss of
pressure in extreme cases, can pose a
potentially lethal safety hazard for the vehi-
cle's occupants and other road users
alike.<
Replacing wheels/tires
Unprofessional attempts by laymen to
service tires can lead to damage and
accidents. Have this work performed by
skilled professionals only. The technicians
at your BMW center will be glad to assist
you with the required professional knowl-
edge and specialized equipment.<
The correct combination of wheels and
tires is another vital factor in ensuring reli-
able operation of various vehicle systems
such as ABS and DSC.
Have the wheel and tire assemblies bal-
anced every time either a wheel or a tire is
replaced.
BMW does not recommend the use of
retreaded tires, as otherwise driving
safety may be reduced. Possible variations
in the design and the age Ð which could be
substantial Ð of the carcasses can lead to
unusually rapid wear.<
The right wheels and tires
BMW recommends that you use only
wheel and tire combinations that
BMW has tested and approved for your
particular vehicle. Variations in factors such
as manufacturing tolerances mean that
even wheels and tires with identical official
size ratings could actually have different
dimensions than the approved units Ð these
differences could lead to body contact, and
with it the risk of severe accidents. If non-
approved wheels and tires are used, BMW
cannot evaluate their suitability, and there-
fore cannot be held liable for driving
safety.<
To maintain good handling and vehicle
response, use only tires of a single tread
configuration from a single manufacturer.
After a flat tire, always remember to have
the specified wheel and tire combination
remounted on the vehicle as soon as pos-
sible.
Recommended tire brands
BMW tests certain tire brands for each tire
size, classifies them as road-safe and
Page 177 of 220
Mobility
175Reference
At a glance
Controls
Driving tips
Communications
Navigation
Entertainment
approves them. You can find out about
these at specialized dealers or at your
BMW center. Observe any country-specific
regulations, e.g. on making a correspond-
ing entry in the vehicle documents.
The factory-mounted tires have been spe-
cially selected to provide optimized perfor-
mance when installed on your vehicle; if
properly cared for, they will provide a com-
bination of safety and excellent ride com-
fort.
Run-flat tires
If your BMW is equipped with run-flat tires,
refer to Run-flat tires, only use these tires,
as in the event of a breakdown there is no
spare wheel available.
Special characteristics of winter
tires
BMW recommends winter tires for use in
cold winter driving conditions. Although all-
season M+S tires provide better winter
traction than summer tires, they generally
fail to provide the same levels of cold-
weather performance as winter tires.
When switching to winter tires, observe the
descriptions at Tire condition and Replac-
ing wheels/tires, refer to pages 173
and 174.
Run-flat tires
If your BMW is equipped with run-flat tires,
refer to Run-flat tires. Your BMW center will
advise you if you wish to replace the tires of
your BMW or wish to switch from summer
to winter tires or vice versa.
If you switch from summer to winter tires,
or vice versa, use run-flat tires, as in the
event of a flat there is no spare wheel avail-
able.
Observing speed ratings
Never exceed the maximum speed for
which the winter tires are rated.
Unprofessional attempts by laymen to ser-
vice tires can lead to damage and acci-
dents. Have this work performed by skilled
professionals only. The technicians at your BMW center will be glad to assist you with
the required professional knowledge and
specialized equipment.<
Storage
Always store wheels and tires in a cool, dry
place with as little exposure to light as pos-
sible. Always protect tires against all con-
tact with oil, grease and fuels. Do not
exceed the maximum tire inflation pressure
indicated on the side wall of the tire.
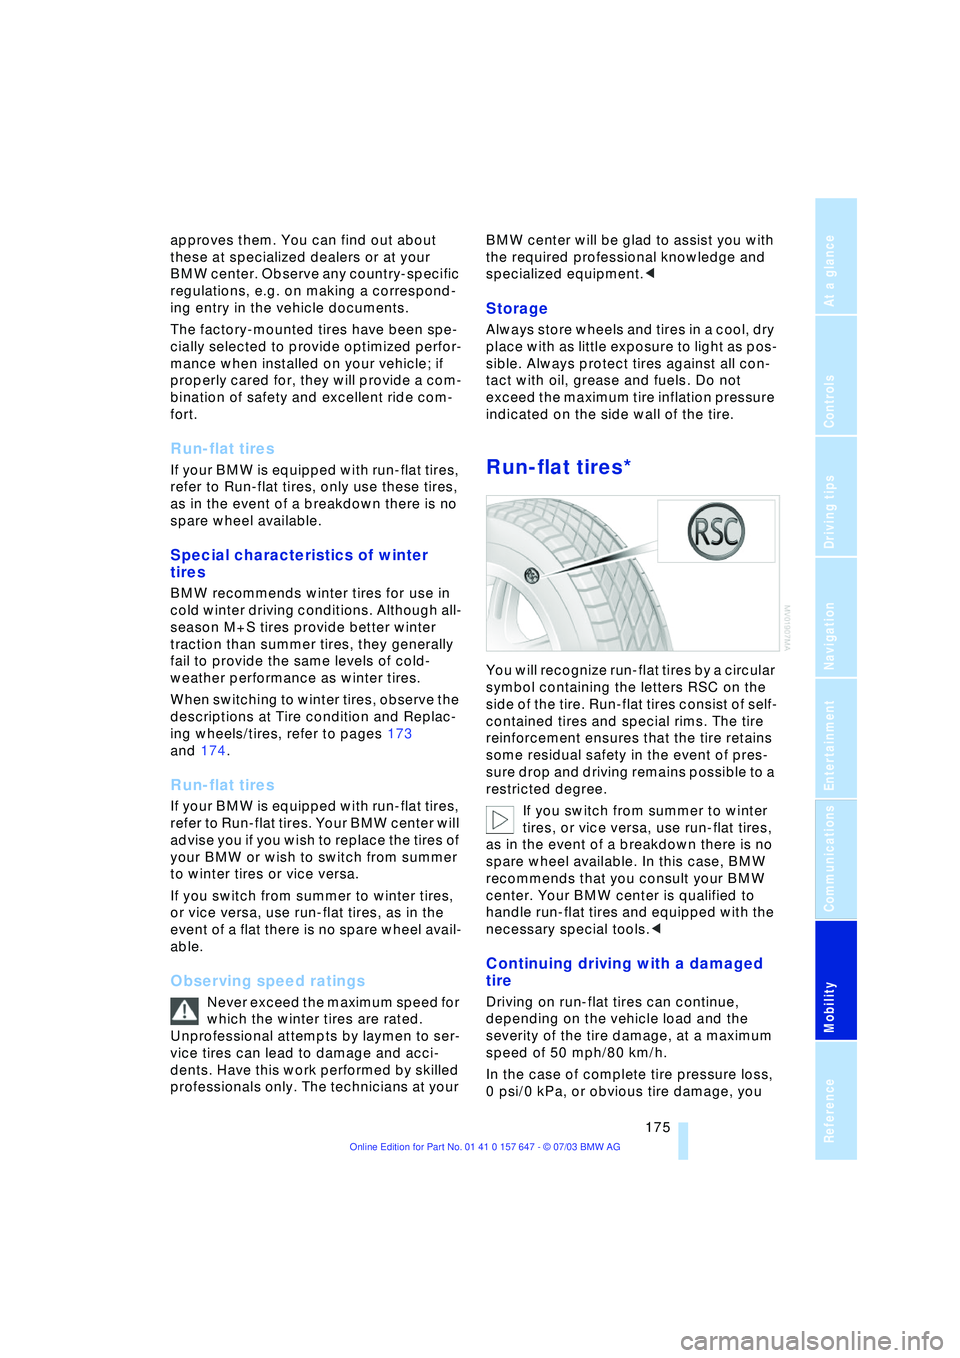
Run-flat tires*
You will recognize run-flat tires by a circular
symbol containing the letters RSC on the
side of the tire. Run-flat tires consist of self-
contained tires and special rims. The tire
reinforcement ensures that the tire retains
some residual safety in the event of pres-
sure drop and driving remains possible to a
restricted degree.
If you switch from summer to winter
tires, or vice versa, use run-flat tires,
as in the event of a breakdown there is no
spare wheel available. In this case, BMW
recommends that you consult your BMW
center. Your BMW center is qualified to
handle run-flat tires and equipped with the
necessary special tools.<
Continuing driving with a damaged
tire
Driving on run-flat tires can continue,
depending on the vehicle load and the
severity of the tire damage, at a maximum
speed of 50 mph/80 km/h.
In the case of complete tire pressure loss,
0 psi/0 kPa, or obvious tire damage, you
Page 178 of 220
Wheels and tires
176 can estimate the possible distance for con-
tinued driving on the basis of the following
guide values:
>With low load:
1 to 2 persons without luggage:
Approx. 155 miles/250 km
>With medium load:
2 persons, luggage compartment full, or
4 persons without luggage:
Approx. 90 miles/150 km
>With full load:
4 persons or more, luggage compart-
ment full:
Approx. 30 miles/50 km.
Drive reservedly and do not exceed a
speed of 50 mph/80 km/h. With infla-
tion pressure loss, the driving characteris-
tics change, for example reduced track sta-
bility on braking, extended braking
distance, and altered self-steering charac-
teristics.
For safety reasons, BMW recommends that
you do not have damaged run-flat tires
repaired and that you consult your BMW
center in this case.<
Snow chains*
BMW only tests certain snow chains, clas-
sifies them as road-safe and approves
them. Consult your BMW center for more
information. BMW recommends only using
these approved, narrow-link snow chains.
These snow chains are approved exclu-
sively for use on summer or winter tires in
pairs on the rear wheels.
Observe the manufacturer's instructions
when installing snow chains.
Do not exceed a vehicle speed of 30 mph/
50 km/h with the chains mounted.
After mounting snow chains, do not
activate the Flat Tire Monitor.
When you are driving with snow chains, it
can be beneficial to switch off DSC briefly,
refer to page 78.<
Page 189 of 220
Mobility
187Reference
At a glance
Controls
Driving tips
Communications
Navigation
Entertainment
Changing a wheel
Safety measures in the event of a
breakdown or wheel change:
Park the vehicle as far away as possible
from moving traffic and on firm ground.
Switch on the hazard warning flashers.
Lock the steering wheel in straight-ahead
setting of the wheels. Apply the handbrake
and engage first gear, reverse gear or
selector lever to position P.
Have all vehicle occupants get out of the
vehicle and ensure that they remain outside
the immediate area in a safe place, such as
behind a guardrail.
If a warning triangle or portable hazard
warning lamp is required, set it up on the
roadside at an appropriate distance from
the rear of the vehicle.
Comply with all safety guidelines and regu-
lations.
Change the wheel only on a level, firm sur-
face which is not slippery.
The vehicle or the jack could slip to the side
if you attempt to raise the vehicle on a soft
or slippery surface such as snow, ice, tiles,
etc.
Position the jack on a firm support surface.
Do not use a wooden block or similar
object as a support base for the jack, as
this would prevent it from extending to its
full support height and reduce its load-car-
rying capacity.
To avoid serious or fatal injury: never lie
under the vehicle, and never start the
engine while it is supported by the jack.<
What you will need
To avoid rattling noises later on, note the
positions of the tools before removing
them, then return them to their initial posi-
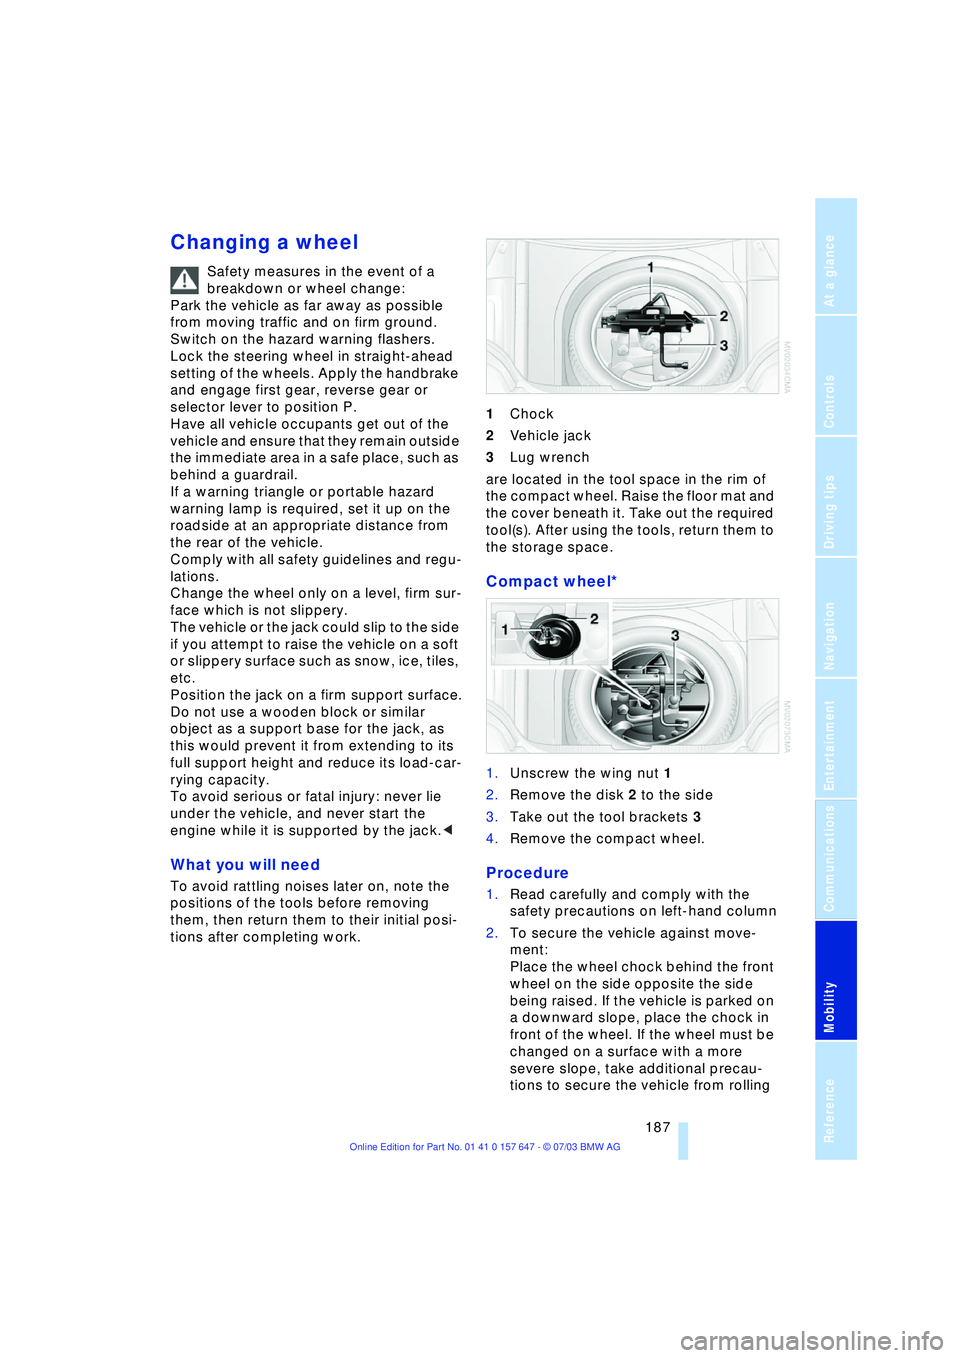
tions after completing work.1Chock
2Vehicle jack
3Lug wrench
are located in the tool space in the rim of
the compact wheel. Raise the floor mat and
the cover beneath it. Take out the required
tool(s). After using the tools, return them to
the storage space.
Compact wheel*
1.Unscrew the wing nut 1
2.Remove the disk 2 to the side
3.Take out the tool brackets 3
4.Remove the compact wheel.
Procedure
1.Read carefully and comply with the
safety precautions on left-hand column
2.To secure the vehicle against move-
ment:
Place the wheel chock behind the front
wheel on the side opposite the side
being raised. If the vehicle is parked on
a downward slope, place the chock in
front of the wheel. If the wheel must be
changed on a surface with a more
severe slope, take additional precau-
tions to secure the vehicle from rolling
Page 190 of 220
Replacing components
188 3.Loosen the lug bolts 1/2 a turn
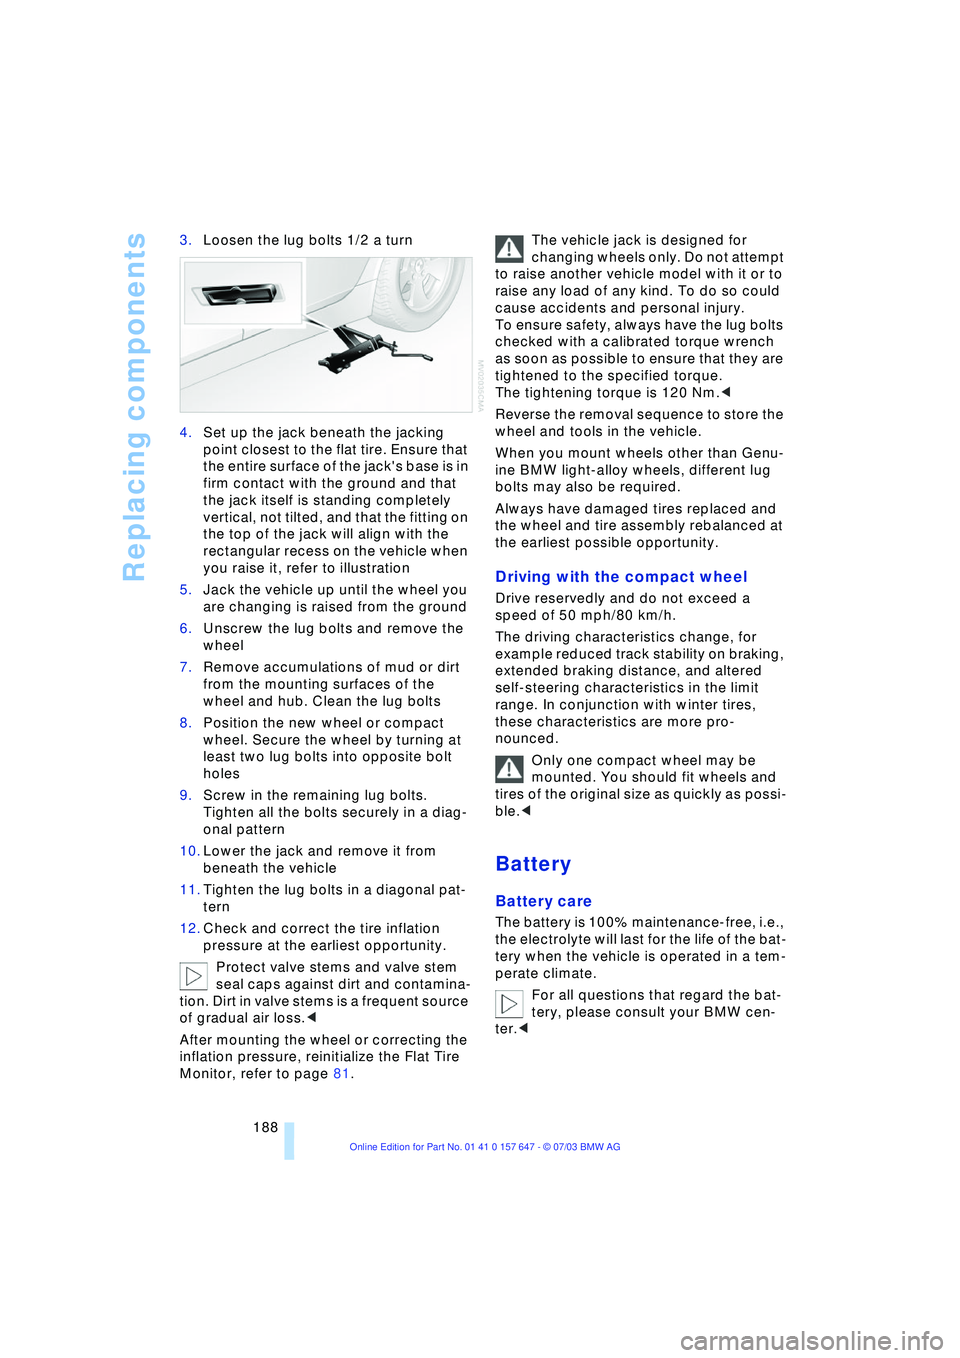
4.Set up the jack beneath the jacking
point closest to the flat tire. Ensure that
the entire surface of the jack's base is in
firm contact with the ground and that
the jack itself is standing completely
vertical, not tilted, and that the fitting on
the top of the jack will align with the
rectangular recess on the vehicle when
you raise it, refer to illustration
5.Jack the vehicle up until the wheel you
are changing is raised from the ground
6.Unscrew the lug bolts and remove the
wheel
7.Remove accumulations of mud or dirt
from the mounting surfaces of the
wheel and hub. Clean the lug bolts
8.Position the new wheel or compact
wheel. Secure the wheel by turning at
least two lug bolts into opposite bolt
holes
9.Screw in the remaining lug bolts.
Tighten all the bolts securely in a diag-
onal pattern
10.Lower the jack and remove it from
beneath the vehicle
11.Tighten the lug bolts in a diagonal pat-
tern
12.Check and correct the tire inflation
pressure at the earliest opportunity.
Protect valve stems and valve stem
seal caps against dirt and contamina-
tion. Dirt in valve stems is a frequent source
of gradual air loss.<
After mounting the wheel or correcting the
inflation pressure, reinitialize the Flat Tire
Monitor, refer to page 81.The vehicle jack is designed for
changing wheels only. Do not attempt
to raise another vehicle model with it or to
raise any load of any kind. To do so could
cause accidents and personal injury.
To ensure safety, always have the lug bolts
checked with a calibrated torque wrench
as soon as possible to ensure that they are
tightened to the specified torque.
The tightening torque is 120 Nm.<
Reverse the removal sequence to store the
wheel and tools in the vehicle.
When you mount wheels other than Genu-
ine BMW light-alloy wheels, different lug
bolts may also be required.
Always have damaged tires replaced and
the wheel and tire assembly rebalanced at
the earliest possible opportunity.
Driving with the compact wheel
Drive reservedly and do not exceed a
speed of 50 mph/80 km/h.
The driving characteristics change, for
example reduced track stability on braking,
extended braking distance, and altered
self-steering characteristics in the limit
range. In conjunction with winter tires,
these characteristics are more pro-
nounced.
Only one compact wheel may be
mounted. You should fit wheels and
tires of the original size as quickly as possi-
ble.<
Battery
Battery care
The battery is 100% maintenance-free, i.e.,
the electrolyte will last for the life of the bat-
tery when the vehicle is operated in a tem-
perate climate.
For all questions that regard the bat-
tery, please consult your BMW cen-
ter.<
Page 195 of 220
Mobility
193Reference
At a glance
Controls
Driving tips
Communications
Navigation
Entertainment
5.Attach the second end of the cable to
the negative terminal of the battery or to
the engine or body ground of the vehi-
cle to be started.
Starting the engine
1.Start the engine on the support vehicle
and allow it to run for several minutes at
a fast idle
2.Start the engine on the other vehicle in
the usual way.
If the first start attempt is not success-
ful, wait a few minutes before another
attempt in order to allow the discharged
battery to recharge
3.Let the engines run for a few minutes
4.Disconnect the jumper cables by
reversing the connection sequence.
If required, have the battery inspected and
recharged at your BMW center.
Never use spray fluids to start the
engine.<
Towing
Always observe all applicable towing
laws and regulations.<
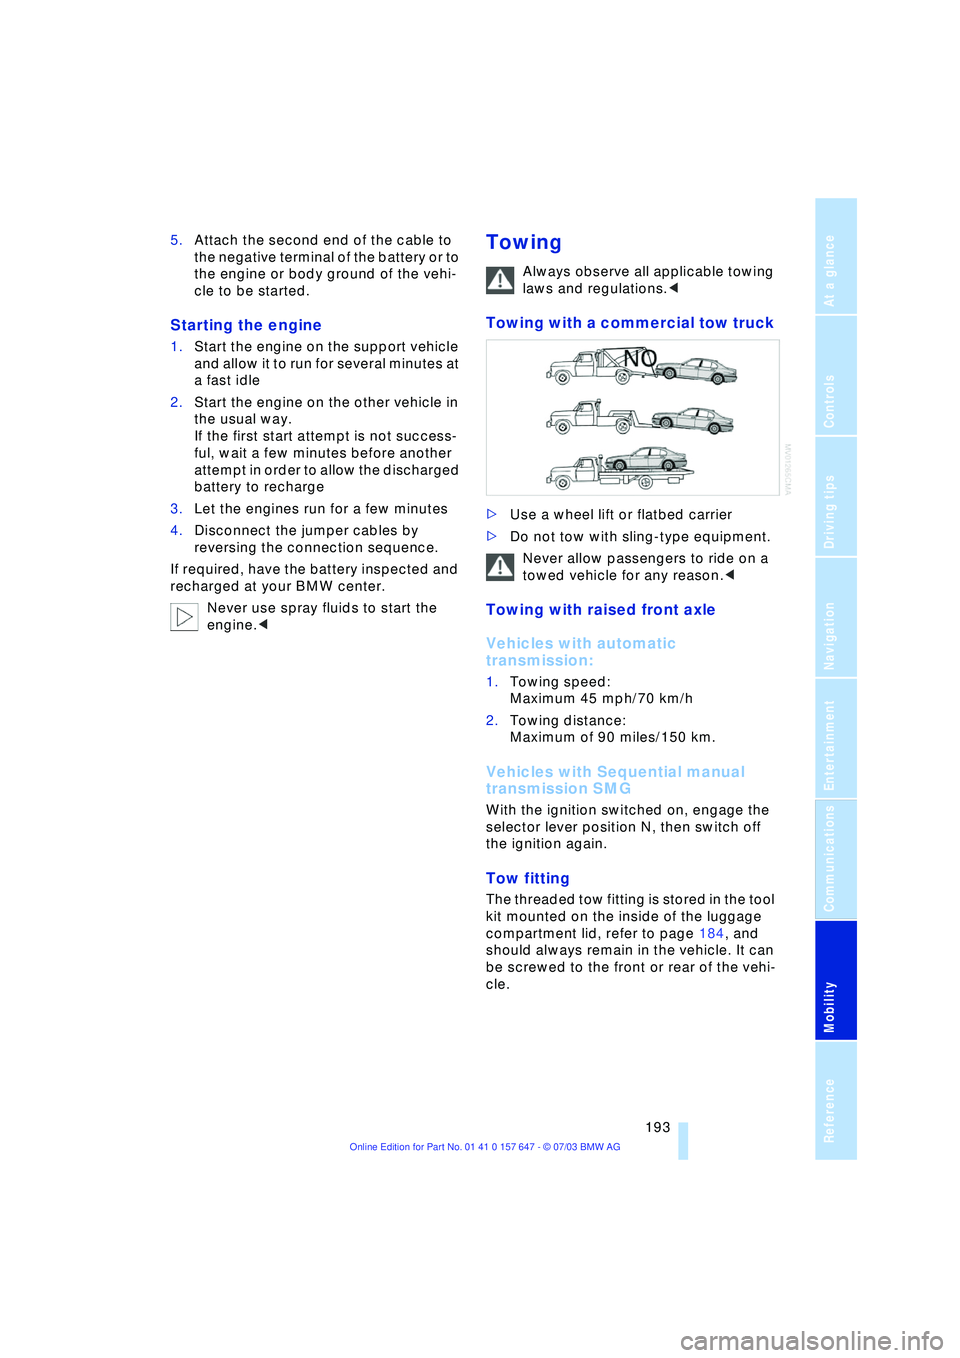
Towing with a commercial tow truck
>Use a wheel lift or flatbed carrier
>Do not tow with sling-type equipment.
Never allow passengers to ride on a
towed vehicle for any reason.<
Towing with raised front axle
Vehicles with automatic
transmission:
1.Towing speed:
Maximum 45 mph/70 km/h
2.Towing distance:
Maximum of 90 miles/150 km.
Vehicles with Sequential manual
transmission SMG
With the ignition switched on, engage the
selector lever position N, then switch off
the ignition again.
Tow fitting
The threaded tow fitting is stored in the tool
kit mounted on the inside of the luggage
compartment lid, refer to page 184, and
should always remain in the vehicle. It can
be screwed to the front or rear of the vehi-
cle.