2004 BMW 525I display
[x] Cancel search: displayPage 70 of 220
Everything under control
68
Check Control
Display of a message
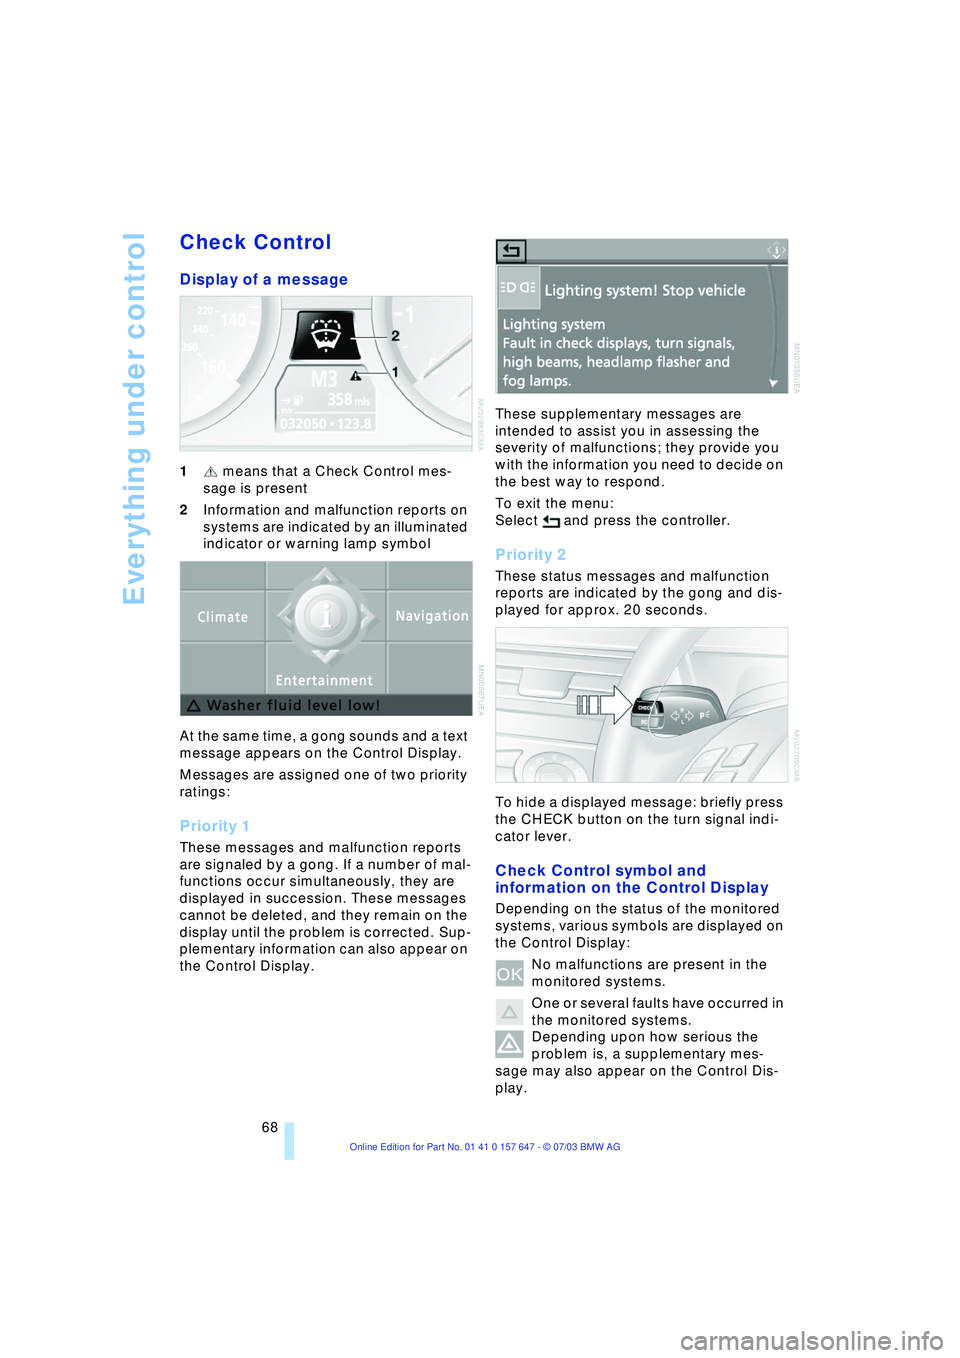
1 means that a Check Control mes-
sage is present
2Information and malfunction reports on
systems are indicated by an illuminated
indicator or warning lamp symbol
At the same time, a gong sounds and a text
message appears on the Control Display.
Messages are assigned one of two priority
ratings:
Priority 1
These messages and malfunction reports
are signaled by a gong. If a number of mal-
functions occur simultaneously, they are
displayed in succession. These messages
cannot be deleted, and they remain on the
display until the problem is corrected. Sup-
plementary information can also appear on
the Control Display. These supplementary messages are
intended to assist you in assessing the
severity of malfunctions; they provide you
with the information you need to decide on
the best way to respond.
To exit the menu:
Select and press the controller.
Priority 2
These status messages and malfunction
reports are indicated by the gong and dis-
played for approx. 20 seconds.
To hide a displayed message: briefly press
the CHECK button on the turn signal indi-
cator lever.
Check Control symbol and
information on the Control Display
Depending on the status of the monitored
systems, various symbols are displayed on
the Control Display:
No malfunctions are present in the
monitored systems.
One or several faults have occurred in
the monitored systems.
Depending upon how serious the
problem is, a supplementary mes-
sage may also appear on the Control Dis-
play.
Page 71 of 220
Controls
69Reference
At a glance
Driving tips
Communications
Navigation
Entertainment
Mobility
The symbols also indicate the status of the
service requirement display, refer to
page 67.
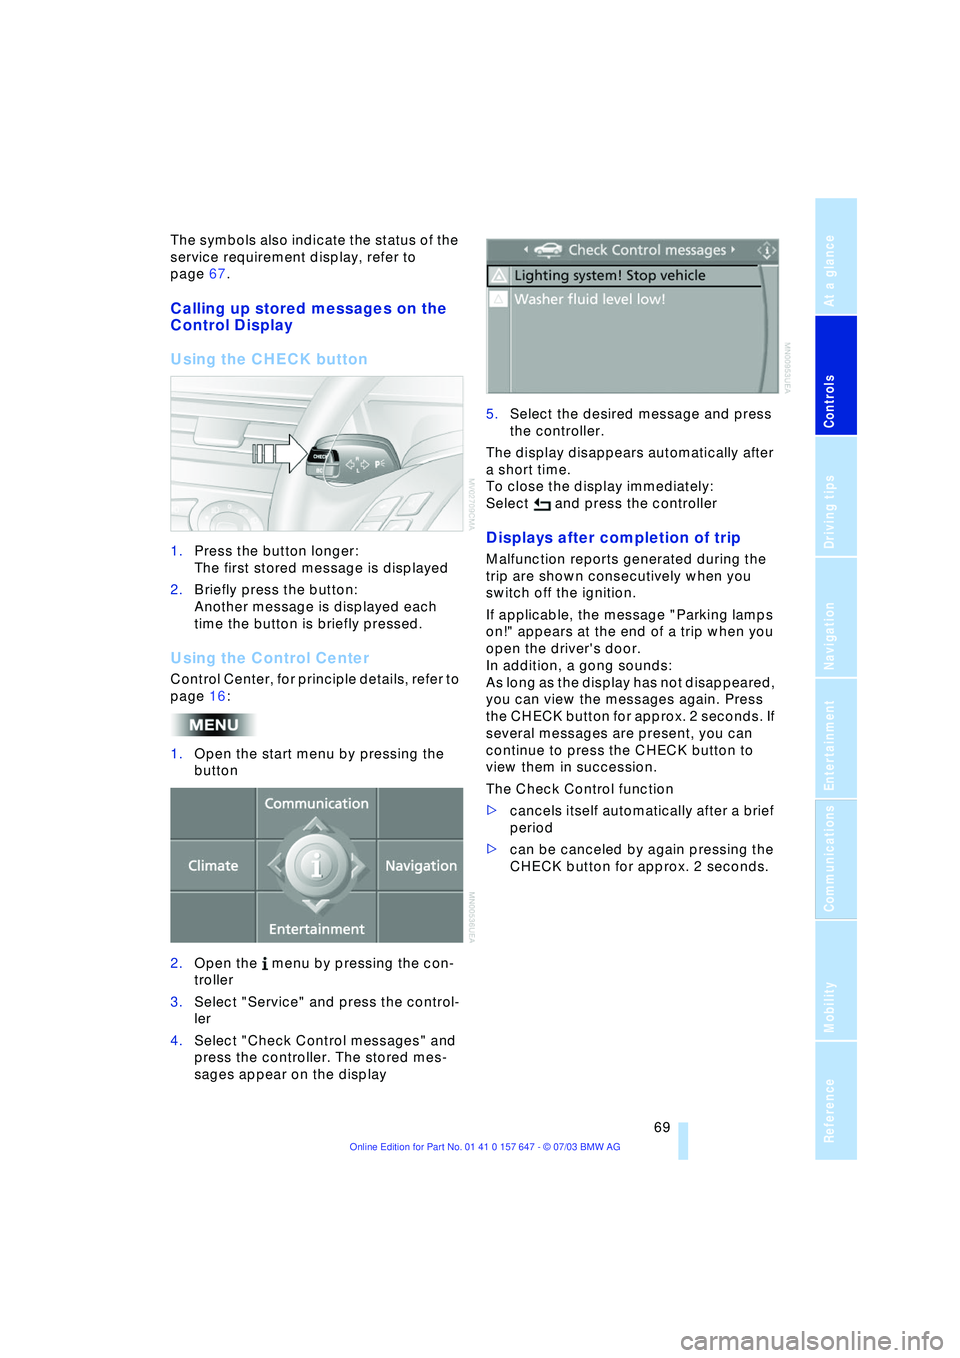
Calling up stored messages on the
Control Display
Using the CHECK button
1.Press the button longer:
The first stored message is displayed
2.Briefly press the button:
Another message is displayed each
time the button is briefly pressed.
Using the Control Center
Control Center, for principle details, refer to
page 16:
1.Open the start menu by pressing the
button
2.Open the menu by pressing the con-
troller
3.Select "Service" and press the control-
ler
4.Select "Check Control messages" and
press the controller. The stored mes-
sages appear on the display 5.Select the desired message and press
the controller.
The display disappears automatically after
a short time.
To close the display immediately:
Select and press the controller
Displays after completion of trip
Malfunction reports generated during the
trip are shown consecutively when you
switch off the ignition.
If applicable, the message "Parking lamps
on!" appears at the end of a trip when you
open the driver's door.
In addition, a gong sounds:
As long as the display has not disappeared,
you can view the messages again. Press
the CHECK button for approx. 2 seconds. If
several messages are present, you can
continue to press the CHECK button to
view them in succession.
The Check Control function
>cancels itself automatically after a brief
period
>can be canceled by again pressing the
CHECK button for approx. 2 seconds.
Page 72 of 220
Everything under control
70
Computer
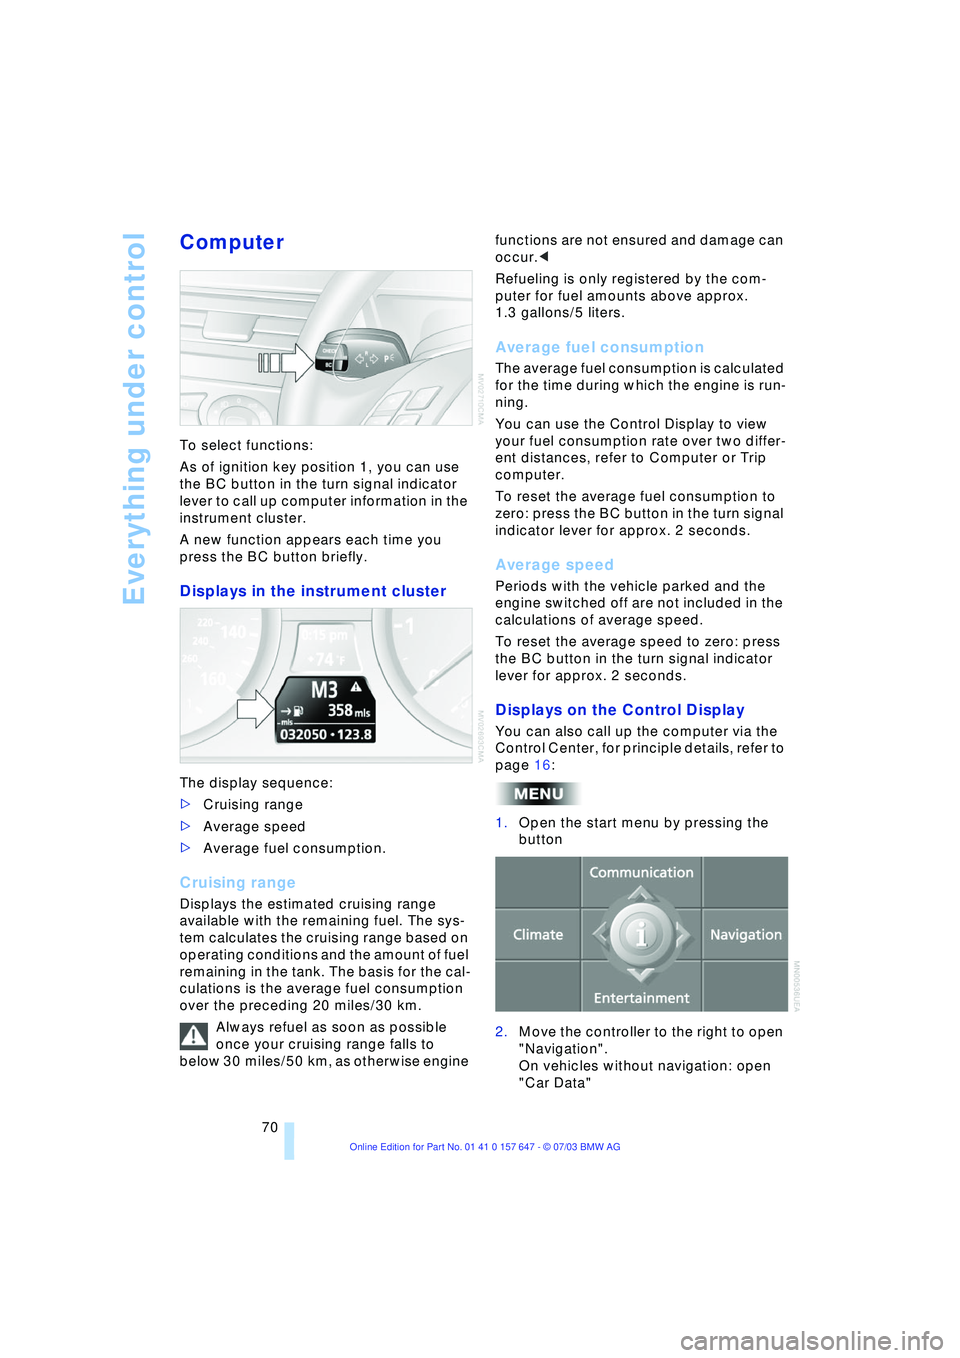
To select functions:
As of ignition key position 1, you can use
the BC button in the turn signal indicator
lever to call up computer information in the
instrument cluster.
A new function appears each time you
press the BC button briefly.
Displays in the instrument cluster
The display sequence:
>Cruising range
>Average speed
>Average fuel consumption.
Cruising range
Displays the estimated cruising range
available with the remaining fuel. The sys-
tem calculates the cruising range based on
operating conditions and the amount of fuel
remaining in the tank. The basis for the cal-
culations is the average fuel consumption
over the preceding 20 miles/30 km.
Always refuel as soon as possible
once your cruising range falls to
below 30 miles/50 km, as otherwise engine functions are not ensured and damage can
occur.<
Refueling is only registered by the com-
puter for fuel amounts above approx.
1.3 gallons/5 liters.
Average fuel consumption
The average fuel consumption is calculated
for the time during which the engine is run-
ning.
You can use the Control Display to view
your fuel consumption rate over two differ-
ent distances, refer to Computer or Trip
computer.
To reset the average fuel consumption to
zero: press the BC button in the turn signal
indicator lever for approx. 2 seconds.
Average speed
Periods with the vehicle parked and the
engine switched off are not included in the
calculations of average speed.
To reset the average speed to zero: press
the BC button in the turn signal indicator
lever for approx. 2 seconds.
Displays on the Control Display
You can also call up the computer via the
Control Center, for principle details, refer to
page 16:
1.Open the start menu by pressing the
button
2.Move the controller to the right to open
"Navigation".
On vehicles without navigation: open
"Car Data"
Page 73 of 220
Controls
71Reference
At a glance
Driving tips
Communications
Navigation
Entertainment
Mobility
3.Select "Car Data" and press the con-
troller.
You have two possibilities to display infor-
mation of the computer:
>Computer
>Trip computer
It is best to use this for driving on vaca-
tion, as when you reset the values to
zero, all the functions are reset together
and then restart.
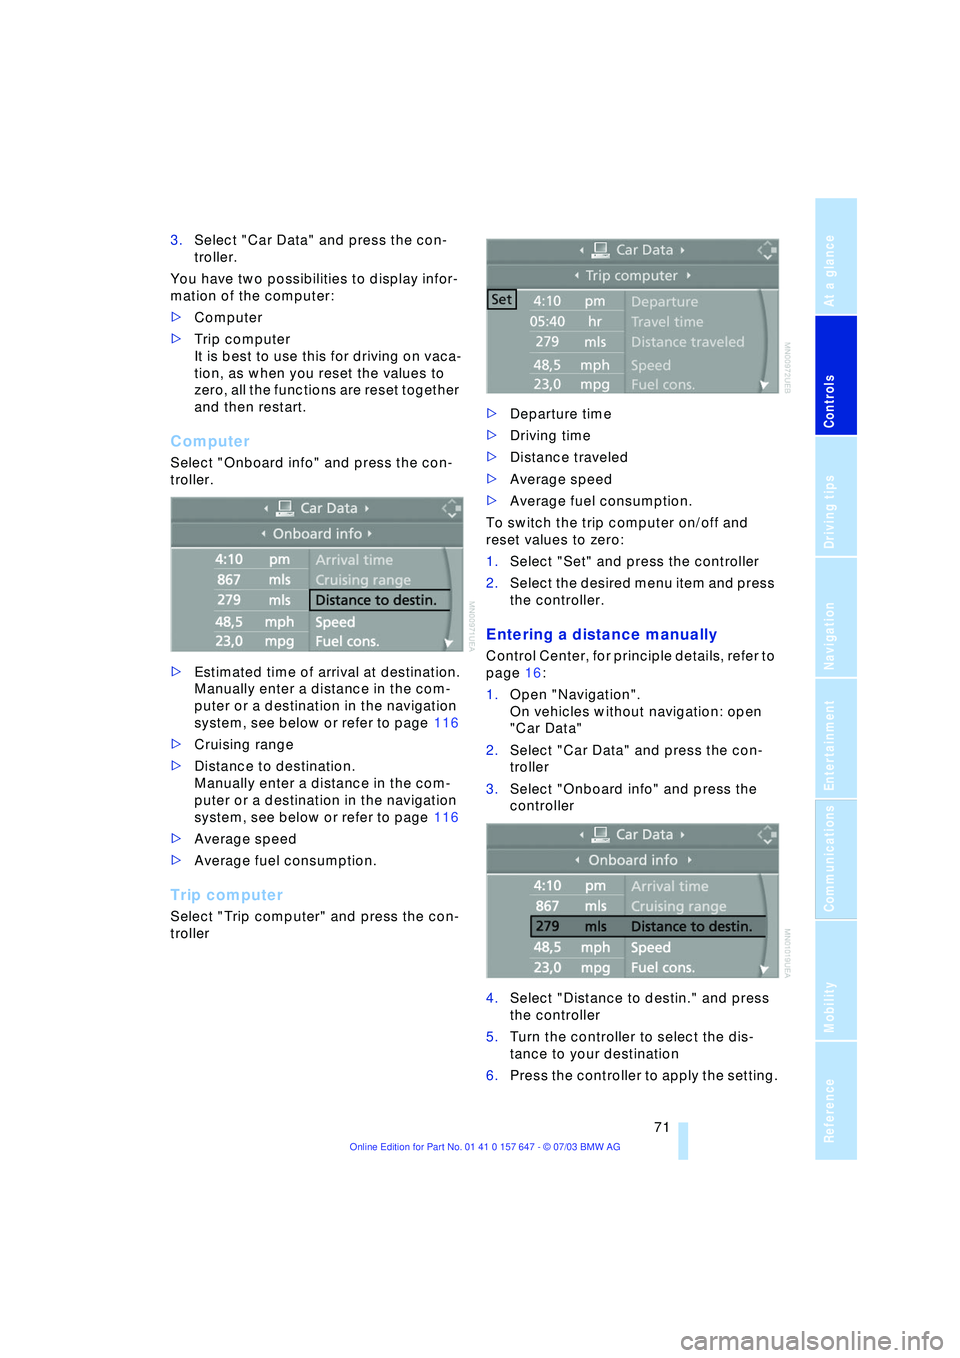
Computer
Select "Onboard info" and press the con-
troller.
>Estimated time of arrival at destination.
Manually enter a distance in the com-
puter or a destination in the navigation
system, see below or refer to page 116
>Cruising range
>Distance to destination.
Manually enter a distance in the com-
puter or a destination in the navigation
system, see below or refer to page 116
>Average speed
>Average fuel consumption.
Trip computer
Select "Trip computer" and press the con-
troller>Departure time
>Driving time
>Distance traveled
>Average speed
>Average fuel consumption.
To switch the trip computer on/off and
reset values to zero:
1.Select "Set" and press the controller
2.Select the desired menu item and press
the controller.
Entering a distance manually
Control Center, for principle details, refer to
page 16:
1.Open "Navigation".
On vehicles without navigation: open
"Car Data"
2.Select "Car Data" and press the con-
troller
3.Select "Onboard info" and press the
controller
4.Select "Distance to destin." and press
the controller
5.Turn the controller to select the dis-
tance to your destination
6.Press the controller to apply the setting.
Page 74 of 220
Everything under control
72 With the destination guidance
switched on, the distance is entered
automatically.<
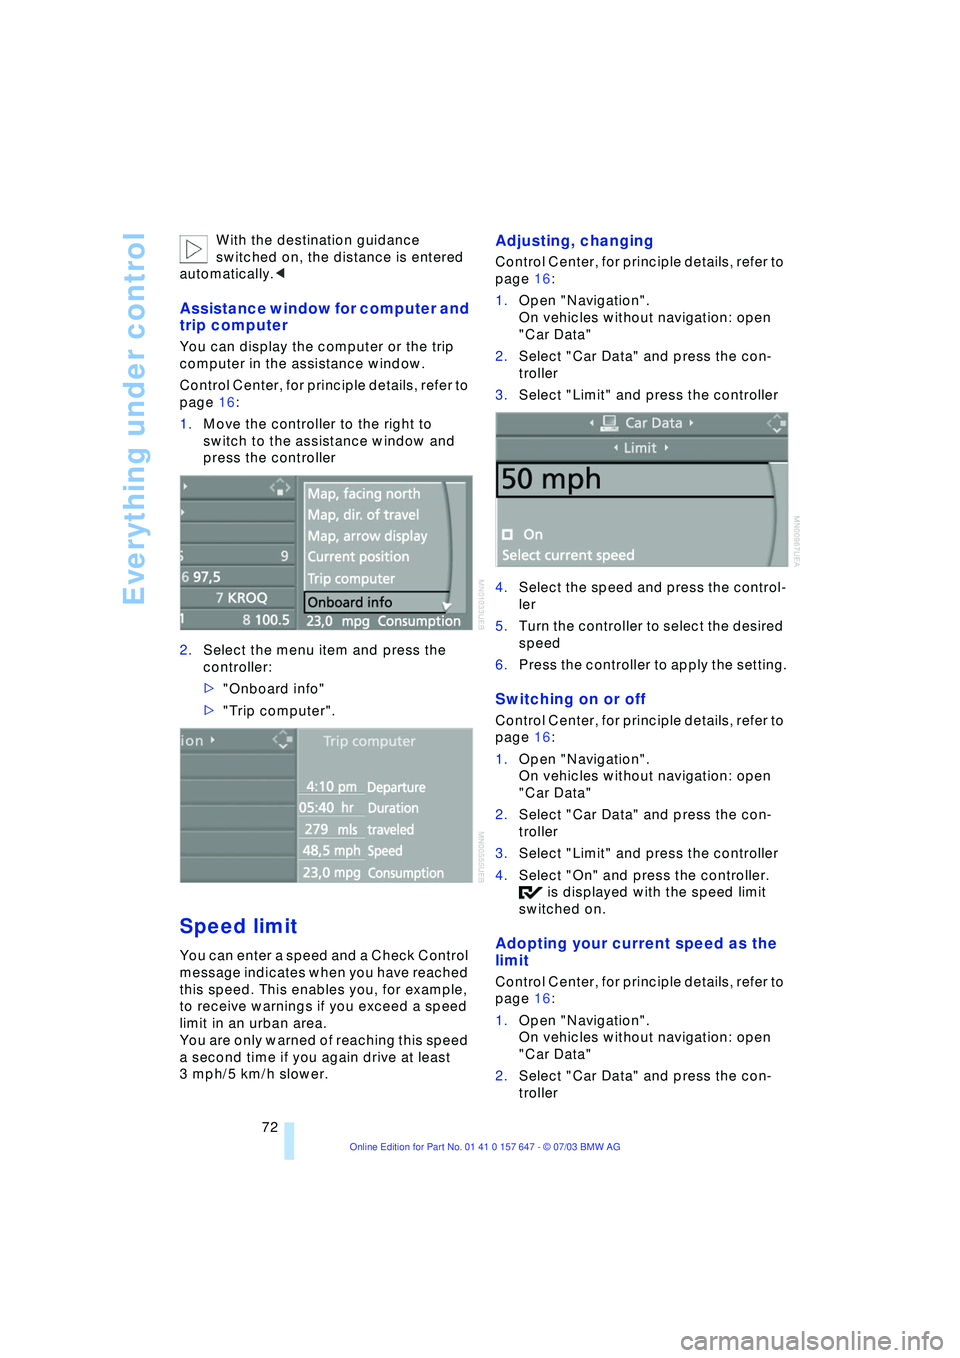
Assistance window for computer and
trip computer
You can display the computer or the trip
computer in the assistance window.
Control Center, for principle details, refer to
page 16:
1.Move the controller to the right to
switch to the assistance window and
press the controller
2.Select the menu item and press the
controller:
>"Onboard info"
>"Trip computer".
Speed limit
You can enter a speed and a Check Control
message indicates when you have reached
this speed. This enables you, for example,
to receive warnings if you exceed a speed
limit in an urban area.
You are only warned of reaching this speed
a second time if you again drive at least
3 mph/5 km/h slower.
Adjusting, changing
Control Center, for principle details, refer to
page 16:
1.Open "Navigation".
On vehicles without navigation: open
"Car Data"
2.Select "Car Data" and press the con-
troller
3.Select "Limit" and press the controller
4.Select the speed and press the control-
ler
5.Turn the controller to select the desired
speed
6.Press the controller to apply the setting.
Switching on or off
Control Center, for principle details, refer to
page 16:
1.Open "Navigation".
On vehicles without navigation: open
"Car Data"
2.Select "Car Data" and press the con-
troller
3.Select "Limit" and press the controller
4.Select "On" and press the controller.
is displayed with the speed limit
switched on.
Adopting your current speed as the
limit
Control Center, for principle details, refer to
page 16:
1.Open "Navigation".
On vehicles without navigation: open
"Car Data"
2.Select "Car Data" and press the con-
troller
Page 75 of 220
Controls
73Reference
At a glance
Driving tips
Communications
Navigation
Entertainment
Mobility
3.Select "Limit" and press the controller
4.Select "Select current speed" and
press the controller. The system adopts
your current speed as the limit.
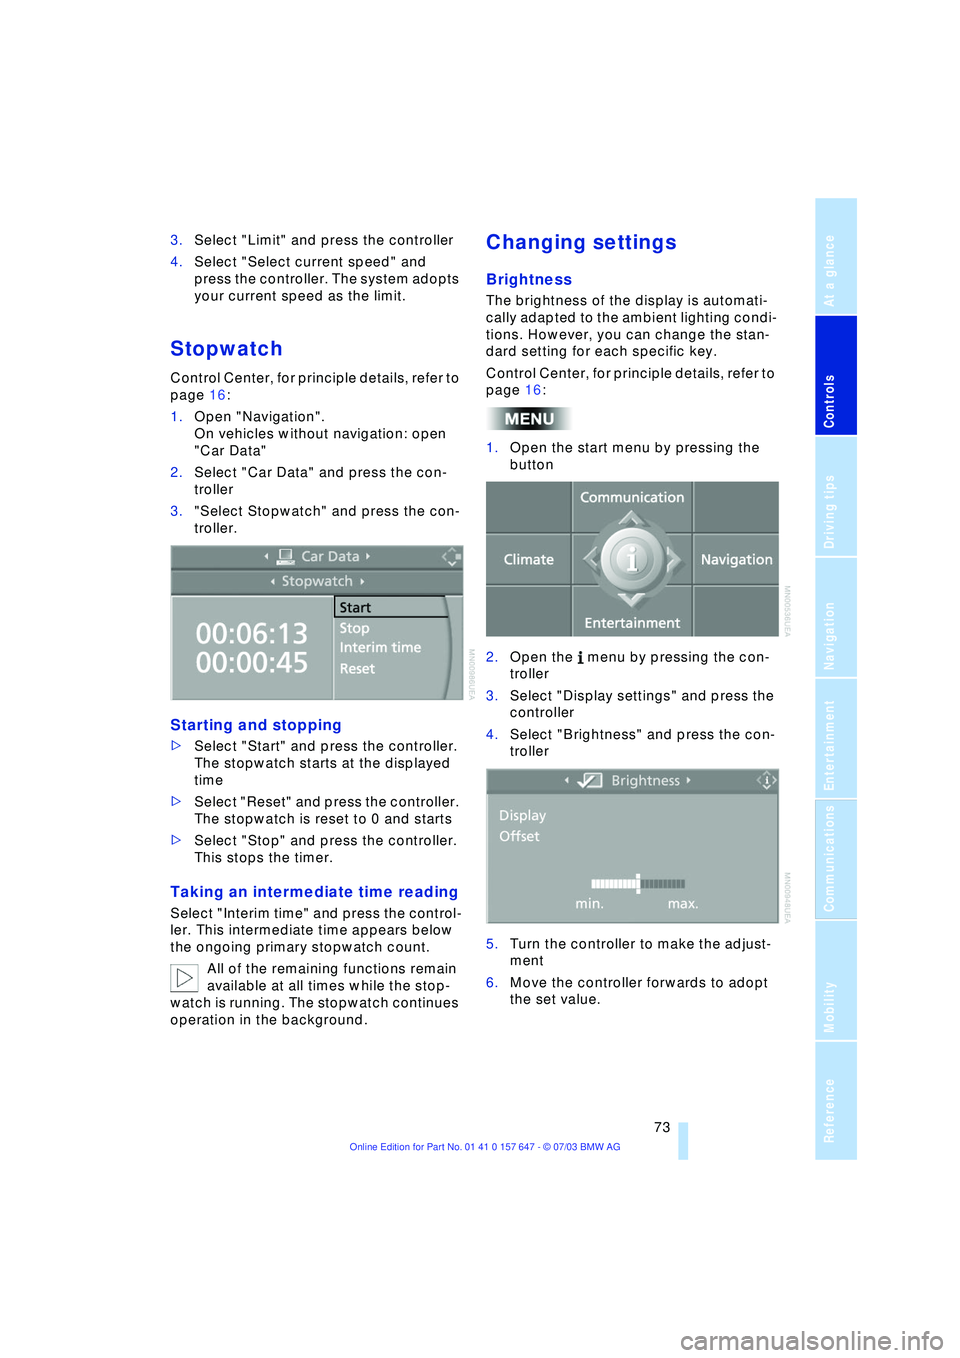
Stopwatch
Control Center, for principle details, refer to
page 16:
1.Open "Navigation".
On vehicles without navigation: open
"Car Data"
2.Select "Car Data" and press the con-
troller
3."Select Stopwatch" and press the con-
troller.
Starting and stopping
>Select "Start" and press the controller.
The stopwatch starts at the displayed
time
>Select "Reset" and press the controller.
The stopwatch is reset to 0 and starts
>Select "Stop" and press the controller.
This stops the timer.
Taking an intermediate time reading
Select "Interim time" and press the control-
ler. This intermediate time appears below
the ongoing primary stopwatch count.
All of the remaining functions remain
available at all times while the stop-
watch is running. The stopwatch continues
operation in the background.
Changing settings
Brightness
The brightness of the display is automati-
cally adapted to the ambient lighting condi-
tions. However, you can change the stan-
dard setting for each specific key.
Control Center, for principle details, refer to
page 16:
1.Open the start menu by pressing the
button
2.Open the menu by pressing the con-
troller
3.Select "Display settings" and press the
controller
4.Select "Brightness" and press the con-
troller
5.Turn the controller to make the adjust-
ment
6.Move the controller forwards to adopt
the set value.
Page 76 of 220
Everything under control
74
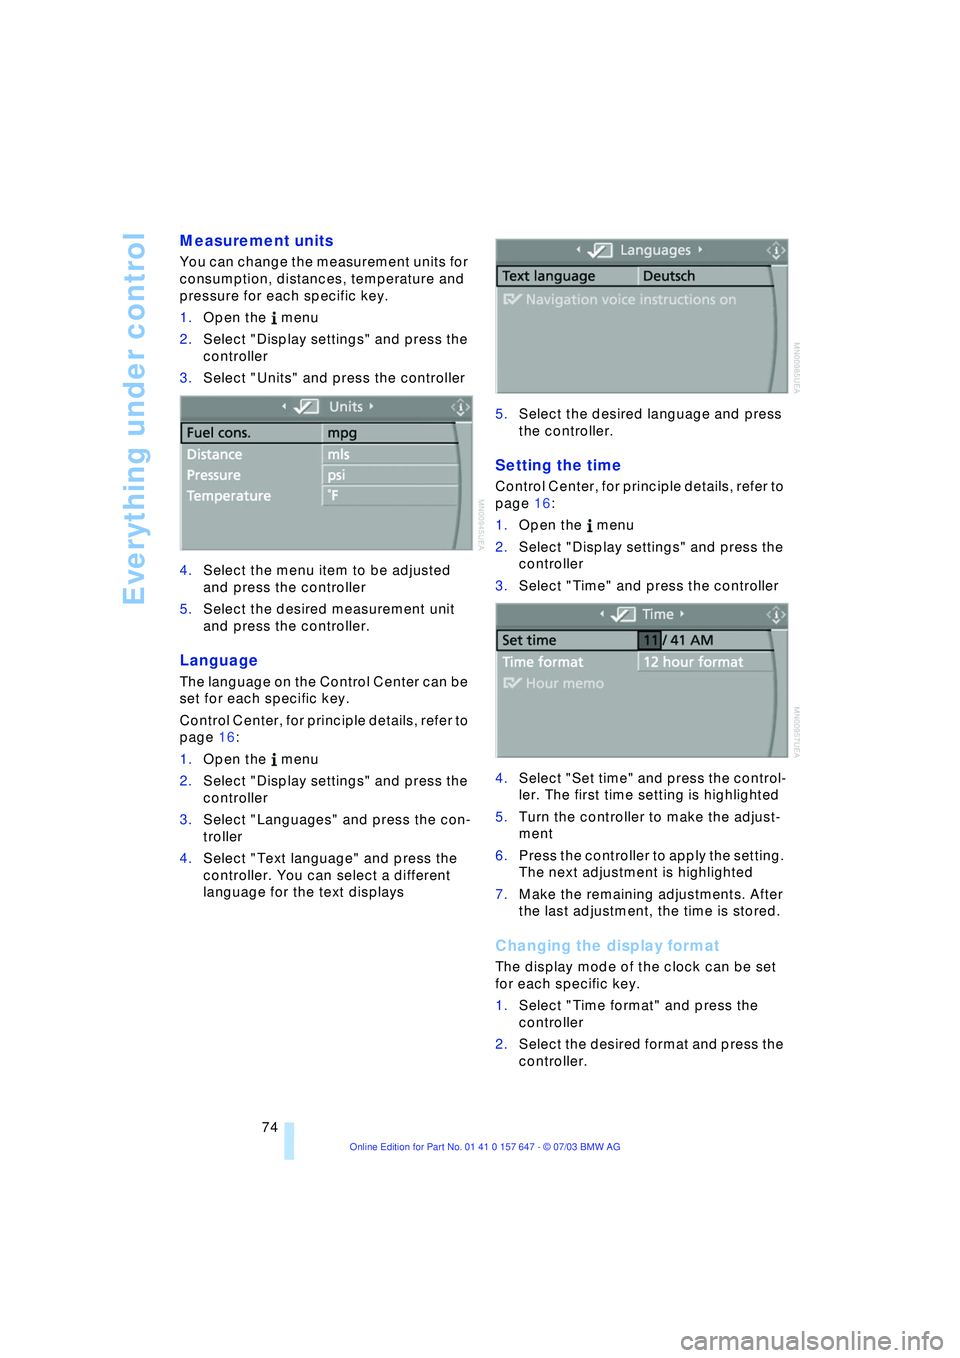
Measurement units
You can change the measurement units for
consumption, distances, temperature and
pressure for each specific key.
1.Open the menu
2.Select "Display settings" and press the
controller
3.Select "Units" and press the controller
4.Select the menu item to be adjusted
and press the controller
5.Select the desired measurement unit
and press the controller.
Language
The language on the Control Center can be
set for each specific key.
Control Center, for principle details, refer to
page 16:
1.Open the menu
2.Select "Display settings" and press the
controller
3.Select "Languages" and press the con-
troller
4.Select "Text language" and press the
controller. You can select a different
language for the text displays5.Select the desired language and press
the controller.
Setting the time
Control Center, for principle details, refer to
page 16:
1.Open the menu
2.Select "Display settings" and press the
controller
3.Select "Time" and press the controller
4.Select "Set time" and press the control-
ler. The first time setting is highlighted
5.Turn the controller to make the adjust-
ment
6.Press the controller to apply the setting.
The next adjustment is highlighted
7.Make the remaining adjustments. After
the last adjustment, the time is stored.
Changing the display format
The display mode of the clock can be set
for each specific key.
1.Select "Time format" and press the
controller
2.Select the desired format and press the
controller.
Page 77 of 220
Controls
75Reference
At a glance
Driving tips
Communications
Navigation
Entertainment
Mobility
Switching on the reminder function*
Select "Hour memo" and press the control-
ler.
is displayed with the reminder function
switched on.
You will hear three tones just before each
full hour.
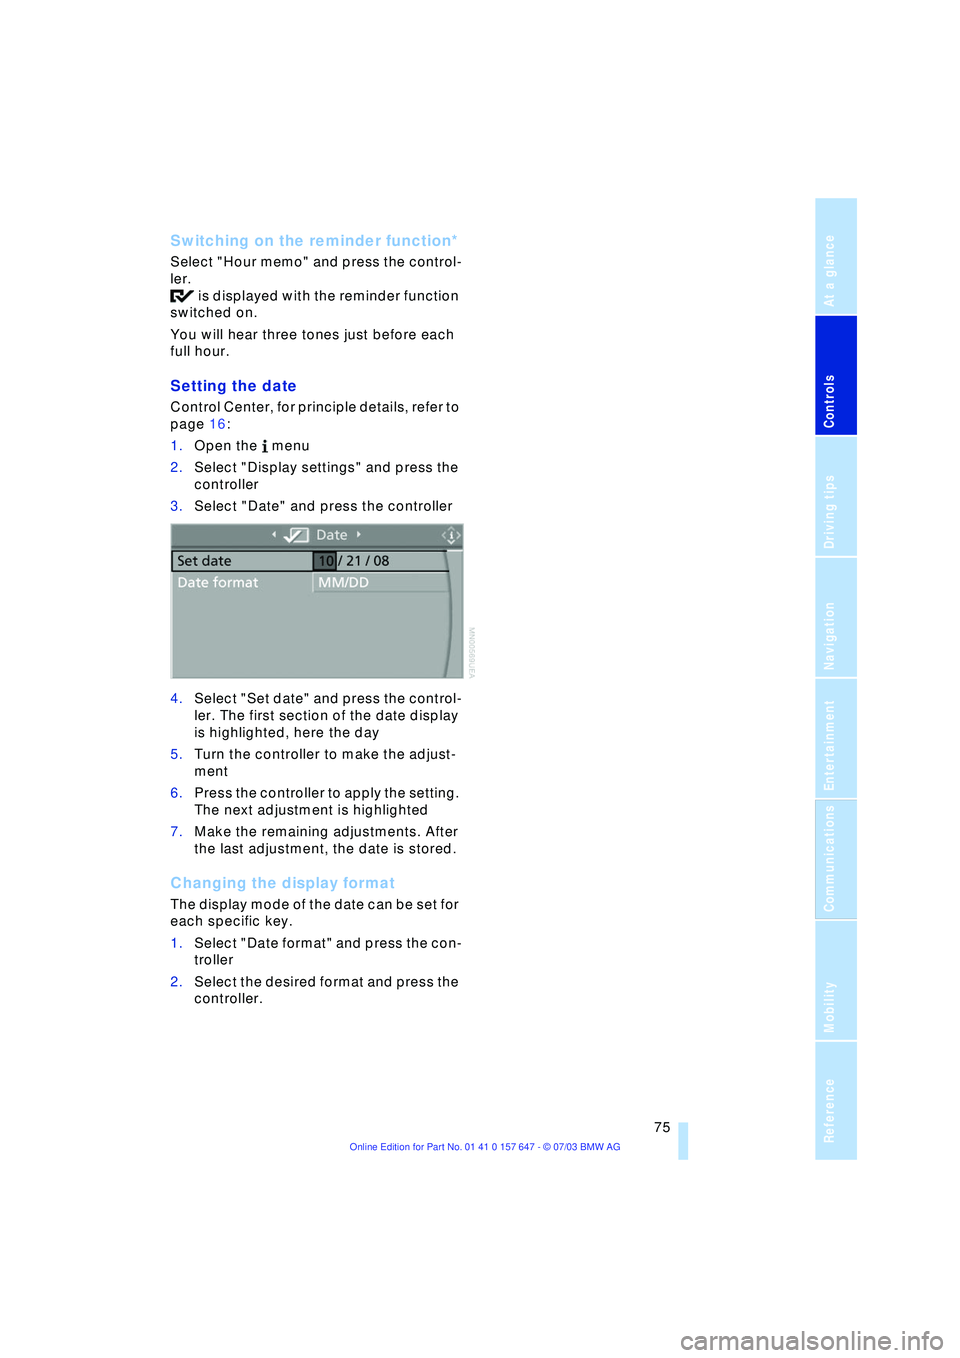
Setting the date
Control Center, for principle details, refer to
page 16:
1.Open the menu
2.Select "Display settings" and press the
controller
3.Select "Date" and press the controller
4.Select "Set date" and press the control-
ler. The first section of the date display
is highlighted, here the day
5.Turn the controller to make the adjust-
ment
6.Press the controller to apply the setting.
The next adjustment is highlighted
7.Make the remaining adjustments. After
the last adjustment, the date is stored.
Changing the display format
The display mode of the date can be set for
each specific key.
1.Select "Date format" and press the con-
troller
2.Select the desired format and press the
controller.