2004 BMW 525I display
[x] Cancel search: displayPage 18 of 220

Control Center
16
Control Center
The Control Center groups the functions of
a large number of switches. This means
that these functions can be operated from
a central position. The following section
provides an introduction to the principle of
the menu guidance. How you control the
individual functions is described in the con-
text of the relevant equipment.
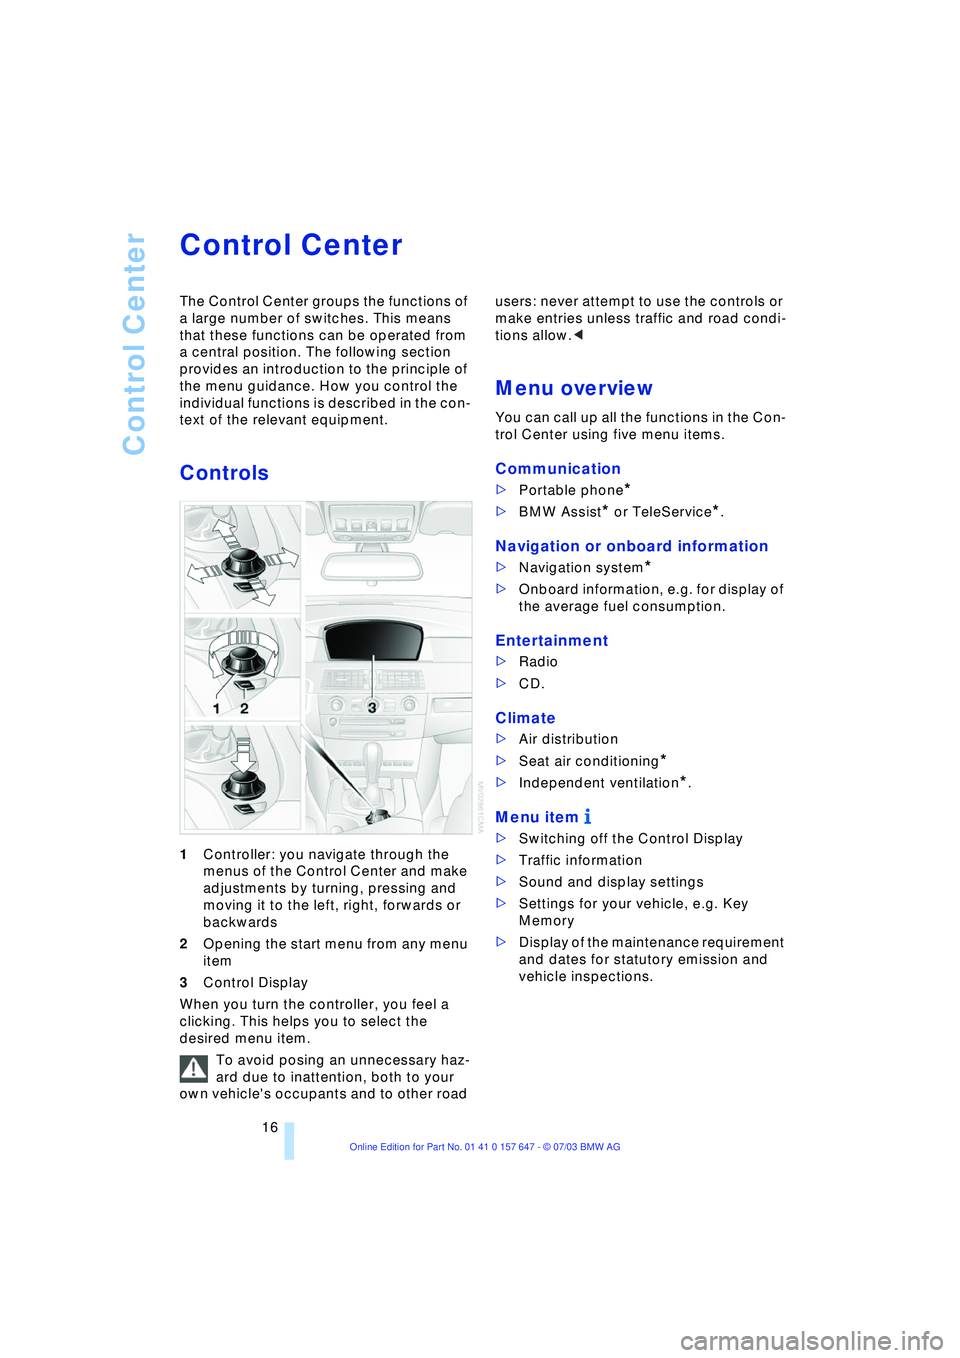
Controls
1Controller: you navigate through the
menus of the Control Center and make
adjustments by turning, pressing and
moving it to the left, right, forwards or
backwards
2Opening the start menu from any menu
item
3Control Display
When you turn the controller, you feel a
clicking. This helps you to select the
desired menu item.
To avoid posing an unnecessary haz-
ard due to inattention, both to your
own vehicle's occupants and to other road users: never attempt to use the controls or
make entries unless traffic and road condi-
tions allow.<
Menu overview
You can call up all the functions in the Con-
trol Center using five menu items.
Communication
>Portable phone*
>BMW Assist* or TeleService*.
Navigation or onboard information
>Navigation system*
>Onboard information, e.g. for display of
the average fuel consumption.
Entertainment
>Radio
>CD.
Climate
>Air distribution
>Seat air conditioning
*
>Independent ventilation
*.
Menu item
>Switching off the Control Display
>Traffic information
>Sound and display settings
>Settings for your vehicle, e.g. Key
Memory
>Display of the maintenance requirement
and dates for statutory emission and
vehicle inspections.
Page 19 of 220

At a glance
17Reference
Controls
Driving tips
Communications
Navigation
Entertainment
Mobility
Menu guidance
As of ignition key position 1, the following
message appears on the Control Display:
Confirm the message by pressing the con-
troller; the start menu is opened.
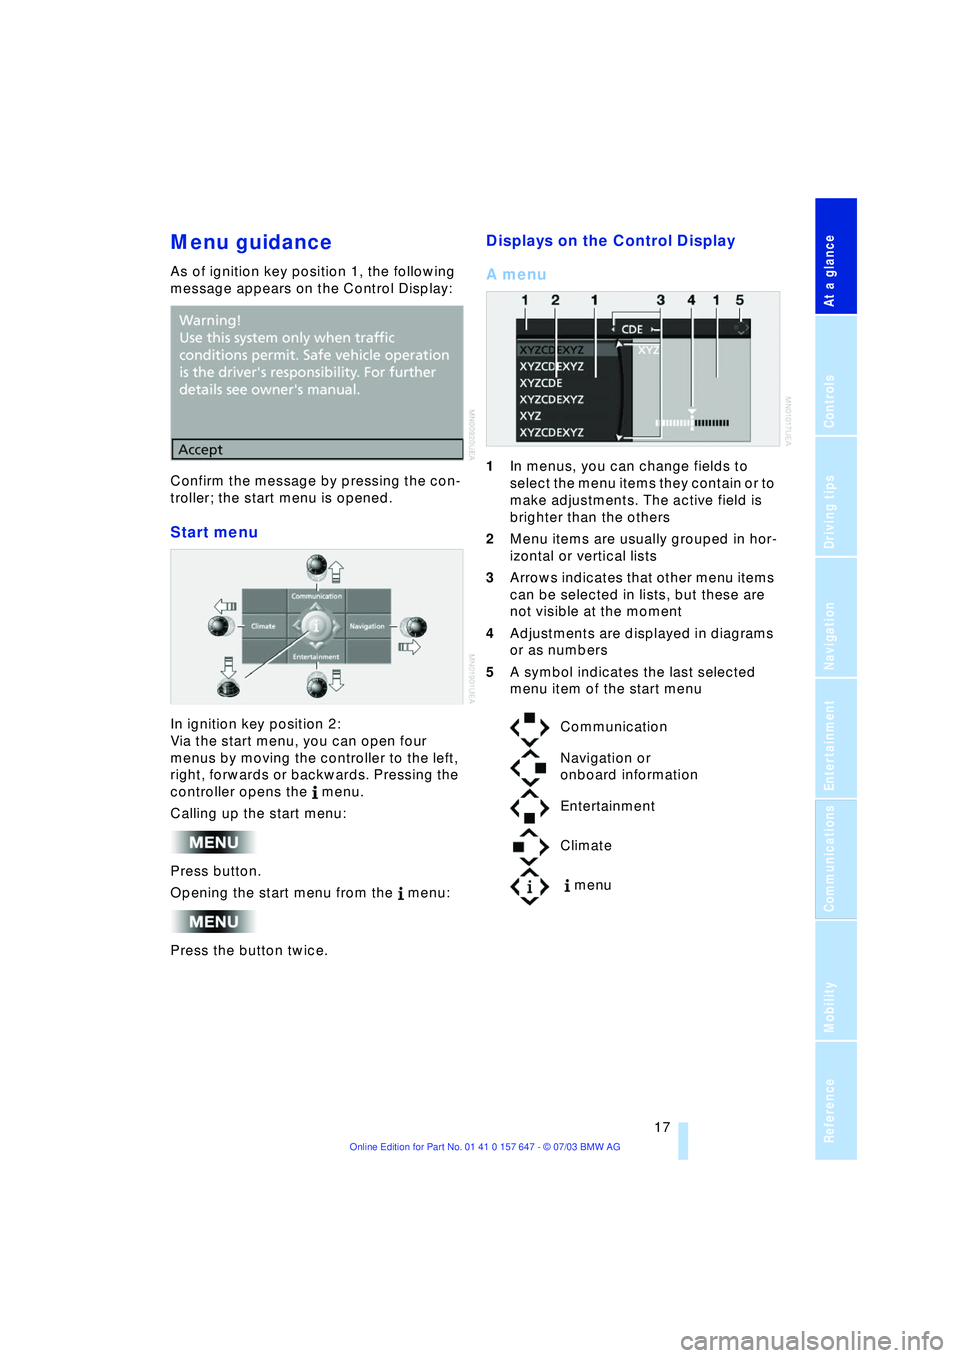
Start menu
In ignition key position 2:
Via the start menu, you can open four
menus by moving the controller to the left,
right, forwards or backwards. Pressing the
controller opens the menu.
Calling up the start menu:
Press button.
Opening the start menu from the menu:
Press the button twice.
Displays on the Control Display
A menu
1In menus, you can change fields to
select the menu items they contain or to
make adjustments. The active field is
brighter than the others
2Menu items are usually grouped in hor-
izontal or vertical lists
3Arrows indicates that other menu items
can be selected in lists, but these are
not visible at the moment
4Adjustments are displayed in diagrams
or as numbers
5A symbol indicates the last selected
menu item of the start menu
Communication
Navigation or
onboard information
Entertainment
Climate
menu
Page 20 of 220

Control Center
18
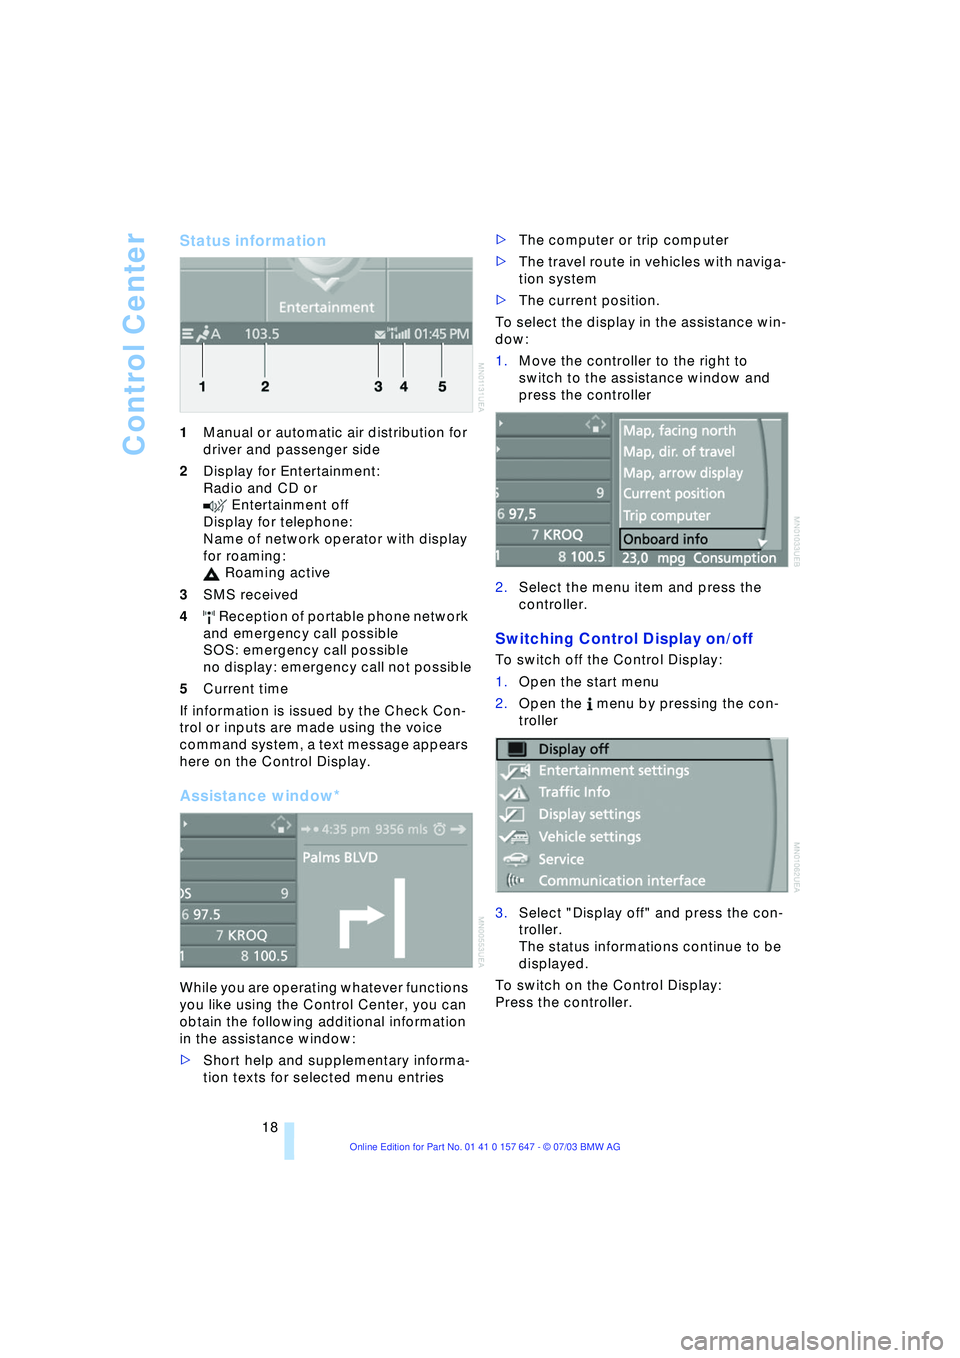
Status information
1Manual or automatic air distribution for
driver and passenger side
2Display for Entertainment:
Radio and CD or
Entertainment off
Display for telephone:
Name of network operator with display
for roaming:
Roaming active
3SMS received
4 Reception of portable phone network
and emergency call possible
SOS: emergency call possible
no display: emergency call not possible
5Current time
If information is issued by the Check Con-
trol or inputs are made using the voice
command system, a text message appears
here on the Control Display.
Assistance window*
While you are operating whatever functions
you like using the Control Center, you can
obtain the following additional information
in the assistance window:
>Short help and supplementary informa-
tion texts for selected menu entries >The computer or trip computer
>The travel route in vehicles with naviga-
tion system
>The current position.
To select the display in the assistance win-
dow:
1.Move the controller to the right to
switch to the assistance window and
press the controller
2.Select the menu item and press the
controller.
Switching Control Display on/off
To switch off the Control Display:
1.Open the start menu
2.Open the menu by pressing the con-
troller
3.Select "Display off" and press the con-
troller.
The status informations continue to be
displayed.
To switch on the Control Display:
Press the controller.
Page 21 of 220

At a glance
19Reference
Controls
Driving tips
Communications
Navigation
Entertainment
Mobility
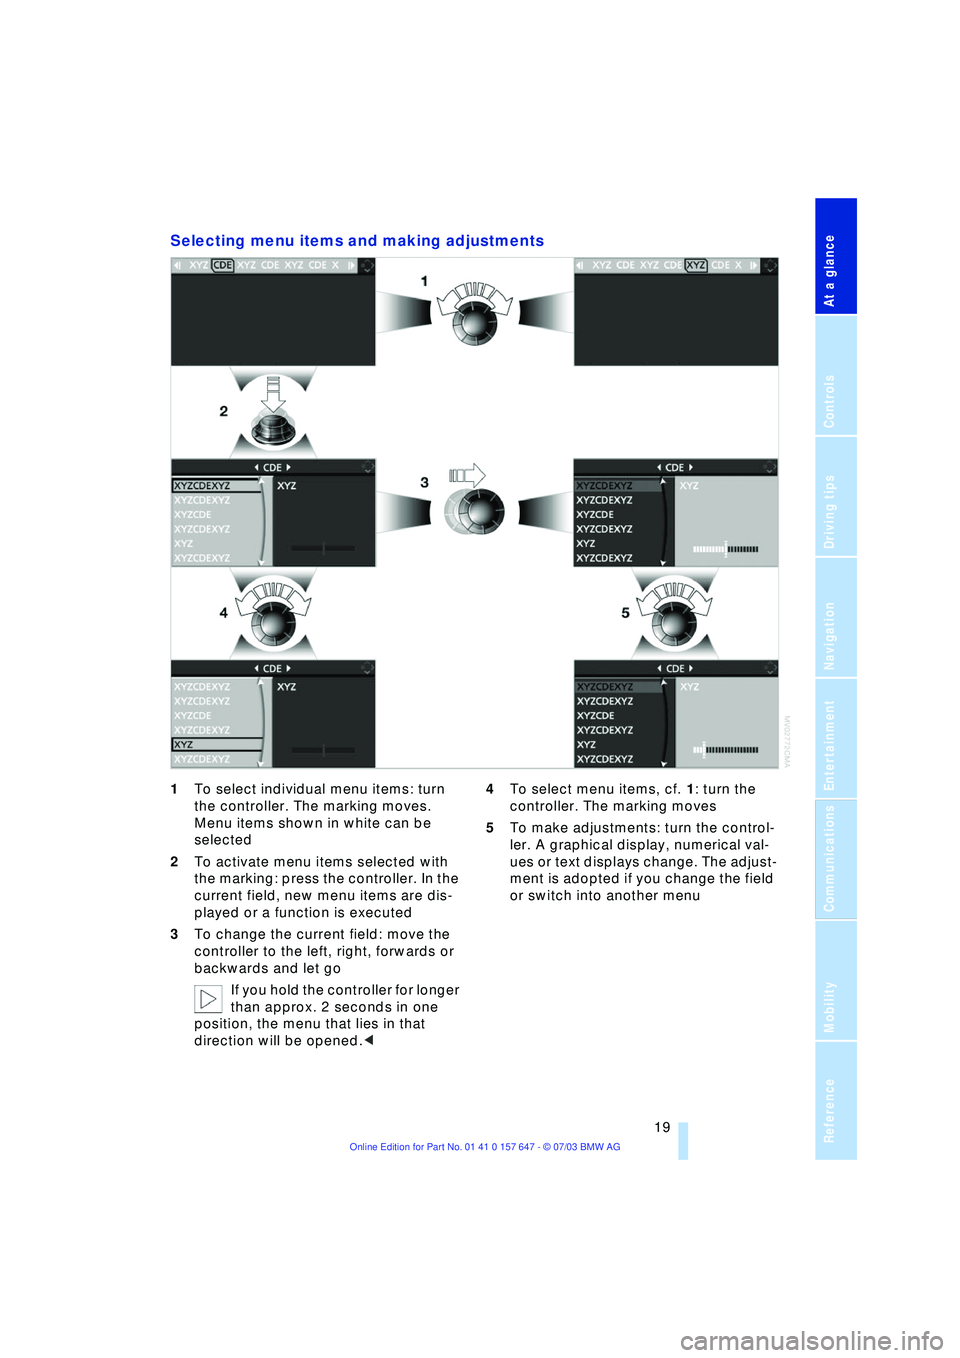
Selecting menu items and making adjustments
1To select individual menu items: turn
the controller. The marking moves.
Menu items shown in white can be
selected
2To activate menu items selected with
the marking: press the controller. In the
current field, new menu items are dis-
played or a function is executed
3To change the current field: move the
controller to the left, right, forwards or
backwards and let go
If you hold the controller for longer
than approx. 2 seconds in one
position, the menu that lies in that
direction will be opened.< 4To select menu items, cf. 1: turn the
controller. The marking moves
5To make adjustments: turn the control-
ler. A graphical display, numerical val-
ues or text displays change. The adjust-
ment is adopted if you change the field
or switch into another menu
Page 22 of 220

Voice command system
20
Voice command system
The concept
The voice command system allows you to
control operation of various vehicle sys-
tems without ever removing your hands
from the steering wheel.
The menu items on the Control Display
serve as voice commands for the equip-
ment that can be operated using the voice
command system. This means you can
open these menu items using the voice
command system instead of with the con-
troller.
The voice command system transforms
your oral commands into control signals for
the selected systems and provides support
in the form of instructions or questions.
Precondition
If the language of the voice command and
Control Display do not match, change the
language of the Control Display, refer to
page 74.
Symbols used
Voice commands
Activating voice command system
Briefly press the button on the steering
wheel or in the center console.If voice command is to come from the pas-
senger side:
Press the button in the center console for a
longer period.
This symbol on the Control Display and
an acoustic message indicate that you can
enter voice commands.
The text or numbers that the voice com-
mand system has registered will appear at
this position on the Control Display.
This symbol appears on the Control Dis-
play when you can enter additional voice
commands.
If there are no other voice commands,
operate the equipment using the Control
Center.
Canceling voice command system
Press the button on the steering wheel or
in the center console
or
While notes are being recorded, canceling
is only possible using one of the buttons .
*
{...} Identifies voice commands.
{{...}} Identifies instructions generated
by the voice command system.
Entertainment{Cancel}.
Page 30 of 220

Opening and closing
28 3.Select "Door locks" and press the con-
troller
4.Select "Central locking" and press the
controller
5.Select "Lock button" and press the con-
troller
6.Select the doors and press the control-
ler:
>"All doors"
>"Driver's door only"
Press the button twice to unlock
the entire vehicle after the driver's
door.
displays the selected doors.
Convenience opening mode
Press and hold the button. The windows
and the glass roof open.
Locking and securing
Press the button.
Switching on the interior lamps
If the vehicle is locked, press
the button.
Switching off the tilt alarm sensor
and interior motion sensor
Press the button once again directly
after locking.
For more detailed information, refer to
page 33.
Panic mode
By pressing and holding the button for
more than approx. two seconds, you can
trigger the alarm system in response to any
impending danger. To switch off the alarm: press any of the
buttons.
Opening the luggage compartment
lid
Press the button.
The luggage compartment lid opens,
regardless of whether it was previously
locked or unlocked.
During opening, the luggage com-
partment lid pivots upward and to the
rear. Ensure that adequate clearance is
available before opening.
Before and after a trip, ensure that the lug-
gage compartment lid has not been
opened unintentionally.
A locked luggage compartment lid is also
locked again after closing.<
Setting the confirmation signals
You can have various confirmation signals
programmed into the system to verify that
the vehicle has been unlocked or locked
securely.
Control Center, for principle details, refer to
page 16:
1.Open the menu
2.Select "Vehicle settings" and press the
controller
3.Select "Door locks" and press the con-
troller
4.Select "Confirmation" and press the
controller
5.Select the desired signal and press the
controller.
indicates the signals switched on.
Page 32 of 220

Opening and closing
30
Opening and closing: from
inside
You can operate the central locking system
with this button when the front doors are
closed. This only unlocks or locks the
doors and luggage compartment lid, but
not secured. Also, the fuel filler door
remains unlocked to allow refueling.
You can also make the following settings
for each specific key:
>The central locking system automati-
cally locks the vehicle as soon as you
drive off
>The central locking system automati-
cally locks the vehicle after a short time
when no door has been opened.
Control Center, for principle details, refer to
page 16:
1.Open the menu
2.Select "Vehicle settings" and press the
controller
3.Select "Door locks" and press the con-
troller
4.Select "Central locking" and press the
controller
5.Select "Lock after driving off" or
"Relock door if not opened" and press the controller.
displays the selected setting.
Unlocking and opening the doors
>Either unlock the doors together with
the button for the central locking sys-
tem and then pull the door handle
above the armrest or
>pull the door handle twice at each indi-
vidual door: the first pull unlocks the
door, the second pull opens it.
Locking
>Use the central locking button to lock all
of the doors simultaneously, or
>press down the individual safety lock
buttons. To prevent you from being
locked out, the open driver's door can-
not be locked using the safety lick but-
ton.
Because any persons or animals left
unattended in a parked vehicle could
lock the doors from the inside, you should
always keep the remote control with you;
this precaution ensures that you will remain
able to unlock the vehicle from the outside
at all times.<
Page 35 of 220

Controls
33Reference
At a glance
Driving tips
Communications
Navigation
Entertainment
Mobility
Indicator lamp displays
>The indicator lamp beneath the interior
mirror flashes continuously: the system
is armed
>If the indicator lamp flashes during arm-
ing: doors, engine hood or luggage
compartment lid are not properly
closed. Even if you do not close the
alerted area, the system begins to mon-
itor the remaining areas, and the indica-
tor lamp flashes continuously after
approx. 10 seconds. However, the inte-
rior motion sensor is not activated
>If the indicator lamp goes out on dis-
arming: no manipulation or attempted
intrusions have been detected in the
period since the system was armed
>If the indicator lamp flashes on disarm-
ing until the key is inserted in the igni-
tion lock, but for approx. 5 minutes at
the most: your vehicle has been manip-
ulated in the meantime.
Following triggering of an alarm, the indica-
tor lamp will flash continuously.
Avoiding unintentional alarms
The tilt alarm sensor and interior motion
sensor may be switched off at the same
time. You can do this to prevent a false
alarm from being triggered in garages with
elevator ramps, for instance, or when the
vehicle is transported by trailer or train:
Lock, i.e. arm twice. Press the but-
ton on the remote control twice in succes-
sion, refer to page 27, or lock twice with
the key, refer to page 30.
The indicator lamp lights up briefly and
then flashes continuously. The tilt alarm
sensor and the interior motion sensor are switched off as long as the system is
armed.
Interior motion sensor
In
order for the interior motion sensor to
function properly, the windows and glass
roof must be completely closed.
However, switch the interior motion sensor
off, refer to Avoiding unintentional alarms, if
>children or animals are to remain in the
vehicle
>the windows or glass roof are to remain
open.
Windows
Opening and closing windows
As of ignition key position 1:
>Press the switch up to the resistance
point:
The window continues to move down-
ward as long as you continue to hold
the switch
>Briefly press the switch beyond the
resistance point:
The window moves downward auto-
matically. Press the switch again to
stop the opening movement.
You can close the windows in the same
manner by pulling the switch.
After switching off the ignition
You can still operate the windows:
>In the radio position for a longer time
>For approx. 1 minute in position 0 or
with the ignition key removed.