Page 98 of 174
98
Microfilter/activated-charcoal
filterThe built-in microfilter removes dust
and pollen from the incoming air. The
activated-charcoal filter provides addi-
tional protection by filtering gaseous
pollutants from the outside air. Your
BMW center replaces this combined fil-
ter as a standard part of your scheduled
maintenance. A substantial reduction in
airflow indicates that the filter needs to
be replaced before scheduled mainte-
nance.
Roller sun blind*To activate, press the button briefly
with the ignition key in position 1 or
higher.
The illustration depicts the arrangement
of the buttons if the vehicle is fully
equipped. The arrangement may vary,
depending on the equipment actually
installed.
Automatic climate control*
Page 99 of 174
99 Interior conveniences
Premium sound system*Harman Kardon premium sound
systemThe system creates the acoustic
impression of a much larger passenger
compartment accompanied by
improved stereophonic sound at all
seating positions.
The system responds to poor reception
conditions by repeatedly alternating
between the stereo and monophonic
modes. You should then switch the sys-
tem off.
Glove compartmentTo openPull the handle. The lamp in the glove
compartment will come on.To closeFold the cover up.
To prevent injury in the event of an
accident, close the glove com-
partment immediately after use.
master key will also be required to
unlock the glove compartment.
OverviewControlsMaintenanceRepairsDataIndex
Page 101 of 174
101
Rear center armrest*The rear center armrest includes a bev-
erage holder and a litter bag holder.
>Beverage holder: press.
Storage package*For your convenience, there are:
>Two flip-out sockets on the rear cen-
ter console
>An eyeglasses storage compart-
ment*, not shown, in the center con-
sole.
Microphone*Hands-free systemOn vehicles that are wired for a tele-
phone* or equipped with a Voice Input
System*, the cover for the hands-free
microphone is located in the headliner
near the interior lamp.
For further information on using your
cellular phone or the Voice Input Sys-
tem, refer to the separate Owner's
Manual.
Storage compartments
OverviewControlsMaintenanceRepairsDataIndex
Page 103 of 174
103
Clothes hooksTo open, press on the upper edge. For
additional information: refer to
page 113.
When hanging clothing on the
hooks, be sure that it will not
obstruct the driver's vision. Do not hang
heavy objects on the hooks. If you do,
they could injure occupants, for exam-
ple during braking or evasive maneu-
vers.<
OverviewControlsMaintenanceRepairsDataIndex
Page 105 of 174

105
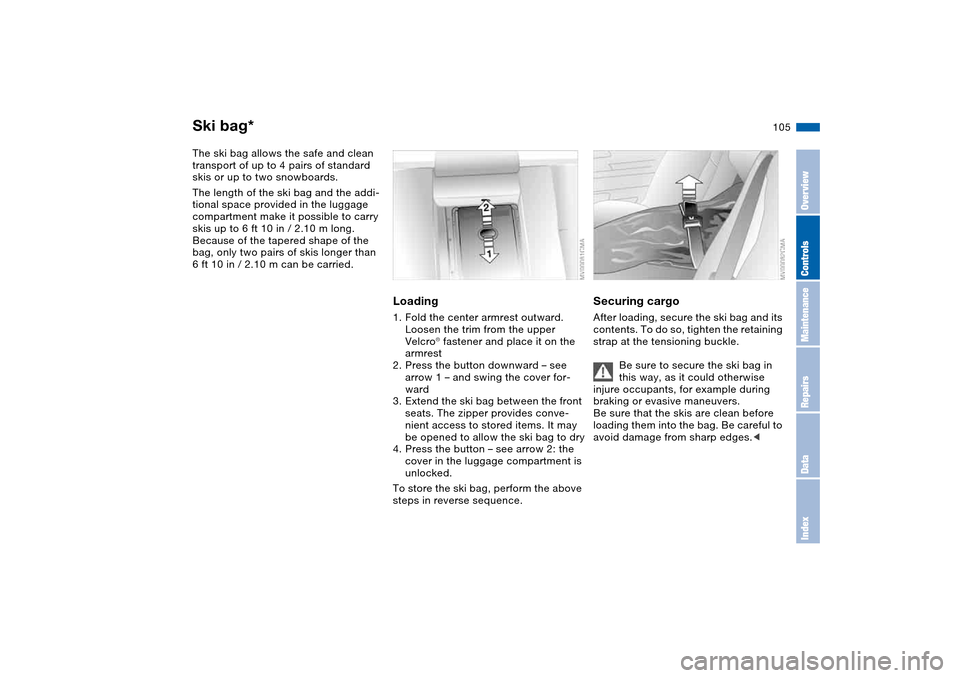
Ski bag*The ski bag allows the safe and clean
transport of up to 4 pairs of standard
skis or up to two snowboards.
The length of the ski bag and the addi-
tional space provided in the luggage
compartment make it possible to carry
skis up to 6 ft 10 in / 2.10 m long.
Because of the tapered shape of the
bag, only two pairs of skis longer than
6 ft 10 in / 2.10 m can be carried.
Loading1. Fold the center armrest outward.
Loosen the trim from the upper
Velcro® fastener and place it on the
armrest
2. Press the button downward – see
arrow 1 – and swing the cover for-
ward
3. Extend the ski bag between the front
seats. The zipper provides conve-
nient access to stored items. It may
be opened to allow the ski bag to dry
4. Press the button – see arrow 2: the
cover in the luggage compartment is
unlocked.
To store the ski bag, perform the above
steps in reverse sequence.
Securing cargoAfter loading, secure the ski bag and its
contents. To do so, tighten the retaining
strap at the tensioning buckle.
Be sure to secure the ski bag in
this way, as it could otherwise
injure occupants, for example during
braking or evasive maneuvers.
Be sure that the skis are clean before
loading them into the bag. Be careful to
avoid damage from sharp edges.<
OverviewControlsMaintenanceRepairsDataIndex
Page 107 of 174
107
LoadThe permissible load is the sum of the
occupants' weights and the weight of
the cargo. The greater the weight of the
occupants, the less cargo can be trans-
ported.
Stowing cargo>Load heavy cargo as far forward as
possible – directly behind the back-
rests – and as low as possible
>Cover sharp edges and corners
>Do not pile objects higher than the
top edge of the backrest
>For transporting very heavy loads
when the rear seat is not occupied,
secure the outer safety belts in the
opposite buckles, refer to the illustra-
tion.
Cargo loading
OverviewControlsMaintenanceRepairsDataIndex
Page 109 of 174

109
Roof-mounted luggage rack*A special roof-rack system is available
as an optional extra for your BMW.
Please observe the precautions
included with the installation instruc-
tions.AnchoragesAccess to the anchorages:
To fold up the covers, please use the
tool provided with the roof-rack system.Loading and driving notesRoof-mounted luggage racks raise the
center of gravity of the vehicle when
they are loaded. For this reason, they
have a major effect on the vehicle's
handling and steering response.
You should therefore always remember
not to exceed the approved roof load
capacity, the approved gross vehicle
weight or the axle loads when loading
the rack. These weights are listed under
Technical data on page 156.
Make sure that the load is not too bulky,
and attempt to distribute it evenly.
Always load the heaviest pieces first so
that they are at the bottom. Be sure that
adequate clearance is maintained for
raising the glass sunroof, and that
objects do not project into the opening
path of the luggage compartment lid.
Secure the roof-mounted luggage cor-
rectly and safely to prevent it from shift-
ing or being lost during driving.
Drive smoothly and avoid sudden
acceleration and braking. Do not corner
at high speeds.
The luggage rack and the roof load
increase aerodynamic resistance:
increased fuel consumption and addi-
tional stress on the vehicle's body are
the result.
OverviewControlsMaintenanceRepairsDataIndex
Page 111 of 174
111
Overview
Controls and features
Operation, maintenance
Owner service procedures
Technical data
Index
OverviewControlsMaintenanceRepairsDataIndex