2004 BMW 330CI CONVERTIBLE ESP
[x] Cancel search: ESPPage 63 of 186

63
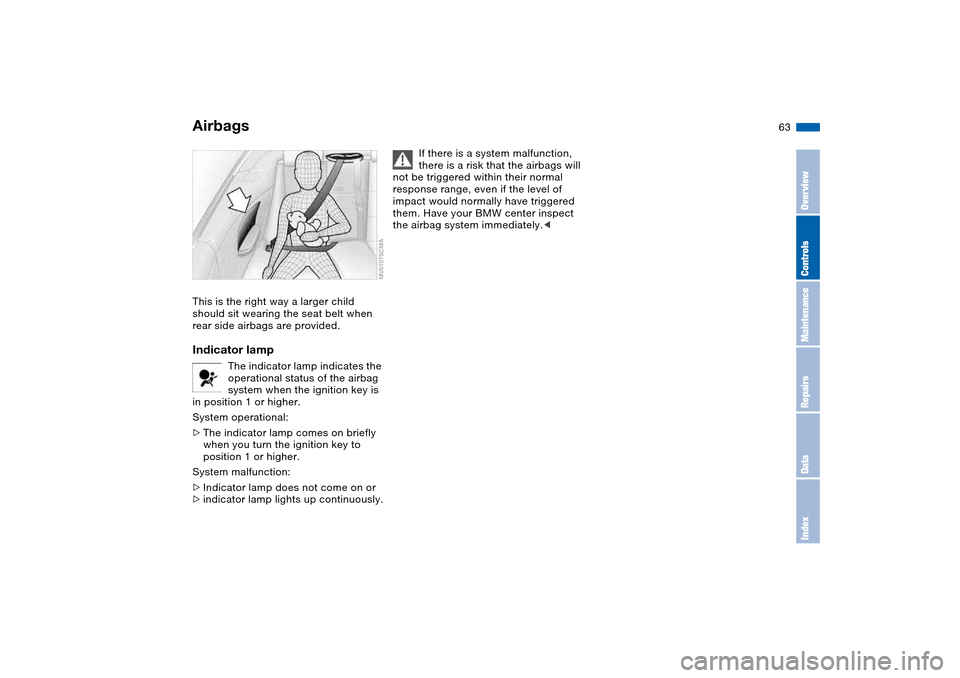
This is the right way a larger child
should sit wearing the seat belt when
rear side airbags are provided.Indicator lamp
The indicator lamp indicates the
operational status of the airbag
system when the ignition key is
in position 1 or higher.
System operational:
>The indicator lamp comes on briefly
when you turn the ignition key to
position 1 or higher.
System malfunction:
>Indicator lamp does not come on or
>indicator lamp lights up continuously.
If there is a system malfunction,
there is a risk that the airbags will
not be triggered within their normal
response range, even if the level of
impact would normally have triggered
them. Have your BMW center inspect
the airbag system immediately.<
Airbags
OverviewControlsMaintenanceRepairsDataIndex
Page 92 of 186

92Technology for safety and driving convenience
Park Distance Control (PDC)*The conceptPDC assists you when you back into a
parking space. Acoustic signals alert
you to the momentary distance to an
object behind your vehicle. The system
features four ultrasonic sensors
mounted in your rear bumper. The mon-
itoring range for the two corner sensors
extends outward roughly 2 ft/60 cm,
while two centrally located sensors
detect objects at distances of up to
approx. 5 ft/1.50 m.
PDC is a parking aid that can
identify objects if they are
approached slowly, as is generally the
case when parking. Avoid driving
towards objects rapidly; due to underly-
ing physical principles, the system may
otherwise alert you too late for you to
take evasive steps.<
The system starts to operate automati-
cally approx. one second after you shift
into Reverse or move the selector lever
into the R position with the ignition key
in position 2.
Let this short period elapse before
driving backwards.<
PDC is deactivated when you shift back
out of Reverse.
You can have a signal set to con-
firm that the PDC has been acti-
vated. The signal then sounds when
you shift into Reverse or move the
selector lever into the R position.
intervals. As the distance between vehi-
cle and object decreases, the intervals
between the tones become shorter. A
continuous tone indicates the pres-
ence of an object less than 1 ft/30 cm
away.
The warning signal is canceled after
approx. three seconds if the distance to
the object remains constant during this
time – if you are moving parallel to
a wall, for instance.
System malfunctions will be indicated
by a continuous high-pitched tone
when the system is activated the first
time. Please have the problem fixed by
your BMW center.
PDC does not replace the driver's
personal responsibility for evaluat-
ing the distance between the vehicle
and any objects. Always remember that
the sensors can neither detect nor pro-
vide warnings of obstacles located
within their blind angles. This applies
especially in those cases where the
system approaches the physical limits
of ultrasonic measurement, as occurs
with tow bars and trailer couplings, and
in the vicinity of thin or wedge-shaped
objects. Moreover, low objects that
have already been detected – such as a
curb edge – can disappear out of the
detection range of the sensors before a
continuous tone sounds.
Loud sources of sound from outside or
inside the vehicle could drown out the
PDC signal tone.<
Keep the sensors clean and free
of ice or snow in order to ensure
that they will continue to operate effec-
tively.
Do not apply high pressure spray to the
sensors for a prolonged period of time.
Always maintain a distance of more
than 4 in/10 cm.<
Page 94 of 186

94
Under these special circumstances
traction is increased by deactivating the
control systems that enhance traction
under normal conditions.Deactivating the DSC and the
DTCHold the DSC button down for at least
3 seconds. The indicator lamp and the
yellow brake warning lamp light up and
remain on continuously.
The systems for enhancing stability and
traction are deactivated, and there is no
active braking intervention or torque
control.
To maintain vehicle stability,
always drive with the DSC acti-
vated whenever possible.
DTC is deactivated.
The laws of physics cannot be
repealed even with DSC. An
appropriate driving style always
remains the responsibility of the driver.
We therefore urge you to avoid using
the additional safety margin of the sys-
tem as an excuse for taking risks.
Whenever the DTC is activated, the
DSC is switched off and performs minor
stabilizing intervention.
Do not make any modifications to the
DSC system. Allow only authorized
technicians to perform service proce-
dures on the DSC.<
Flat Tire Monitor*The conceptAs you drive, the Flat Tire Monitor
keeps track of pressure levels in all four
tires. The system alerts you whenever
the inflation pressure of a tire falls sig-
nificantly below the pressure of another
tire.
The system actually detects pressure
loss by monitoring differences in the
relative speeds of the four wheels. It
interprets variations outside specified
limits as severe pressure loss, and then
responds by generating a warning.Functional requirementsIn order for the Flat Tire Monitor to learn
the correct tire inflation pressure,
please do the following:
1. Check the tire inflation pressures in
all tires
2. Compare them with the tire inflation
pressure table on page 25 and cor-
rect them, if necessary
3. Initialize the system.
Dynamic Stability Control (DSC)
Page 97 of 186

97 Lamps
Parking lamps/Low beamsParking lamps
The front, rear and side vehicle
lighting is switched on. You can
use the parking lamps to signal
the position of the vehicle when it is
parked. For lighting on one side for
parking as an additional feature, refer to
page 99.
Low beams
When the ignition is switched off
while the low beams are on, the
headlamps go out and only the
parking lamps remain on.
Follow me home lampsWhen you activate the headlamp
flasher after parking the vehicle with the
lamps turned off, the low-beam head-
lamps will come on for a short time.
You can also have this function
deactivated.
tion 0, you will hear an acoustic signal
for a few seconds to remind you that
the lamps have not been switched off.Daytime driving lamps*If you desire, the light switch can be left
in the second position: when the igni-
tion is switched off, the external lighting
is also switched off.
You can have the activation set-
tings for the daytime driving lamps
programmed on your vehicle.
position the system automati-
cally activates and cancels the
low beams in response to changes in
ambient light – in tunnels, at dusk, etc. –
and in the event of rain and snow. If the
low-beam headlamps are on, the LED
next to the symbol lights up.
The vehicle's external lights
remain on constantly when you
switch on the front fog lamps after the
headlamps have come on automati-
cally.<
Automatic headlamp control can-
not serve as a substitute for the
driver's judgement in determining when
the vehicle lights should be switched
on. For example, the sensors are not
able to detect fog. To avoid safety risks,
you should respond to these kinds of
low-visibility situations by switching the
headlamps on manually.<
You can have the sensitivity of
your vehicle's automatic head-
lamp control adjusted.<
OverviewControlsMaintenanceRepairsDataIndex
Page 104 of 186

104
Air supply/Blower
You can select blower speeds
from 1 to 4. The heating and
ventilation become more and
more effective as the air sup-
ply settings are increased. In position 0,
the blower and the heater are switched
off. The outside air supply is blocked in
position 0.
Temperature
In order to increase the tem-
perature of the passenger
compartment, turn to the right
toward the red zone. The tem-
perature of the incoming air is kept con-
stant.
Air distribution
You can direct air to flow onto
the windows , toward your
upper body or into the
footwell . All intermediate
settings are possible. In the setting ,
there is a low flow of air onto the win-
dows to keep them free of condensa-
tion.
Rear window defroster
When the rear window defroster
is activated, the indicator lamp
comes on. The rear window defroster
switches off automatically.
You can have your vehicle pro-
grammed in such a way that the
rear window defroster switches on
automatically. This occurs within 5 min-
utes after starting the engine when out-
side temperatures are below approx.
397/+46.<
Air conditioning
The air is cooled and dehumidi-
fied and – depending on the
temperature setting – rewarmed.
Depending on the weather, the wind-
shield may fog over briefly when the
engine is started. Air conditioning helps
prevent the windows from fogging up.
Condensation forms during opera-
tion of the air conditioning system,
which then exits under the vehicle. It is
thus not unusual for a small puddle to
form under the car while the system is
running.<
Outside air/Recirculated-air mode
You can respond to unpleasant
external odors by temporarily
blocking the supply of outside air. The
system then recirculates the air cur-
rently within the vehicle.
If the windows should fog over in
the recirculated-air mode, switch
this mode off and increase the air sup-
ply as required.<
Air conditioning
Page 109 of 186

109
Outside air/Automatic
recirculated-air control (AUC)/
Recirculated air
You can respond to unpleasant
external odors or pollutants by
temporarily stopping the flow of outside
air. The system then recirculates the air
currently within the vehicle.
Press the button repeatedly to select
one of three different operating modes.
>Indicator lamps off: outside airflow is
on
>Left indicator lamp on – automatic
mode: the system recognizes pollut-
ants in the outside air and blocks the
flow of air when necessary. The sys-
tem then recirculates the air currently
within the vehicle. Depending on the
air quality, the automatic system then
switches back and forth between
outside air supply and recirculation of
the air within the vehicle
>Right indicator lamp on: the flow of
outside air into the vehicle is perma-
nently blocked. The system then
recirculates the air currently within
the vehicle.
If the windows should fog over in
the recirculated-air mode, switch
this mode off and increase the air sup-
ply as required.<
Rear window defroster
With the convertible top closed
or with the hardtop* mounted,
press the button. The indicator lamp
comes on. The rear window defroster
switches off automatically.
You can have your vehicle pro-
grammed in such a way that the
rear window defroster switches on
automatically. This occurs within 5 min-
utes after starting the engine when out-
side temperatures are below approx.
397/+46.<
Draft-free ventilationYou can adjust the blower controls for
the upper body area to obtain the opti-
mum airflow rates and directions for
your personal requirements:
1Rotary dials for infinitely variable
opening and closing of the vent out-
lets
2Levers for airflow direction
3Use the rotary dial to control the tem-
perature of the airflow:
>Rotate toward blue – colder
>Turn toward red – warmer
Automatic climate control*
OverviewControlsMaintenanceRepairsDataIndex
Page 112 of 186

112
Integrated universal remote control*The conceptThe integrated universal remote control
takes the place of up to three different
handheld transmitters belonging to var-
ious radio remote control devices, such
as door openers and home alarm sys-
tems. The integrated universal remote
control recognizes and learns the signal
sent by each original control device.
The signal of an original control device
can be programmed into one of the
three memory buttons 1. Afterwards,
the programmed memory button 1 can
be used to operate the corresponding
device. The signal transmission is indi-
cated by the indicator lamp 2.
Before selling the vehicle, clear the
memory buttons 1, refer to page 114.
While programming is in progress
and before operating any pro-
grammed system by remote control
using the integrated universal remote
control, make sure that the area of
movement of the system in question is
clear of people, animals and inanimate
obstructions, in order to avoid possible
injury or damage. Also comply with the
safety precautions issued for the origi-
nal control device.<
Checking compatibility
If this symbol is depicted on the
packaging or in the operating
instructions of the original con-
trol device, it is safe to assume that the
remote-controlled system is compatible
with the integrated universal remote
control.
If you have additional questions,
please consult your BMW center
or call 1-800-355-3515.
You can also visit these websites:
www.bmwusa.com or
www.homelink.com.
HomeLink is a registered trademark
owned by Johnson Controls, Inc.<
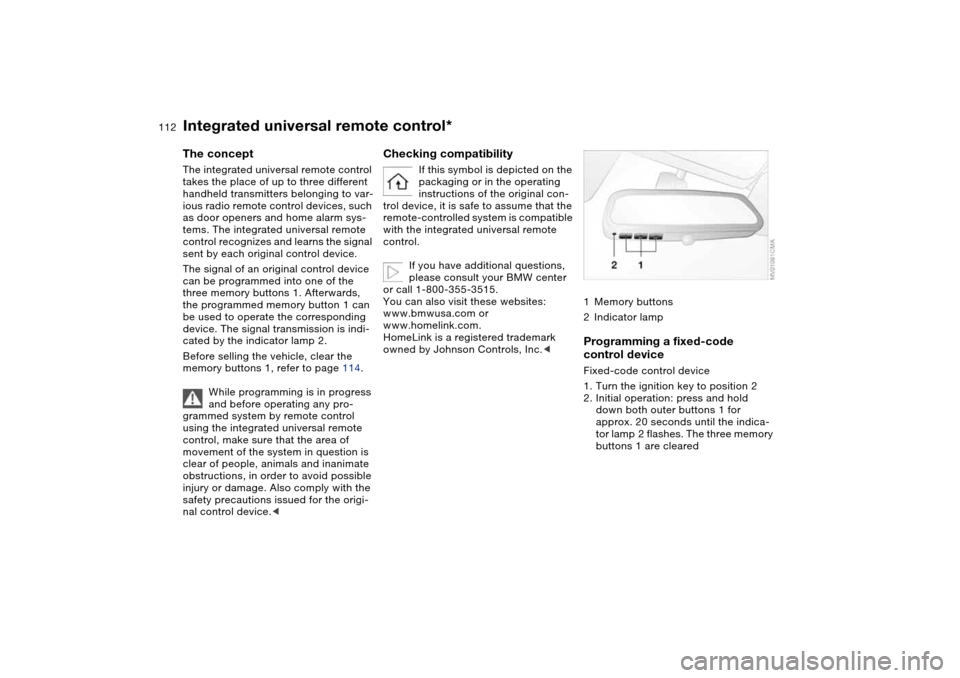
1Memory buttons
2Indicator lampProgramming a fixed-code
control deviceFixed-code control device
1. Turn the ignition key to position 2
2. Initial operation: press and hold
down both outer buttons 1 for
approx. 20 seconds until the indica-
tor lamp 2 flashes. The three memory
buttons 1 are cleared
Page 113 of 186

113
3. Hold the original control device
approx. 2 to 8 in / 5 to 20 cm away
from memory buttons 1.
The required distance between
the control device and the mem-
ory buttons 1 may vary, depending on
the system of the original control device
in question.<
4. Simultaneously press the command
button of the original control device
and the desired memory button 1 on
the integrated universal remote con-
trol. Indicator lamp 2 starts to flash
slowly. When indicator lamp 2
flashes rapidly, release both but-
tons. If the indicator lamp 2 does not
flash rapidly after approx.
15 seconds, select a different dis-
tance between the two devices
5. To program other original control
devices, repeat steps 3 and 4.
The corresponding memory button 1 is
now programmed with the signal of the
original control device.
The system can be operated from igni-
tion key position 2.
If the system cannot be operated
after repeated attempts at pro-
gramming, check whether the original
control device is equipped with an
alternating-code system. You can either
check the operating instructions of the
original control device for this informa-
tion, or you can press and hold down
the programmed memory button 1 of
the integrated universal remote control.
If indicator lamp 2 of the integrated uni-
versal remote control flashes rapidly for
a brief period and then remains on for
approx. 2 seconds, the original control
device is equipped with an alternating-
code system. In this case, you have to
program the memory buttons 1 as
described below for an alternating-
code control device.<
Programming an alternating-code
control deviceYou will need to follow the operating
instructions of the system in question in
order to program the integrated univer-
sal remote control. Read through the
operating instructions for information
on synchronization. Comply with the
following additional instructions when
you program an alternating-code con-
trol device:
You will find programming easier if
you have the assistance of
another person.<
1. Park the vehicle within range of the
radio remote controlled device
2. Program the integrated universal
remote control as described above in
the section on fixed-code program-
ming
3. Locate the button on the receiver of
the target device, for example on the
drive
4. Press the button on the receiver of
the target device. Once you have
completed step 4, you have approx.
30 seconds to complete step 5
5. Press the programmed memory
button 1 of the integrated universal
remote control three times.
The corresponding memory button 1 is
now programmed with the signal of the
original control device.
Please contact your BMW center
if you have any questions.<
Integrated universal remote control*
OverviewControlsMaintenanceRepairsDataIndex