2004 BMW 330CI CONVERTIBLE fuel cap
[x] Cancel search: fuel capPage 24 of 186

24
RefuelingFuel filler door
Always switch off the engine
before refueling, as it is not possi-
ble to add fuel with the engine running,
and attempts may also trigger the
SERVICE ENGINE SOON lamp.<
Press on the rear edge of the fuel filler
door to open and close it.
Pull the knob with the fuel pump sym-
bol, located on the right side wall of the
luggage compartment.
Always observe all safety precau-
tions posted at the service station
when handling fuel.
Never carry spare fuel containers in
your vehicle. Whether empty or full,
these containers can leak, cause an
explosion, or lead to fire in the event of
a collision.<
Simple and environmentally
friendly
Open the gas cap carefully to pre-
vent fuel from spraying out. Fuel
spray may cause injury.<
Keep the gas cap in the bracket
attached to the fuel filler door.
When refueling, insert the filler nozzle
completely into the filler pipe. Lifting the
nozzle during refueling
>results in premature pump shutoff
>and will reduce the effectiveness of
the vapor recovery system on the
pump.
The fuel tank is full when the filler noz-
zle shuts off the first time.
Page 25 of 186

25
Close the gas cap carefully after
refueling until a click is heard.
While closing, be sure not to squeeze
the strap which is fastened to the cap.
A loose or missing cap will activate the
CHECK GAS CAP* lamp.<
Fuel tank capacity>Approx. 16.6 gal./63 liters, of which
>approx. 2.1 gal./8 liters are reserve
capacity.
Do not drive to the last drop of
fuel. This can prevent the engine
from operating properly and result in
damage.<
Fuel specificationsThe engine uses lead-free gasoline
only.
Required fuel:
>Premium Unleaded Gasoline,
min. 91 AKI.
AKI = Anti Knock Index
Never use leaded fuel, as it would
cause permanent and irreversible
damage to the oxygen sensor and the
catalytic converter.<
Tire inflation pressureChecking tire pressuresTire pressures in psi/kilopascal are
shown on the driver's door post and are
visible when the door is open.
Only check the tire inflation pressures
of cold tires. This means after driving a
maximum of 1.25 miles/2 km or after
the vehicle has been parked for at least
2 hours. Warm tires have higher infla-
tion pressures.
In the following tire inflation pressure
table, all pressures are specified in the
standard units of pressure, psi and kilo-
pascal, and apply to cold tires, i.e. tires
at ambient temperature.
Refueling
OverviewControlsMaintenanceRepairsDataIndex
Page 70 of 186

70
Vehicle Memory, Key MemoryHow the system functionsNo doubt you have reflected at one
time or another on how great it would
be if you could permanently configure
your vehicle's various features and
adjustments to mirror your own individ-
ual preferences. In engineering your
vehicle, BMW has provided for a num-
ber of options for personal adjustment
that can be programmed into your vehi-
cle at your BMW center.
The available configuration data fall into
two categories, according to whether
their primary orientation is the vehicle –
Vehicle Memory – or the individual –
Key Memory. Provided that each per-
son has a separate remote-control key,
you can have your BMW center enter
basic adjustment data for up to four
individuals in the system.
The system then relies on a bilateral
data exchange to identify the individual
user and executes the selected settings
whenever the remote control unit is
used to disengage the door locks.
Distinguishing between keysColor-coded decals have been pro-
vided to help you distinguish individual
keys with different settings.What the system can doYour BMW center can provide you with
details on the capabilities of the Vehicle
Memory and Key Memory systems.
You will see this symbol through-
out the Owner's Manual. It is to
remind you at appropriate places of the
settings that are available to you.<
Examples for Vehicle Memory:
>Various signals as acknowledgment
when locking or unlocking your vehi-
cle, refer to pages 31, 33
>Activates/deactivates the 'Follow me
home' function, refer to page 97
>Activates/deactivates daytime driv-
ing lamps, refer to page 97
>Sets the units of measure for display-
ing time, outside temperature, dis-
tance traveled and fuel consumption
in the instrument cluster
>When you shift into Reverse, an
acoustic signal indicates that PDC
has been activated, refer to page 92
>Switches on rear window defroster
automatically, refer to
pages 104, 109
>Activates/deactivates various alarm
system functions, refer to page 39
>After giving an ice warning, the
onboard computer display returns to
the previous setting, refer to page 90.
Examples for Key Memory:
>Unlocks driver's door first, then the
vehicle's remaining locks, refer to
page 33
>Locks the vehicle automatically after
you start off, refer to page 34
>Automatically adjusts the driver's
seat to the personal programmed
settings when the vehicle is
unlocked, refer to page 57
>Automatic tilting of the passenger-
side mirror, refer to Automatic curb
monitor, page 58.
Page 87 of 186

87
Fuel gaugeOnce the indicator lamp stays on con-
tinuously, there are still approx. 2.1 gal-
lons/8 liters of fuel in the fuel tank.
Fuel tank capacity approx.
16.6 gallons/63 liters.
Certain operating conditions, such as
those encountered in mountainous
areas, may cause the needle to fluctu-
ate slightly.
Fill the fuel tank before it is com-
pletely empty. Driving to the last
drop of fuel can prevent the engine
from operating properly and result in
damage.<
When you switch on the ignition, the
indicator lamp lights up briefly as an
operation check.
Engine coolant temperature gaugeBlueThe engine is still cold. Drive at moder-
ate engine and vehicle speeds.Between the blue and red zonesNormal operating range. The needle
may rise as far as the edge of the red
sector during normal operation.RedWhen you switch on the ignition, the
warning lamp comes on briefly as an
operation check.
If the lamp comes on during normal
vehicle operation: the engine has over-
heated. Shut off the engine immediately
and allow it to cool down.
To check coolant level, refer to
page 140.
OverviewControlsMaintenanceRepairsDataIndex
Page 121 of 186

121
Roof-mounted luggage rack for the hardtop*A special roof-rack system is available
as an optional extra for your BMW.
Please observe the precautions
included with the installation instruc-
tions.AnchoragesAccess to the anchorages:
To fold up the covers, please use the
tool provided with the roof-rack system.Loading and driving notesRoof-mounted luggage racks raise the
center of gravity of the vehicle when
they are loaded. For this reason, they
exercise a major effect on the vehicle's
handling and steering response.
You should therefore always remember
not to exceed the approved roof load
capacity, the approved gross vehicle
weight or the maximum axle loads
when loading the rack. These weights
are listed under Technical data on
page 168.
Make sure that the load is not too bulky,
and attempt to distribute it evenly.
Always load the heaviest pieces first so
that they are at the bottom. Make sure
that no objects will be in the way when
the luggage compartment lid is opening
or closing.
Secure the roof-mounted luggage cor-
rectly and securely to prevent it from
shifting or being lost during driving.
Drive smoothly and avoid sudden
acceleration or braking. Do not corner
at high speeds.
The roof-mounted luggage rack and the
roof load increase the aerodynamic
resistance: increased fuel consumption
and additional stress on the vehicle's
body are the result.
OverviewControlsMaintenanceRepairsDataIndex
Page 138 of 186

138
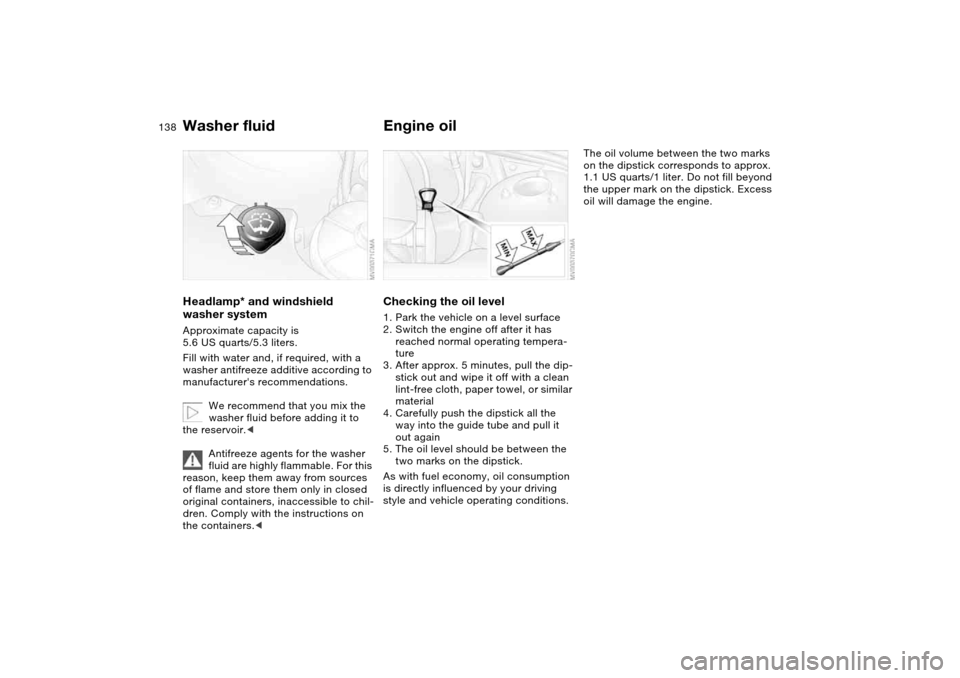
Washer fluidHeadlamp* and windshield
washer systemApproximate capacity is
5.6 US quarts/5.3 liters.
Fill with water and, if required, with a
washer antifreeze additive according to
manufacturer's recommendations.
We recommend that you mix the
washer fluid before adding it to
the reservoir.<
Antifreeze agents for the washer
fluid are highly flammable. For this
reason, keep them away from sources
of flame and store them only in closed
original containers, inaccessible to chil-
dren. Comply with the instructions on
the containers.<
Engine oilChecking the oil level1. Park the vehicle on a level surface
2. Switch the engine off after it has
reached normal operating tempera-
ture
3. After approx. 5 minutes, pull the dip-
stick out and wipe it off with a clean
lint-free cloth, paper towel, or similar
material
4. Carefully push the dipstick all the
way into the guide tube and pull it
out again
5. The oil level should be between the
two marks on the dipstick.
As with fuel economy, oil consumption
is directly influenced by your driving
style and vehicle operating conditions.
The oil volume between the two marks
on the dipstick corresponds to approx.
1.1 US quarts/1 liter. Do not fill beyond
the upper mark on the dipstick. Excess
oil will damage the engine.
Page 169 of 186

169
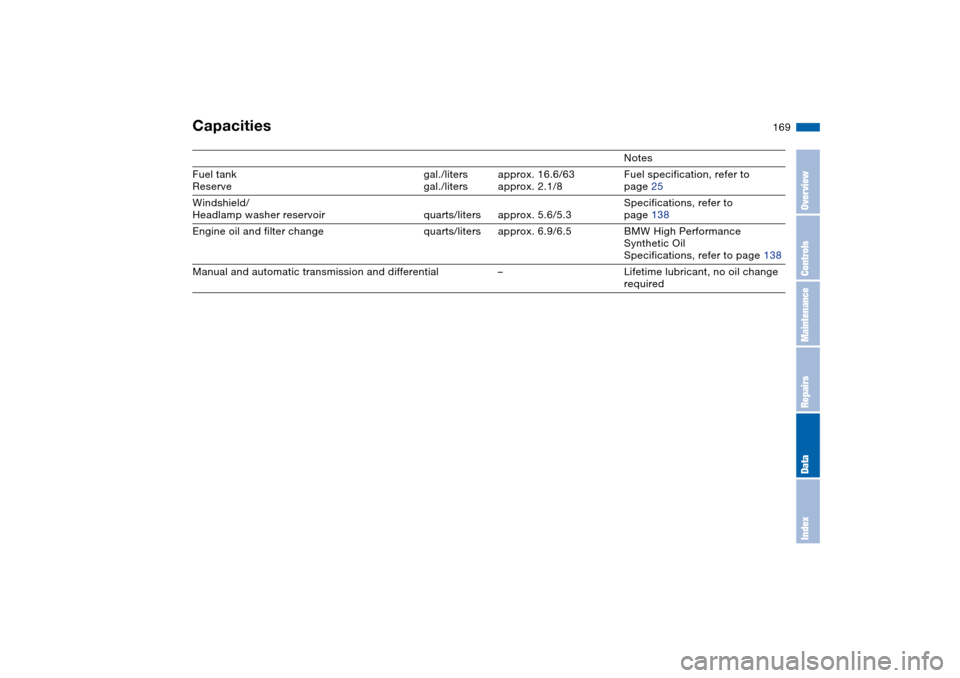
Capacities
Notes
Fuel tank
Reservegal./liters
gal./litersapprox. 16.6/63
approx. 2.1/8Fuel specification, refer to
page 25
Windshield/
Headlamp washer reservoir quarts/liters approx. 5.6/5.3Specifications, refer to
page 138
Engine oil and filter change quarts/liters approx. 6.9/6.5 BMW High Performance
Synthetic Oil
Specifications, refer to page 138
Manual and automatic transmission and differential – Lifetime lubricant, no oil change
required
OverviewControlsMaintenanceRepairsDataIndex
Page 174 of 186

Everything from A to ZClock 89
12-/24-hour mode 89
setting, refer also to the
Owner's Manual for
Radio/Onboard Computer
Closing
from inside 34
from outside 31
Clothes hooks 125
Clutch
breaking in 124
Cockpit 14
Code, refer to the Owner's
Manual for Radio/Onboard
Computer
Coin box 115
Cold start, refer to Starting
the engine 71
Compact disc operation,
refer to the Owner's Man-
ual for Radio/Onboard
Computer
Compartments 114
Compression ratio, refer to
Engine data 166
Computer 90
Condensation, refer to Air
conditioning mode
104, 108
Configuring settings, refer to
Vehicle Memory, Key
Memory 70Connecting a vacuum
cleaner, refer to Cigarette
lighter 116
Consumption
display 86
Consumption, refer to Aver-
age fuel consumption 91
Control elements, refer to
Cockpit 14
Convenience operation
from outside 33
windows 32
Convertible top
cleaning position 45, 50
closing in an
emergency 48
electrical fault 48
indicator lamps 47
remote control 31
Convertible top activation
fully automatic top 46
manual top 41
Convertible top compart-
ment panel 37
Coolant 140
indicator lamp 19, 87
level 140
temperature gauge 87
Coolant water, refer to Cool-
ant 140
Cooling, refer to Tempera-
ture 104, 108Copyright 4
Cornering Brake Control
(CBC) 125
warning lamp 19
Correct tires 132
Cruise control 84
indicator lamp 20
Cup holders, see Beverage
holders 115
Curb weight, refer to
Weights 168
Current consumption, refer
to Energy control 86
Curve lighting, refer to
Adaptive headlights 98
Cylinders, refer to Engine
data 166
D
Dashboard, refer to
Cockpit 14
Data
capacities 169
dimensions 167
engine 166
technical 166
weights 168
Daytime driving lamps 97
DBC Dynamic Brake Control
19, 125
Deep water, refer to Water
on roadways 125Defrost position, refer
to Defrosting windows
105, 108
Defrosting and demisting
windows
air conditioning 105
automatic climate
control 108
Defrosting windows
105, 108
Defrosting windshield, refer
to Defrosting windows
105, 108
Demisting windows
air conditioning 105
automatic climate
control 108
Determining the maximum
load 118
Differential
breaking in 124
Digital clock 89
Dimensions 167
Dipstick, engine oil 138
Disc brakes 126
Displacement, refer to
Engine data 166
Display lighting, refer to
Instrument lighting 98
Displays, refer to Instrument
cluster 16