2004 BMW 325CI COUPE belt
[x] Cancel search: beltPage 53 of 174
53
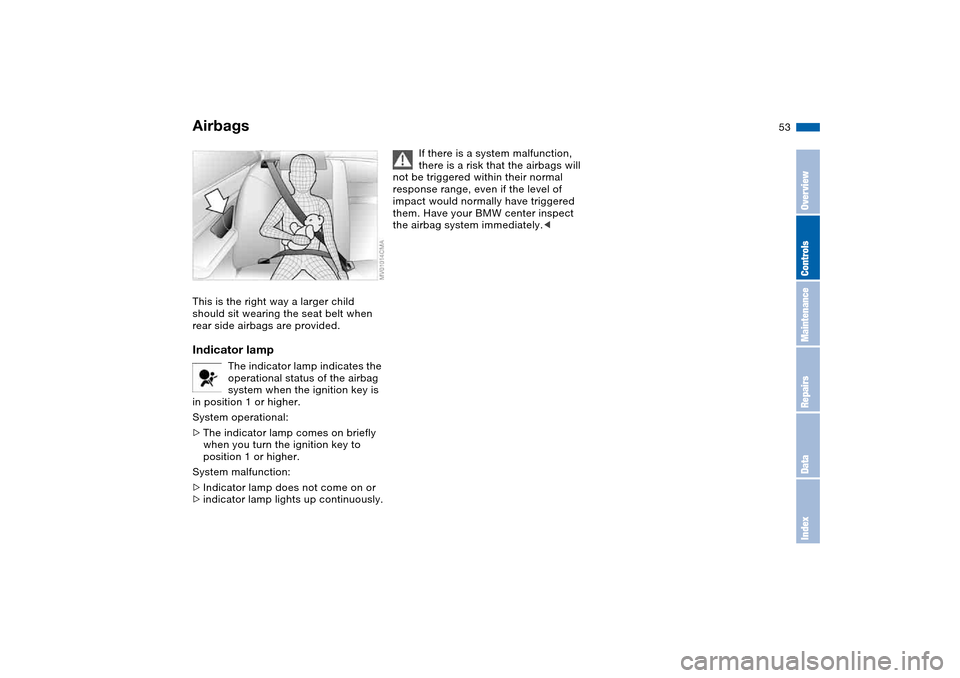
This is the right way a larger child
should sit wearing the seat belt when
rear side airbags are provided.Indicator lamp
The indicator lamp indicates the
operational status of the airbag
system when the ignition key is
in position 1 or higher.
System operational:
>The indicator lamp comes on briefly
when you turn the ignition key to
position 1 or higher.
System malfunction:
>Indicator lamp does not come on or
>indicator lamp lights up continuously.
If there is a system malfunction,
there is a risk that the airbags will
not be triggered within their normal
response range, even if the level of
impact would normally have triggered
them. Have your BMW center inspect
the airbag system immediately.<
Airbags
OverviewControlsMaintenanceRepairsDataIndex
Page 54 of 174
54
Transporting children safelyCommercially available child-restraint
systems are designed to be secured
with a lap belt or with the lap belt por-
tion of a combination lap/shoulder belt.
Improperly or inadequately installed
restraint systems can increase the risk
of injury to children. Always read and
follow the instructions that come with
the system.Correct location for installingIn your BMW, all seats equipped with a
three-point safety belt – except for the
driver's seat – are suitable for installing
universal child-restraint systems of all
age classes and which have been
approved for the age group in question.
Child-restraint system with
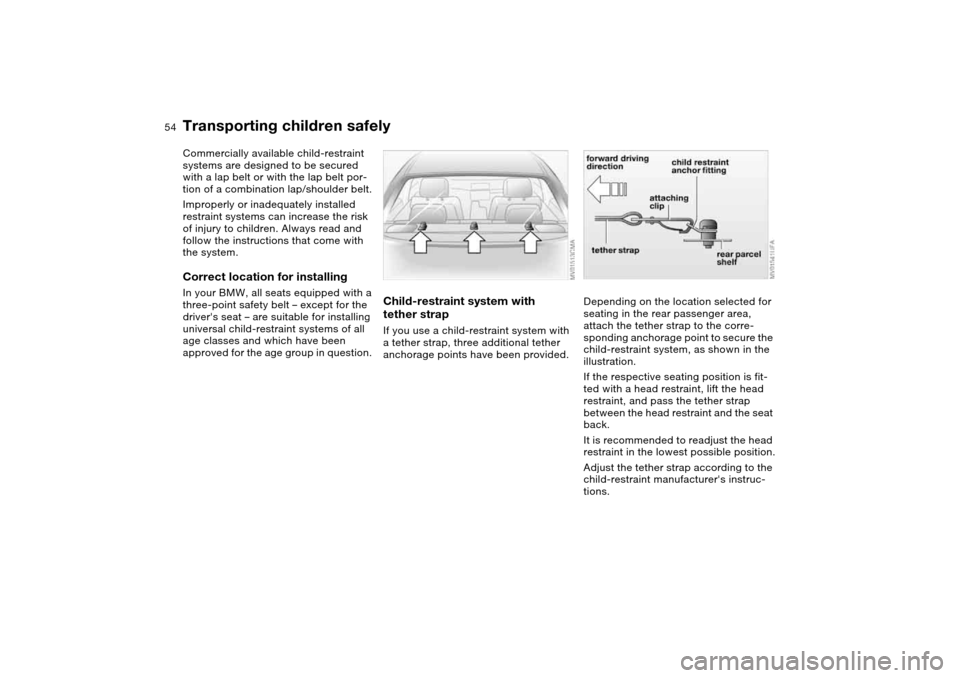
tether strapIf you use a child-restraint system with
a tether strap, three additional tether
anchorage points have been provided.
Depending on the location selected for
seating in the rear passenger area,
attach the tether strap to the corre-
sponding anchorage point to secure the
child-restraint system, as shown in the
illustration.
If the respective seating position is fit-
ted with a head restraint, lift the head
restraint, and pass the tether strap
between the head restraint and the seat
back.
It is recommended to readjust the head
restraint in the lowest possible position.
Adjust the tether strap according to the
child-restraint manufacturer's instruc-
tions.
Page 55 of 174

55
Before installing any child-
restraint device or child seat,
please read the following:
Never install a rearward-facing child-
restraint system in the front passenger
seat of this vehicle.
Your vehicle is equipped with an airbag
supplemental restraint system for the
front passenger. Because the backrest
on any rearward-facing child-restraint
system – of the kind designed for
infants under 1 year and 20 lbs/9 kg –
would be within the airbag's deploy-
ment range, you should never mount
such a device in the front passenger
seat, since the impact of the airbag
against the child-restraint's backrest
could lead to serious or fatal injuries.
If it is necessary for a child – not an
infant – to ride in the front seat, certain
precautions should be taken. First,
move the passenger seat as far away
from the dashboard as possible. This
important precaution is intended to
maximize the distance between the air-
bag and the child. Older children
should be tightly secured with a safety
belt after they have outgrown a booster
seat that is appropriate for their age,
height, and weight. Younger children
should be secured in an appropriate
forward-facing child-restraint system
that has first been properly installed
with a safety belt.
Never install a rearward-facing child-
restraint system in the front passenger
seat.
We strongly urge you to carefully read
and comply with the instructions for
installation and use provided by the
child restraint's manufacturer when-
ever you use such a device.
Do not attempt to modify child-restraint
systems. If you do this, the protection
provided by these systems could be
impaired.
Always ensure that all occupants – of all
ages – remain properly and securely
restrained at all times.<
All rear seating positions in your vehicle
meet the recommendations of
SAE J1819, an industry-recommended
practice for securing child-restraint sys-
tems in motor vehicles.
Securing child-restraint systemAll of the rear belt retractors and the
front passenger's safety belt can be
locked for mounting and securing child-
restraint systems.
A label with the appropriate instructions
for this is located in the immediate
vicinity of the buckle latch of each
safety belt.To lock the safety beltExtract the entire length of the belt from
the inertia reel mechanism. Allow the
reel to retract the belt somewhat and
engage the buckle, then tighten the belt
against the child-restraint system. The
retraction mechanism is now locked.
Transporting children safely
OverviewControlsMaintenanceRepairsDataIndex
Page 56 of 174
56
The belt cannot be extracted further.
Always observe the installation instruc-
tions provided by the manufacturer of
the child-restraint system.
To unlock the safety belt
Release the safety belt, remove the
child seat and retract the safety belt to
its end position on the belt retractor.
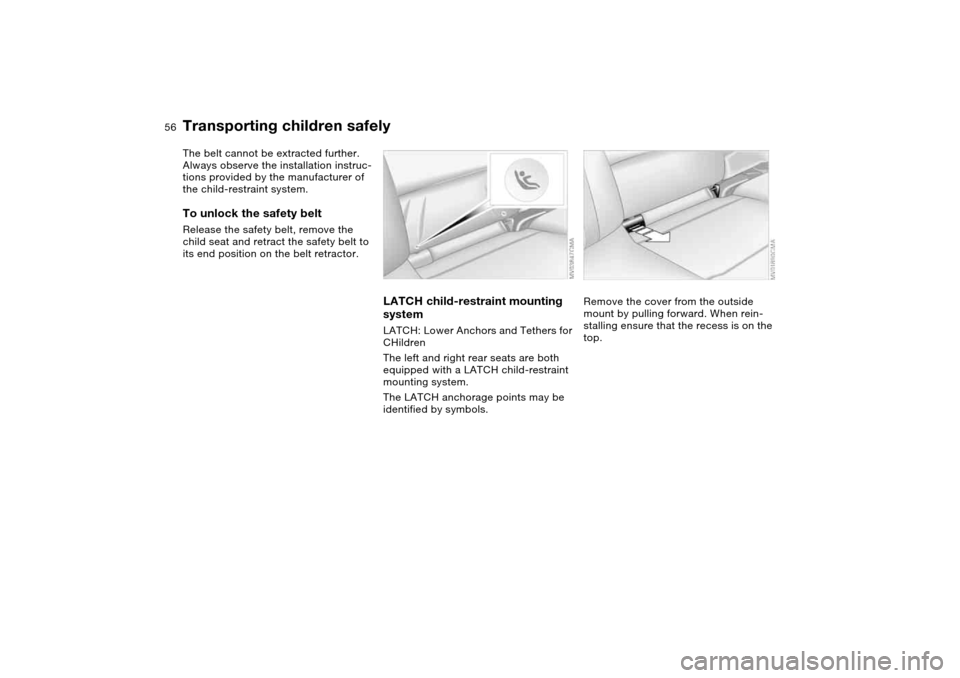
LATCH child-restraint mounting
system
LATCH: Lower Anchors and Tethers for
CHildren
The left and right rear seats are both
equipped with a LATCH child-restraint
mounting system.
The LATCH anchorage points may be
identified by symbols.
Remove the cover from the outside
mount by pulling forward. When rein-
stalling ensure that the recess is on the
top.
Transporting children safely
Page 104 of 174
104Loading and transporting
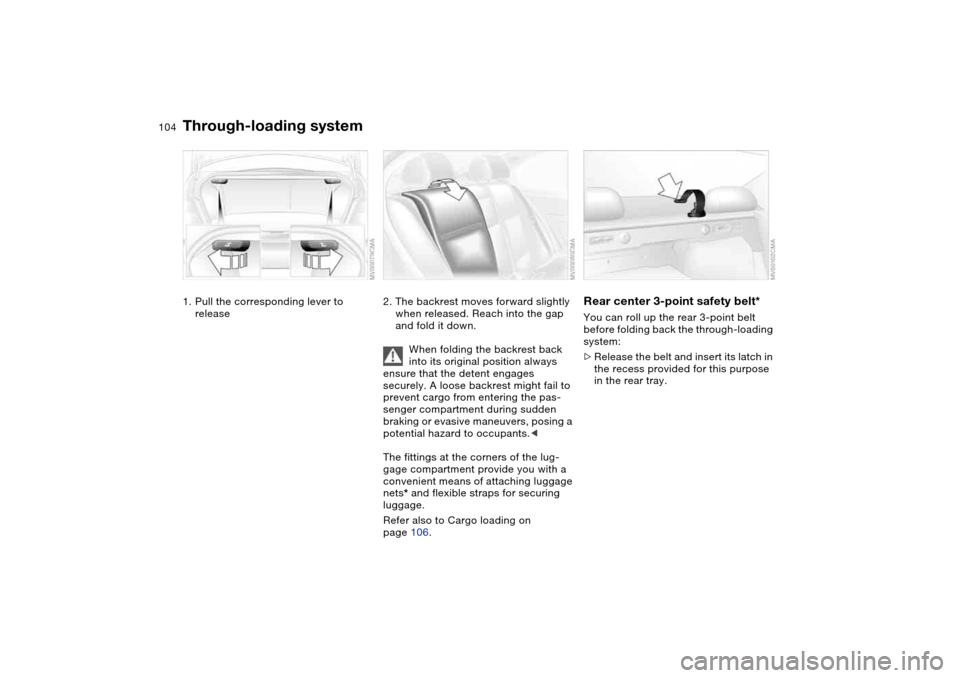
Through-loading system1. Pull the corresponding lever to
release
2. The backrest moves forward slightly
when released. Reach into the gap
and fold it down.
When folding the backrest back
into its original position always
ensure that the detent engages
securely. A loose backrest might fail to
prevent cargo from entering the pas-
senger compartment during sudden
braking or evasive maneuvers, posing a
potential hazard to occupants.<
The fittings at the corners of the lug-
gage compartment provide you with a
convenient means of attaching luggage
nets* and flexible straps for securing
luggage.
Refer also to Cargo loading on
page 106.
Rear center 3-point safety belt*You can roll up the rear 3-point belt
before folding back the through-loading
system:
>Release the belt and insert its latch in
the recess provided for this purpose
in the rear tray.
Page 107 of 174
107
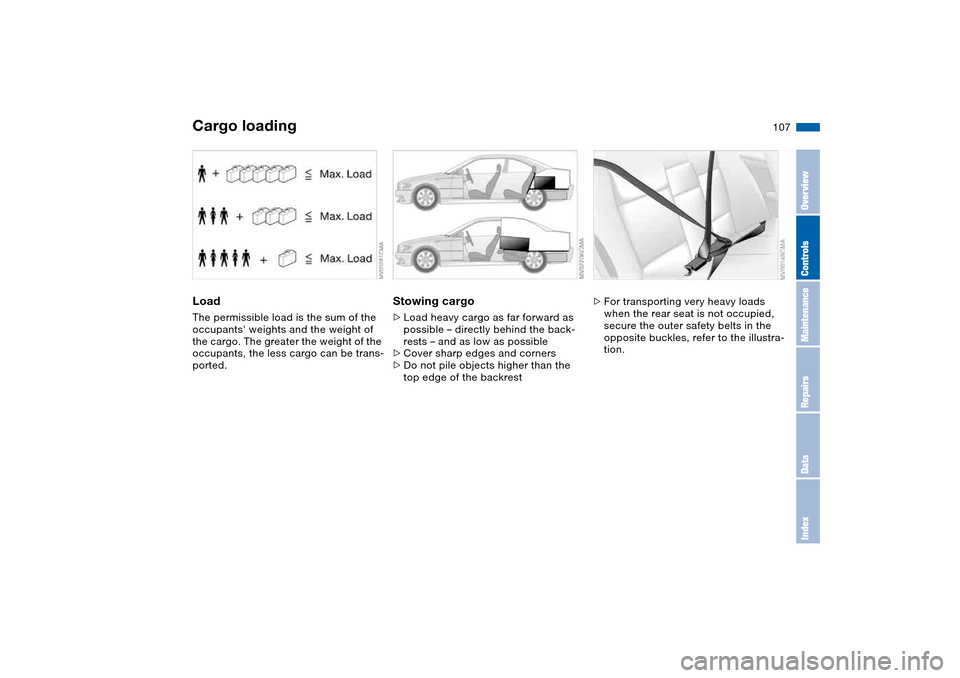
LoadThe permissible load is the sum of the
occupants' weights and the weight of
the cargo. The greater the weight of the
occupants, the less cargo can be trans-
ported.
Stowing cargo>Load heavy cargo as far forward as
possible – directly behind the back-
rests – and as low as possible
>Cover sharp edges and corners
>Do not pile objects higher than the
top edge of the backrest
>For transporting very heavy loads
when the rear seat is not occupied,
secure the outer safety belts in the
opposite buckles, refer to the illustra-
tion.
Cargo loading
OverviewControlsMaintenanceRepairsDataIndex
Page 118 of 174

118
Tire codeKnowing the tire code on the tire side-
wall makes it easier to correctly choose
and identify your tires.Tire sizeE.g. 205/60 R 15 91 W
205 = Nominal width in mm
60 = Cross-sectional ratio in %
R = Radial belt construction
15 = Rim diameter in inches
91 = Load index, not on ZR tires
W = Speed rating, in front of the R on
ZR tiresSpeed ratingQ = up to 100 mph (160 km/h)
T = up to 118 mph (190 km/h)
H = up to 130 mph (210 km/h)
V = up to 150 mph (240 km/h)
W = up to 167 mph (270 km/h)
Y = up to 186 mph (300 km/h)Tire Identification NumberTires with DOT codes comply with the
guidelines of the U.S. Department of
Transportation.DOT code:
E.g. DOT xxxx xxx 1004
xxxx = Manufacturer's code for tire
brand
xxx = Tire size and tire version
1004 = Tire age
Tire ageThe date on which the tire was manu-
factured is indicated by the code on the
sidewall:
DOT … 1004 indicates that the tire was
manufactured in week 10 of the year
2004.
BMW recommends the replacement of
all tires when they are no more than
6 years old, even if a tire life of 10 years
is possible.Uniform Tire Quality GradingQuality grades can be found where
applicable on the tire sidewall between
tread shoulder and maximum section
width. For example:
Tread wear 200 Traction AA
Temperature ADOT quality gradesTread wearTraction AA A B C
Temperature A B C
All passenger car tires must con-
form to Federal Safety Require-
ments in addition to these grades.<
Tread wearThe tread wear grade is a comparative
rating based on the wear rate of the tire
when tested under controlled condi-
tions on a specified government test
course.
For example, a tire graded 150 would
wear one and one-half – 1
1/2 – times as
well on the government course as a tire
graded 100. The relative performance
of tires depends upon the actual condi-
tions of their use, however, and may
depart significantly from the norm due
to variations in driving habits, service
practices and differences in road char-
acteristics and climate.
TractionThe traction grades, from highest to
lowest, are AA, A, B, and C.
Page 122 of 174

122
tire center, preferably your BMW cen-
ter. Observe any country-specific regu-
lations, e.g. on making a corresponding
entry in the vehicle documents.
The factory-approved radial belt tires
are matched to your vehicle and pro-
vide optimum safety and driving com-
fort when used properly.Run Flat tiresIf your vehicle is equipped with Run Flat
tires, refer to Run Flat tires, use only
these tires since no spare wheel is
available in the event of a flat.Special characteristics of winter
tiresBMW recommends the use of winter
tires for operation under winter road
conditions. While all-season tires with
M+S designation provide better winter
traction than summer tires, they gener-
ally do not achieve the full performance
of winter tires.
Run Flat tires:
If your vehicle is equipped with Run Flat
tires, refer to Run Flat tires, please note
the following: when mounting new tires
or replacing summer tires with winter tires, or vice versa, use only Run Flat
tires since no spare wheel is available
in the event of a flat. Your BMW center
will be glad to advise you.
Observing speed ratings:
Never exceed the maximum
speed for which the winter tires
are rated. Unprofessional attempts by
laymen to service tires can lead to dam-
age and accidents. Have this work per-
formed by skilled professionals only.
The technicians at your BMW center
will be glad to assist you with the
required professional knowledge and
specialized equipment.<
StorageAlways store tires in a cool, dry place.
Store them away from light whenever
possible. Protect the tires against con-
tact with oil, grease and fuel. Do not
exceed the maximum tire inflation pres-
sures specified on the tire sidewall.
Snow chains*Only certain snow chains have been
tested by BMW and determined and
approved as roadworthy. Consult your
BMW center for details. BMW recom-
mends using only these approved fine-
link snow chains. Use them in pairs on
either summer or winter tires, but only
on both rear wheels.
Comply with all manufacturer's safety
precautions when mounting the chains.
Do not exceed a speed of 30 mph /
50 km/h when using snow chains.
You cannot mount snow chains on the
following tires:
>225/50 R 16
>225/45 R 17
>245/40 R 17
>225/40 R 18
>255/35 R 18.
Do not initialize the Flat Tire Moni-
tor after mounting snow chains to
the tires.
When driving with snow chains, it may
be useful to turn off the DSC for a short
time, refer to page 81 or 82.<
New wheels and tires