2004 BMW 3.0i ROADSTER&COUPE coolant
[x] Cancel search: coolantPage 14 of 120
Cockpit
12
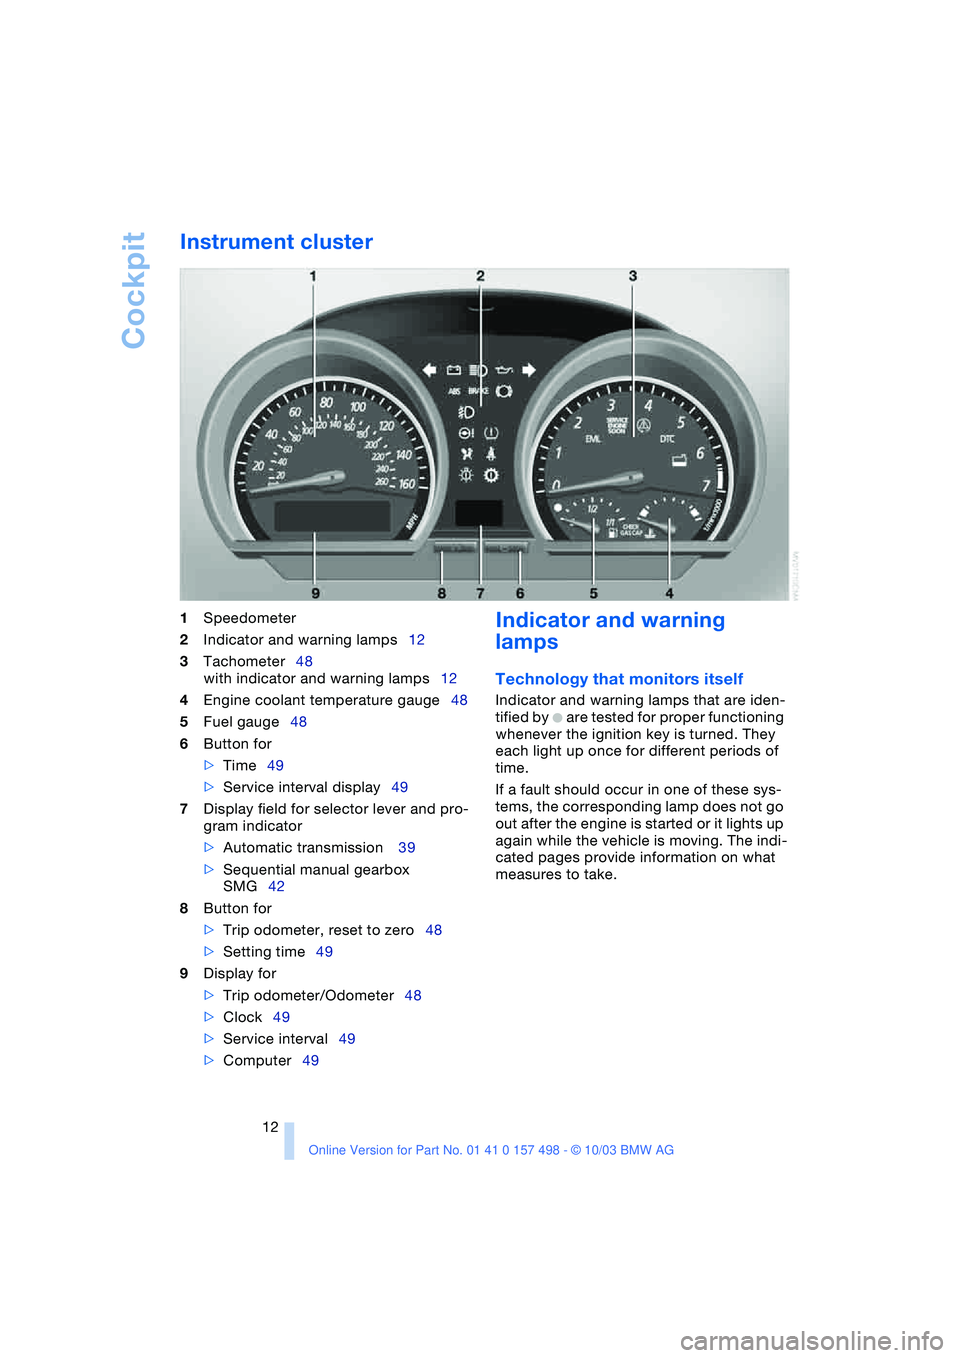
Instrument cluster
1
Speedometer
2
Indicator and warning lamps12
3
Tachometer48
with indicator and warning lamps12
4
Engine coolant temperature gauge48
5
Fuel gauge48
6
Button for
>
Time49
>Service interval display49
7Display field for selector lever and pro-
gram indicator
>Automatic transmission 39
>Sequential manual gearbox
SMG42
8Button for
>Trip odometer, reset to zero48
>Setting time49
9Display for
>Trip odometer/Odometer48
>Clock49
>Service interval49
>Computer49
Indicator and warning
lamps
Technology that monitors itself
Indicator and warning lamps that are iden-
tified by
+ are tested for proper functioning
whenever the ignition key is turned. They
each light up once for different periods of
time.
If a fault should occur in one of these sys-
tems, the corresponding lamp does not go
out after the engine is started or it lights up
again while the vehicle is moving. The indi-
cated pages provide information on what
measures to take.
Page 15 of 120
At a glance
Controls
Driving tips
Mobility Reference
13
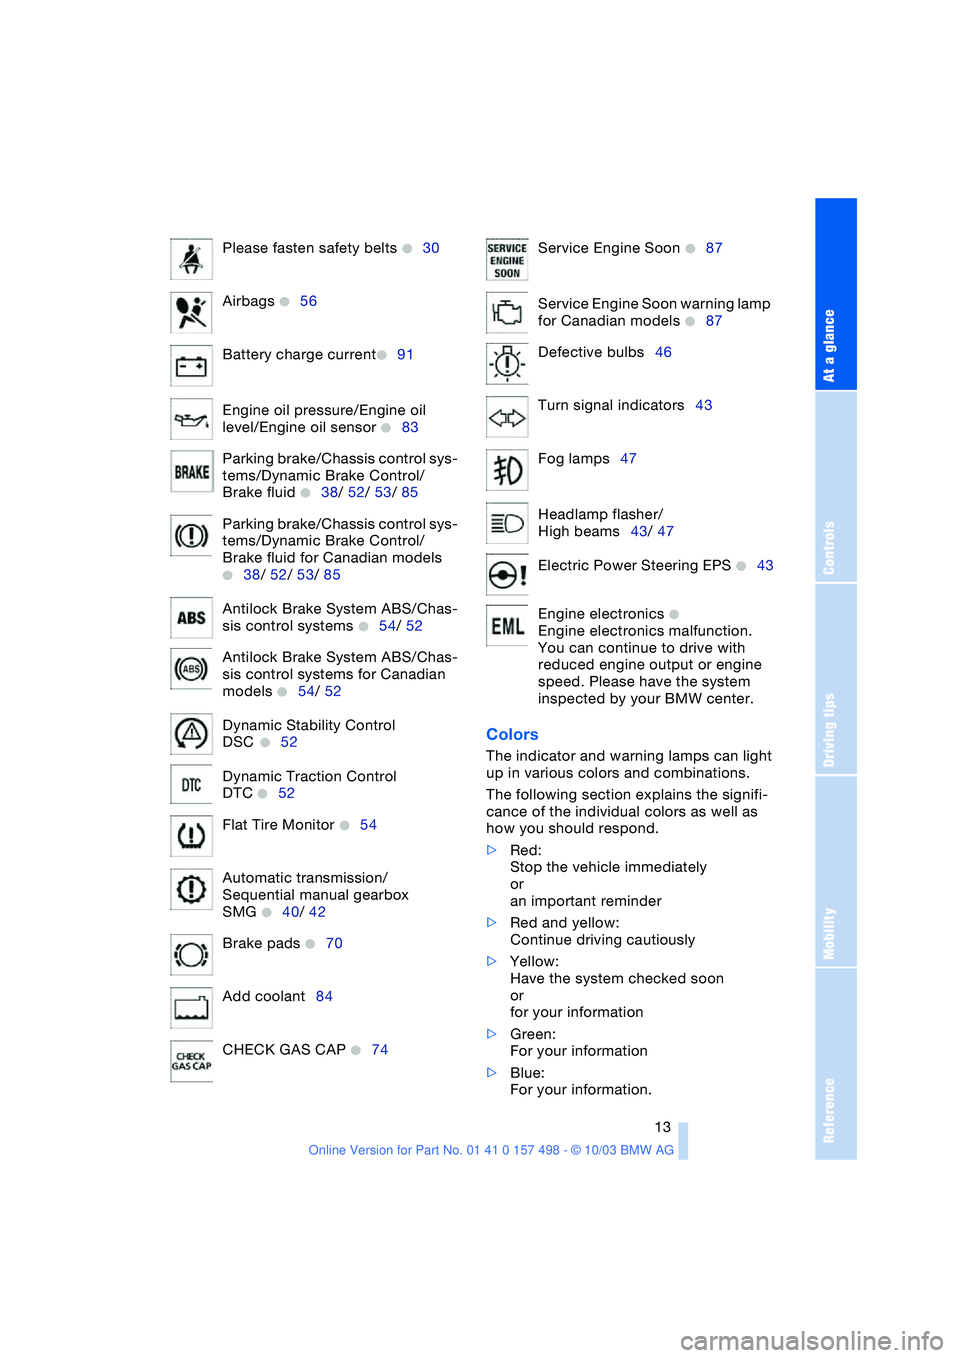
Colors
The indicator and warning lamps can light
up in various colors and combinations.
The following section explains the signifi-
cance of the individual colors as well as
how you should respond.
>Red:
Stop the vehicle immediately
or
an important reminder
>Red and yellow:
Continue driving cautiously
>Yellow:
Have the system checked soon
or
for your information
>Green:
For your information
>Blue:
For your information. Please fasten safety belts
+30
Airbags
+56
Battery charge current
+91
Engine oil pressure/Engine oil
level/Engine oil sensor
+83
Parking brake/Chassis control sys-
tems/Dynamic Brake Control/
Brake fluid
+38/ 52/ 53/ 85
Parking brake/Chassis control sys-
tems/Dynamic Brake Control/
Brake fluid for Canadian models
+38/ 52/ 53/ 85
Antilock Brake System ABS/Chas-
sis control systems
+54/ 52
Antilock Brake System ABS/Chas-
sis control systems for Canadian
models
+54/ 52
Dynamic Stability Control
DSC
+52
Dynamic Traction Control
DTC
+52
Flat Tire Monitor
+54
Automatic transmission/
Sequential manual gearbox
SMG
+40/ 42
Brake pads
+70
Add coolant84
CHECK GAS CAP
+74
Service Engine Soon +87
Service Engine Soon warning lamp
for Canadian models
+87
Defective bulbs46
Turn signal indicators43
Fog lamps47
Headlamp flasher/
High beams43/ 47
Electric Power Steering EPS
+43
Engine electronics
+
Engine electronics malfunction.
You can continue to drive with
reduced engine output or engine
speed. Please have the system
inspected by your BMW center.
Page 50 of 120
Everything under control
48
Everything under control
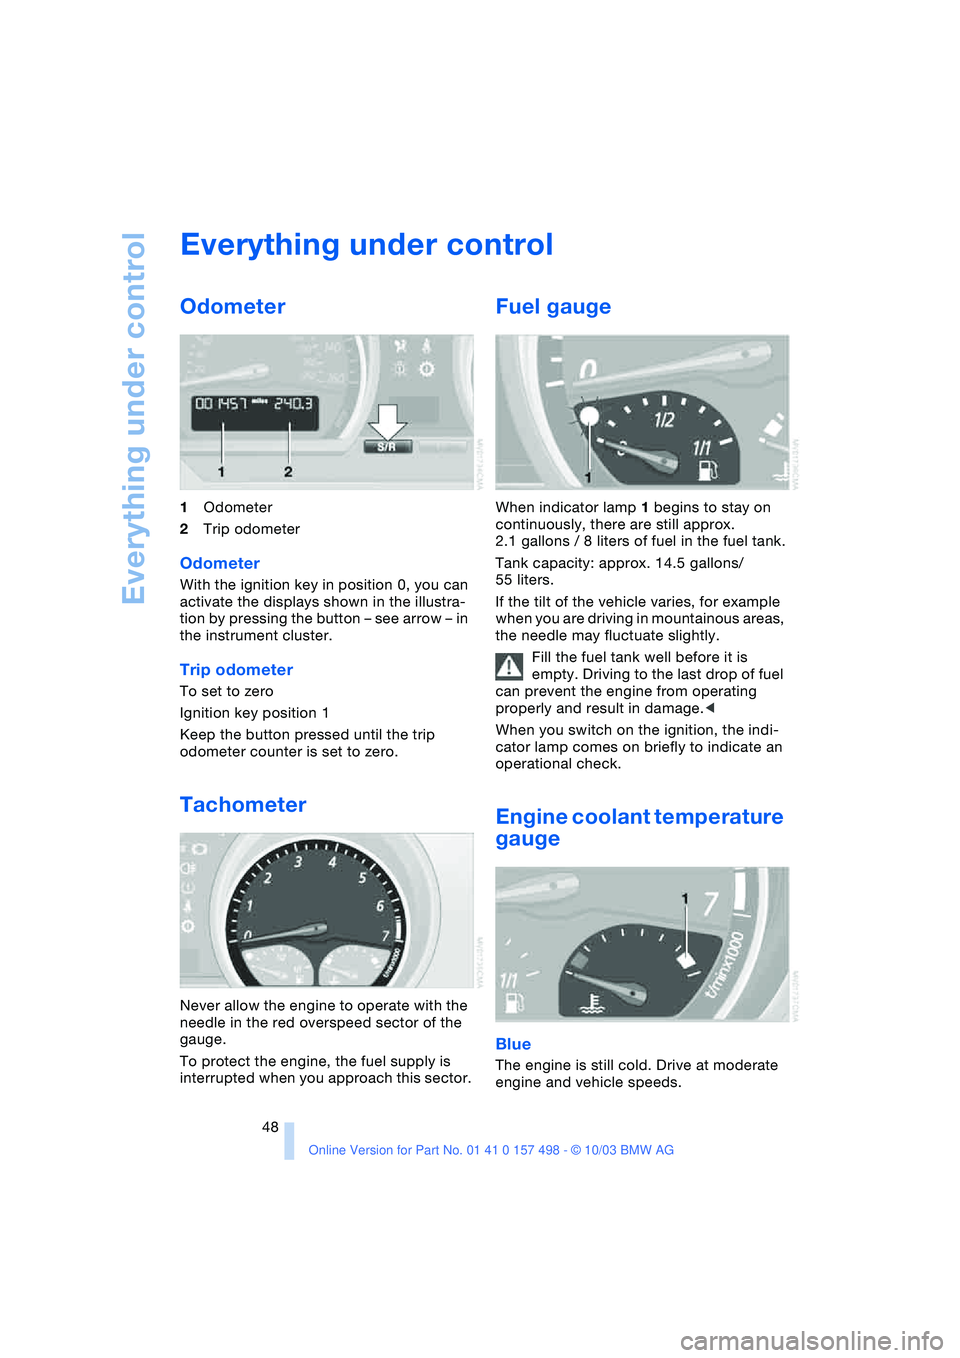
Odometer
1Odometer
2Trip odometer
Odometer
With the ignition key in position 0, you can
activate the displays shown in the illustra-
tion by pressing the button – see arrow – in
the instrument cluster.
Trip odometer
To set to zero
Ignition key position 1
Keep the button pressed until the trip
odometer counter is set to zero.
Tachometer
Never allow the engine to operate with the
needle in the red overspeed sector of the
gauge.
To protect the engine, the fuel supply is
interrupted when you approach this sector.
Fuel gauge
When indicator lamp 1 begins to stay on
continuously, there are still approx.
2.1 gallons / 8 liters of fuel in the fuel tank.
Tank capacity: approx. 14.5 gallons/
55 liters.
If the tilt of the vehicle varies, for example
when you are driving in mountainous areas,
the needle may fluctuate slightly.
Fill the fuel tank well before it is
empty. Driving to the last drop of fuel
can prevent the engine from operating
properly and result in damage.<
When you switch on the ignition, the indi-
cator lamp comes on briefly to indicate an
operational check.
Engine coolant temperature
gauge
Blue
The engine is still cold. Drive at moderate
engine and vehicle speeds.
Page 51 of 120
Reference
At a glance
Controls
Driving tips
Mobility
49
Between the blue and red zones
Normal operating range. The needle may
rise as far as the edge of the red sector dur-
ing normal operation.
Red
When you switch on the ignition, warning
lamp 1 comes on briefly to indicate an
operational check.
Comes on while driving:
The engine has overheated. Stop and
switch the engine off immediately and
allow it to cool down.
For checking the coolant level, refer to
page 84.
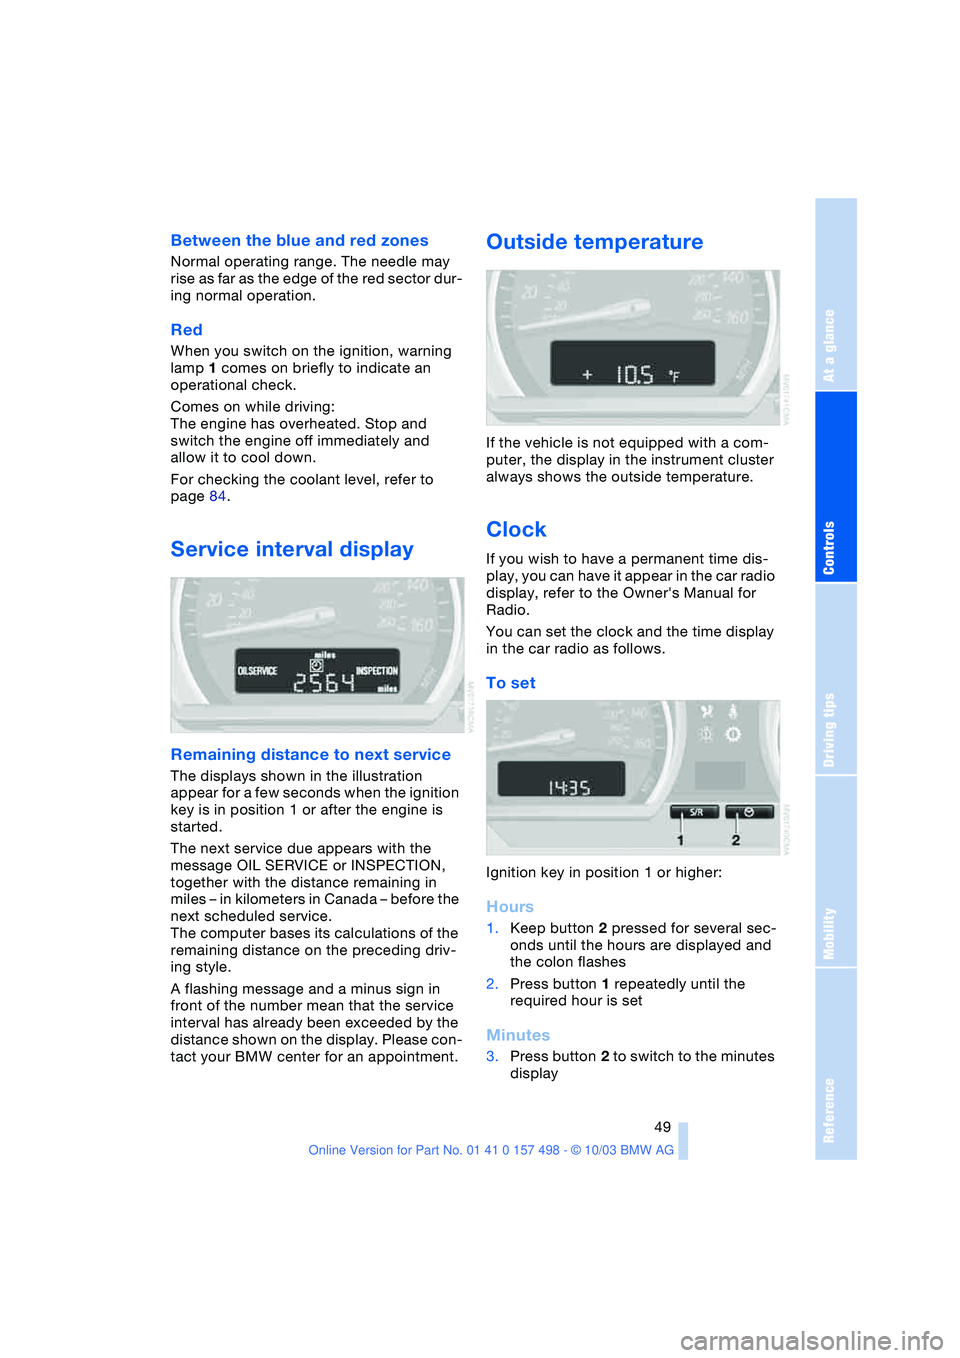
Service interval display
Remaining distance to next service
The displays shown in the illustration
appear for a few seconds when the ignition
key is in position 1 or after the engine is
started.
The next service due appears with the
message OIL SERVICE or INSPECTION,
together with the distance remaining in
miles – in kilometers in Canada – before the
next scheduled service.
The computer bases its calculations of the
remaining distance on the preceding driv-
ing style.
A flashing message and a minus sign in
front of the number mean that the service
interval has already been exceeded by the
distance shown on the display. Please con-
tact your BMW center for an appointment.
Outside temperature
If the vehicle is not equipped with a com-
puter, the display in the instrument cluster
always shows the outside temperature.
Clock
If you wish to have a permanent time dis-
play, you can have it appear in the car radio
display, refer to the Owner's Manual for
Radio.
You can set the clock and the time display
in the car radio as follows.
To set
Ignition key in position 1 or higher:
Hours
1.Keep button 2 pressed for several sec-
onds until the hours are displayed and
the colon flashes
2.Press button 1 repeatedly until the
required hour is set
Minutes
3.Press button 2 to switch to the minutes
display
Page 84 of 120
In the engine compartment
82
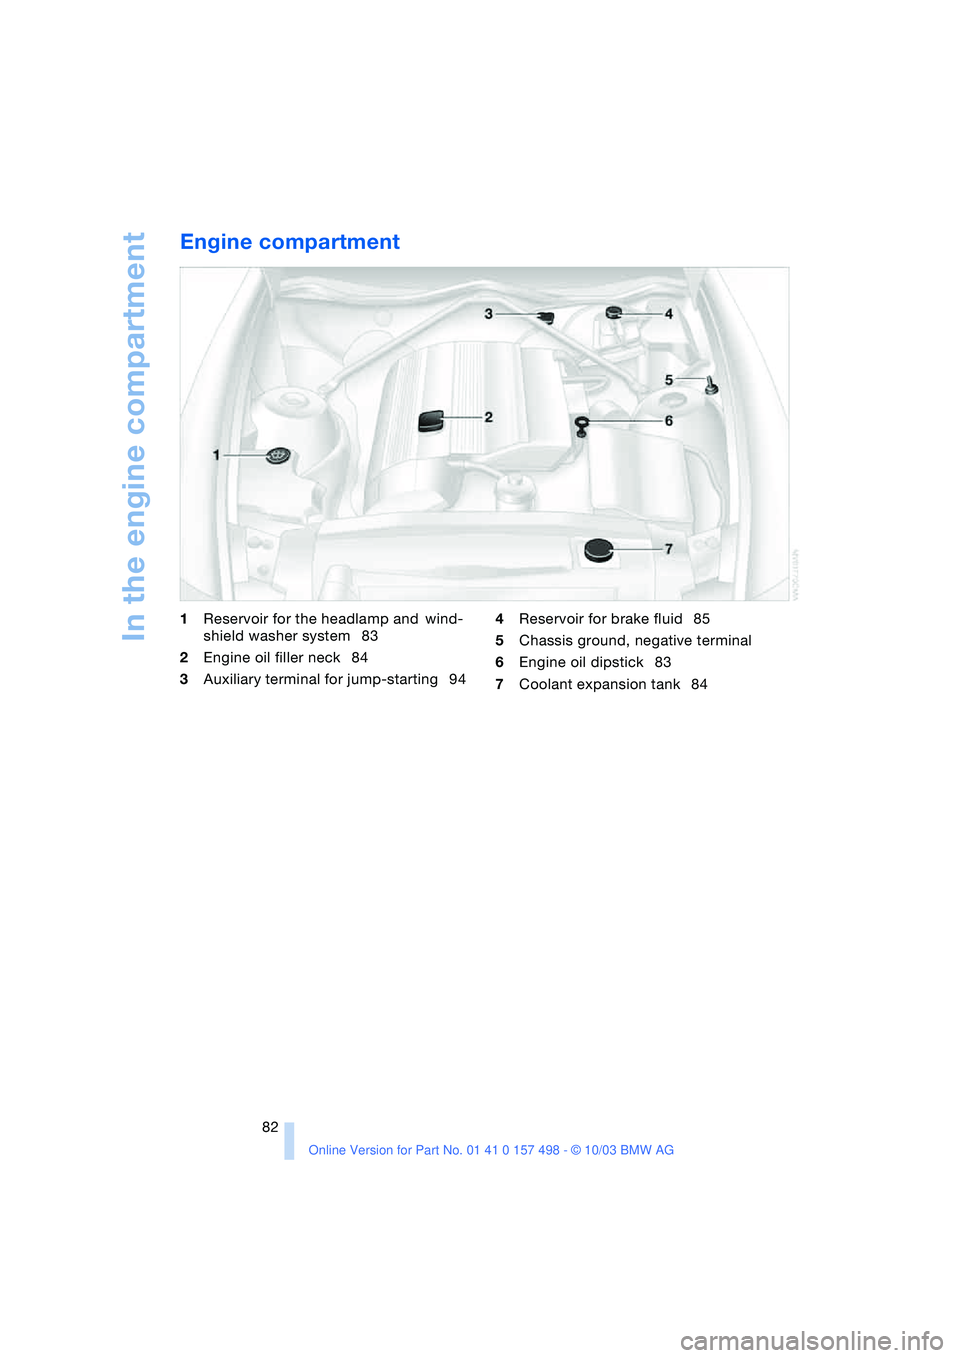
Engine compartment
1Reservoir for the headlamp and wind-
shield washer system 83
2Engine oil filler neck 84
3Auxiliary terminal for jump-starting 944Reservoir for brake fluid 85
5Chassis ground, negative terminal
6Engine oil dipstick 83
7Coolant expansion tank 84
Page 86 of 120
In the engine compartment
84 The oil volume between the two marks on
the dipstick corresponds to approx.
1.1 quarts/1 liter. Do not fill beyond the
upper mark on the dipstick. Excess oil will
damage the engine.
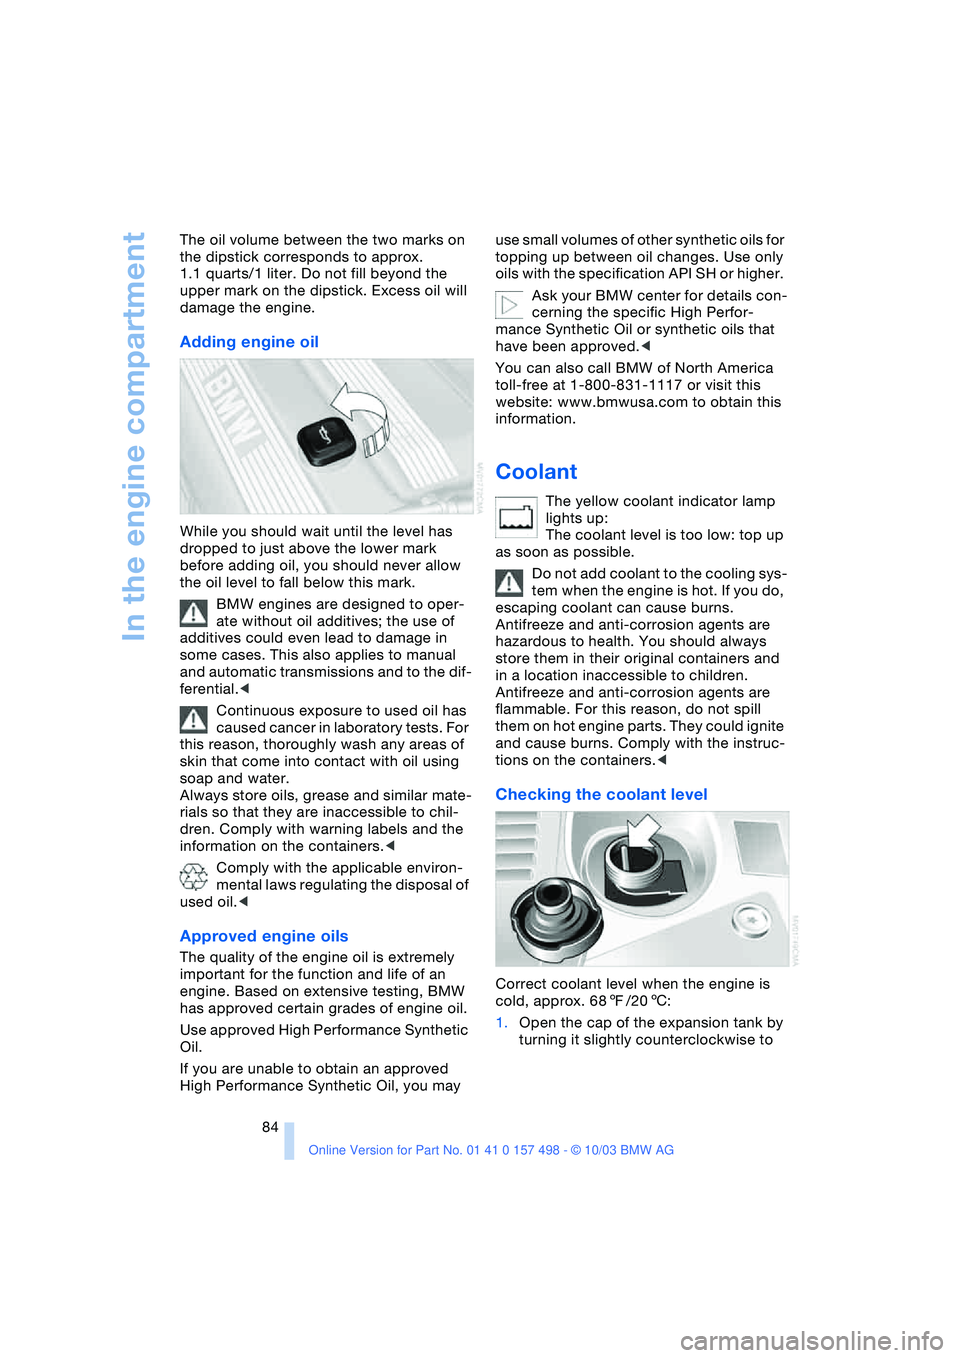
Adding engine oil
While you should wait until the level has
dropped to just above the lower mark
before adding oil, you should never allow
the oil level to fall below this mark.
BMW engines are designed to oper-
ate without oil additives; the use of
additives could even lead to damage in
some cases. This also applies to manual
and automatic transmissions and to the dif-
ferential.<
Continuous exposure to used oil has
caused cancer in laboratory tests. For
this reason, thoroughly wash any areas of
skin that come into contact with oil using
soap and water.
Always store oils, grease and similar mate-
rials so that they are inaccessible to chil-
dren. Comply with warning labels and the
information on the containers.<
Comply with the applicable environ-
mental laws regulating the disposal of
used oil.<
Approved engine oils
The quality of the engine oil is extremely
important for the function and life of an
engine. Based on extensive testing, BMW
has approved certain grades of engine oil.
Use approved High Performance Synthetic
Oil.
If you are unable to obtain an approved
High Performance Synthetic Oil, you may use small volumes of other synthetic oils for
topping up between oil changes. Use only
oils with the specification API SH or higher.
Ask your BMW center for details con-
cerning the specific High Perfor-
mance Synthetic Oil or synthetic oils that
have been approved.<
You can also call BMW of North America
toll-free at 1-800-831-1117 or visit this
website: www.bmwusa.com to obtain this
information.
Coolant
The yellow coolant indicator lamp
lights up:
The coolant level is too low: top up
as soon as possible.
Do not add coolant to the cooling sys-
tem when the engine is hot. If you do,
escaping coolant can cause burns.
Antifreeze and anti-corrosion agents are
hazardous to health. You should always
store them in their original containers and
in a location inaccessible to children.
Antifreeze and anti-corrosion agents are
flammable. For this reason, do not spill
them on hot engine parts. They could ignite
and cause burns. Comply with the instruc-
tions on the containers.<
Checking the coolant level
Correct coolant level when the engine is
cold, approx. 687/206:
1.Open the cap of the expansion tank by
turning it slightly counterclockwise to
Page 87 of 120
Reference
At a glance
Controls
Driving tips
Mobility
85
allow accumulated pressure to escape,
then open completely
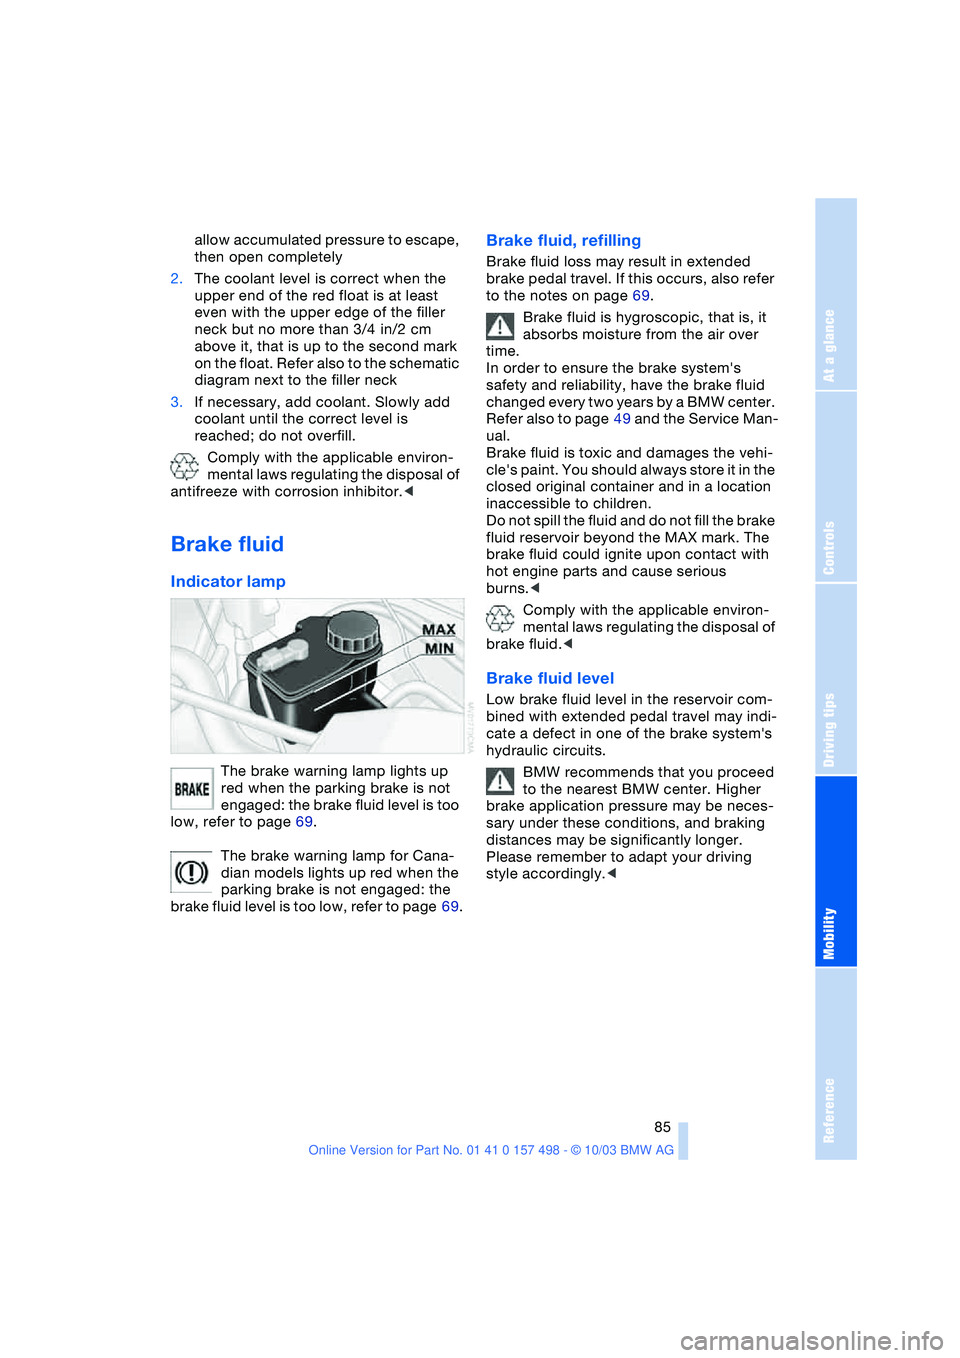
2.The coolant level is correct when the
upper end of the red float is at least
even with the upper edge of the filler
neck but no more than 3/4 in/2 cm
above it, that is up to the second mark
on the float. Refer also to the schematic
diagram next to the filler neck
3.If necessary, add coolant. Slowly add
coolant until the correct level is
reached; do not overfill.
Comply with the applicable environ-
mental laws regulating the disposal of
antifreeze with corrosion inhibitor.<
Brake fluid
Indicator lamp
The brake warning lamp lights up
red when the parking brake is not
engaged: the brake fluid level is too
low, refer to page 69.
The brake warning lamp for Cana-
dian models lights up red when the
parking brake is not engaged: the
brake fluid level is too low, refer to page 69.
Brake fluid, refilling
Brake fluid loss may result in extended
brake pedal travel. If this occurs, also refer
to the notes on page 69.
Brake fluid is hygroscopic, that is, it
absorbs moisture from the air over
time.
In order to ensure the brake system's
safety and reliability, have the brake fluid
changed every two years by a BMW center.
Refer also to page 49 and the Service Man-
ual.
Brake fluid is toxic and damages the vehi-
cle's paint. You should always store it in the
closed original container and in a location
inaccessible to children.
Do not spill the fluid and do not fill the brake
fluid reservoir beyond the MAX mark. The
brake fluid could ignite upon contact with
hot engine parts and cause serious
burns.<
Comply with the applicable environ-
mental laws regulating the disposal of
brake fluid.<
Brake fluid level
Low brake fluid level in the reservoir com-
bined with extended pedal travel may indi-
cate a defect in one of the brake system's
hydraulic circuits.
BMW recommends that you proceed
to the nearest BMW center. Higher
brake application pressure may be neces-
sary under these conditions, and braking
distances may be significantly longer.
Please remember to adapt your driving
style accordingly.<
Page 106 of 120
Everything from A to Z
104
A
ABS Antilock Brake
System 54
– indicator lamp 13
Accessories, refer to
– For your own safety 5
– Your individual vehicle 5
Accident, refer to
Emergency call 93
Activated-charcoal filter 63
Adaptive Transmission
Control ATC 40
Air, drying,
refer to Air conditioning
mode 59, 62
Airbags 56
– deactivation 33
– indicator lamp 13
– passenger airbags
indicator lamp 34
– reactivation 33
– safe seating position 27
Airbag switch 33
Air conditioning 58
Air conditioning mode
– air conditioning 59
– automatic climate
control 62
Air conditioning mode
switching on/off
manually 59, 62
Air distribution
– air conditioning 59
– automatic climate
control 62
Airing out, refer to
Ventilation 59, 63
Air outlets,
refer to Ventilation 59, 63
Air pressure, refer to Tire
inflation pressure 75
Air recirculation, refer to
Recirculated-air
mode 59, 63Air supply/blower
– air conditioning 59
– automatic climate
control 62
AKI, refer to Fuel
specifications 74
Alarm system
– avoiding unintentional
alarms 26
Antenna, refer to the
Caring for your vehicle
brochure
Antifreeze 83, 84
– coolant 84
– washing fluids 83
Antilock Brake System
ABS 54
– indicator lamp 13
Anti-theft alarm system,
refer to Alarm system 25
Anti-theft protection 25
Approved axle load, refer to
Weights 101
Approved engine oils 84
Approved gross vehicle
weight, refer to
Weights 101
Artificial leather, refer to the
Caring for your vehicle
brochure
Ashtray 65
Assistant systems, refer to
Dynamic Stability Control
DSC 52
ATC Adaptive Transmission
Control 40
AUC Automatic
recirculated-air
control 63Automatic
– air distribution 62
– air supply/blower 62
– cruise control 45
– headlamp control 46
– luggage compartment lid
operation 19
Automatic car wash, refer
to the Caring for your
vehicle brochure
Automatic climate
control 61
Automatic recirculated-air
control AUC 63
Automatic transmission
with Steptronic 39
– ignition 36
– indicator lamp 13
– interlock 36
– selector lever lock 39
– shiftlock 39
AUTO program,
refer to Automatic air
distribution 62
Average fuel
consumption 51
– setting units of
measure 50
Average speed 51
– setting units of
measure 50
Axle loads, refer to
Weights 101
B
Backrest, refer to Seat
adjustment 28
Backup lamps 38
– bulb replacement 90
Bandages, refer to First-aid
kit 94
Everything from A to Z
Index