Page 89 of 120

Reference
At a glance
Controls
Driving tips
Mobility
87
Laws and regulations
California Proposition 65
warning
California laws require us to state the fol-
lowing warning:
Engine exhaust and a wide variety of
automobile components and parts,
including components found in the interior
furnishings in a vehicle, contain or emit
chemicals known to the State of California
to cause cancer and birth defects and
reproductive harm. In addition, certain flu-
ids contained in vehicles and certain prod-
ucts of component wear contain or emit
chemicals known to the State of CA to
cause cancer and birth defects or other
reproductive harm. Battery posts, terminals
and related accessories contain lead and
lead compounds. Wash your hands after
handling. Used engine oil contains chemi-
cals that have caused cancer in laboratory
animals. Always protect your skin by wash-
ing thoroughly with soap and water.<
OBD interface socket
The Onboard Diagnostic OBD interface
socket is located on the left of the driver's
side under the instrument panel and under
a cover.
The cover has the letters OBD on it.
The purpose of the OBD system is to
ensure proper operation of the emission
control system for the vehicle's lifetime. The system monitors emission-related
components and system for deterioration
and malfunction.
If the Service Engine Soon indicator
lamp comes on either continuously
or intermittently, this indicates a
fault in the emissions-related electronic
systems. Although the vehicle remains
operational, you should have the systems
checked by your BMW center at the earli-
est possible opportunity.
The illuminated indicator informs you of the
need for service, not that you need to stop
the vehicle. However, the systems should
be checked by your BMW center at the
next opportunity.
If the indicator blinks or flashes, this indi-
cates a high level of engine misfire. Reduce
speed and contact the nearest BMW center
immediately. Severe engine misfiring over
even a short period of time can seriously
damage emission control system compo-
nents, especially the catalytic converter.
Service Engine Soon warning lamp
for Canadian models.
If the gas cap is not on tight enough,
the OBD system can detect leaking
vapor and the indicator will light up. If the
gas cap is then tightened, the indicator will
usually go out after a short period of time.<
Page 90 of 120

Replacement procedures
88
Replacement procedures
Onboard tool kit
The onboard tool kit is stored in a tool
pouch. It is located in the luggage compart-
ment beneath the floor panel.
Windshield wiper blades
1.Fold the wiper arm completely out from
the windshield
2.Position the wiper blade at an angle and
pull the release spring, see arrow
3.Fold the wiper blade down and unhook
it toward the windshield
4.Pull the wiper blade past the wiper arm
toward the top
5.Insert a new wiper blade and apply
pressure until you hear it engage.
Lamps and bulbs
The lamps and bulbs make essential contri-
butions to the safety of your vehicle. There-
fore, comply fully with the following instruc-
tions during bulb replacement. If you are
not familiar with the procedures, BMW rec-
ommends that you have your BMW center
carry out the work.
Do not touch the glass portion of
a new bulb with your bare hands
since even small amounts of impurities
burn in to the surface and reduce the ser-
vice life of the bulb. Use a clean cloth,
paper napkin or a similar material, or hold
the bulb by its metallic base.<
A replacement bulb set is available from
your BMW center.
Before working on the electrical sys-
tem, switch off the electrical acces-
sory you are working on or disconnect the
cable from the negative terminal of the bat-
tery. Failure to observe this precaution
could result in short circuits.
To prevent injuries and damage, always
comply with any instructions provided by
the bulb manufacturer.<
Accessing the headlamps
Protective cover in the wheel well
To gain access to the headlamp covers,
turn the front wheels in the required direc-
tion.
Page 91 of 120

Reference
At a glance
Controls
Driving tips
Mobility
89
1.Open the caps with a suitable object,
e.g. a coin or screwdriver
2.Fold up the protective cover in the
wheel well.
Headlamp cover
1.Pull the wire clamp out straight
2.Pull the wire clamp past the catches,
see arrows, and fold it down
3.Flip the headlamp cover open and
remove.
Reinstall the headlamp cover care-
fully. If it is not on tight, the headlamp
installation could be damaged.<
Reinstall the headlamp cover in reverse
order.
Low beams and high beams
Left side of engine compartment:
1Low beams
2High beams
H7 bulb, 55 watts
The H7 bulb is pressurized. There-
fore, wear safety glasses and protec-
tive gloves. Failure to comply with these
precautions could result in physical injury if
the bulb is damaged.<
1.Turn the bulb holder to the left and pull
out
2.Remove and replace the bulb
3.Install in the reverse order.
When cleaning the headlamps,
please observe the instructions in the
Caring for your vehicle brochure.<
Xenon lamps*
The service life of these bulbs is very long
and the probability of a failure is very low,
provided that they are not switched on and
off an unusual number of times. If one of
these bulbs should nevertheless fail, it is
possible to continue driving with great cau-
tion using the fog lamps, provided traffic
laws in your area do not prohibit this.
Because of the extremely high volt-
ages involved, any work on the xenon
lighting system, including bulb-changing,
should be carried out by technically quali-
fied personnel only. Otherwise, there is a
risk of fatal injury.<
Page 92 of 120

Replacement procedures
90
Front turn signal indicators
21 watt bulb
1.Insert a Phillips-head screwdriver from
the onboard toolkit into the appropriate
opening, arrows 1
2.Turn the screwdriver to the left,
arrows 2
3.Use the Phillips-head screwdriver to
pull out the entire bulb holder
4.Replace the bulb
5.Install in the reverse order.
Side turn signal indicators
5 watt bulb
1.Turn the lamp to the left and remove
2.Apply gentle pressure to the bulb while
turning it to the left to remove
3.Install in the reverse order.
Tail lamps
Tail lamps 1: 21/4 watt bulbs
Remaining bulbs: 21 watt
1Tail lamp/brake lamp, red
2Turn signal indicator, yellow
3Backup lamp, white
On the right-hand side of the luggage com-
partment:
1.Remove the cover by turning the lock to
the right; refer to the detail in the illus-
tration
2.Applying light pressure, turn the bulb to
the left. Remove and exchange the bulb
3.Reinstall the cover.
Center high-mount brake lamp
The LED strip is in the luggage compart-
ment lid.
Page 93 of 120

Reference
At a glance
Controls
Driving tips
Mobility
91
Please contact a BMW center in case of a
malfunction.
License plate lamps
5 watt bulb
1.Push out the lamp with a suitable object
and remove it
2.Replace the bulb.
Snap the lamp back into place.
Changing a wheel
Run Flat tires
Your BMW is equipped with Run Flat tires.
Therefore, the wheel no longer has to be
changed immediately in the event of a loss
in inflation pressure.
Run Flat tires are labeled on the sidewall
with a circular symbol containing the letters
RSC. Refer to page 80.
BMW recommends that you consult your
BMW center if you wish to replace the tires
of your BMW, or change from summer to
winter tires or vice versa.
Your BMW center knows how to work with
Run Flat tires and is equipped with the nec-
essary special tools.
When mounting or replacing summer
tires with winter tires, or vice versa,
use only Run Flat tires since no spare
wheel is available in the event of a flat.<
Jacking points
The jacking points are located at the posi-
tions indicated in the illustration.
Your BMW center can provide you
with a suitable jack.<
Battery
Maintenance
The battery is completely maintenance-
free. This means that the original electro-
lyte will normally last for the service life of
the battery under moderate climatic condi-
tions.
Please consult your BMW center
whenever you have any questions
concerning the battery.<
Indicator lamp
The indicator lamp for the battery
charge current lights up:
The battery is no longer being
charged. The alternator drive belt is defec-
tive or there is a malfunction in the charging
circuit of the alternator. Please contact the
nearest BMW center.
If the drive belt is defective, pull over
and switch off the engine immediately
to prevent overheating and serious engine
damage.
If the onboard supply voltage drops to a
very low level, increased steering effort
may also be necessary.<
Page 94 of 120
Replacement procedures
92
Charging the battery
Charge the battery in the vehicle only when
the engine is not running. For information
on connections, refer to Jump-starting on
page 94.
Battery disposal
Return used batteries to a recycling
point or to your BMW center. Maintain
the battery in an upright position for trans-
port and storage. Secure the battery
against tilting when transporting.<
Fuses
You will find the fuses and information on
their respective allocation behind the glove
compartment.
1.Open the glove compartment
2.Press the lock on the left; see arrow 1
3.Press the lock on the right; see arrow 2
4.Swing the glove compartment down.
Spare fuses and plastic tweezers for grasp-
ing the fuses are found in the onboard tool
kit; refer to page 88.
Do not attempt to repair a burned fuse
or replace it with a fuse having a dif-
ferent color or amperage rating. To do this
could cause a fire in the vehicle as a result
of circuit overload.<
Page 95 of 120

Reference
At a glance
Controls
Driving tips
Mobility
93
Giving and receiving assistance
Receiving assistance
The BMW Group's Mobile Service offers
you 24-hour assistance in the event of a
breakdown, even on weekends and holi-
days.
The telephone numbers of the Mobile Ser-
vice control center in your country are
listed in the BMW Dealer Directory.
If your vehicle has the necessary equip-
ment, you can contact the Mobile Service
or issue an emergency call using buttons in
the center console, behind the parking
brake under a cover.
When an emergency call is initiated, a tele-
phone connection is established with the
general emergency call center.
In vehicles with activated BMW Assist
function, a telephone connection is set up
to the BMW Assist emergency call center. If
the current location of your vehicle can be
determined, this location is transmitted to
the BMW Assist emergency call center.
Fold up the cover.
1Emergency call
2Mobile Service
Requirements for initiating an emergency
call or contacting Mobile Service:
>The car phone must be registered with
a mobile network
>The emergency call system must be
operational.
Initiating an emergency call*
Press button 1 for at least 2 seconds.
The indicator lamp flashes as soon as a
telephone connection has been set up to
the main emergency call center.
If the indicator lamp is flashing but you can-
not hear the emergency call center, you
may still be heard by the emergency call
center.
For technical reasons, the emergency
call function cannot be guaranteed in
certain unfavorable conditions.<
If certain requirements are met, an emer-
gency call is automatically initiated after a
serious accident. The automatic emer-
gency call will not be hindered by pressing
the button.
Mobile Service*
To establish contact with the BMW Group's
Mobile Service:
Press button 2 for at least 2 seconds.
Depending on the country you are in, your
vehicle's current location will also be trans-
mitted if your vehicle is equipped with an
activated BMW Assist function.
Page 96 of 120

Giving and receiving assistance
94
Warning triangle*
The warning triangle is stored in the rear
luggage compartment panel.
Pull the ends of the rubber bands upward
and out of the fasteners.
Always observe all legal regulations
requiring a warning triangle to be car-
ried in the vehicle.<
First-aid kit*
The first-aid kit is located beneath the pas-
senger seat.
To open
Pull the handle and fold the cover down-
ward.
To close
Fold the cover up and press into the catch.
Some of the articles in the first-aid kit
have a limited period of use before
expiration. For this reason, check the expi-
ration dates of each of the items regularly,
and replace any whose expiration dates
have passed. You can acquire replace-
ments in any drugstore or pharmacy.
Always observe all legal regulations requir-ing a first-aid kit to be carried in the vehi-
cle.<
Jump-starting
When your battery is discharged you can
use two jumper cables to start your vehicle
with power from the battery in a second
vehicle. You can also use the same method
to help start another vehicle. Always use
jumper cables with fully insulated handles
on the terminal clamps.
Do not touch components carrying
current on a running engine. Contact
with these components can cause fatal
injury. Carefully observe the following
instructions to avoid personal injury and/or
damage to one or both vehicles.<
Preparations
1.Check whether the battery of the sup-
port vehicle has 12 volts and approxi-
mately the same capacity – measured in
Ah. This information is provided on the
battery
2.Stop the engine of the support vehicle
3.Switch off all electrical accessories in
both vehicles
Make absolutely certain that there is
no contact between the bodywork of
the two vehicles: short circuit hazard.<
 1
1 2
2 3
3 4
4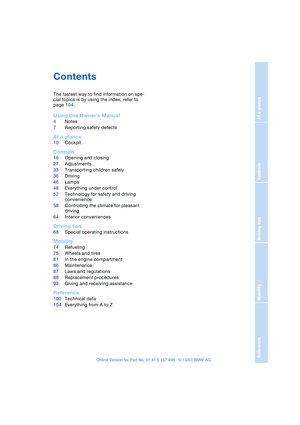 5
5 6
6 7
7 8
8 9
9 10
10 11
11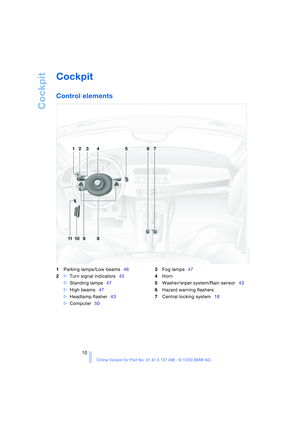 12
12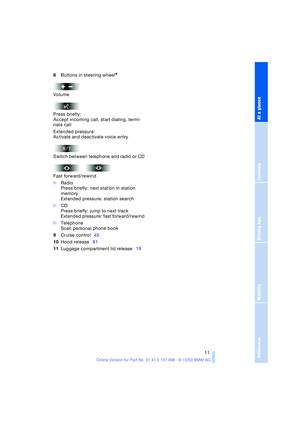 13
13 14
14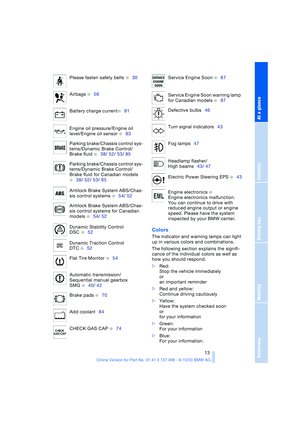 15
15 16
16 17
17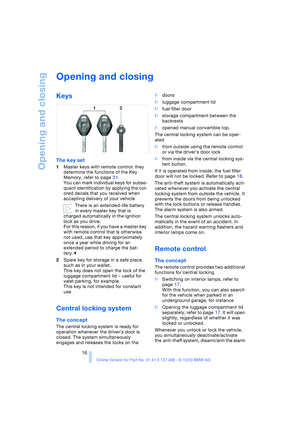 18
18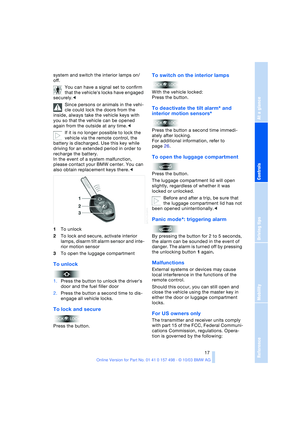 19
19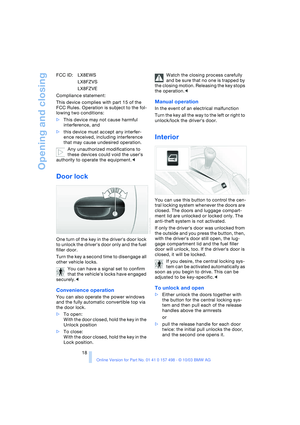 20
20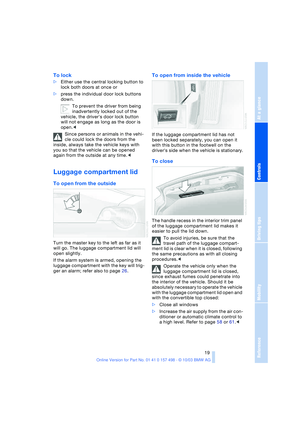 21
21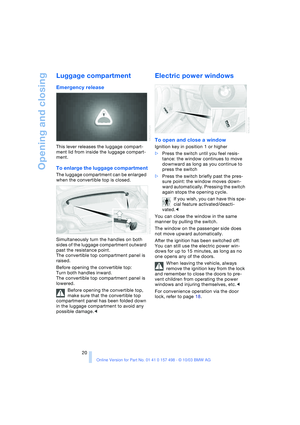 22
22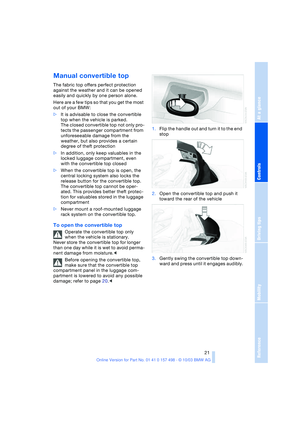 23
23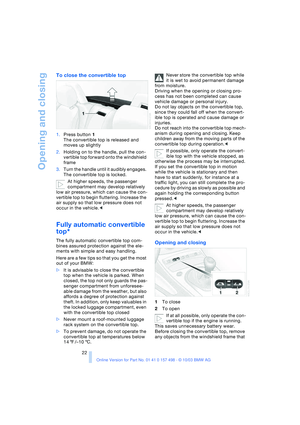 24
24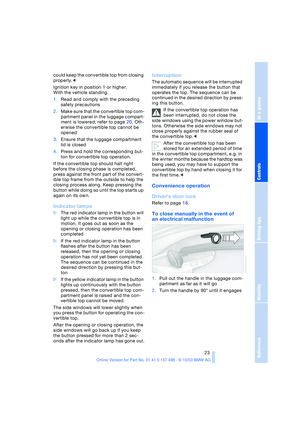 25
25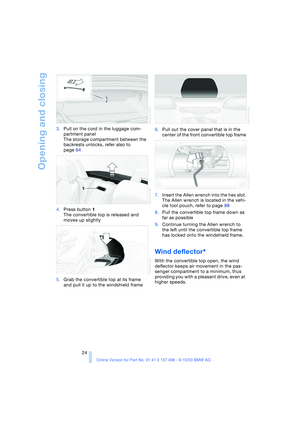 26
26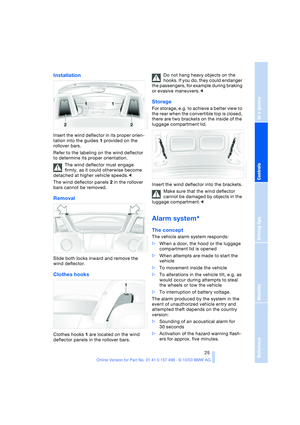 27
27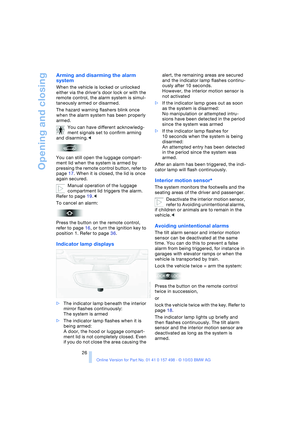 28
28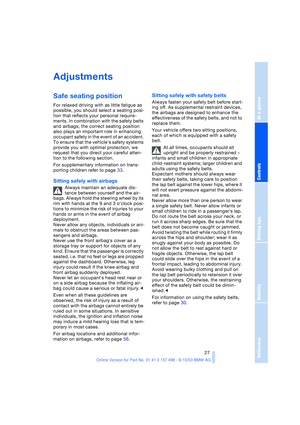 29
29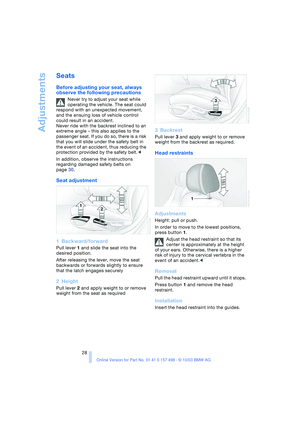 30
30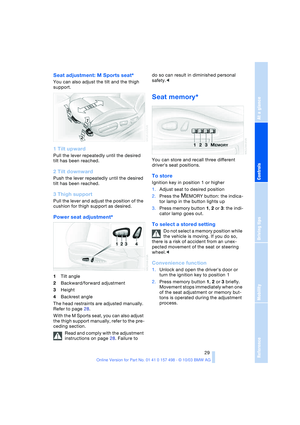 31
31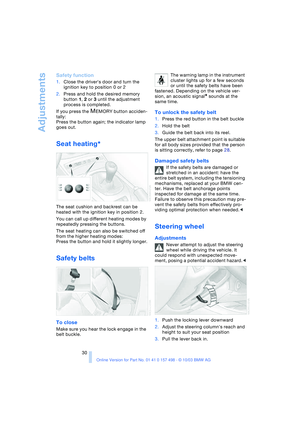 32
32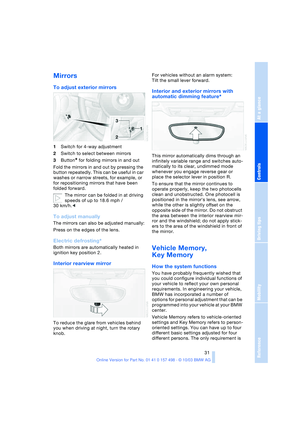 33
33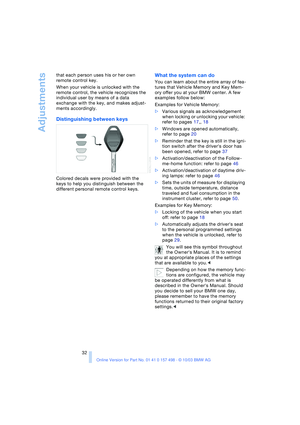 34
34 35
35 36
36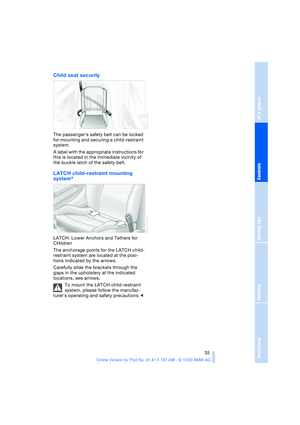 37
37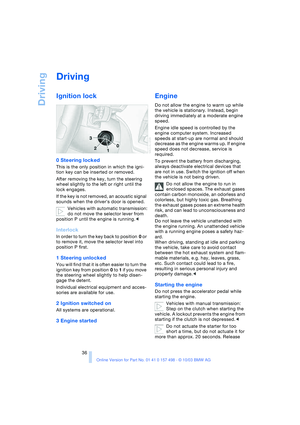 38
38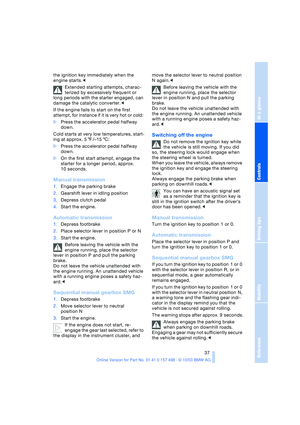 39
39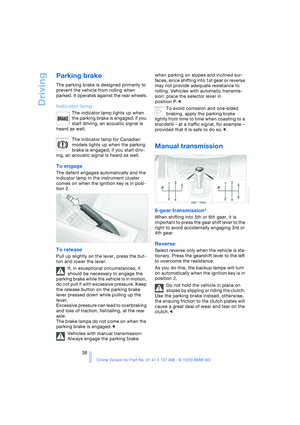 40
40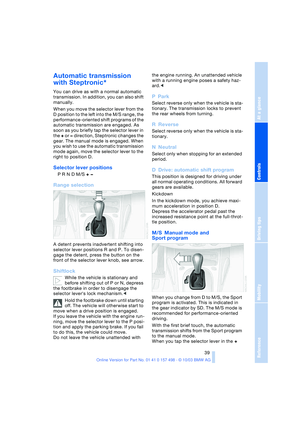 41
41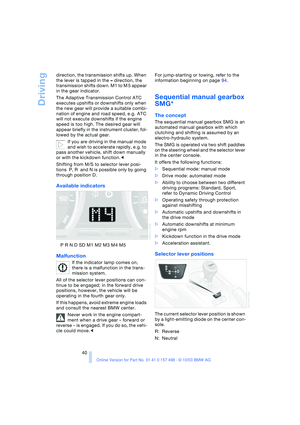 42
42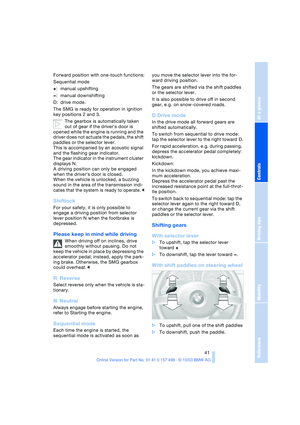 43
43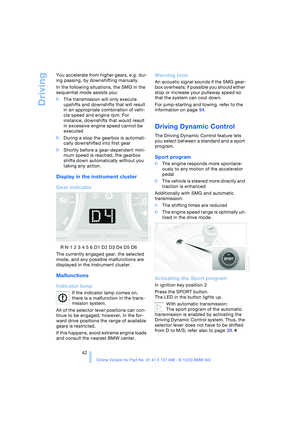 44
44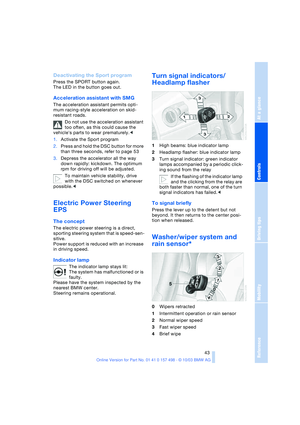 45
45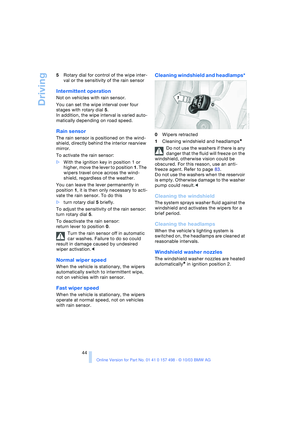 46
46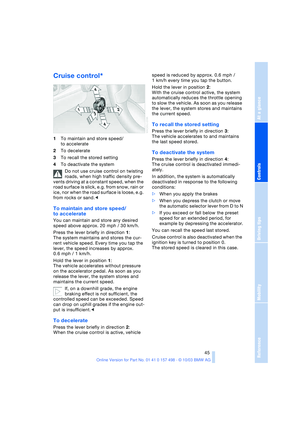 47
47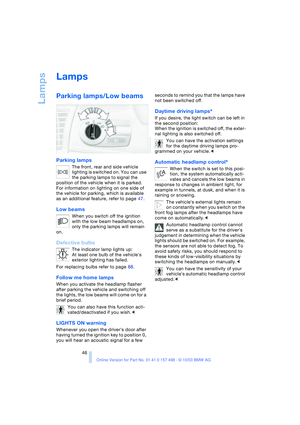 48
48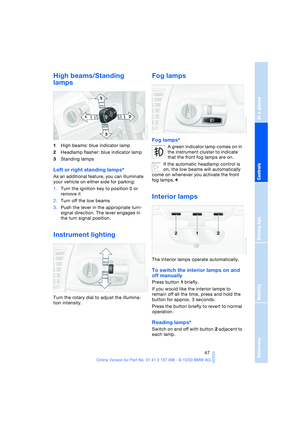 49
49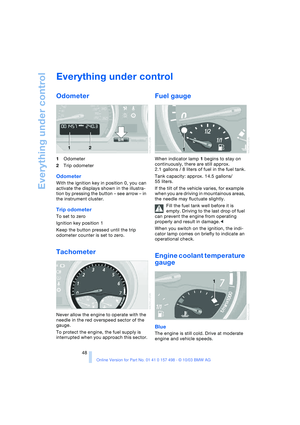 50
50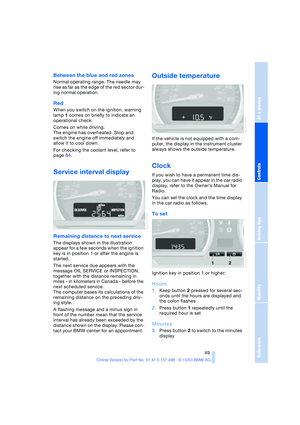 51
51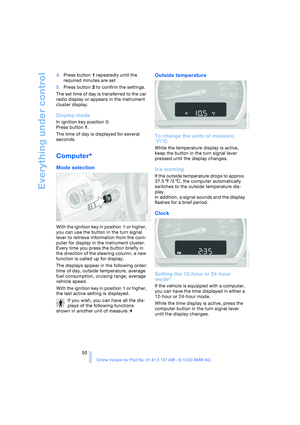 52
52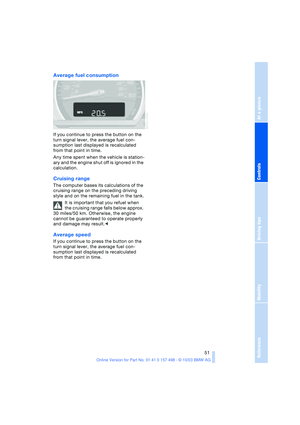 53
53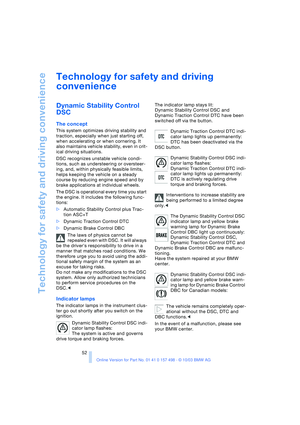 54
54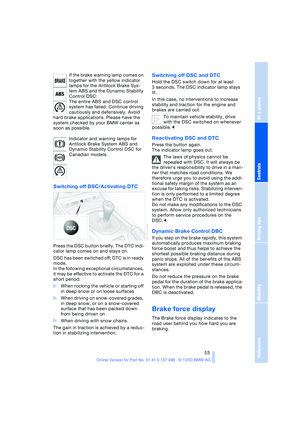 55
55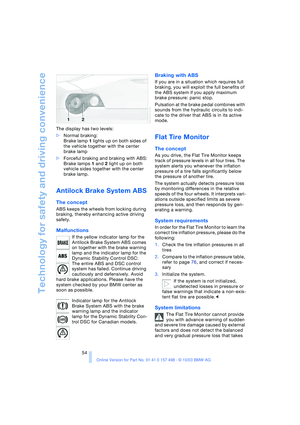 56
56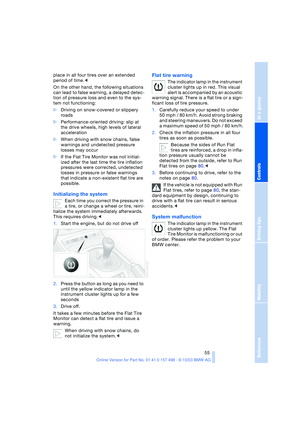 57
57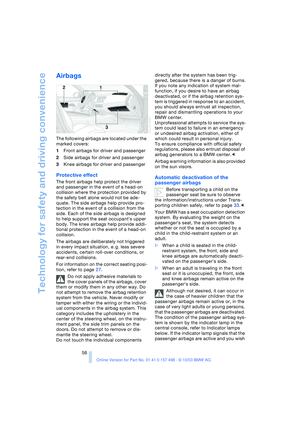 58
58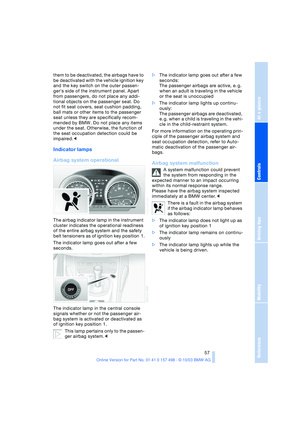 59
59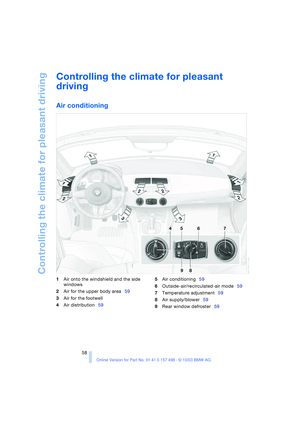 60
60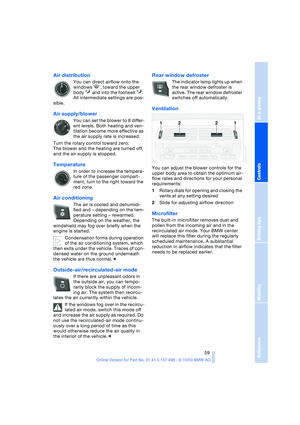 61
61 62
62 63
63 64
64 65
65 66
66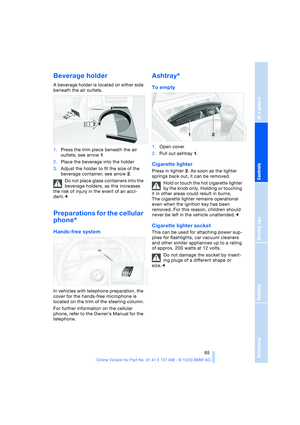 67
67 68
68 69
69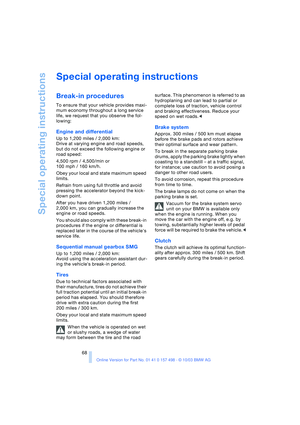 70
70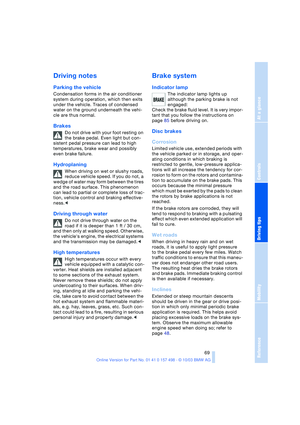 71
71 72
72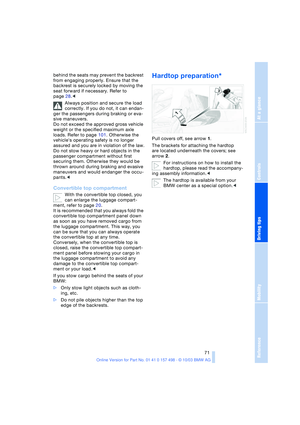 73
73 74
74 75
75 76
76 77
77 78
78 79
79 80
80 81
81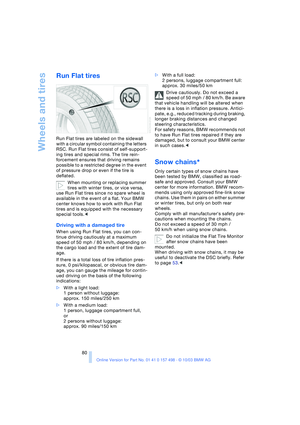 82
82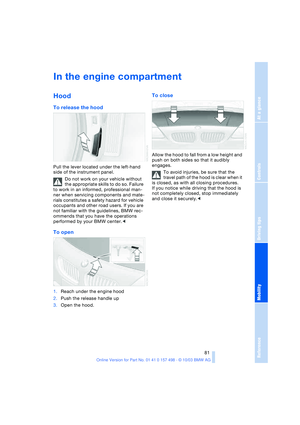 83
83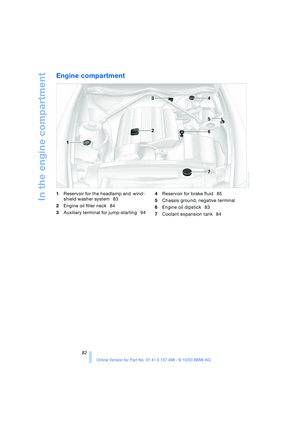 84
84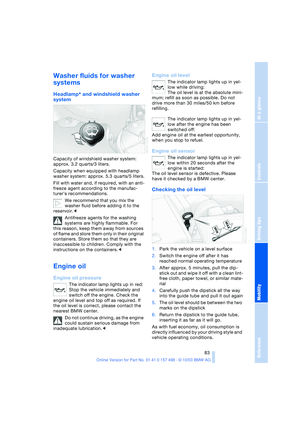 85
85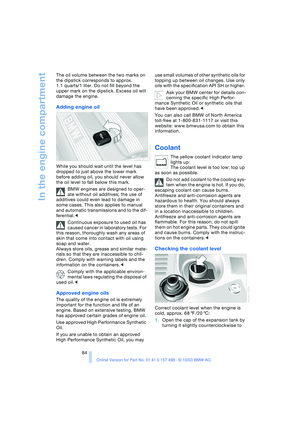 86
86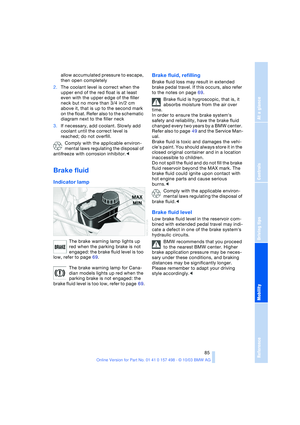 87
87 88
88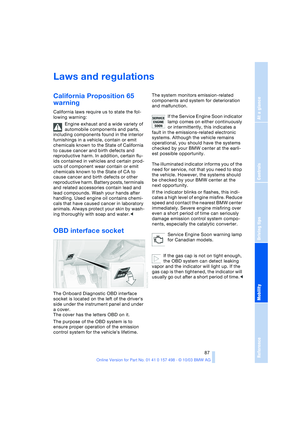 89
89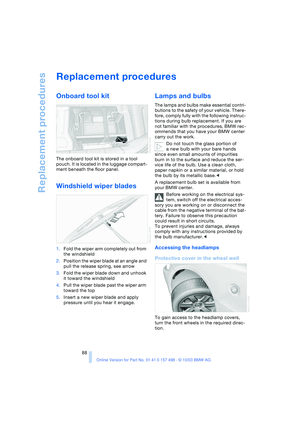 90
90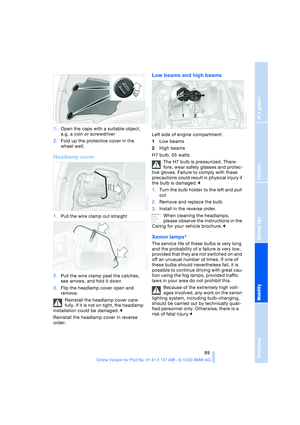 91
91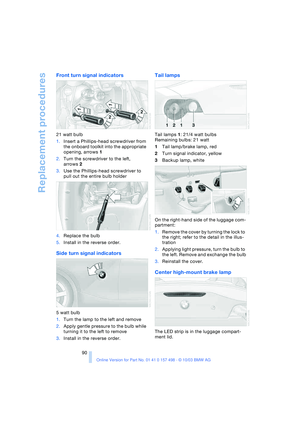 92
92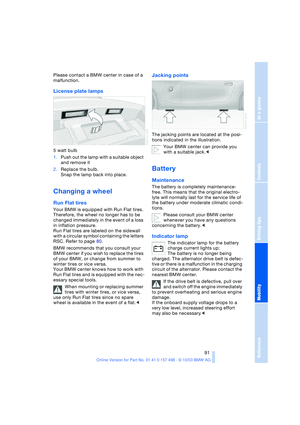 93
93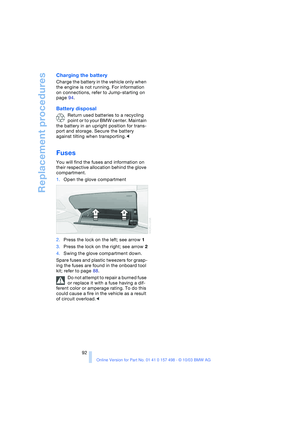 94
94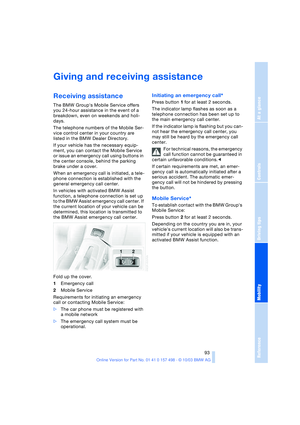 95
95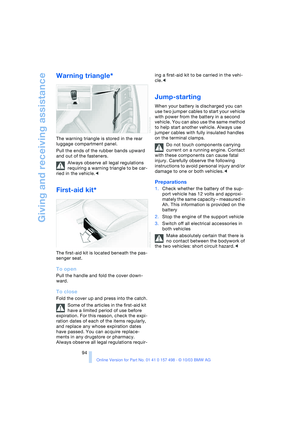 96
96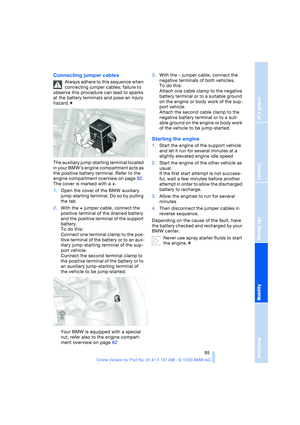 97
97 98
98 99
99 100
100 101
101 102
102 103
103 104
104 105
105 106
106 107
107 108
108 109
109 110
110 111
111 112
112 113
113 114
114 115
115 116
116 117
117 118
118 119
119