Drives39
General operation
RADIO, CD
NAME, TEL
NAV, INFO
CAR, SETUP
– Press the button to open the display �page 38,
fig.36.
– Hold the MP3 CD or audio CD by the hole in the center
and the outer edge �page 38, fig.37.
– Guide the MP3 CD or audio CD straight (label side up)
into the drive . The CD is pulled in automatically.Before inserting the CD, check to make sure there is no CD already
in the drive. If there is a CD in the drive, push the Eject button and
remove the CD
�page 37.
A CD s ho uld never be forced in to the drive. The CD is pulled in auto-
matically. If the CD is inserted wrong side up, you will be alerted by
a message in the open display.
If an MP3 CD has been inserted and not played, the data from the
ID3 tag are read in in the background. If you start playback of an
MP3 CD immediately, the ID3 tag data are displayed for the track
being played.
An audio CD (CD-A) inserted in the DVD navigation drive is played
using the CD function
�page 78. An MP3 CD inserted in the DVD
navigation drive is played using the MP3 function
�page 83.
Note
�
Always keep the navigation DVD that you removed in a suitable
j e w e l c as e (e .g . C D c as e ) to p ro t e c t t he DV D f ro m d i r t , d us t p a r t i c le s ,
scratches and other damage
�page 48.
�
Do not attach labels to the CDs. Heat can cause the label to
b e c o m e d e t a ch e d i n t h e d ri v e , j a m t h e CD a n d c a us e a m a lf un c t io n .
Use a permanent marker to label CDs you have burned yourself.
�
Never expose the navigation DVD to direct sunlight.
Tips
�
Standard 12-cm diameter CDs can be used. Mini CDs with a
diameter of 8 cm (3 inches) or non-circular CDs, known as shape
CDs, must not be used.
�
The use of cleaning CDs can lead to mechanical damage to the
drive.
�
Because of the diversity of CD-R/CD-RW blanks and their
different storage capacities, function may be limited with individual
storage media.
�
If you have not inserted a navigation DVD into the drive, you
cannot use the Navigation and Directory functions.
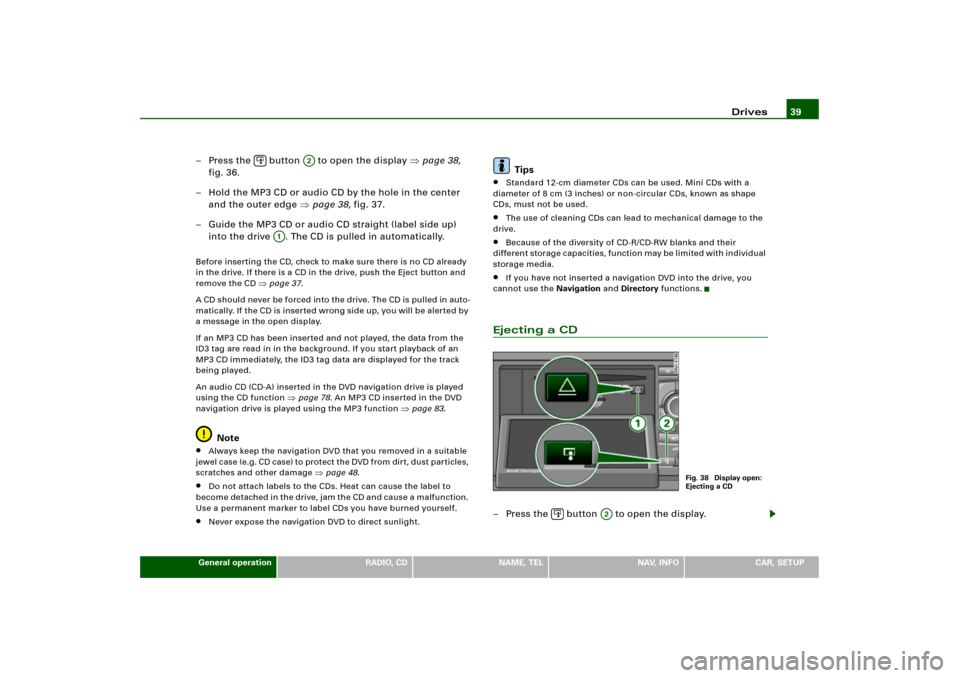
Ejecting a CD– Press the button to open the display.
�
A2
A1
Fig. 38 Display open:
Ejecting a CD
�
A2
Adjusting sound settings 94
TipsVehicles with a BOSE sound system in conjunction with
an AudioPilot do not have a DSP function. In this case your vehicle
is equipped with dynamic noise compensation
�page 94.
Applies to vehicles: with BOSE sound system in conjunction with AudioPilotDynamic noise compensationVehicles with a BOSE sound system in conjunction with AudioPilot
are equipped with dynamic noise compensation.
Dynamic noise compensation automatically adjust music playback
so that the music is no t drowned out b y no ise . No matter what kind
of ambient noise you have in the vehicle, the music playback level
remains the same.
Dynamic noise compensation takes account of both temporary and
permanent ambient noise.
How does dynamic noise compensation work?
A microphone in the vehicle interior detects both the noise level of
the music playback and intrusive noises. The intrusive noises are
digitally analyzed and evaluated. The system simultaneously
ensures that the music playback level is increased by the frequen-
cie s affe cte d by intrusive noise so that music playback remains at a
constant level for good listening.
Tips
In the event of a malfunction in the AudioPilot system, a gong signal
sounds three times to alert you after the Navigation System is
turned on. Have the AudioPilot system inspected by a qualified
dealership.
Vo l u m e s e t t i n g sFig. 99 Display: Volume settings– Press the control button for the Sound function from an
audio or Setup menu.
– Select Vo lum e set tin g s.
– Select Navigation info.
– Rotate and press the control knob to set the desired
volume.When you adjust the volume for Navigation prompts, a test
announcement is made automatically. This test announcement is
made only if the navigation DVD is in the DVD navigation drive �page 35.