Page 252 of 370
�µ�µ�µ �µ
�µ
�µ
�µ
Youshouldcheckthefollowing
items at the specif ied intervals. If
you are unsure of how to perf orm
any check, turn to the page given.
Engine oil level Check every
time you fill the fuel tank. See
page .
Engine coolant level Check the
radiator reserve tank every time
you f ill the f uel tank. See page .
Windshield washer f luid Check
the level in the reservoir monthly.
If weather conditions cause you to
use the washers f requently, check
the reservoir each time you stop
f or f uel. See page .Lights Check the operation of
the headlights, parking lights,
taillights, high-mount brake light,
turn signals, brake lights, and
license plate lights monthly. See
page . Tires Check the tire pressure
monthly. Examine the tread f or
wear and foreign objects. See page
.
Automatic transmission Check
the f luid level monthly. See page .
Brakes Check the f luid level
monthly. See page . 207
208
263
264 266 281
286
Owner Maintenance Checks
Maint enance249
Page 254 of 370
To add oil, unscrew and remove the
engine oil f ill cap on top of the lef t
valve cover. Pour in the oil, and
replace the engine oil f ill cap.
Tighten it securely. Wait a f ew
minutes and recheck the oil level. Do
not f ill above the upper mark; you
could damage the engine.Make sure the API Certif ication Seal
says ‘‘For Gasoline Engines.’’
Pour the oil slowly and caref ully so
you do not spill. Clean up any spills
immediately. Spilled oil could damage components in the engine
compartment.
Oil is major contributor to your
engine’s perf ormance and longevity.
Always use a premium-grade
detergent oil displaying the API
Certif ication Seal. This seal indicates
the oil is energy conserving, and that
it meets the American Petroleum
Institute’s latest requirements. It is
highly recommended that you use
Honda Motor Oil in your car f or as
long as you own it.
CONT INUED
A dding Oil
Recommended Oil
Engine Oil
Maint enance251
ENGINE OIL FILL CAP
API CERTIFICATION SEAL
Page 257 of 370
Install a new oil f ilter according to
instructions that come with it.
Put a new washer on the drain bolt,
then reinstall the drain bolt.
Tighten it to:Let the engine run f or several
minutes, then check the drain bolt
and oil f ilter f or leaks.
Turn of f the engine, let it sit f or
several minutes, then check the oil
level. If necessary, add oil to bring
the level to the upper mark on the
dipstick.
Replace the engine oil f ill cap.
Start the engine. The oil pressure
indicator light should go out within
f ive seconds. If it does not, turn of f
the engine and reinspect your
work. Refill the engine with the recom-
mended oil.
Engine oil change capacity
(including f ilter):
6.
7. 8.
9.
4.
5.
Engine Oil
Maint enance254
33 lbf·ft (44 N·m , 4.5 kgf·m)
4.9 US qt (4.6
)
Page 268 of 370

�µ�µ
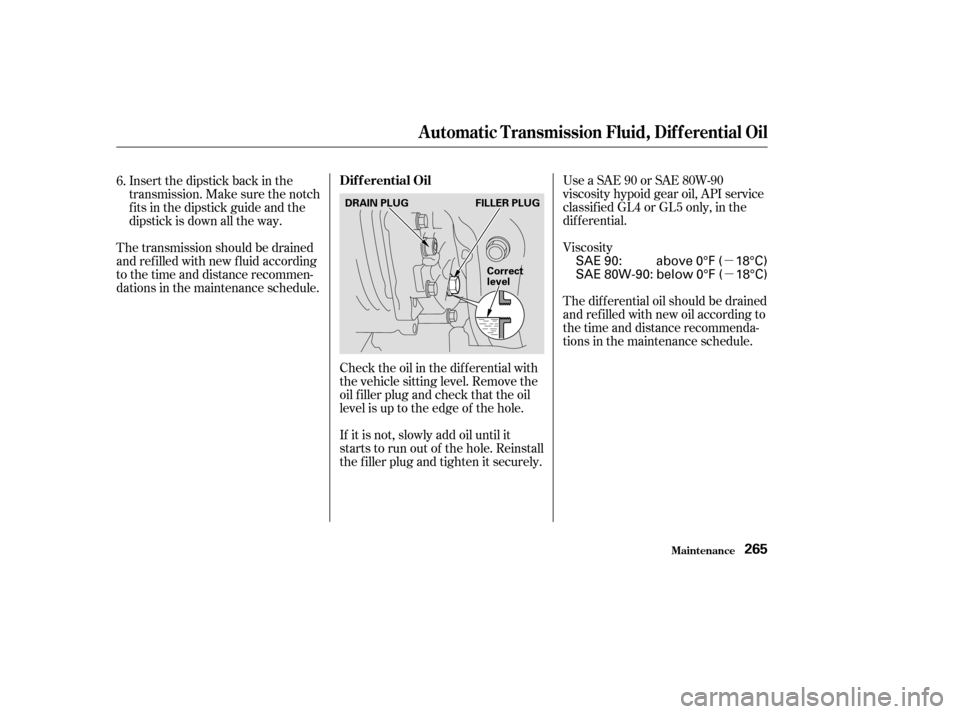
UseaSAE90orSAE80W-90
viscosity hypoid gear oil, API service
classif ied GL4 or GL5 only, in the
dif f erential.
The dif f erential oil should be drained
and ref illed with new oil according to
the time and distance recommenda-
tions in the maintenance schedule. Viscosity
If it is not, slowly add oil until it
starts to run out of the hole. Reinstall
the f iller plug and tighten it securely.
Insert the dipstick back in the
transmission. Make sure the notch
f its in the dipstick guide and the
dipstick is down all the way.
The transmission should be drained
and ref illed with new f luid according
to the time and distance recommen-
dations in the maintenance schedule.
Check the oil in the dif f erential with
the vehicle sitting level. Remove the
oil f iller plug and check that the oil
levelisuptotheedgeof thehole.
6.
Maint enance
Dif f erential Oil
Automatic Transmission Fluid, Dif f erential Oil
265
DRAIN PLUGFILLER PLUG
Correct
level
SAE 90: above 0°F ( 18°C)
SAE 80W-90: below 0°F ( 18°C)
Page 280 of 370

Run the air conditioning at least once
a week during the cold weather
months. Run it f or at least ten
minutes while you are driving at a
steady speed with the engine at
normal operating temperature. This
circulates the lubricating oil con-
tained in the ref rigerant.If the air conditioning does not get as
cold as before, have your dealer
check the system. Recharge the
system with Ref rigerant HFC-134a
(R-134a). (See Specif ications on page
.)
Periodically check the engine’s
radiator and air conditioning
condenser f or leaves, insects, and
dirt stuck to the f ront surf ace. These
block the air f low and reduce cooling
ef f iciency. Use a light spray f rom a
hose or a sof t brush to remove them. Your car’s air conditioning is a sealed
system. Any major maintenance,
such as recharging, should be done
by a qualif ied mechanic. You can do
a couple of things to make sure the
air conditioning works ef f iciently. 338
A ir Condit ioning Syst em
Maint enance277
AIR CONDITIONING CONDENSER
Whenever you have the air conditioning
system serviced, make sure the service
f acility uses a ref rigerant recycling
system. This system captures the
ref rigerant f or reuse. Releasing
ref rigerant into the atmosphere can
damage the environment.
The condenser and radiator f ins bend
easily. Only use a low-pressure spray
or sof t-bristle brush to clean them.
Page 310 of 370

This section covers the more-
common problems that motorists
experience with their vehicles. It
gives you inf ormation about how to
safely evaluate the problem and what
to do to correct it. If the problem has
stranded you on the side of the road,
you may be able to get going again.
If not, you will also f ind instructions
on getting your car towed.......................
Compact Spare Tire .308
....................
Changing a Flat Tire .309
..........
If Your Engine Won’t Start . 314
Nothing Happens or the Starter Motor Operates ........................
Very Slowly .314
The Starter Operates ................................
Normally .315
................................
Jump Starting .316
............
If Your Engine Overheats . 319
.........
Low Oil Pressure Indicator . 321
..........
Charging System Indicator . 322
.......
Malf unction Indicator Lamp . 323
.......................
Readiness Codes .324
...............
Brake System Indicator . 325
..................
Closing the Moonroof . 326
..............................................
Fuses .327
..........
Checking and Replacing . 328
......................
Emergency Towing .332
Taking Care of the Unexpected
T aking Care of t he Unexpect ed307
Page 324 of 370

Start the engine and watch the oil
pressure indicator. If the light
does not go out within ten seconds,
turn of f the engine. There is a
mechanical problem that needs to
be repaired bef ore you can
continue driving. (Seeon page .)
Saf ely pull of f the road and shut
of f the engine. Turn on the hazard
warning indicators.
This indicator should light when the
ignition switch is ON (II), and go out
af ter the engine starts. It should
never come on when the engine is
running. If it starts f lashing, it
indicates that the oil pressure
dropped very low f or a moment, then
recovered. If the indicator stays on
with the engine running, it shows
that the engine has lost oil pressure
and serious engine damage is
possible. In either case, you should
take immediate action. If necessary, add oil to bring the
level back to the full mark on the
dipstick (see page ). Let the vehicle sit f or a minute.
Open the hood and check the oil
level (see page ). Although oil
levelandoilpressurearenot
directly connected, an engine that
is very low on oil can lose pressure
during cornering and other driving
maneuvers.
1.
2.
3. 4.
207 253 332
Emergency
Towing
L ow Oil Pressure Indicator
T aking Care of t he Unexpect ed321
LOW OIL PRESSURE INDICATOR
Running the engine with low oil
pressure can cause serious mechanical
damage almost immediately. Turn of f
the engine as soon as you can saf ely get
the vehicle stopped.
Page 360 of 370

CONT INUED
BatteryCharging System ...........................
Indicator .58, 322
............................
Jump Starting .316
..............................
Maintenance .272
............................
Specif ications .339
..............................
Bef ore Driving .203
....................................
Belts,Seat .8,44
...........................
Beverage Holder .110
...................................
Body Repair .306
Brakes ...........
Anti-lock System (ABS) . 224
.............
Break-in, New Linings . 204
....................
Bulb Replacement .292
...........................................
Fluid .266
.......................................
Parking .107
.................
System Indicator . 58,325
........................
Wear Indicators .223
.............................
Braking System .223
.................
Break-in, New Vehicle . 204
..
Brightness Control, Instruments . 71
........................
Brights, Headlights .68
...
Accessories and Modif ications . 210
................................
Accessories .210
.
Additional Safety Precautions . 211
............................
Modif ications .211
ACCESSORY (Ignition Key .......................................
Position) .82
.............
Accessory Power Socket . 113
....................
Additives, Engine Oil . 254
.........................
Airbag (SRS) .9, 47, 49
.....................
Air Cleaner Element .267
..............
Air Conditioning System . 120
..............................
Maintenance .277
.................................
Usage .122, 127
.......................
Air Outlets (Vents) .120
.......................
Air Pressure, Tires .279
...........................
Alarm, Anti-theft .181
.......................
Alcohol in Gasoline .343
.......
Aluminum Wheels, Cleaning . 301
......................................
Antif reeze .256
Anti-lock Brakes (ABS) ...............................
Indicator .60, 225
...................................
Operation .224
..............
Anti-thef t, Audio System . 180Anti-thef t Steering Column
..............................................
Lock .82
..........................
Anti-thef t System .181
..........................
Appearance Care .299
.........................................
Ashtrays .115
...............
Audio Controls, Remote . 178
........................
Audio System .134, 151
Automatic Climate Control ........................................
System .120
.........................
Automatic Lighting .69
...
Automatic Seat Belt Tensioners . 45
.............
Automatic Speed Control . 182
..............
Automatic Transmission . 218
..........................
Capacity, Fluid .338
...............
Checking Fluid Level . 264
.......................................
Shif ting .218
.
Shif t Lever Position Indicator . 218
................
Shif t Lever Positions . 218
....................
Shif t Lock Release . 221
Index
A B
I