Page 49 of 130

PRE-OPERATION CHECKS
4-2
4
Throttle gripMake sure that operation is smooth.
Check cable free play.
If necessary, have Yamaha dealer adjust cable free play and lubricate cable and
grip housing.6-23, 6-34
Control cablesMake sure that operation is smooth.
Lubricate if necessary.6-34
Drive chainCheck chain slack.
Adjust if necessary.
Check chain condition.
Lubricate if necessary.6-32–6-34
Wheels and tiresCheck for damage.
Check tire condition and tread depth.
Check air pressure.
Correct if necessary.6-24–6-27
Brake and shift pedalsMake sure that operation is smooth.
Lubricate pedal pivoting points if necessary.6-35–6-36
Brake and clutch leversMake sure that operation is smooth.
Lubricate lever pivoting points if necessary.6-35
SidestandMake sure that operation is smooth.
Lubricate pivot if necessary.6-36
Chassis fastenersMake sure that all nuts, bolts and screws are properly tightened.
Tighten if necessary.—
Instruments, lights, signals
and switchesCheck operation.
Correct if necessary.—
Sidestand switchCheck operation of ignition circuit cut-off system.
If system is defective, have Yamaha dealer check vehicle.3-29
Air intake ductCheck that the screen is not clogged.
Clean if necessary.6-22 ITEM CHECKS PAGE
U5SLE0.book Page 2 Wednesday, September 11, 2002 11:46 AM
Page 60 of 130

PERIODIC MAINTENANCE AND MINOR REPAIR
6-3
6
10
*TiresCheck tread depth and for damage.
Replace if necessary.
Check air pressure.
Correct if necessary.√√√√ √
11*Wheel bearingsCheck bearing for looseness or damage.√√√√
12*SwingarmCheck operation and for excessive play.√√√√
Lubricate with lithium-soap-based grease. Every 50,000 km
13 Drive chainCheck chain slack.
Make sure that the rear wheel is properly aligned.
Clean and lubricate.Every 800 km and after washing
the motorcycle or riding in the rain
14*Steering bearingsCheck bearing play and steering for roughness.√√√√√
Lubricate with lithium-soap-based grease. Every 20,000 km
15*Chassis fastenersMake sure that all nuts, bolts and screws are properly
tightened.√√√√ √
16 SidestandCheck operation.
Lubricate.√√√√ √
17*Sidestand switchCheck operation.√√√√√ √
18*Front forkCheck operation and for oil leakage.√√√√
19*Shock absorber
assemblyCheck operation and shock absorber for oil leakage.√√√√
20*Rear suspension relay
arm and connecting arm
pivoting pointsCheck operation.√√√√
21*Electronic fuel injectionAdjust engine idling speed and synchronization.√√√√√ √
22 Engine oilChange.
Check oil level and vehicle for oil leakage.√√√√√ √
23 Engine oil filter cartridgeReplace.√√√ NO. ITEM CHECK OR MAINTENANCE JOBODOMETER READING (×1,000 km)
ANNUAL
CHECK
1 10203040
U5SLE0.book Page 3 Wednesday, September 11, 2002 11:46 AM
Page 103 of 130
PERIODIC MAINTENANCE AND MINOR REPAIR
6-46
6 To service the rear wheel
Raise the rear wheel off the ground by
using a motorcycle stand or, if a motor-
cycle stand is not available, by placing
a jack either under each side of the
frame in front of the rear wheel or under
each side of the swingarm.
EAU04956
Front wheel To remove the front wheel
EW000122
WARNING
_ �
It is advisable to have a Yamaha
dealer service the wheel.
�
Securely support the motor-
cycle so that there is no danger
of it falling over.
_1. Loosen the axle bolt, the wheel
axle pinch bolts, and then the
brake caliper bolts.2. Lift the front wheel off the ground
according to the procedure on
page 6-45.
3. Remove the brake hose holder on
each side by removing the bolt.
4. Remove the brake caliper on each
side by removing the bolts.1. Front wheel axle pinch bolt (× 4)
1. Brake hose holder
2. Brake caliper
3. Axle bolt
4. Bolt (× 3)
U5SLE0.book Page 46 Wednesday, September 11, 2002 11:46 AM
Page 104 of 130

PERIODIC MAINTENANCE AND MINOR REPAIR
6-47
65. Remove the axle bolt, pull the
wheel axle out, and then remove
the wheel.
ECA00046
CAUTION:_ Do not apply the brake after the
brake calipers have been removed,
otherwise the brake pads will be
forced shut. _
EAU05021
To install the front wheel
1. Lift the wheel up between the fork
legs.
2. Insert the wheel axle.
3. Lower the front wheel so that it is
on the ground.
4. Install the brake calipers by install-
ing the bolts, and then tightening
them to the specified torque.NOTE:_ Make sure that there is enough space
between the brake pads before install-
ing the brake calipers onto the brake
discs. _5. Install the brake hose holders by
installing the bolts.
6. Secure the wheel axle by installing
the axle bolt, and then tightening
the wheel axle to the specified
torque.
NOTE:_ While tightening the wheel axle, hold
the axle bolt to keep it from turning. _
1. Wheel axle
Tightening torque:
Brake caliper bolt:
40 Nm (4.0 m·kgf)
Tightening torque:
Wheel axle:
91 Nm (9.1 m·kgf)
E_5sl_Periodic.fm Page 47 Thursday, October 17, 2002 1:13 PM
Page 106 of 130
PERIODIC MAINTENANCE AND MINOR REPAIR
6-49
6
EAU04947
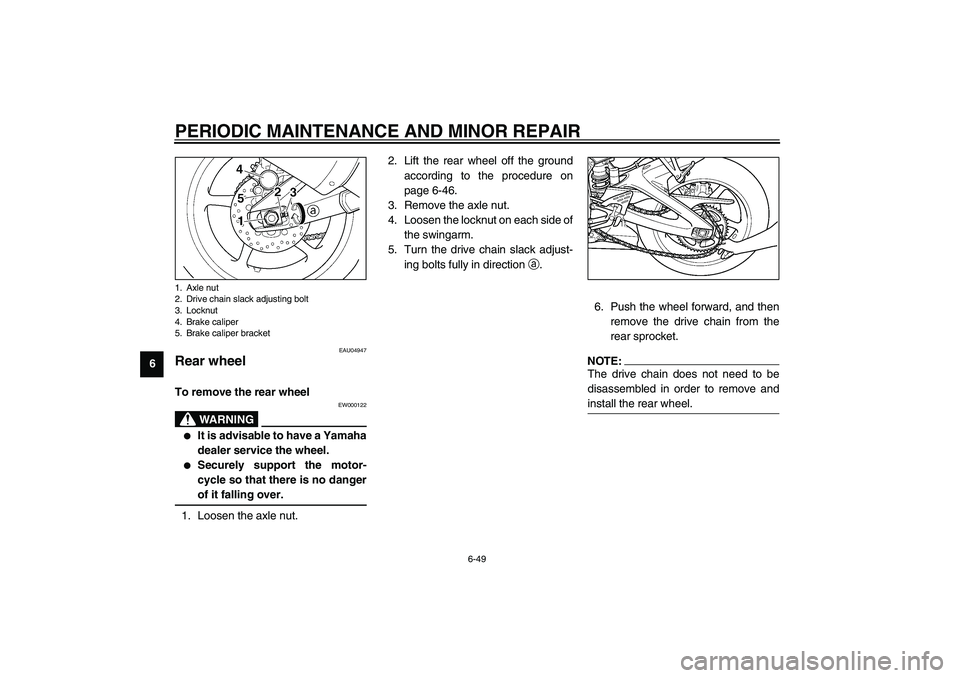
Rear wheel To remove the rear wheel
EW000122
WARNING
_ �
It is advisable to have a Yamaha
dealer service the wheel.
�
Securely support the motor-
cycle so that there is no danger
of it falling over.
_1. Loosen the axle nut.2. Lift the rear wheel off the ground
according to the procedure on
page 6-46.
3. Remove the axle nut.
4. Loosen the locknut on each side of
the swingarm.
5. Turn the drive chain slack adjust-
ing bolts fully in direction
a.
6. Push the wheel forward, and then
remove the drive chain from the
rear sprocket.
NOTE:_ The drive chain does not need to be
disassembled in order to remove and
install the rear wheel. _
1. Axle nut
2. Drive chain slack adjusting bolt
3. Locknut
4. Brake caliper
5. Brake caliper bracketU5SLE0.book Page 49 Wednesday, September 11, 2002 11:46 AM