Page 93 of 130
PERIODIC MAINTENANCE AND MINOR REPAIR
6-36
6
EAU03165
Checking and lubricating the
sidestand The operation of the sidestand should
be checked before each ride, and the
sidestand pivot and metal-to-metal
contact surfaces should be lubricated if
necessary.
EW000113
WARNING
@ If the sidestand does not move up
and down smoothly, have a Yamaha
dealer check or repair it. @Recommended lubricant:
Lithium-soap-based grease
(all-purpose grease)
U5SLE0.book Page 36 Wednesday, September 11, 2002 11:46 AM
Page 94 of 130

PERIODIC MAINTENANCE AND MINOR REPAIR
6-37
6
EAU02939
Checking the front fork The condition and operation of the front
fork must be checked as follows at the
intervals specified in the periodic main-
tenance and lubrication chart.
To check the condition
EW000115
WARNING
@ Securely support the motorcycle so
that there is no danger of it falling
over. @Check the inner tubes for scratches,
damage and excessive oil leakage.To check the operation
1. Place the motorcycle on a level
surface and hold it in an upright
position.
2. While applying the front brake,
push down hard on the handle-
bars several times to check if the
front fork compresses and re-
bounds smoothly.
EC000098
CAUTION:@ If any damage is found or the front
fork does not operate smoothly,
have a Yamaha dealer check or re-
pair it. @
EAU00794
Checking the steering Worn or loose steering bearings may
cause danger. Therefore, the operation
of the steering must be checked as fol-
lows at the intervals specified in the pe-
riodic maintenance and lubrication
chart.
1. Place a stand under the engine to
raise the front wheel off the
ground.
EW000115
WARNING
@ Securely support the motorcycle so
that there is no danger of it falling
over. @
U5SLE0.book Page 37 Wednesday, September 11, 2002 11:46 AM
Page 96 of 130

PERIODIC MAINTENANCE AND MINOR REPAIR
6-39
6
EW000116
WARNING
@ �
Electrolyte is poisonous and
dangerous since it contains sul-
furic acid, which causes severe
burns. Avoid any contact with
skin, eyes or clothing and al-
ways shield your eyes when
working near batteries. In case
of contact, administer the fol-
lowing FIRST AID.
EXTERNAL: Flush with plenty
of water.
INTERNAL: Drink large quan-
tities of water or milk and im-
mediately call a physician.
EYES: Flush with water for
15 minutes and seek prompt
medical attention.
�
Batteries produce explosive hy-
drogen gas. Therefore, keep
sparks, flames, cigarettes, etc.,
away from the battery and pro-
vide sufficient ventilation when
charging it in an enclosed
space.
�
KEEP THIS AND ALL BATTER-
IES OUT OF THE REACH OF
CHILDREN.
@To store the battery
1. If the motorcycle will not be used
for more than one month, remove
the battery, fully charge it, and
then place it in a cool, dry place.
2. If the battery will be stored for
more than two months, check it at
least once a month and fully
charge it if necessary.
3. Fully charge the battery before in-
stallation.
4. After installation, make sure that
the battery leads are properly con-
nected to the battery terminals.
EC000102
CAUTION:@ �
Always keep the battery
charged. Storing a discharged
battery can cause permanent
battery damage.
�
To charge a sealed-type (MF)
battery, a special (constant-
voltage) battery charger is re-
quired. Using a conventional
battery charger will damage the
battery. If you do not have ac-
cess to a sealed-type (MF) bat-
tery charger, have a Yamaha
dealer charge your battery.
@
U5SLE0.book Page 39 Wednesday, September 11, 2002 11:46 AM
Page 99 of 130

PERIODIC MAINTENANCE AND MINOR REPAIR
6-42
6 4. Unhook the headlight bulb holder,
and then remove the defective
bulb.
EW000119
WARNING
_ Headlight bulbs get very hot. There-
fore, keep flammable products away
from a lit headlight bulb, and do not
touch the bulb until it has cooled
down. _5. Place a new headlight bulb into
position, and then secure it with
the bulb holder.
EC000104
CAUTION:_ Take care not to damage the follow-
ing parts:�
Headlight bulb
Do not touch the glass part of
the headlight bulb to keep it free
from oil, otherwise the transpar-
ency of the glass, the luminosi-
ty of the bulb, and the bulb life
will be adversely affected. Thor-
oughly clean off any dirt and fin-
gerprints on the headlight bulb
using a cloth moistened with al-
cohol or thinner.
�
Headlight lens
Do not affix any type of tinted
film or stickers to the head-
light lens.
Do not use a headlight bulb of
a wattage higher than speci-
fied.
_
1. Headlight bulb holder
1. Do not touch the glass part of the bulb.
U5SLE0.book Page 42 Wednesday, September 11, 2002 11:46 AM
Page 103 of 130
PERIODIC MAINTENANCE AND MINOR REPAIR
6-46
6 To service the rear wheel
Raise the rear wheel off the ground by
using a motorcycle stand or, if a motor-
cycle stand is not available, by placing
a jack either under each side of the
frame in front of the rear wheel or under
each side of the swingarm.
EAU04956
Front wheel To remove the front wheel
EW000122
WARNING
_ �
It is advisable to have a Yamaha
dealer service the wheel.
�
Securely support the motor-
cycle so that there is no danger
of it falling over.
_1. Loosen the axle bolt, the wheel
axle pinch bolts, and then the
brake caliper bolts.2. Lift the front wheel off the ground
according to the procedure on
page 6-45.
3. Remove the brake hose holder on
each side by removing the bolt.
4. Remove the brake caliper on each
side by removing the bolts.1. Front wheel axle pinch bolt (× 4)
1. Brake hose holder
2. Brake caliper
3. Axle bolt
4. Bolt (× 3)
U5SLE0.book Page 46 Wednesday, September 11, 2002 11:46 AM
Page 106 of 130
PERIODIC MAINTENANCE AND MINOR REPAIR
6-49
6
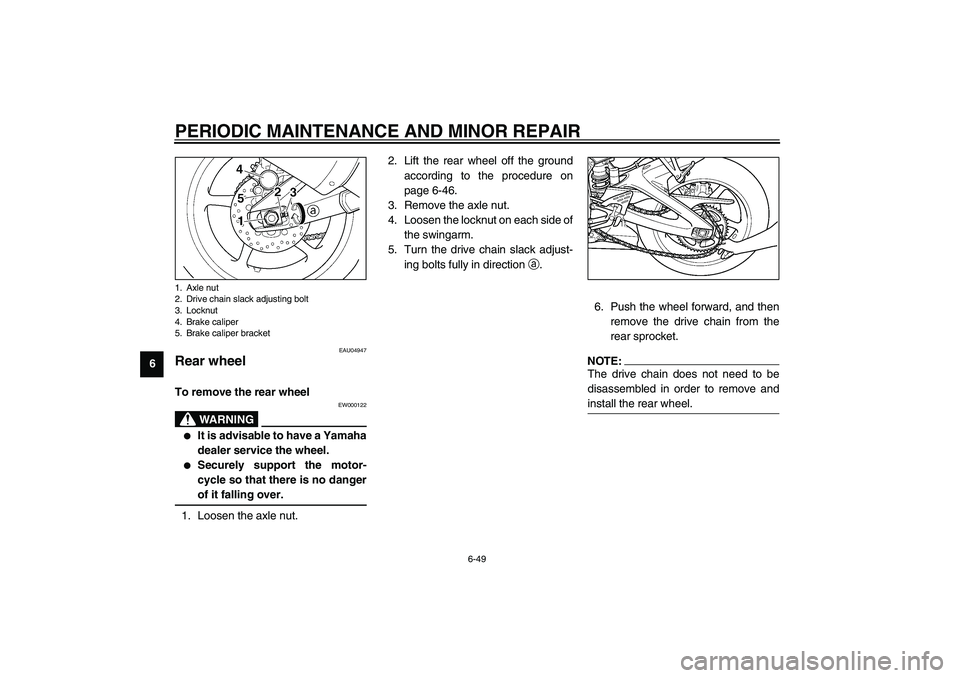
EAU04947
Rear wheel To remove the rear wheel
EW000122
WARNING
_ �
It is advisable to have a Yamaha
dealer service the wheel.
�
Securely support the motor-
cycle so that there is no danger
of it falling over.
_1. Loosen the axle nut.2. Lift the rear wheel off the ground
according to the procedure on
page 6-46.
3. Remove the axle nut.
4. Loosen the locknut on each side of
the swingarm.
5. Turn the drive chain slack adjust-
ing bolts fully in direction
a.
6. Push the wheel forward, and then
remove the drive chain from the
rear sprocket.
NOTE:_ The drive chain does not need to be
disassembled in order to remove and
install the rear wheel. _
1. Axle nut
2. Drive chain slack adjusting bolt
3. Locknut
4. Brake caliper
5. Brake caliper bracketU5SLE0.book Page 49 Wednesday, September 11, 2002 11:46 AM
Page 109 of 130

PERIODIC MAINTENANCE AND MINOR REPAIR
6-52
6
EAU02990
Troubleshooting charts Starting problems or poor engine performance
EW000125
WARNING
@ Keep away open flames and do not smoke while checking or working on the fuel system. @
Check the fuel level in
the fuel tank.1. Fuel
There is enough fuel.
There is no fuel.
Check the compression.
Supply fuel.
The engine does not start.
Check the compression.
Operate the electric starter.2. Compression
There is compression.
There is no compression.
Check the ignition.
Have a Yamaha dealer
check the vehicle.
Remove the spark plugs
and check the electrodes.3. Ignition
Wipe off with a dry cloth and correct the
spark plug gaps, or replace the spark plugs.
Have a Yamaha dealer check the vehicle.
The engine does not start.
Have a Yamaha dealer
check the vehicle.
The engine does not start.
Check the battery.
Operate the electric starter.4. Battery
The engine turns over
quickly.
The engine turns over
slowly.
The battery is good.Check the battery lead connections,
and charge the battery if necessary.
DryWet
Open the throttle halfway and operate
the electric starter.
U5SLE0.book Page 52 Wednesday, September 11, 2002 11:46 AM
Page 110 of 130

PERIODIC MAINTENANCE AND MINOR REPAIR
6-53
6Engine overheating
EW000070
WARNING
@ �
Do not remove the radiator cap when the engine and radiator are hot. Scalding hot fluid and steam may be
blown out under pressure, which could cause serious injury. Be sure to wait until the engine has cooled.
�
After removing the radiator cap retaining bolt, place a thick rag, like a towel, over the radiator cap, and then
slowly rotate the cap counterclockwise to the detent to allow any residual pressure to escape. When the hiss-
ing sound has stopped, press down on the cap while turning it counterclockwise, and then remove the cap.
@aNOTE:@ If coolant is not available, tap water can be temporarily used instead, provided that it is changed to the recommended coolant
as soon as possible. @
Wait until the
engine has cooled.
Check the coolant level in the
reservoir and radiator.
The coolant level
is OK.The coolant level is low.
Check the cooling system
for leakage.
Have a Yamaha dealer checkand repair the cooling system.Add coolant. (See NOTE.)
Start the engine. If the engine overheats again,
have a
Yamaha dealer check
and repair the cooling system.
There is
leakage.
There is
no leakage.
U5SLE0.book Page 53 Wednesday, September 11, 2002 11:46 AM