Page 41 of 88

6-9
PERIODIC MAINTENANCE AND MINOR REPAIR
6
EAU04616
Engine oil and oil filter
element
The engine oil level should be
checked before each ride. In addition,
the oil must be changed and the oil
filter element cleaned at the intervals
specified in the periodic maintenance
and lubrication chart.
To check the engine oil level
1. Place the motorcycle on a level
surface and hold it in an upright
position.
NOTE:
Make sure that the motorcycle is
positioned straight up when checking
the oil level. A slight tilt to the side
can result in a false reading.
2. Start the engine, warm it up for
several minutes, and then turn it
off.3. Wait a few minutes until the oil
settles, and then check the oil
level through the check window
located at the bottom-right side
of the crankcase.
NOTE:
The engine oil should be between the
minimum and maximum level marks.
4. If the engine oil is below the min-
imum level mark, add sufficient
oil of the recommended type to
raise it to the correct level.
2
3 1
1. Engine oil level check window
2. Maximum level mark
3. Minimum level mark
To change the engine oil (with or
without oil filter element cleaning)
1. Start the engine, warm it up for
several minutes, and then turn it
off.
2. Place an oil pan under the
engine to collect the used oil.
3. Remove the engine oil filler cap
and drain bolt to drain the oil
from the crankcase.
1
1. Engine oil filler cap
5RS-9-E1 (TW125) 8/23/02 11:37 AM Page 40
Page 42 of 88
6-10
PERIODIC MAINTENANCE AND MINOR REPAIR
6
1
1. Engine oil drain bolt
ECA00039
cC
When removing the engine oil
drain bolt, the O-ring, compression
spring, and oil strainer will fall out.
Take care not to lose these parts.
12 3
1. Strainer
2. Compression spring
3. O-ring
NOTE:
Skip steps 4–9 if the oil filter element
is not being cleaned.
4. Remove the oil filter element
drain bolt to drain the oil from the
oil filter element.
5. Remove the oil filter element
cover by removing the bolts.
1
2
3
1. Oil filter element drain bolt
2. Oil filter element cover
3. Oil filter element cover bolt (×2)
5RS-9-E1 (TW125) 8/23/02 11:37 AM Page 41
Page 43 of 88

6-11
PERIODIC MAINTENANCE AND MINOR REPAIR
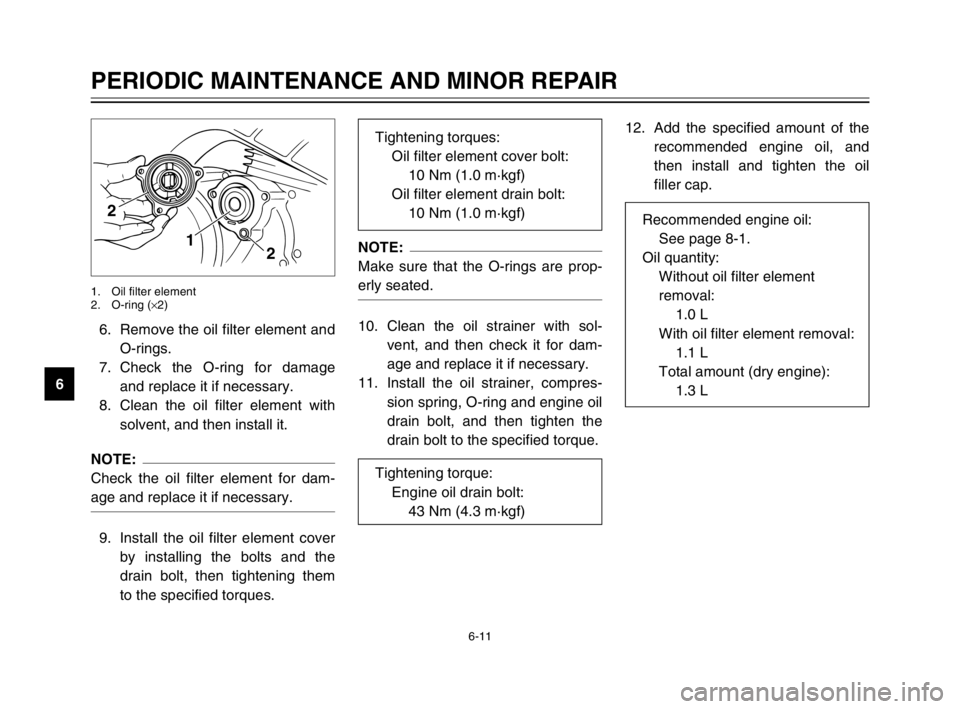
66. Remove the oil filter element and
O-rings.
7. Check the O-ring for damage
and replace it if necessary.
8. Clean the oil filter element with
solvent, and then install it.
NOTE:
Check the oil filter element for dam-
age and replace it if necessary.
9. Install the oil filter element cover
by installing the bolts and the
drain bolt, then tightening them
to the specified torques.
1 22
1. Oil filter element
2. O-ring (×2)
NOTE:
Make sure that the O-rings are prop-
erly seated.
10. Clean the oil strainer with sol-
vent, and then check it for dam-
age and replace it if necessary.
11. Install the oil strainer, compres-
sion spring, O-ring and engine oil
drain bolt, and then tighten the
drain bolt to the specified torque.12. Add the specified amount of the
recommended engine oil, and
then install and tighten the oil
filler cap. Tightening torques:
Oil filter element cover bolt:
10 Nm (1.0 m·kgf)
Oil filter element drain bolt:
10 Nm (1.0 m·kgf)
Tightening torque:
Engine oil drain bolt:
43 Nm (4.3 m·kgf)
Recommended engine oil:
See page 8-1.
Oil quantity:
Without oil filter element
removal:
1.0 L
With oil filter element removal:
1.1 L
Total amount (dry engine):
1.3 L
5RS-9-E1 (TW125) 8/23/02 11:37 AM Page 42
Page 79 of 88

7-4
MOTORCYCLE CARE AND STORAGE
7
Storage
Short-term
Always store your motorcycle in a
cool, dry place and, if necessary, pro-
tect it against dust with a porous
cover.
ECA00014
cC
8Storing the motorcycle in a
poorly ventilated room or cov-
ering it with a tarp, while it is
still wet, will allow water and
humidity to seep in and cause
rust.
8To prevent corrosion, avoid
damp cellars, stables (because
of the presence of ammonia)
and areas where strong chemi-
cals are stored.
Long-term
Before storing your motorcycle for
several months:
1. Follow all the instructions in the
“Care” section of this chapter.
2. For motorcycles equipped with a
fuel cock that has an “OFF” posi-
tion: Turn the fuel cock lever to
“OFF”.
3. Drain the carburetor float cham-
ber by loosening the drain bolt;
this will prevent fuel deposits
from building up. Pour the
drained fuel into the fuel tank.
4. Fill up the fuel tank and add fuel
stabilizer (if available) to prevent
the fuel tank from rusting and the
fuel from deteriorating.
5. Perform the following steps to
protect the cylinder, piston rings,
etc. from corrosion.a. Remove the spark plug cap
and spark plug.
b. Pour a teaspoonful of engine
oil into the spark plug bore.
c. Install the spark plug cap onto
the spark plug, and then place
the spark plug on the cylinder
head so that the electrodes
are grounded. (This will limit
sparking during the next step.)
d. Turn the engine over several
times with the starter. (This
will coat the cylinder wall with
oil.)
e. Remove the spark plug cap
from the spark plug, and then
install the spark plug and the
spark plug cap.
EWA00003
w
To prevent damage or injury from
sparking, make sure to ground the
spark plug electrodes while turn-
ing the engine over.
5RS-9-E1 (TW125) 8/23/02 11:37 AM Page 78