Page 43 of 88
6-11
PERIODIC MAINTENANCE AND MINOR REPAIR
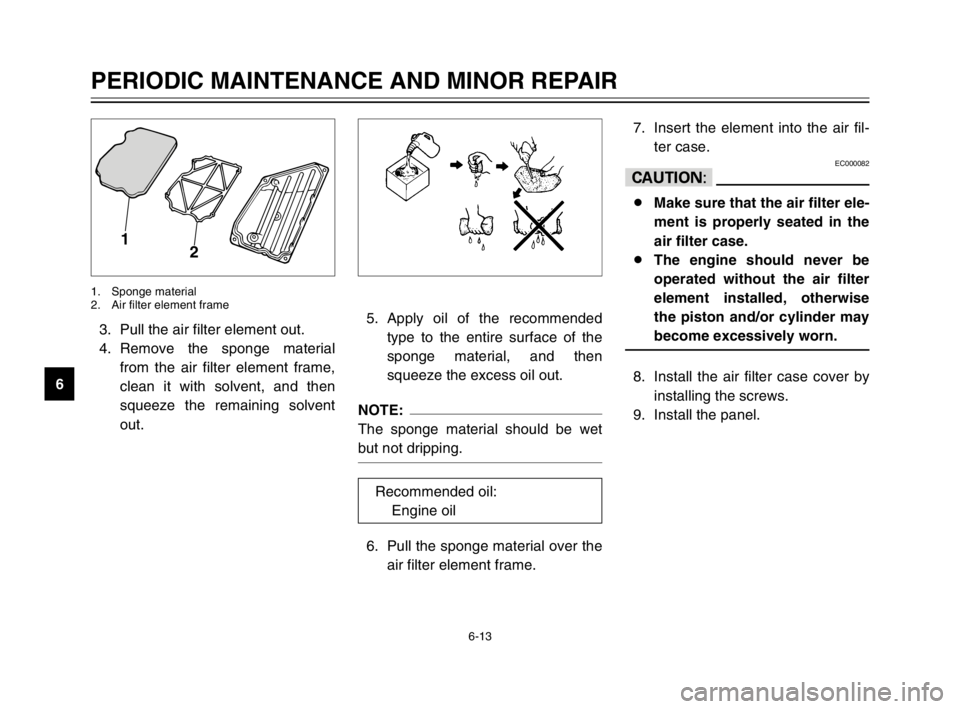
66. Remove the oil filter element and
O-rings.
7. Check the O-ring for damage
and replace it if necessary.
8. Clean the oil filter element with
solvent, and then install it.
NOTE:
Check the oil filter element for dam-
age and replace it if necessary.
9. Install the oil filter element cover
by installing the bolts and the
drain bolt, then tightening them
to the specified torques.
1 22
1. Oil filter element
2. O-ring (×2)
NOTE:
Make sure that the O-rings are prop-
erly seated.
10. Clean the oil strainer with sol-
vent, and then check it for dam-
age and replace it if necessary.
11. Install the oil strainer, compres-
sion spring, O-ring and engine oil
drain bolt, and then tighten the
drain bolt to the specified torque.12. Add the specified amount of the
recommended engine oil, and
then install and tighten the oil
filler cap. Tightening torques:
Oil filter element cover bolt:
10 Nm (1.0 m·kgf)
Oil filter element drain bolt:
10 Nm (1.0 m·kgf)
Tightening torque:
Engine oil drain bolt:
43 Nm (4.3 m·kgf)
Recommended engine oil:
See page 8-1.
Oil quantity:
Without oil filter element
removal:
1.0 L
With oil filter element removal:
1.1 L
Total amount (dry engine):
1.3 L
5RS-9-E1 (TW125) 8/23/02 11:37 AM Page 42
Page 44 of 88

6-12
PERIODIC MAINTENANCE AND MINOR REPAIR
6
ECA00133
cC
8In order to prevent clutch slip-
page (since the engine oil also
lubricates the clutch), do not
mix any chemical additives.
Do not use oils with a diesel
specification of “CD” or oils of
a higher quality than specified.
In addition, do not use oils
labeled “ENERGY CONSERV-
ING
II” or higher.
8Make sure that no foreign
material enters the crankcase.
13. Start the engine, and then let it
idle for several minutes while
checking it for oil leakage. If oil is
leaking, immediately turn the
engine off and check for the
cause.
14. Turn the engine off, and then
check the oil level and correct it if
necessary.
EAU04216
Cleaning the air filter
element and check hose
The air filter element should be
cleaned at the intervals specified in
the periodic maintenance and lubrica-
tion chart. Clean the air filter element
more frequently if you are riding in
unusually wet or dusty areas. In addi-
tion, the air filter check hose must be
frequently checked and cleaned if
necessary.
To clean the air filter element
1. Remove panel A. (See page 6-5
for panel removal and installation
procedures.)2. Remove the air filter case cover
by removing the screws.
1
2
2
1. Air filter case cover
2. Screw (×4)
5RS-9-E1 (TW125) 8/23/02 11:37 AM Page 43
Page 45 of 88
6-13
PERIODIC MAINTENANCE AND MINOR REPAIR
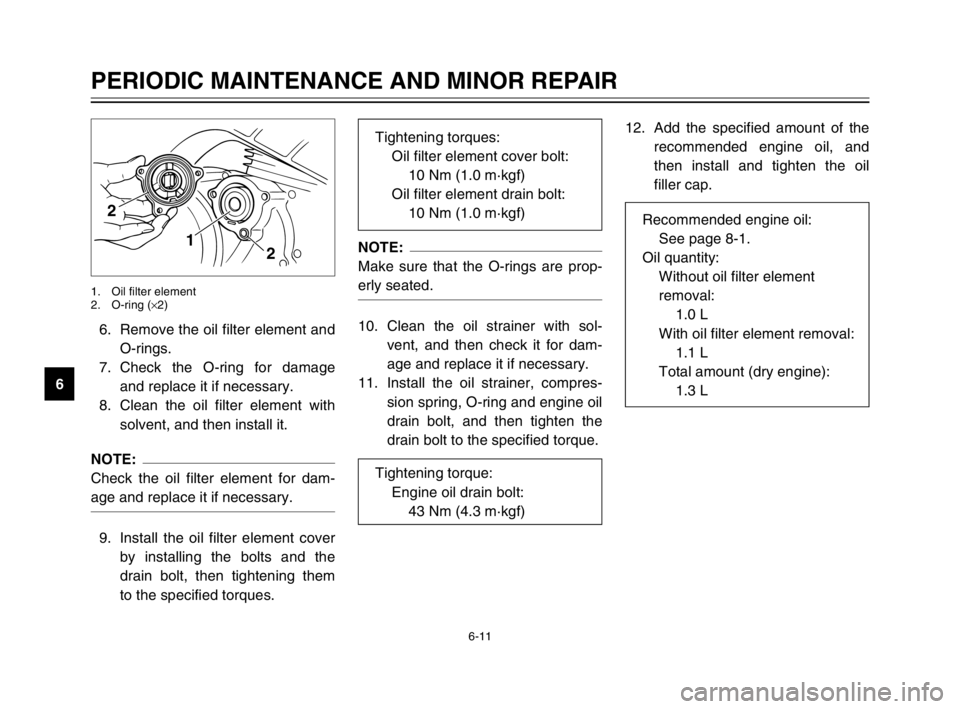
63. Pull the air filter element out.
4. Remove the sponge material
from the air filter element frame,
clean it with solvent, and then
squeeze the remaining solvent
out.
1
2
1. Sponge material
2. Air filter element frame
5. Apply oil of the recommended
type to the entire surface of the
sponge material, and then
squeeze the excess oil out.
NOTE:
The sponge material should be wet
but not dripping.
6. Pull the sponge material over the
air filter element frame.
7. Insert the element into the air fil-
ter case.
EC000082
cC
8Make sure that the air filter ele-
ment is properly seated in the
air filter case.
8The engine should never be
operated without the air filter
element installed, otherwise
the piston and/or cylinder may
become excessively worn.
8. Install the air filter case cover by
installing the screws.
9. Install the panel.
Recommended oil:
Engine oil
5RS-9-E1 (TW125) 8/23/02 11:37 AM Page 44
Page 56 of 88

6-24
PERIODIC MAINTENANCE AND MINOR REPAIR
6
EAU04856
Checking the brake fluid
level
Insufficient brake fluid may allow air
to enter the brake system, possibly
causing it to become ineffective.
Before riding, check that the brake
fluid is above the minimum level mark
and replenish if necessary. A low
brake fluid level may indicate worn
brake pads and/or brake system
leakage. If the brake fluid level is low,
be sure to check the brake pads for
wear and the brake system for leak-
age.
1
1. Minimum level mark
Observe these precautions:
8When checking the fluid level,
make sure that the top of the
brake fluid reservoir is level.
8Use only the recommended qual-
ity brake fluid, otherwise the rub-
ber seals may deteriorate, caus-
ing leakage and poor braking
performance.
8Refill with the same type of brake
fluid. Mixing fluids may result in a
harmful chemical reaction and
lead to poor braking perfor-
mance.
8Be careful that water does not
enter the brake fluid reservoir
when refilling. Water will signifi-
cantly lower the boiling point of
the fluid and may result in vapor
lock.8Brake fluid may deteriorate paint-
ed surfaces or plastic parts.
Always clean up spilled fluid
immediately.
8As the brake pads wear, it is nor-
mal for the brake fluid level to
gradually go down. However, if
the brake fluid level goes down
suddenly, have a Yamaha dealer
check the cause.
Recommended brake fluid:
DOT 4
5RS-9-E1 (TW125) 8/23/02 11:37 AM Page 55
Page 57 of 88

6-25
PERIODIC MAINTENANCE AND MINOR REPAIR
6
EAU03985
Changing the brake fluid
Have a Yamaha dealer change the
brake fluid at the intervals specified in
the NOTE after the periodic mainte-
nance and lubrication chart. In addi-
tion, have the oil seals of the brake
master cylinder and caliper as well as
the brake hose replaced at the inter-
vals listed below or whenever they
are damaged or leaking.
8Oil seals: Replace every two
years.
8Brake hose: Replace every four
years.
EAU00744
Drive chain slack
The drive chain slack should be
checked before each ride and adjust-
ed if necessary.
To check the drive chain slack
1. Place the motorcycle on a level
surface and hold it in an upright
position.
NOTE:
When checking and adjusting the
drive chain slack, the motorcycle
should be positioned straight up and
there should be no weight on it.2. Shift the transmission into the
neutral position.
3. Move the rear wheel by pushing
the motorcycle to locate the tight-
est portion of the drive chain,
and then measure the drive
chain slack as shown.
4. If the drive chain slack is incor-
rect, adjust it as follows.
a
a. Drive chain slack
Drive chain slack:
35–60 mm
5RS-9-E1 (TW125) 8/23/02 11:37 AM Page 56
Page 59 of 88

6-27
PERIODIC MAINTENANCE AND MINOR REPAIR
6
EAU01106
Lubricating the drive chain
The drive chain must be cleaned and
lubricated at the intervals specified in
the periodic maintenance and lubrica-
tion chart, otherwise it will quickly
wear out, especially when riding in
dusty or wet areas. Service the drive
chain as follows.
EC000097
cC
The drive chain must be lubricated
after washing the motorcycle or
riding in the rain.
1. Remove all dirt and mud from
the drive chain with a brush or
cloth.
2. Spray a drive chain lubricant on
both sides and on the middle of
the chain, making sure that all
side plates and rollers have been
sufficiently oiled.
NOTE:
For a thorough cleaning, have a
Yamaha dealer remove the drive
chain and soak it in solvent.
EAU02962
Checking and lubricating the
cables
The operation of all control cables
and the condition of the cables
should be checked before each ride,
and the cables and cable ends
should be lubricated if necessary. If
a cable is damaged or does not move
smoothly, have a Yamaha dealer
check or replace it.
Recommended lubricant:
Engine oil
5RS-9-E1 (TW125) 8/23/02 11:37 AM Page 58
Page 62 of 88

6-30
PERIODIC MAINTENANCE AND MINOR REPAIR
6
EAU04282
Lubricating the rear
suspension
The pivoting points of the rear sus-
pension must be lubricated at the
intervals specified in the periodic
maintenance and lubrication chart.
1
1. Grease nipple (×2)
EAU02939
Checking the front fork
The condition and operation of the
front fork must be checked as follows
at the intervals specified in the peri-
odic maintenance and lubrication
chart.
To check the condition
EW000115
w
Securely support the motorcycle
so that there is no danger of it
falling over.
Check the inner tubes for scratches,
damage and excessive oil leakage.To check the operation
1. Place the motorcycle on a level
surface and hold it in an upright
position.
2. While applying the front brake,
push down hard on the handle-
bars several times to check if the
front fork compresses and
rebounds smoothly.
EC000098
cC
If any damage is found or the front
fork does not operate smoothly,
have a Yamaha dealer check or
repair it.
Recommended lubricant:
Lithium-soap-based grease
5RS-9-E1 (TW125) 8/23/02 11:37 AM Page 61
Page 67 of 88

6-35
PERIODIC MAINTENANCE AND MINOR REPAIR
63. Unhook the headlight bulb hold-
er, and then remove the defec-
tive bulb.EW000119
w
Headlight bulbs get very hot.
Therefore, keep flammable prod-
ucts away from a lit headlight bulb,
and do not touch the bulb until it
has cooled down.
4. Place a new headlight bulb into
position, and then secure it with
the bulb holder.
1
1. Headlight bulb holder
EC000105
cC
Do not touch the glass part of the
headlight bulb to keep it free from
oil, otherwise the transparency of
the glass, the luminosity of the
bulb, and the bulb life will be
adversely affected. Thoroughly
clean off any dirt and fingerprints
on the headlight bulb using a cloth
moistened with alcohol or thinner.
a
a. Do not touch the glass part of the bulb.
5. Install the headlight bulb cover,
and then connect the coupler.
6. Install the headlight unit by
installing the screws.
7. Have a Yamaha dealer adjust
the headlight beam if necessary.
5RS-9-E1 (TW125) 8/23/02 11:37 AM Page 66