2003 YAMAHA TW125 torque
[x] Cancel search: torquePage 33 of 88

6-1
EAU00462
PERIODIC MAINTENANCE AND MINOR REPAIR
6
EAU00464
Safety is an obligation of the owner.
Periodic inspection, adjustment and
lubrication will keep your vehicle in
the safest and most efficient condi-
tion possible. The most important
points of inspection, adjustment, and
lubrication are explained on the fol-
lowing pages.
The intervals given in the periodic
maintenance and lubrication chart
should be simply considered as a
general guide under normal riding
conditions. However, DEPENDING
ON THE WEATHER, TERRAIN,
GEOGRAPHICAL LOCATION, AND
INDIVIDUAL USE, THE MAINTE-
NANCE INTERVALS MAY NEED TO
BE SHORTENED.
EW000060
w
If you are not familiar with motor-
cycle maintenance work, have a
Yamaha dealer do it for you.
EAU01175
Owner’s tool kit
The owner’s tool kit is located behind
panel B. (See page 6-6 for panel
removal and installation procedures.)
The service information included in
this manual and the tools provided in
the owner’s tool kit are intended to
assist you in the performance of pre-
ventive maintenance and minor
repairs. However, additional tools
such as a torque wrench may be nec-
essary to perform certain mainte-
nance work correctly.
1
1. Owner’s tool kit
NOTE:
If you do not have the tools or experi-
ence required for a particular job,
have a Yamaha dealer perform it for
you.
EW000063
w
Modifications not approved by
Yamaha may cause loss of perfor-
mance and render the vehicle
unsafe for use. Consult a Yamaha
dealer before attempting any
changes.
5RS-9-E1 (TW125) 8/23/02 11:37 AM Page 32
Page 40 of 88

6-8
PERIODIC MAINTENANCE AND MINOR REPAIR
6 To check the spark plug
1. Check that the porcelain insula-
tor around the center electrode
of the spark plug is a medium-to-
light tan (the ideal color when the
motorcycle is ridden normally).
NOTE:
If the spark plug shows a distinctly
different color, the engine could be
defective. Do not attempt to diagnose
such problems yourself. Instead,
have a Yamaha dealer check the
motorcycle.
2. Check the spark plug for elec-
trode erosion and excessive car-
bon or other deposits, and
replace it if necessary.To install the spark plug
1. Measure the spark plug gap with
a wire thickness gauge and, if
necessary, adjust the gap to
specification.
2. Clean the surface of the spark
plug gasket and its mating sur-
face, and then wipe off any grime
from the spark plug threads.
3. Install the spark plug with the
spark plug wrench, and then
tighten it to the specified torque.
a
a. Spark plug gap
NOTE:
If a torque wrench is not available
when installing a spark plug, a good
estimate of the correct torque is
1/4–1/2 turn past finger tight.
However, the spark plug should be
tightened to the specified torque as
soon as possible.
4. Install the spark plug cap.
Spark plug gap:
0.6–0.7 mm
Tightening torque:
Spark plug:
17.5 Nm (1.75 m·kgf)
Specified spark plug:
DR8EA (NGK)
5RS-9-E1 (TW125) 8/23/02 11:37 AM Page 39
Page 43 of 88

6-11
PERIODIC MAINTENANCE AND MINOR REPAIR
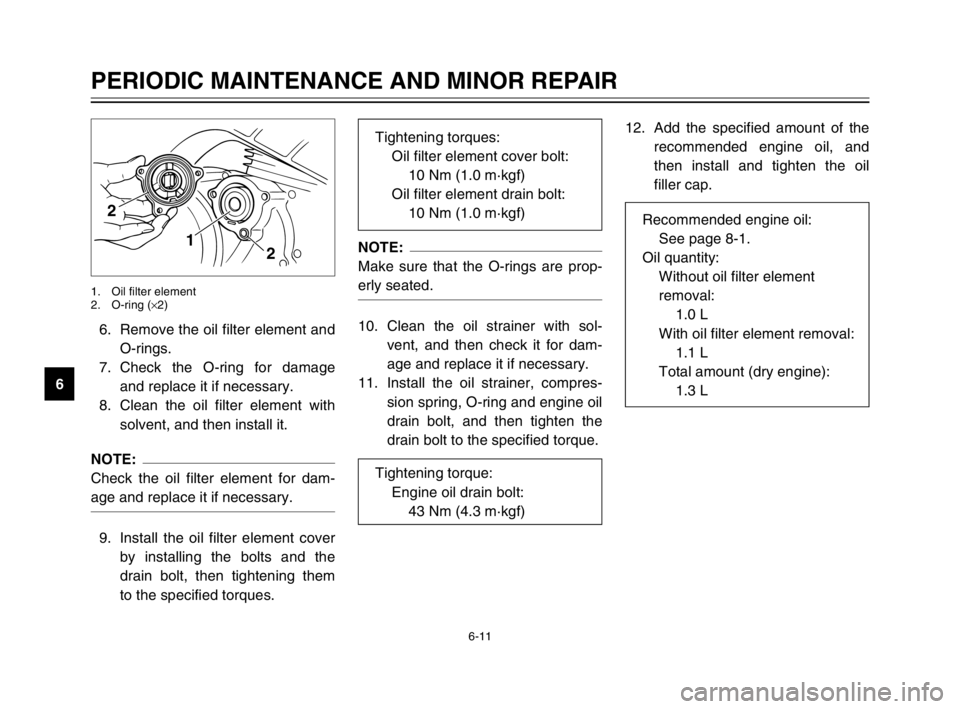
66. Remove the oil filter element and
O-rings.
7. Check the O-ring for damage
and replace it if necessary.
8. Clean the oil filter element with
solvent, and then install it.
NOTE:
Check the oil filter element for dam-
age and replace it if necessary.
9. Install the oil filter element cover
by installing the bolts and the
drain bolt, then tightening them
to the specified torques.
1 22
1. Oil filter element
2. O-ring (×2)
NOTE:
Make sure that the O-rings are prop-
erly seated.
10. Clean the oil strainer with sol-
vent, and then check it for dam-
age and replace it if necessary.
11. Install the oil strainer, compres-
sion spring, O-ring and engine oil
drain bolt, and then tighten the
drain bolt to the specified torque.12. Add the specified amount of the
recommended engine oil, and
then install and tighten the oil
filler cap. Tightening torques:
Oil filter element cover bolt:
10 Nm (1.0 m·kgf)
Oil filter element drain bolt:
10 Nm (1.0 m·kgf)
Tightening torque:
Engine oil drain bolt:
43 Nm (4.3 m·kgf)
Recommended engine oil:
See page 8-1.
Oil quantity:
Without oil filter element
removal:
1.0 L
With oil filter element removal:
1.1 L
Total amount (dry engine):
1.3 L
5RS-9-E1 (TW125) 8/23/02 11:37 AM Page 42
Page 58 of 88

6-26
PERIODIC MAINTENANCE AND MINOR REPAIR
6
EAU04369
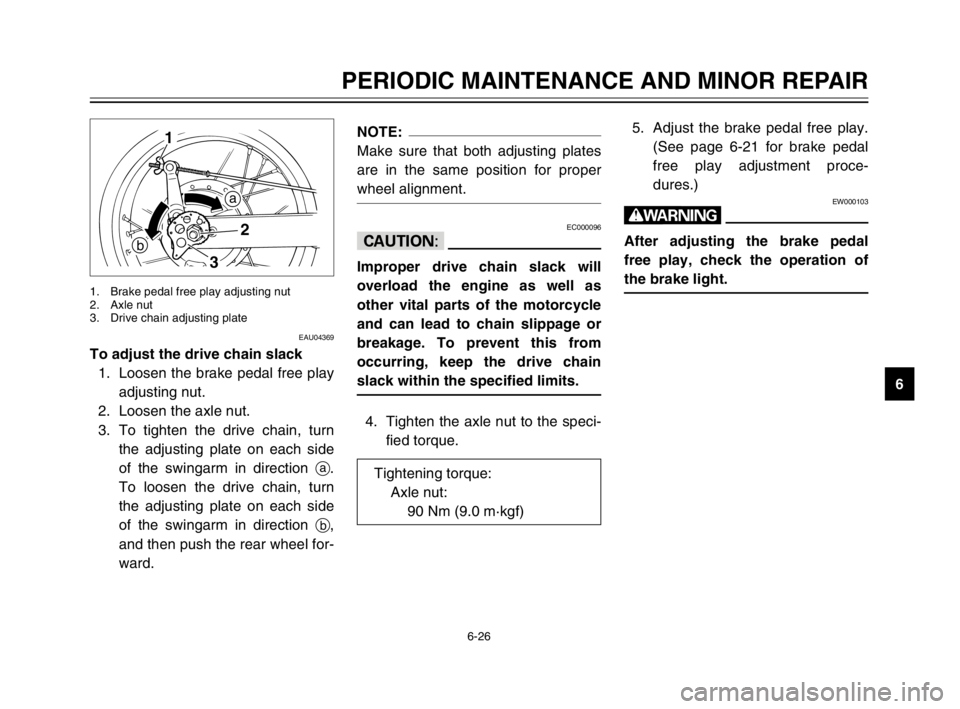
To adjust the drive chain slack
1. Loosen the brake pedal free play
adjusting nut.
2. Loosen the axle nut.
3. To tighten the drive chain, turn
the adjusting plate on each side
of the swingarm in direction a.
To loosen the drive chain, turn
the adjusting plate on each side
of the swingarm in direction b,
and then push the rear wheel for-
ward.
32
a
b
1
1. Brake pedal free play adjusting nut
2. Axle nut
3. Drive chain adjusting plate
NOTE:
Make sure that both adjusting plates
are in the same position for proper
wheel alignment.
EC000096
cC
Improper drive chain slack will
overload the engine as well as
other vital parts of the motorcycle
and can lead to chain slippage or
breakage. To prevent this from
occurring, keep the drive chain
slack within the specified limits.
4. Tighten the axle nut to the speci-
fied torque.5. Adjust the brake pedal free play.
(See page 6-21 for brake pedal
free play adjustment proce-
dures.)
EW000103
w
After adjusting the brake pedal
free play, check the operation of
the brake light.
Tightening torque:
Axle nut:
90 Nm (9.0 m·kgf)
5RS-9-E1 (TW125) 8/23/02 11:37 AM Page 57
Page 72 of 88

6-40
PERIODIC MAINTENANCE AND MINOR REPAIR
6
NOTE:
Make sure that there is enough
space between the brake pads
before inserting the brake disc and
that the slot in the speedometer gear
unit fits over the retainer on the fork
leg.
3. Insert the wheel axle, and then
install the axle nut.
4. Lower the front wheel so that it is
on the ground.
2 1
1. Retainer
2. Speedometer cable
5. Tighten the axle nut to the speci-
fied torque.
6. Place the rubber cover at the
bottom of the right-side fork leg
in the original position.
7. Install the rubber cover at the
bottom of the left-side fork leg.
8. Connect the speedometer cable.
EAU03519
Rear wheel
To remove the rear wheelEW000122
w
8It is advisable to have a
Yamaha dealer service the
wheel.
8Securely support the motorcy-
cle so that there is no danger
of it falling over.
1. Loosen the axle nut.
5a
2
1
34
1. Axle nut
2. Brake pedal free play adjusting nut
3. Brake rod
4. Brake camshaft lever
5. Drive chain adjusting plate
Tightening torque:
Axle nut:
90 Nm (9.0 m·kgf)
5RS-9-E1 (TW125) 8/23/02 11:37 AM Page 71
Page 73 of 88

6-41
PERIODIC MAINTENANCE AND MINOR REPAIR
62. Remove the brake pedal free
play adjusting nut, and then dis-
connect the brake rod from the
brake camshaft lever.
3. Turn the drive chain adjusting
plate on each side of the
swingarm fully in direction a.
4. Lift the rear wheel off the ground
according to the procedure on
page 6-37.
5. Remove the axle nut, and then
pull the wheel axle out.
6. Push the wheel forward, and
then remove the drive chain from
the rear sprocket.
NOTE:
The drive chain does not need to be
disassembled in order to remove and
install the wheel.
7. Remove the wheel.
EAU03520
To install the rear wheel
1. Insert the wheel axle from the
left-hand side.
NOTE:
Make sure that the drive chain adjust-
ing plates are installed with the
punched sides facing to the outside
and that the slot in the brake shoe
plate fits over the retainer on the
swingarm.
1
1. Retainer
2. Install the drive chain onto the
rear sprocket, and then adjust
the drive chain slack. (See page
6-26 for drive chain slack adjust-
ment procedures.)
3. Install the axle nut, and then
lower the rear wheel so that it is
on the ground.
4. Tighten the axle nut to the speci-
fied torque.
5. Install the brake rod onto the
brake camshaft lever, and then
install the brake pedal free play
adjusting nut onto the brake rod.
6. Adjust the brake pedal free play.
(See page 6-21 for brake pedal
free play adjustment proce-
dures.) Tightening torque:
Axle nut:
90 Nm (9.0 m·kgf)
5RS-9-E1 (TW125) 8/23/02 11:37 AM Page 72
Page 85 of 88

8-5
SPECIFICATIONS
8
All specification data in this manual are listed in SI and
METRIC UNITS.
Use this table to convert METRIC unit values to IMPERIAL
unit values.
Example:
METRIC VALUE CONVERSION
FACTORIMPERIAL VALUE
2 mm× 0.03937 = 0.08 in
Conversion table
METRIC SYSTEM TO IMPERIAL SYSTEM
Metric unit Conversion factor Imperial unit
Torquem·kgf
m·kgf
cm·kgf
cm·kgf
× 7.233× 86.794× 0.0723× 0.8679ft·lbf
in·lbf
ft·lbf
in·lbf
Weightkg
g
× 2.205× 0.03527lb
oz
Speed km/h
× 0.6214 mi/h
Distancekm
m
m
cm
mm
× 0.6214× 3.281× 1.094× 0.3937× 0.03937mi
ft
yd
in
in
Volume,
Capacitycc (cm3)
cc (cm3)
L (liter)
L (liter)× 0.03527× 0.06102× 0.8799× 0.2199oz (IMP liq.)
cu·in
qt (IMP liq.)
gal (IMP liq.)
Miscellaneouskg/mm
kgf/cm
2
°C
× 55.997× 14.2234× 1.8 + 32 lb/in
psi (lbf/in
2)
°F
EAU04513
Conversion table
5RS-9-E1 (TW125) 8/23/02 11:37 AM Page 84